Categories
Apps Featured How To

Facebook Tips And Tricks: How To Save And Download Facebook Live Videos Before Deletion

Key Highlights

  • Facebook Live videos now gets removed automatically after 30 days
  • Move comes as a part of updated storage policy
  • Bulk download policy available for multiple videos

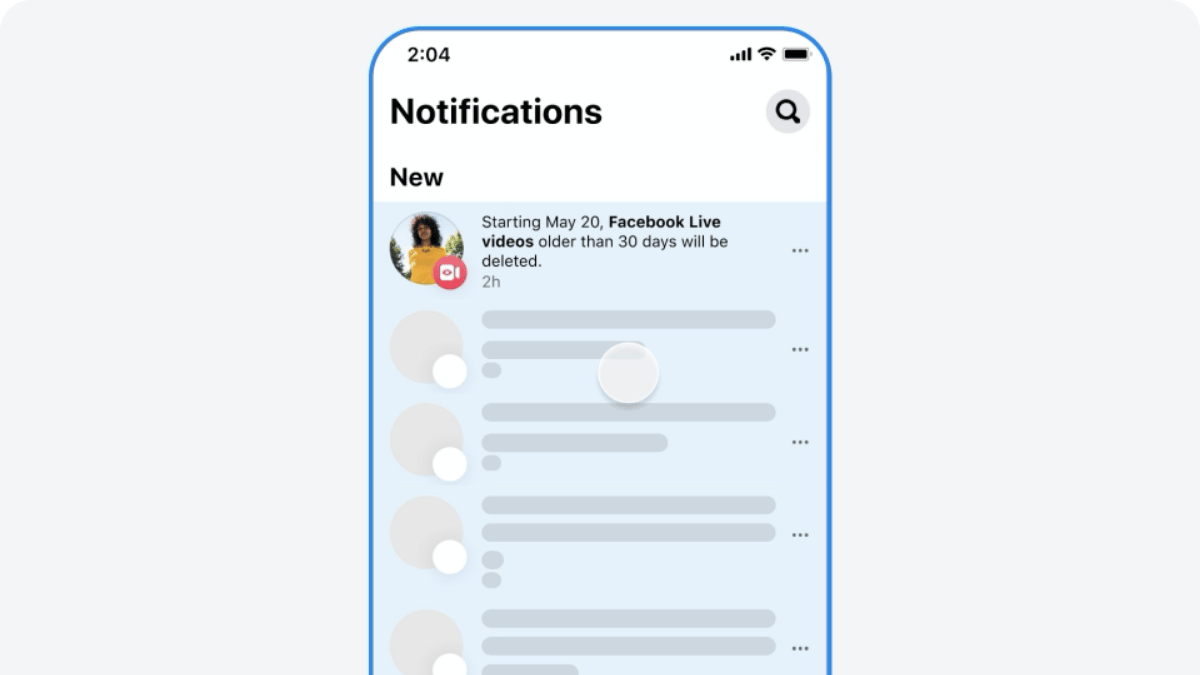
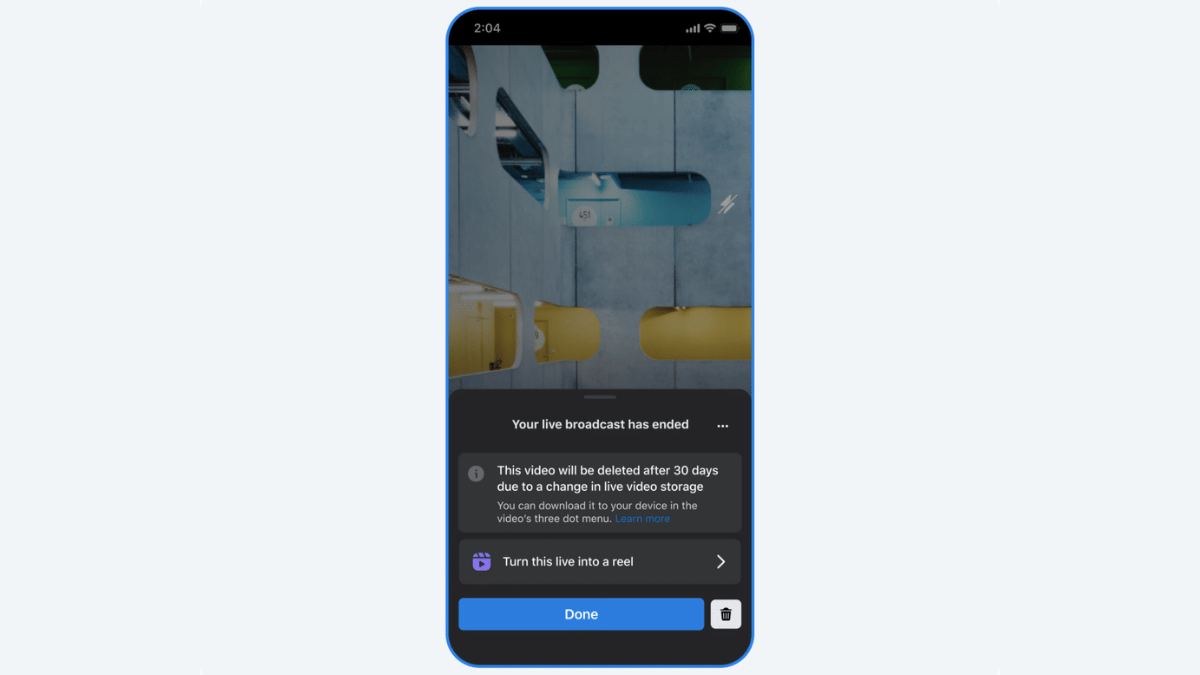
Earlier in February this year, Facebook revised its storage policy guidelines for its platform. One direct impact was the stopping of live video storage on Facebook for unlimited period. After introducing a 90-day grace period to download old live videos library, Facebook has now announced a new timeline of 30 days. If you are frequently going live on Facebook and have a large database of old live videos, you should save it offline or download it. In this guide, we share the steps to do so.

For the tech geeks, stay updated with the latest cutting-edge gadgets in the market, exclusive tech updates, gadget reviews, and more right on your phone’s screen. Join Giznext’s WhatsApp channel and receive the industry-first tech updates.

Also Read: Instagram Edits: New Standalone Editing Insta Tool? 10 Easy Steps To Use!

How To Download Facebook Live Videos Before 30 Days Deletion Timeline (Single Videos)

Step 1: Open Facebook mobile app

Step 2: Visit the Activity centre

Step 3: Locate “Your Live Videos” option

Step 4: Move to Videos or Live tab on your profile, page, or Meta Business suite

Step 5: Locate the video and tap on it for full screen mode

Step 6: Now, tap on the three dots to download the video

Also Read: WhatsApp In-App Language Translation Feature In Works: Update

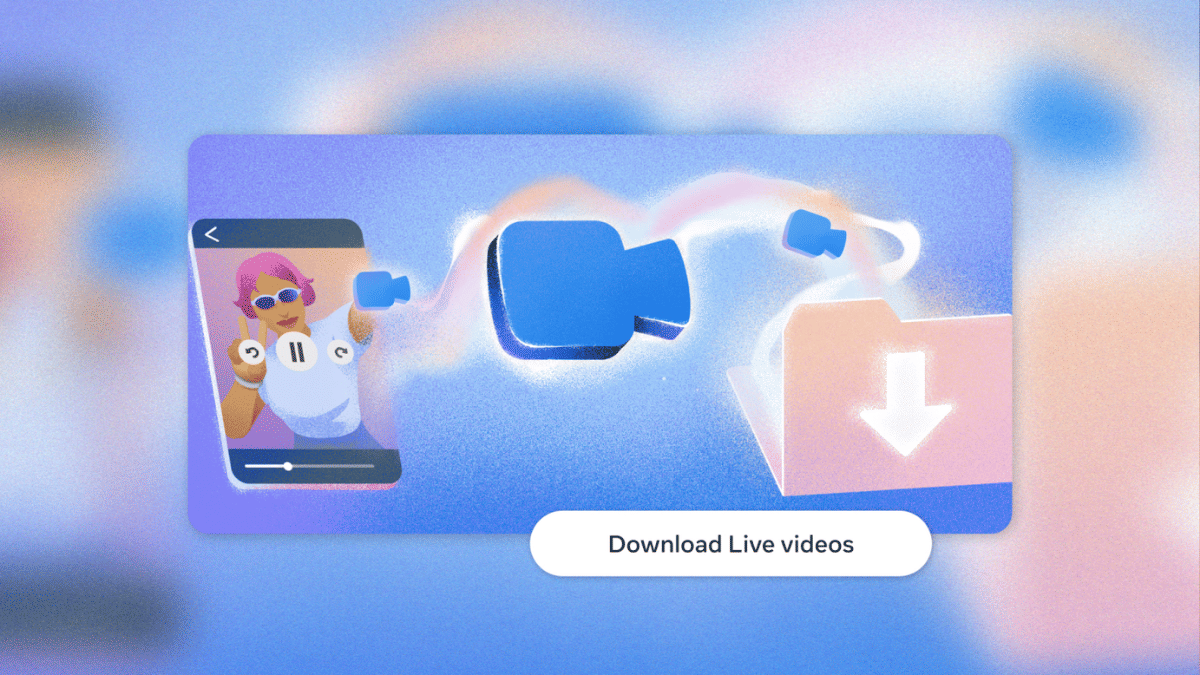
How To Download Facebook Live Videos In Bulk

Step 1: Open Facebook app and tap the notofication for storage policy update to enter into the download flow.

Step 2: Click on “Download Live videos” option

Step 3: Confirm the file download location (smartphone/ tablet, laptop/ pc).

Step 4: Select th date range for the live videos that will be downloaded on the selected device

Step 5: Click “Create File”

Categories
Apps Featured

YouTube Now Allows Premium Subscription Sharing Between Two People: Plan Price, Features

Key Highlights

  • YouTube bringing Premium subscription plan sharing option
  • Will allow sharing Premium plan with family member
  • Pilot phase started already in select regions

YouTube’s growth has been immense in the last few years. What earlier was primarily a free user-oriented entertainment hub is now a full fledged platform for both public and creators. For the former, it’s no more free services and you have to purchase subscription plans to watch ad-free videos for an uninterrupted media watching experience. A new subscription is being introduced that intends to make YouTube premium services more accessible to the users. The two-person subscription sharing feature is what YouTube’s rolling out for the masses that will allow sharing premium subsciption between two users. Let’s dive into the details below:

For the tech geeks, stay updated with the latest cutting-edge gadgets in the market, exclusive tech updates, gadget reviews, and more right on your phone’s screen. Join Giznext’s WhatsApp channel and receive the industry-first tech updates.

Also Read: Exam Results: How To Check CBSE, ICSC, ISC, UPMSP Exam Results Via Digilocker App

YouTube Two-Person Subscription Sharing Plan: What Is It?

YouTube subscription plans starts at a monthly charges of around Rs. 99 (for students going all the way to up to Rs. 299 (for families) allowing single individual or family members get all the premium services. However, it’s only the family pack where you can login and use YouTube on multiple devices. But now, a new subscription is under pilot where YouTube premium subscription can be shared between two people. You can either share your YouTube premium plan’s credential with one of your family member or any friend with this package.

Also Read: Want Free Delivery And Streaming? Here’s How To Join Amazon Prime On Mobile

YouTube Two-Person Subscription Sharing: Plan Costs, Features

YouTube is selling the two-person subscription plan at a monthly charge for Rs. 219. Currently, this subscription plan is under trial phase and is being offered in some select regions. The market where users can access two-person subscription plan includes some parts in France, Hong Kong, India, and Taiwan. Besides, during the pilot phase, the YT music subscription plan will be available at Rs. 149 per month.

Full Subscription Price List

  • YouTube Two-Person sharing plan (latest): Rs. 219
  • YouTube Premium subscription (for students): Rs. 89
  • YouTube Premium subscription (Individual): Rs. 149
  • YouTube Premium subscription (Family): Rs. 299

Features

  • Ad-free playback experience
  • Video offline download option
  • Background video playback option

Also Read: Top YouTube Channels For Exploring Hindu Mythology

Categories
Apps Featured

Telegram May 2025 Updates: Enhanced Group Call Privacy, Automated Business Accounts, And More

Key Highlights

  • Telegram releases multiple new updates with May patch
  • Privacy enhanced for group calls,
  • Automated business accounts and gifts features added
  • New gesture control also introduced

Telegram has just released a bunch of new features for Android and iOS users. The May 2025 update patch for Telegram adds a host of feature that enhances the privacy for group calls, improves gesture navigation, and more. Let’s take a look at all the latest updates that the May 2025 patch brings along for Telegram and how to use them:

For the tech geeks, stay updated with the latest cutting-edge gadgets in the market, exclusive tech updates, gadget reviews, and more right on your phone’s screen. Join Giznext’s WhatsApp channel and receive the industry-first tech updates.

Also Read: How To Use Telegram Without Internet? Top 5 Working Tricks In 2025

Group Calls Enhanced Privacy And Easy Accessibility

Telegram has made instant group calls more private yet easily accessible with the latest update. Users will be able to make spontaneous group video calls with specific members without leaving the group chat. This will be ideal for professional meetings and calls where the admin will be able to share the screen, media and also invite more members to the call.

  • Up to 200 particpants can be added in any ongoing group call
  • Video, audio, and screen can be shared
  • Invitation to other members or contacts can be sent via a call link or QR code
  • Matching emoji can be used for end-to-end encryption verification

Also Read: WhatsApp Advanced Chat Privacy: How To Add Extra Safety Layer For WhatsApp Chats?

Automated Business Accounts (For Premium Users)

Telegram will now allow integrating third-party bots including AI-driven bots. However, this feature comes only for the premium account holders. This new feature is introduced to help professionals to control, manage, and grow their businesses efficiently. Telegram premium users accessing Automated business accounts will be able to set bots for managing replies, posts, stories, etc.

Also Read: Instagram Edits: New Standalone Editing Insta Tool? 10 Easy Steps To Use!

Updated ‘Gifts’ Settings

Telegram has its own gifting feature which is being widely used and is now getting easier to manage and control with the latest update. A bunch of customisations have been added such as:

  • ‘Gift’ button can now be added to chats directly
  • Control which gift to be shown at a specific chat
  • Control who and what kind of gift another contact can send

Steps To Manage Gifts In Telegram

  • Open Settings
  • Click on Privacy and Security
  • Tap on Gifts
  • If you want to view individual gifts then instead select My Profile and select Gifts tab
  • Tap on Send Gift once selected

Also Read: Is Telegram Still Private? The Platform To Provide User Data To Governments

Improved Gestures And Controls

Forward Message (Android and iOS) : Hold on a message and drag the share arrow to forward message

Open Story Editor (iOS): Swipe right on the story list or main chat list to instantly launch the Story Editor tool

Categories
Apps Featured

AI Image Editing Finally Coming For Gemini App:

Key Highlights

  • Google confirms AI Image editor for Gemini App
  • Will allow editing images directly via Gemini app
  • Will support up to 45 different languages
  • Can draft a storyline and provide images for the same

Gemini, the AI chatbot from Google is all set for its next big update and will become one of the most powerful AI tools for image editing. This development comes with Google’s announcement confirming the AI image editing integration in Gemini app. This upcoming feature will definitely be a game changer for Gemini. Here are all the details you need to know:

For the tech geeks, stay updated with the latest cutting-edge gadgets in the market, exclusive tech updates, gadget reviews, and more right on your phone’s screen. Join Giznext’s WhatsApp channel and receive the industry-first tech updates.

Also Read: Exam Results: How To Check CBSE, ICSC, ISC, UPMSP Exam Results Via Digilocker App

Gemini AI Image Editing Feature: When Is The Stable Update Rolling Out?

Google via an official blogpost has announced this new AI image editing feature for Gemini app. While the date for stable update release is not mentioned, it is expected to make its way to all Gemini app users gradually in a phased manner. Once the mass update is complete, users will be able to directly upload images to Gemini app and edit it as per their requirements. No third part app will be required for the same.

Also Read: Gemini Live Camera, Screen Sharing Now Free For All Android Users: How To Use

Gemini AI Image Editing: The Possibilities!

Google is finally adding the native AI image editing to make Gemini a potent editing tool. Besides basic edits, users can do a lot more and even get help with creating storyline on different topics along with images.

Users will get the option to both upload image directly to Gemini app via phone or laptop/ PC gallery and use AI image creation. For the latter, one simply need to give commands as to what are the image requirements, how should the subject be placed, background type, etc.

As for the image editing capabilities, users will be able to do basic and advance levels of editing. This surely will make Gemini app more convenient for both general users as well as creators and professionals. From replacing objects to adding a new one and changing the background using AI image editing will be possible once the update is released.

Additionally, this AI image editing feature will allow users to create a storyline using AI and also get images simultaneously on the same storyline. Users will be also be able to give text-based commands or prompts for editing any image that is created using AI or is uploaded from the gallery.

Categories
Apps Featured How To

Instagram Edits: New Standalone Editing Insta Tool? 10 Easy Steps To Use!

Key Highlights

  • Instagram launches standalone editing app called Edits
  • Introduced for both Android and iOS platforms
  • Allows editing videos for reels and more directly

Instagram has emerged as one of the most used platforms for social media engagement. It is one of those multimedia sharing apps where when can get as creative as they can with photo and video uploads. And to provide a consistent and diverse experience, new updates frequently makes way to this social media platform. A new feature rather a standalone app has now been introduced by Instagram that brings along a whole range of comprehensive editing tools for video/ photo editing and also monitoring performance of the uploaded content. What is this latest Instagram Edits app and how can you utilise it as a editing tool and a performance analyser simultaneously. We explain in this article:

For the tech geeks, stay updated with the latest cutting-edge gadgets in the market, exclusive tech updates, gadget reviews, and more right on your phone’s screen. Join Giznext’s WhatsApp channel and receive the industry-first tech updates.

Also Read: How To Use Instagram’s New Song Lyrics Feature In Reels: A Step-By-Step Guide

What Is Instagram’s Edit App?

Instagram Edits is the latest Meta-developed app that has been designed to help content creators to improve their quality of content being uploaded on the platform. This AI-backed app brings along a host of features ranging from AI-backgrounds, green screen, sound and visual effects pre-set, and more.

Instagram Edits will also allow users to remove background from a video and replace it with another in real time. Besides using pre-recorded footages from the gallery, Instagram Edits allows recording directly via the app where the videos can be recorded to up to 4K resolution@60fps. Edits currently supports shooting and recording videos of up to 10 mins.

Also Read: Instagram Top Hacks: How To Enable or Disable Sensitive Content From Home Feed

How To Download And Use Instagram Edits On Android and iOS

Step 1: Open Google Play Store or Apple App store on your smartphones

Step 2: Enter Instagram Edits in the search bar and tap on Install

Step 3: Open the Instagram Edits app

Step 4: Use your existing Instagram user ID and password to log-in

Step 5: To start a new project, tap on “+” icon.

Step 6: You can either import an existing video or image for the gallery or start a new recording. Tap on the capture icon for the latter.

Step 7: Toggle between the different lenses and apply if you want while recording a new clip

Step 8: Now, edit the video using AI-backgrounds, filters. You can also merge clips, use transition effects, add music, etc.

Step 9: Once done, tap on Export.

Step 10: You can share this edited video directly on Instagram and Facebook without switching the app.

Categories
Apps Featured Info

Duolingo Adds 148 New AI-Powered Language Courses: Largest Update Yet

Key Highlights

  • Duolingo launched 148 new AI-made language courses
  • Courses are now available in 28 different app languages
  • AI will play a big role in how Duolingo works and hires

Duolingo has just taken a giant leap forward with the launch of 148 new language courses, its biggest content update ever. What makes this expansion even more exciting is that all the new courses were built using Duolingo’s own AI tools. Here’s everything you need to know about Duolingo’s AI-powered upgrade.

Also Read | Duolingo Delight: Top Five Features For Effortless Language Learning

Biggest Course Launch In Duolingo’s History

  • Duolingo added 148 new language courses, more than doubling its total offerings.
  • These courses were created in under a year using generative AI, a huge jump from the traditional process, which usually took years for just one course.

Powered By AI, Built For Speed

  • The platform used a new AI system called “shared content systems”, where a base course is created and then adapted into other languages.
  • This AI approach allowed the company to quickly scale and improve access to quality content.

Available In 28 User Interface Languages

  • The expansion ensures that Duolingo’s seven most popular non-English languages, Spanish, French, German, Italian, Japanese, Korean, and Mandarin, are now accessible across 28 UI languages.
  • This means over a billion global users can now learn in a language they are comfortable with.

More Learning Options For All

  • New courses let Spanish and Portuguese speakers learn Japanese, Korean, and Mandarin.
  • European language speakers can now access more Asian language courses.
  • Asian language users, who earlier only had English options, now have access to all top non-English languages.
  • All of the most popular non-English languages are now available to Asian language users, who previously had just English alternatives.

Also Read | Top 4 Language Translation Apps For Smooth International Travel

What This Means For Learners

Duolingo’s AI-first shift makes language learning faster, smarter, and more accessible. With more language combinations now available, learners from all over the world can connect and grow like never before.

For the tech geeks, stay updated with the latest cutting-edge gadgets in the market, exclusive tech updates, gadget reviews, and more right on your phone’s screen. Join Giznext’s WhatsApp channel and receive the industry-first tech updates.

Categories
Apps Featured How To

Want Free Delivery And Streaming? Here’s How To Join Amazon Prime On Mobile

Key Highlights

  • Sign up for Prime easily on your phone
  • Enjoy a 30-day free trial
  • Plans start at Rs. 299 per month

Are you someone who loves online shopping, binge-watching movies, or hunting for the best deals and discounts? If yes, then an Amazon Prime membership is something you should definitely consider. There are many benefits to Prime, including free delivery, Prime Video, and exclusive offers. Signing up is simple and quick, regardless of whether you’re using a desktop computer or a smartphone. To help you get started right now, here is a simple, step-by-step guide.

Also Read | How To Cancel Amazon Prime Subscription: See All Step Here

How To Install Amazon Prime On Your Smartphone

Signing up using your mobile is super simple. Just follow these steps:

Step 1: Open your mobile browser and go to Amazon Prime Page. This is where you’ll begin your Prime journey.

Step 2: Don’t have an Amazon account yet? Tap “Create Account”.

Step 3: Enter your password, name, and phone number. To get an OTP, tap “Verify mobile number.”

Step 4: If you’re an existing Amazon user, skip the account creation and simply log in with your details.

Step 5: Choose “Try Prime Free” after tapping the three-line menu.

Step 6: Press the “Start your 30-day free trial” button.

Step 7: Choose your Prime plan, confirm your billing and shipping details.

Step 8: You will be charged automatically when the trial period is up. If necessary, cancel at any moment.

For a better and faster shopping experience, download the Amazon app from your play store/ app store. It makes browsing, tracking, and shopping much easier.

Amazon Prime Membership Plans In India

Plan TypePrice
MonthlyRs. 299
3-Month PlanRs. 599
Annual PlanRs. 1,499

Also Read | Stay Safe While Shopping Online: Five Easy Tips To Avoid Getting Scammed

Why Prime Is Worth It

  • Many items come with free one- or two-day delivery
  • Special access to Prime-only offers and Lightning Deals
  • Prime Video and Prime Music streaming is unlimited
  • Prime Reading and gaming benefits

Whether you’re shopping, streaming, or saving, Prime has something for everyone.

For the tech geeks, stay updated with the latest cutting-edge gadgets in the market, exclusive tech updates, gadget reviews, and more right on your phone’s screen. Join Giznext’s WhatsApp channel and receive the industry-first tech updates.

Categories
Apps Featured Info

From Hania Aamir To Ali Zafar: Instagram Bans Hit Pakistani Celebrities In India After Pahalgam Attack

Key Highlights

  • Instagram bans profiles belonging to Pakistani actors in India
  • 16 YouTube channels from Pakistan banned
  • India takes strong action after Kashmir terror attack

Indian fans wake up to find top Pakistani celebs like Hania Aamir and Mahira Khan suddenly vanish from their feeds. When fans in India try to access these profiles, they see a message saying, “Account not available in India. This is because we complied with a legal request to restrict this content.” This comes amid ongoing political tensions between India and Pakistan following a deadly terror attack in Kashmir on April 22. Here’s everything you need to know.

Also Read | Instagram Account Hacked? Immediate Steps To Take If Instagram Account Is Compromised

Pakistani Celebrities Blocked On Instagram In India

Several big names from Pakistan’s entertainment industry are no longer accessible to Indian Instagram users. These include:

  • Hania Aamir
  • Mahira Khan
  • Ali Zafar
  • Sanam Saeed
  • Bilal Abbas
  • Iqra Aziz
  • Imran Abbas
  • Sajal Aly

While fans are upset about not being able to follow their favorite stars, it’s important to note that not all Pakistani celebrities are blocked. For example, Fawad Khan and Wahaj Ali’s profiles are still visible to users in India.

16 Pakistani YouTube Channels Also Banned

Instagram is not the only social media platform subject to this ban. Additionally, 16 YouTube channels from Pakistan have been blacklisted by the Indian authorities. These channels were allegedly spreading false narratives and sensitive content targeting Indian security forces and creating communal tension.

Shoaib Akhtar’s YouTube Channel Taken Down

One of the most prominent takedowns was the YouTube channel of former cricketer Shoaib Akhtar, which had over 3.5 million subscribers. His channel was removed as part of this wider crackdown on digital content coming from Pakistan.

Why Is This Happening?

The restrictions come after the terror attack in Pahalgam on April 22, which claimed 26 lives. In response, India has taken a number of aggressive measures to censor sensitive content and false information online, such as banning YouTube channels and social media accounts associated with Pakistan.

Also Read | The Insta-Famous Five: Check Top Five Most-Followed Instagram Accounts

What It Means For Indian Users

If you try to search for these Pakistani actors or YouTube channels from India, you’ll likely be met with an “Account not available” message. This is due to a legal compliance request made by the Indian government to restrict content that could potentially incite unrest or misinform the public.

For the tech geeks, stay updated with the latest cutting-edge gadgets in the market, exclusive tech updates, gadget reviews, and more right on your phone’s screen. Join Giznext’s WhatsApp channel and receive the industry-first tech updates.

Categories
Apps Featured How To

Exam Results: How To Check CBSE, ICSC, ISC, UPMSP Exam Results Via Digilocker App

Key Highlights

  • Digilocker is authorized app for personal ID and document storage
  • Is available on Android and iOS platforms
  • School and university exams can be checked online

Digilocker is the safest platform to keep all crucial identity documents. Authorised by the government of India, this mobile app allows storing personal IDs (Aadhaar card, driving licence), vehicle documents, etc. Digilocker is also offering services to check and download school and university results. And with the exam result season kickstarting, Digilocker is the safest bet to verify and download results directly from the issuing organisation/ authority. Be it class 10th and 12th CBSE or ICSE or ISC or UPMSP board results, you can easily see your exam results and also download it for future use.

For the tech geeks, stay updated with the latest cutting-edge gadgets in the market, exclusive tech updates, gadget reviews, and more right on your phone’s screen. Join Giznext’s WhatsApp channel and receive the industry-first tech updates.

Also Read: IRCTC Helicopter Reservations Begin For Char Dham Kedarnath Yatra 2025: Ticket Prices, How To Book

How To Check And Download Any Exam Result Using Digilocker Mobile App

Step 1: Download and install Digilocker app. You can download this app on both Android and iOS platforms.

Step 2: You can also access its desktop version by visiting www.digilocker.gov.in

Step 3: Login using valid credentials or register if you are a first time user.

Step 4: Scroll down on the hompage to the ‘Documents your might need’ section. Look for your ‘Class marksheet’. You will get multiple options for different exam results such as SSC, HSC, Class X, etc.

Step 5: Select the board of examination.

Step 6: Alternatively, tap on search and directly type in CBSE, ICSE, ICS or other board exam result.

Step 7: Enter student’s name, roll number, and year of exam.

Step 8: Tap on Get Document option

Step 9: The exam result with authorised signature will be issued which you can download as a PDF on your device.

Step 10: Get the print of the result if required

Categories
Apps Featured How To

Travelling Overseas? Here’s How To Activate International UPI On Gpay, PhonePe For Payments Abroad

Key Highlights

  • UPI apps have simplified digital money transactions
  • International payments now allowed via UPI apps
  • Steps listed below to activate international UPI

UPI (Unified Payments Interface) has been the game changer for the Indian citizens. The digital money transaction platform have simplified making/ receiving payments with bank linked phone number and dedicated apps. UPI services have been active in India for long now with frequent improvements enhancing the payment interface and overall security with digital money transactions. It’s even possible now to use popular UPI apps such as Google Pay and PhonePe overseas for payments. So, if you are travelling abroad and have to make some emergency payments, international UPI comes to your rescue. But how do you activate it? Well, in this guide we have shared the steps with which you can easily activate international UPI on Google Pay and PhonePe.

For the tech geeks, stay updated with the latest cutting-edge gadgets in the market, exclusive tech updates, gadget reviews, and more right on your phone’s screen. Join Giznext’s WhatsApp channel and receive the industry-first tech updates.

Also Read: Instagram Account Hacked? Immediate Steps To Take If Instagram Account Is Compromised

How To Activate International UPI On PhonePe

Step 1: Open PhonePe mobile app

Step 2: Tap on your profile icon placed on the top of the app’s homepage

Step 3: Scroll down and find the ‘Manage Payments’ option. Click it.

Step 4: Now, navigate to the ‘International’ option and tap on it.

Step 5: Select the ‘UPI International’ option. Currently, it is available for over 6 countries.

Step 6: Tap on the ‘Activate’ button in front of the bank account that you wish to activate for international payments.

Also Read: Enhance Your Daily Productivity: How To Pair Android Smartphones With Windows 11 PC, Laptop Without USB Cable

How To Activate International UPI In Google Pay

Step 1: Open Google Pay app on your smartphones

Step 2: Tap on the QR code scanner

Step 3: Scan the QR code of the international merchant

Step 4: You’ll get an option to enable international UPI. Activate it.

Step 5: Enter the amount you want to make as a payment. You will be shown the currency conversion rate as per the current date.

Step 6: Simply complete the payment by entering your UPI pin.