Categories
Featured Gaming How To

How To Fix Lag In Online Games: Quick And Easy Tips

Key Highlights

  • Use a wired connection and close background apps for better speed
  • Lower game graphics settings to reduce system load and lag
  • Keep your system and drivers updated for smoother performance

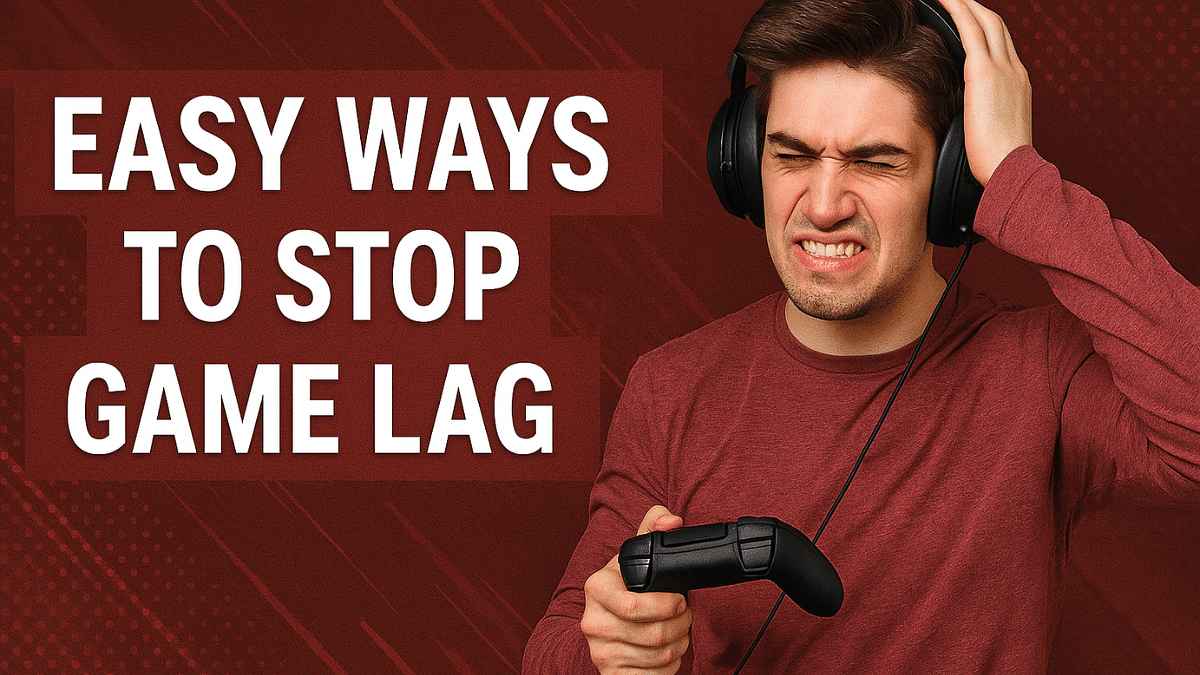
There’s nothing more frustrating than getting the perfect shot lined up, only for lag to ruin it all. Whether you’re in a high-stakes battle royale or a fast-paced football match, lag can cost you the game. But don’t worry, you don’t need a fancy setup to enjoy smoother gameplay. With just a few simple changes, you can reduce lag and improve your gaming experience in no time. Here’s how you can get started with five tried-and-tested tricks.

Also Read | Seeking Success in Gaming? Here’s Top Must-Haves For Gamers In India

Use A Wired Ethernet Connection Instead of Wi-Fi

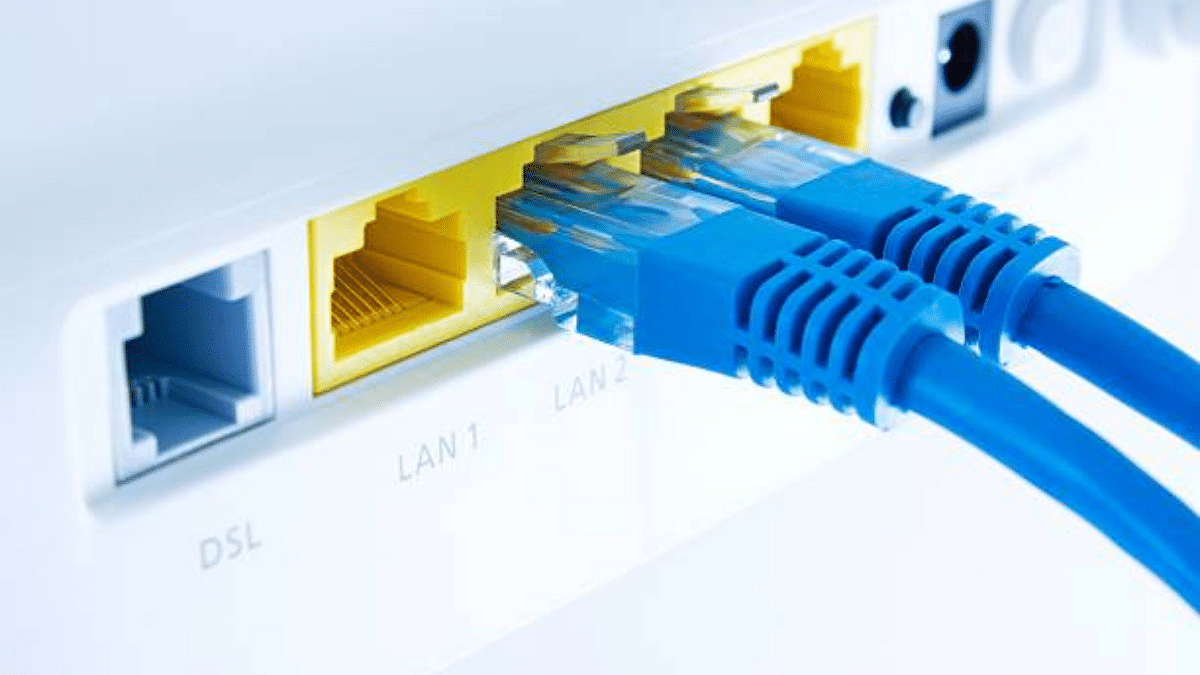
Wireless connections can be unstable, especially when there are multiple devices using the same network. Switching to a wired Ethernet cable provides a more reliable and faster connection with lower ping. This is one of the easiest ways to instantly reduce lag and enjoy seamless gaming.

Close Background Apps And Programs

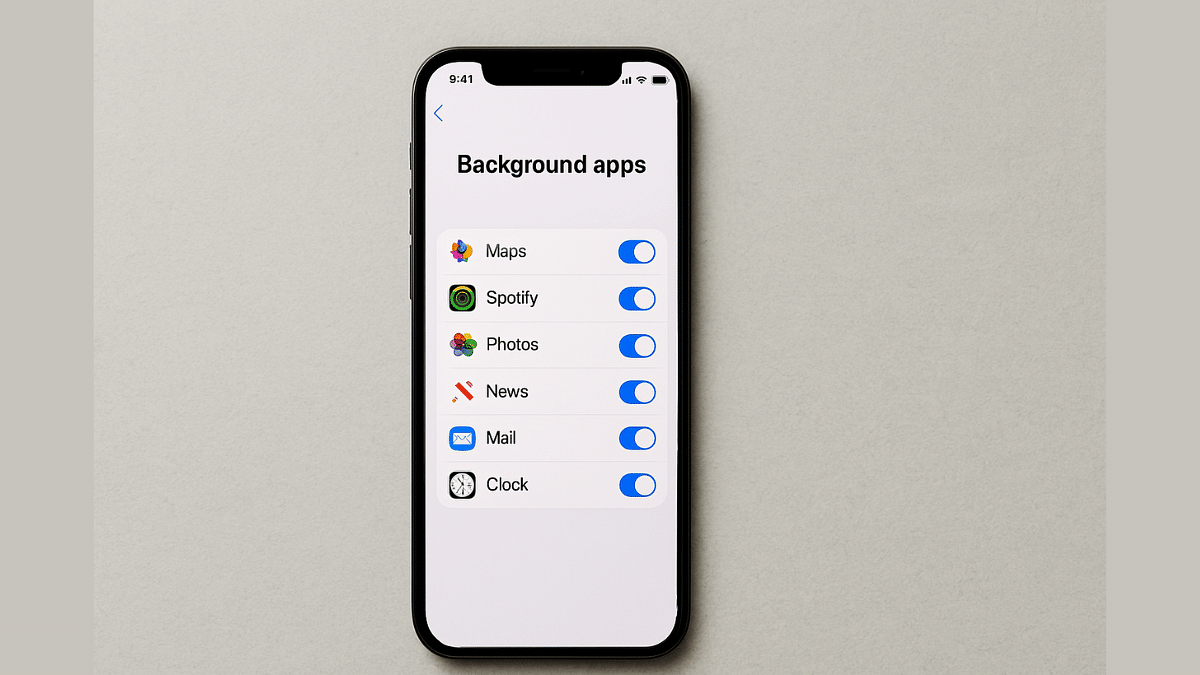
Before starting your game, make sure to shut down apps running in the background, especially heavy ones like browsers, streaming services, or software updates. These programs consume bandwidth and system resources, slowing down your gaming performance.

Adjust Your Game’s Graphics Settings

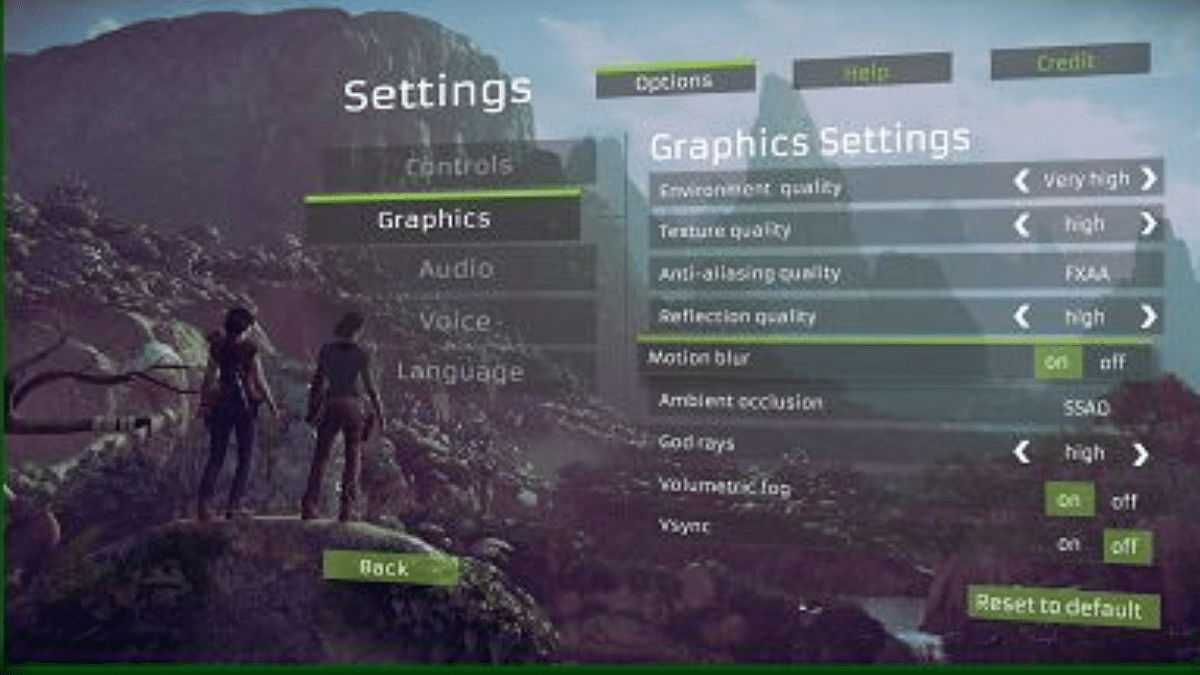
High-resolution graphics might look great but they can also cause frame drops and input delays if your device can’t handle them. Lowering settings like shadows, texture quality, or resolution can help your system run the game more smoothly and reduce lag.

Optimize Your Router Settings

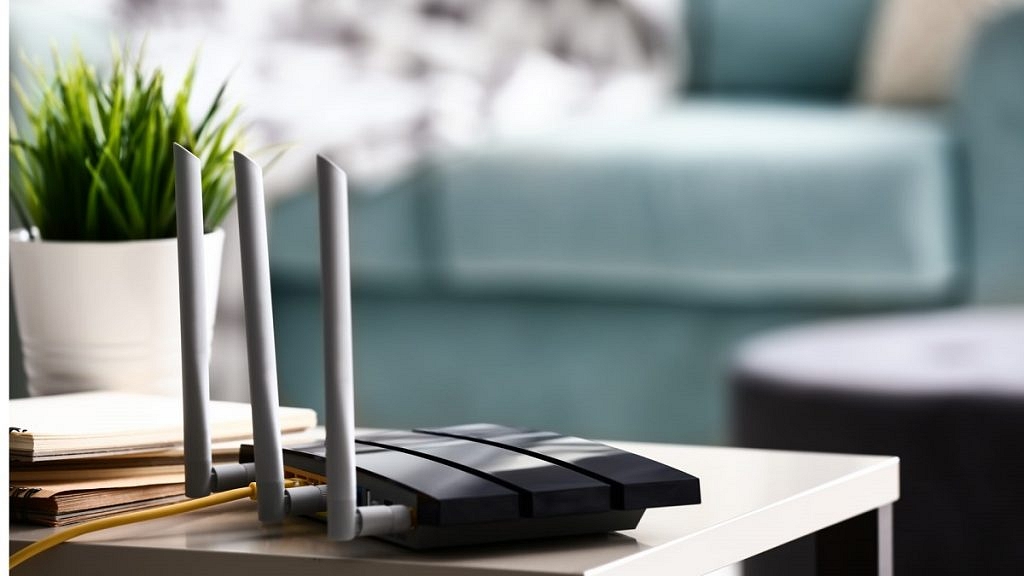
Your router plays a huge role in your gaming experience. Enable QoS in your router settings to prioritize gaming traffic. Also, place your router in an open space, away from walls or obstacles, to improve signal strength.

Also Read | 100+ Best Instagram Gaming Names For Boys

Keep Your System And Drivers Updated

Outdated software and drivers can lead to performance issues. Regularly check for system updates and ensure your graphics card drivers are up to date. These updates often include bug fixes and performance improvements designed to enhance your gaming experience.

Lag doesn’t have to ruin your gaming session. These five simple tips can drastically improve your connection and overall gameplay without needing expensive upgrades.

For the tech geeks, stay updated with the latest cutting-edge gadgets in the market, exclusive tech updates, gadget reviews, and more right on your phone’s screen. Join Giznext’s WhatsApp channel and receive the industry-first tech updates.

Categories
Featured How To Laptop

Windows 11 Laptop, PC Reset Guide: How To Perform System Reset Without Loosing Data

Key Highlights

  • Windows 11 laptop/ PC reset helps boost speeds and performance
  • Windows 11 laptop, PC can be reset without loosing data
  • Can also help with system reboot in case of failed startups

Performance issue is the last ting you want to deal with your laptop or PC. Especially, when you need to complete any crucial task or want to play games. Microsoft with Windows 11 have made it easier to reset laptops and PCs which allows for performance boost and speed improvements. This can be done without paying a visit to the service centres. Often, system reset is asscociated with data loss. That’s not the case with Windows 11 OS. Bonus is, you don’t have to pay a visit to the nearby service centre to reset your Windows 11-powered laptop or PC. In this guide, we’ll take you through the steps to reset your Windows 11 laptop or PC with few simple steps while keeping all data safe.

For the tech geeks, stay updated with the latest cutting-edge gadgets in the market, exclusive tech updates, gadget reviews, and more right on your phone’s screen. Join Giznext’s WhatsApp channel and receive the industry-first tech update.

Also Read: Instagram Reels In WhatsApp? Here’s How To Watch Them Using Meta AI

Is It Possible To Reset Windows 11 PC or Laptop Without Loosing Data?

The answer is yes. Windows 11 OS is more optimised and user friendly compared to previous-gen Windows OS. With Windows 11 OS, it is possible to reset the system without loosing local files and data. But, it’s essential to pick the right option while resetting the PC or laptop.

Also Read: Android Auto Customization: How To Change Wallpaper With And Without Smartphone

Method 1: Windows 11 System Reset Via Settings Menu

Step 1: On your Windows 11 laptop/ PC’s taskbar, click on the Start menu

Step 2: Tap on the Settings menu

Step 3: Scroll to the System menu

Step 4: Go to the Recovery section

Step 5: Click on the Reset this PC option

Step 6: You’ll see two option on the screen including “Keep My Files”, and “Remove EVerything”. You need to select the former to avoid data deletion during the reset.

Step 7: In the next step, you’ll need to select if you wish to re-install program files via “Cloud” or “Local re-install“. Select as per your preference. Note, the former consumes data, hence, ensure your laptop/ PC is connected to Wi-Fi.

Step 8: Tap Next

Step 9: Click on Reset.

Also Read: How To Use Telegram Without Internet? Top 5 Working Tricks In 2025

Method 2: Advanced Hard Reset Option

This is the method which works best with resetting Windows 11 laptop and PCs that are unable to boot. Using this method one can reset the laptop or PC to a previous timeline where it was functional.

Step 1: Ensure the laptop or PC is turned off

Step 2: Initiate the boot process. However, press and hold the power button while tapping on Shift key.

Step 3: Tap on the Torubleshoot option

Step 4: Select Reset this PC option

Step 5: Complete the steps shared on the screen and wait for the laptop/ PC to reset.

Categories
Apps Featured How To Info

UIDAI Launches New Aadhaar App With Face Authentication: Here’s How It Works

Key Highlights

  • New Aadhaar app uses face scan for easy identity verification
  • No need to carry physical Aadhaar cards or share photocopies
  • App is currently in testing and will roll out to more users soon

The UIDAI has launched a new and improved Aadhaar app that can verify your identity by scanning your face. The app was introduced at the Aadhaar Samvaad event in Delhi. It is designed to make identity checks quicker, safer, and completely digital, so you won’t need to carry any papers. Here’s everything you need to know about the new Aadhaar app and how it works.

Also Read | Aadhaar Card Lost Or Misplaced? Here’s How to Apply for a Duplicate Aadhaar Card Online

Face Authentication Made Simple

  • The updated Aadhaar app lets users verify their identity by simply scanning their face using the phone’s front camera.
  • No need to carry physical Aadhaar cards or share photocopies. Just use the app for quick verification.
  • The app integrates UIDAI’s Aadhaar Face Authentication system for secure, real-time verification.

How It Works: Step-by-Step Guide

Step 1: Download and install the new Aadhaar app on your smartphone (currently available to limited testers).

Step 2: Set a secure PIN to protect the app.

Step 3: When a QR code is presented, say at a hotel or retail store, the app will prompt you to enter your PIN.

Step 4: A digital, masked version of your Aadhaar card will appear, showing essential info like name, date of birth, and mobile number (masked).

Step 5: The app will then prompt you to align your face inside a circle and blink to confirm liveness.

Step 6: Once completed, a confirmation message is displayed stating that your identity has been verified.

Focus On Security And Privacy

  • According to UIDAI, the app does not share personal data with the service provider, only verified status is shared.
  • All verifications are done with user consent to ensure privacy.
  • Experts still urge caution, citing concerns about the storage and use of facial biometrics, which are unchangeable if leaked.

Also Read | Need To Lock And Unlock Your Aadhaar Card Biometrics? Here’s How To Do It

Testing Phase And Rollout

  • The redesigned app is currently in beta testing, rolled out to a select group of users and ecosystem partners.
  • Based on feedback, the UIDAI plans a wider rollout in the coming months.

UIDAI’s new Aadhaar app could redefine how we verify identity in India, fast, paperless, and secure.

For the tech geeks, stay updated with the latest cutting-edge gadgets in the market, exclusive tech updates, gadget reviews, and more right on your phone’s screen. Join Giznext’s WhatsApp channel and receive the industry-first tech updates.

Categories
Featured How To Info

Top 5 Common Scams During Natural Disasters Exposed: Safety Tips Guide

Key Highlights

  • Phishing attacks and scams common during natural disaster events
  • Scammers target public offering job volunteering, fake relief fund scams, etc.
  • Verification must before making any donations or payments
  • Avoid sharing personal and confidential details to impersonators online

Natural disaster events can strike without any prior warning impacting not just humans but also economics and the environment. During such catastrophic events, governments ensure that relief funds and food is made available to the masses in the affected region. Sadly, even tough times like these turn out to be an opportunity for scammers to rob netizens off their hard earned money.

We have come across numerous such cases where imposters have exploited the chaos during natural disaster to scam people and rob money, personal identities, and sensitive and private data. While this is an unfortunate situation, being vigilante and alert can help you stay safe from such nuisance scams during natural disasters. Here we are exploring the common scams during a natural disaster and how can you stay protected from them. Let’s take a look:

For the tech geeks, stay updated with the latest cutting-edge gadgets in the market, exclusive tech updates, gadget reviews, and more right on your phone’s screen. Join Giznext’s WhatsApp channel and receive the industry-first tech update.

Also Read: Instagram Reels In WhatsApp? Here’s How To Watch Them Using Meta AI

Most Common Scams During Natural Disasters

There are several common scams that take place during any natural disaster event. From fake emergency funds, to volunteering services asking money, and social media scams, these common scam practices have been adopted by scammers globally.

1. Phishing Attacks Via Fake Donation Websites, Emails

This is the most digital scam method adopted by scammers where a phishing mail or fake website link is sent to a user. These mails and websites contains link which when clicked gives remote access to personal information and sometime even the device compromising the user security. Often these links install harmful malware on your device which can give the remote access to these attackers.

Also Read: Android Auto Customization: How To Change Wallpaper With And Without Smartphone

2. Government Official Imposters

Often scammers disguise as government officials during natural disaster events. If you recieve calls or messages from NDRF and similar organizations, it could be a scam. Specifically, if you are directly or indirectly asked for donations.

Also Read: Three Effective Ways To Restore Deleted Games And Apps On Windows 11 Laptops And PC: How To Guide

3. Offers For Job And Volunteering Could Be Fake

If you receive calls and messages asking for volunteering or jobs during any natural disaster that too with an entry fees, it could be a scam. You might be scammed in the name of “processing fee” to be a part of such relief activities.

Also Read: Accidentally Deleted Your Favourite Game Or Mobile App With Active Progress: Here’s How To Restore On Android

4. Emergency Relief Fund Frauds

This is another common fraud targeting masses amidst all the chaos caused by natural disasters. Messages on WhatsApp and other platforms are circulated by the scammer for relief funds and donations.

Also Read: No Microsoft Account? No Problem: Here’s How To Install Windows 11 Your Way

5. Social Media Fraud

With the digitization at its boom, online scams are now more common than ever. The same goes for natural disaster events where social media platforms are used by the scammers to con public and collect money in the name of donations.

Also Read: Measure Distance Between Two Points With Pinpoint Accuracy On Google Maps: How To Guide

How to Stay Safe from Scams During Natural Disasters

1. Rely Only On Trusted News Sources

Only trust the official news sources during such events. Avoide fake WhatsApp, Facebook, or YouTube media. Sites like NDMA, IMD, and primary media houses should be referred.

1. No Donation Without Verification

If you wish to make donations, directly visit official NGO or disaster management websites, Refrain from clicking any unauthorised donation link, it could give attackers your personal and banking details. Online platforms such as Milaap and GiveIndia can also be visited for the same.

3. Don’t Share OTPs With Any Random Official

If you get calls from NGOs or banking officials for emergency relief fund donations and are sharing OTPs, avoid giving it over the calls. These OTPs or PINs can empty your bank accounts which could be a nightmare for you.

4. Credibility Of Insurance Providers

Insurance scams can also take place during a natural disaster. If you get calls from an insurance company asking any form of monetary benefits or official documents, it could be scam. Verify from the official insurance providers in such events.

Categories
Apps Featured How To

Instagram Reels In WhatsApp? Here’s How To Watch Them Using Meta AI

Key Highlights

  • WhatsApp users can now watch Instagram Reels via Meta AI
  • The feature is limited but offers quick entertainment within the app
  • Just update WhatsApp, tap the Meta AI icon, and ask for Reels

Instagram Reels have taken over our screens, and now, thanks to Meta AI, you don’t even need to leave WhatsApp to watch them. Whether you are in the middle of a chat or just killing time, you can now enjoy trending Reels directly in your WhatsApp app. This new feature blends AI magic with social entertainment, giving you quick access to your favorite content in seconds. Curious to know how it works? Here’s a quick step-by-step guide to get started in no time.

Also Read | Instagram Tips And Tricks: How To Share Music/ Songs As DMs With Friends On Instagram

How To Watch Instagram Reels In WhatsApp Using Meta AI

Step 1: Make sure your WhatsApp is updated to the latest version on Android or iOS. This feature only works on the most recent update, so check the app store before you begin.

Step 2: Open WhatsApp and look for a glowing blue-pink animated circle above your chat list. That’s the Meta AI icon. Tap on it to launch the feature.

Step 3: You’ll be directed to a chat-like interface, similar to any WhatsApp conversation. At the bottom, there’s a text box where you can type your prompt.

Step 4: In the chat, type something like “Show me Instagram Reels” and hit send. Within seconds, a handful of Instagram Reels will pop up right in the chat.

Step 5: Tap on any of the Reels shown to start watching them directly within WhatsApp. No need to switch apps.

Want Reels From A Specific Creator?

For this, you just need to type the creator’s name in the prompt.  For example, “Show me Reels from Virat Kohli”, and Meta AI will try to fetch the latest or trending Reels from that account.

Also Read | Want To Stand Out On Instagram As A Car Enthusiast? Check Out These 100+ Ideas

Important Note Before You Start

To access this feature, users must agree to Meta’s terms for chatting with businesses and bots on WhatsApp. Without that, Meta AI won’t work, and you won’t be able to access Reels.

For the tech geeks, stay updated with the latest cutting-edge gadgets in the market, exclusive tech updates, gadget reviews, and more right on your phone’s screen. Join Giznext’s WhatsApp channel and receive the industry-first tech updates.

Categories
Auto Tech Featured How To

Android Auto Customization: How To Change Wallpaper With And Without Smartphone

Key Highlights

  • Android Auto screen can be customized
  • Allows transforming screen as per preference
  • Changing wallpapers and adding app shortcuts popular custmization choices

Android Auto has definitely addressed the long due upgrade in four wheeler cabins. The car infotainment system which certainly hasn’t been the most strongest aspect of a car design in the past years have evolved to a full fledged navigation and entertainment hub. These modern digital infotainment system takes the driving experience to a whole new level. Now, you don’t have to solely rely on your smartphone for navigation and media playback when you ate driving an Android Auto loaded car. From mirroring your smartphone apps to allowing users customize the home screen, all can be done with just few taps. We are exploring the ways to customize Android Auto’s home screen by changing wallpapers and adding shortcuts. Read on to find out the steps for the same:

Also Read: Forgot Your ATM Card? Don’t Worry! Here’s How To Withdraw Cash From ATM Using Smartphone

Method 1: Steps To Change Android Auto Background Using Smartphone

This is the easiest way to change the Android Auto screen’s wallpaper. In this method, the Android Auto screen mirrors the wallpaper of the paired smartphone’s screen. Additionally, you can use the smartphone gallery to change the wallpaper on Android Auto screen.

  • Step 1: Unlock your smartphone
  • Step 2: Tap and hold on any empty space on the home screen. This will open up the Wallpaper settings.
  • Step 3: Click on Wallpapers and Styles
  • Step 4: Click on Change Wallpaper

The updated wallpaper on your smartphone will now reflect on the Android Auto Home screen.

Also Read: How To Use Telegram Without Internet? Top 5 Working Tricks In 2025

Method 2: Steps To Change Android Auto Background Without Smartphone

If you don’t wish to mirror the same wallpaper as your smartphone on Android Auto’s screen, you can use the built-in extensive range of wallpapers as well. Note, you won’t be able to set any custom image clicked from your phone as the wallpaper if you are going with this method. But the

  • Step 1: From the Android Auto app’s home screen, open the Settings menu
  • Step 2: Navigate to Wallpapers settings
  • Step 3: A list of wallpapers will show up on the screen. Tap on the wallpaper that suits your mood.

Pro Tip: You can also enable Dark Mode using the Settings menu on Android Auto app.

Categories
Apps Featured How To

How To Use Telegram Without Internet? Top 5 Working Tricks In 2025

Key Highlights

  • Telegram is the closest rival to WhatsApp
  • Allows instant messaging, media sharing, audio, and video calling
  • Can be used without internet
  • Limited functionality without active internet connection

While WhatsApp is the most common instant messaging app for Android users, Telegram with a similar end-to-end encrypted platform has made its mark in the instant messaging app space. It’s one of the most versatile apps offering some advanced messaging, calling, and media sharing features. As with other instant messaging apps, you need an active internet connection to use all the features offered by Telegram. But what if we tell you, there are a few ways with which you can use Telegram services even without an active internet connection? And the steps aren’t tricky too. Here in this article we are sharing the methods that will help you use Telegram without an internet connection.

For the tech geeks, stay updated with the latest cutting-edge gadgets in the market, exclusive tech updates, gadget reviews, and more right on your phone’s screen. Join Giznext’s WhatsApp channel and receive the industry-first tech update.

Also Read: How To Use WhatsApp Without Internet And Your Primary Device: Step By Step Guide

Can You Really Use Telegram Without Internet?

Well, directly no; but with workarounds, definitely. Features like schedule messages, multi-device sync, Bluetooth/ Hotspot file sharing, etc. can help with get the work done when there is no active internet. You can use these features on Telegram mobile app which comes handy when you are in not network zone-like situations. Let’s breakdown the methods with which you can use Telegram without internet on your smartphones.

Also Read: Accidentally Deleted Your Favourite Game Or Mobile App With Active Progress: Here’s How To Restore On Android

Method 1. Via Scheduled Messages Option

This is just like WhatsApp, where you can pre-schedule a text message for any of your contact on Telegram. Besides texts, you can also schedule media messages to both single contact, groups, or Telegram channel. This feature is useful for businesses where one can stay connected with clients while travelling or in a no internet zone.

  • Step 1: Open Telegram mobile app and go the the contact, group, or channel where you want to schedule the message.
  • Step 2: Compose the message and long press on the Send icon
  • Step 3: Select the “Schedule Message” option.
  • Step 4: Set the time, date for the message to be sent
  • Step 5: Click on Send

Also Read: Measure Distance Between Two Points With Pinpoint Accuracy On Google Maps: How To Guide

Method 2: Via Multi-Sync Option

This is another feature which is similar to WhatsApp. Using the Multi-Sync option, you can access your Telegram account on a different device (it could be another smartphone, laptop, or PC). Once you log in to the other device using same Telegram account, all the messages and media gets sync in real time. This feature is useful when the primary device on which Telegram is being used is either running out of battery or has some technical issues.

Also Read: No Microsoft Account? No Problem: Here’s How To Install Windows 11 Your Way

Method 3: Use Draft And Sync Mode On Telegram

This is another way that allows you using Telegram app services without a working internet connection. Using this method, you can essentially prepare drafts in advance (for both messages and media) beforehand. Once the internet connection has resumed, the messages in draft will be sent automatically by Telegram.

Also Read: Call Merge Scam Alert: Here’s How To Stay Safe From OTP Fraud

Method 4 Via: Use Telegram Bots

Another effective way to use Telegram’s messaging service without an active internet connection is by making use of bots. There are dedicated Telegram bots that can help you execute certain commands like queue or schedule messages for later period. Once the bot have been enabled, the messages in queue will be sent without working internet connection.

Also Read: Three Effective Ways To Restore Deleted Games And Apps On Windows 11 Laptops And PC: How To Guide

Method 5: Media File Transfer/Sharing Via Bluetooth/Mobile Hotspot (Business Nearby Feature)

This is one those advanced features that helps you use Telegram with no internet. Using this option, one can share files and media to nearby users. This feature is called Business Nearby and it allows file transfers over mobile hotspot and Bluetooth. Designed essentially for businesses, this feature is helpful if you want to share media files. To use this feature it is critical for you to create a business account.

Categories
Featured How To Laptop

Three Effective Ways To Restore Deleted Games And Apps On Windows 11 Laptops And PC: How To Guide

Key Highlights

  • Windows 11 offers extensive app and software compatibility
  • Microsoft store allows downloading official PC apps and games
  • Provision to restore accidentally deleted files available
  • Multiple methods for restoring deleted apps and games on Windows 11 listed below

Microsoft has been developing Windows OS ecosystem to meet all user requirements for an efficient PC user experience. Over the last few years, Windows OS has been optimised for enhanced security and smooth work flow. A dedicated space has also been created by Microsoft from where users can download trusted apps and games on their laptops and PCs. Downloading an app or game from Microsoft Store comes with an added advantage of easy restore in case of accidentally deletes. But if you have deleted your favourite app or game from your Windows 11 powered laptop or PC, the Microsoft Store isn’t the only way that can help you restore. Here in this article, we have shared the methods with which you can easily restore your deleted apps and games on Windows 11 PC or laptop.

Also Read: Accidentally Deleted Your Favourite Game Or Mobile App With Active Progress: Here’s How To Restore On Android

Method 1: Head To Official Microsoft Store

If the deleted app or game was downloaded from Microsoft Store, it will be easiest to re-install. Follow these steps:

Step 1: Power on your laptop/ PC

Step 2: From the task bar, tap on the Start menu

Step 3: Open the Microsoft Store app. If you have the shortcut on the desktop, open it directly.

Step 4: Tap on the Profile icon

Step 5: Go to the Library option

Step 6: From the “Not Installed” list, search for the app or game that has been deleted.

Step 7: Tap on Install

Also Read: Measure Distance Between Two Points With Pinpoint Accuracy On Google Maps: How To Guide

Method 2: Via OneDrive

You can restore your deleted apps and games on Windows 11 laptop or PC via OneDrive. Note that this method only works when the File History or OneDrive option has been enabled.

Step 1: Tap on the Start menu and go to the Control Panel

Step 2: Now, Click on the File History option

Step 3: Now, locate the folder where the app data was saved (this could be either in App Data or Program Files folder).

Step 4: Once the app or game’s folder is located, tap on Restore

Step 5: You can also directly log into OneDrive and download or restore the deleted app/ game.

Also Read: No Microsoft Account? No Problem: Here’s How To Install Windows 11 Your Way

Method 3: Via Windows System Recovery Tool

This is a built-in feature offered by Windows 11 which allows resetting the system settings and also recover older files, apps, or games.

Step 1: Power on your laptop or PC

Step 2: Open Settings

Step 3: Head to the System option

Step 4: Tap on About and then select System Protection option

Step 5: Click on the System Restore option

Step 6: Now, select the restore point to the point before which the app was deleted accidentally.

Step 7: Perform the steps mentioned on the screen

Step 8: Wait for the System restore to be completed.

Categories
Apps Featured How To

Accidentally Deleted Your Favourite Game Or Mobile App With Active Progress: Here’s How To Restore On Android

Key Highlights

  • Accidentally deleted apps can be restored
  • Games can also be restored with all progress
  • No subscription or plans re-purchases required with Google linked accounts

Google Play Store is the one stop destination for all mobile apps and games available for the Android users. Be it your favourite social media or messaging app or games, Play Store is the only authentic platform to download and install these apps. Google keeps a constant check on the apps being made available on the platform to keep it free from malware or similar scam apps. Often multiple mobile apps can lead up to clogged device memory which is why uninstalling apps that are not in use is advised. However, this process can lead to you accidentally delete the apps that you are using frequently. It can be a game with certain level of progress or your favorite app containing all your preferred customisations. If you have been in such situation then there’s no need to panic. In this article we are exploring the methods with which you can easily restore your deleted apps or mobile games on your Android smartphones and tablets:

For the tech geeks, stay updated with the latest cutting-edge gadgets in the market, exclusive tech updates, gadget reviews, and more right on your phone’s screen. Join Giznext’s WhatsApp channel and receive the industry-first tech update.

Also Read: Merge Two Different PF Accounts Into One: How To Guide

Steps To Restore Deleted Apps/ Games On Android

Via Google Play Store

This is the easiest way with which you can restore your deleted mobile apps or games. Google keeps a log of the installed apps on your device using the Google account. Just visit Play Store and re-install the app that has been deleted accidentally.

Step 1: On your Android devices, open the∫ app.

Step 2: From the top right corner, click on the Profile icon.

Step 3: You will see a bunch of option, navigate to the Manage apps and devices option.

Step 4: Tap on Manage option

Step 5: From the drop down next to Installed menu, tap on the “Not Installed” option

Step 6: Now, simply search for the app that has been deleted accidentally.

Step 7: Tap on the “Install” option

Step 8: Wait for the app to be downloaded and re-installed on your device

Step 9: Open the app once installed and sign-in back using your registered email address of Gmail account.

Pro Tip: Apps installed using Google Account can be re-synced. This means no need to buy subscriptions again.

Also Read: Incognito Browsing Not So Private! Steps To Check Incognito Mode Browsing History And How To Delete

Steps To Restore System Apps On Android Devices

If you have accidentally system apps or Google apps such as Phone app, clock, gallery, etc., do the following to restore

Step 1: Open Settings menu on your Android devices

Step 2: Navigate to Apps section

Step 3: Select Disabled Apps section

Step 4: Select the app that you want to restore such as Phone, Messages, etc.

Step 5: Click on Enable.

Also Read: Want To Transfer Ola Money Cash To Bank Account? Here’s How To Do It

Steps To Restore Games With Active Progress And Purchases

Most of the modern day games and apps on Google Play Store can be re-synced to previous progress. Also, no new subscriptions or purchases will be required to continue using the services.

Step 1: Open Play Store and download the deleted game or app

Step 2: For games like BGMI, Free Fire, etc., auto restore progress option is available.

Step 3: If the progress isn’t restored, open the game Settings

Step 4: Tap on the Restore from Cloud/ Server option.

Categories
Apps Featured How To

Measure Distance Between Two Points With Pinpoint Accuracy On Google Maps: How To Guide

Key Highlights

  • Navigation is easier than ever with Google Maps
  • Allows calculating distance between two points
  • Option available for Android and iOS users
  • Desktop version also supports distance measure feature

Google Maps is one of those reliable navigation apps that besides helping us to get directions also helps with trip planning and more. Maps have also simplified lives of tourists by offering the option to find nearby hot spots, emergency services, fuel stations, and what not. With such a long list, it might be a possibility that you miss out on some of the coolest features that Google Maps offer. One of such feature is the option to measure distance between two or more points. And Maps allows to do so with pinpoint accuracy. Here’s how you can use this simple Google Maps trick for you journey planning.

For the tech geeks, stay updated with the latest cutting-edge gadgets in the market, exclusive tech updates, gadget reviews, and more right on your phone’s screen. Join Giznext’s WhatsApp channel and receive the industry-first tech updates.

Also Read: No Microsoft Account? No Problem: Here’s How To Install Windows 11 Your Way

Steps To Measure Distance On Google Maps (Android, iOS) With Pinpoint Accuracy

Step 1: On your smartphones, open Google Maps app

Step 2: Touch anywhere on the app’s home screen. Ensure you are tapping on an empty space instead of a place or name or icon.

Step 3: A Red pin icon will show up. Tap on it.

Step 4: Scroll down to the option list and click on the Measure distance (ruler icon)

Step 5: Now, drag or move the map bringing the black circle to the point that you want to add for distance measurement.

Step 6: From the bottom right, select the Add Point (+) option. This will allow you to add multiple options.

Step 7: The distance between the selected two points will be displayed at the bottom with pinpoint accuracy.

Also Read: How To Use WhatsApp Without Internet And Your Primary Device: Step By Step Guide

Steps To Measure Distance On Google Map Desktop Version (Laptop, PC) With Pinpoint Accuracy

Step 1: Launch Google Maps desktop version on your laptop/ PC

Step 2: Right-click on any starting point

Step 3: Navigate to and select the Measure distance option

Step 4: Now, tap anywhere on the map to create a path to measure the distance.

Step 5: If you need another point then click anywhere again on the map.

Step 6: The distance between the point A and point B will be shown at the bottom with pinpoint accuracy.

Why Should You Use Distance Measure Feature On Google Maps?

  • Allows to plan trips efficiently
  • Allows tracking distances for fitness activities like running, cycling, etc.
  • Can help calculating distanced between points that aren’t directly connected via roads
  • Allows measuring distances between multiple points