Categories
Apps Featured How To

Instagram Top Hacks: How To Enable or Disable Sensitive Content From Home Feed

Key Highlights

  • Instagram allows sensitive content display on home feed
  • Post frequency can be increased or decreased
  • Settings can be modified via both Android and iOS app

Instagram is a rapidly advancing social media platform which gets a prefference from both general audience as well as content creators. If you scroll through Instagram feed, you generally get the reels, photos from the accounts you follow. However. Instagram also shows you posts based on your activities and interests. Selecting preferred content type that shows up on your feed based on your interests can be done at any given point of time. But despite selecting the preferred content type, you might come across sensitive content on your feed.

The frequency can vary depending on your interest in watching any sensitive pic or video on Instagram. You might get more sensitive content if your frequently consume such content or visit profiles that boast the same content. However, if you wish Instagram to stop pushing sensitive content to your home feed then we can help you with the same. The steps to enable or disable sensitive content on Instagram are listed below:

For the tech geeks, stay updated with the latest cutting-edge gadgets in the market, exclusive tech updates, gadget reviews, and more right on your phone’s screen. Join Giznext’s WhatsApp channel and receive the industry-first tech update.

Also Read: Google Messages Photomoji: What Is It? How To Use?

Instagram Sensitive Content Control: How To Enable Or Disable?

Step 1: Open Instagram Android or iOS mobile app

Step 2: Click on the profile picture icon that you can locate on the bottom right corner

Step 3: Tap on the More (three horizontal lines) option

Step 4: Scroll down to the Suggested Content section

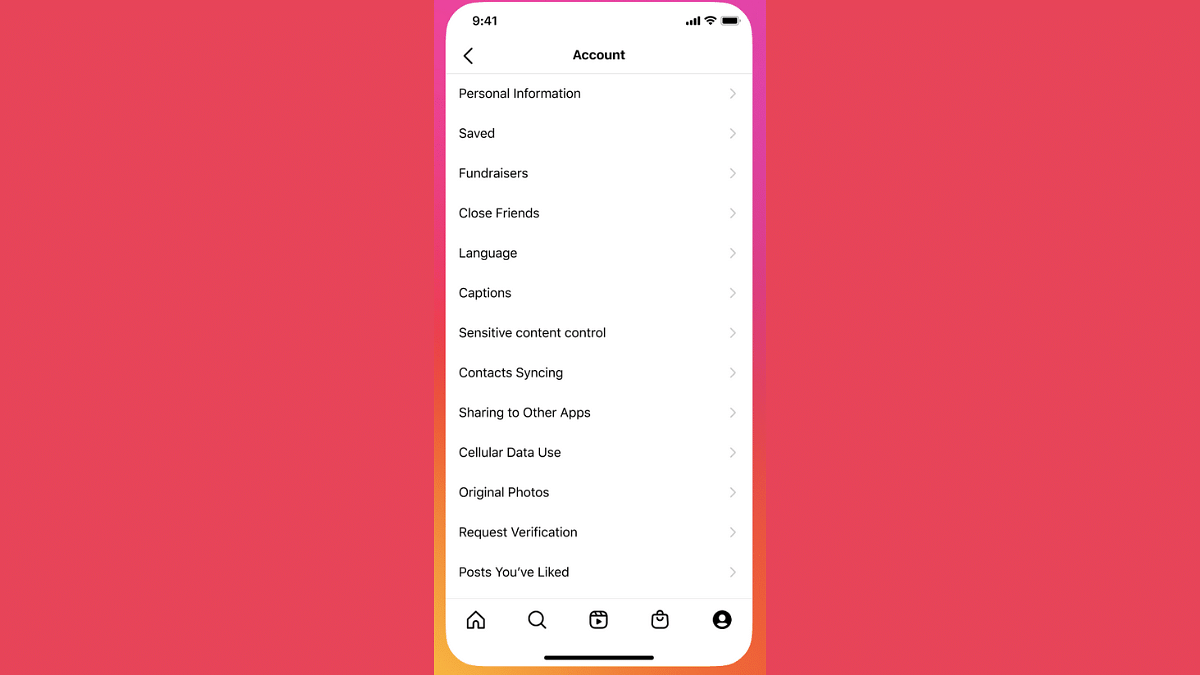
Step 5: Select the Sensitive Content Menu

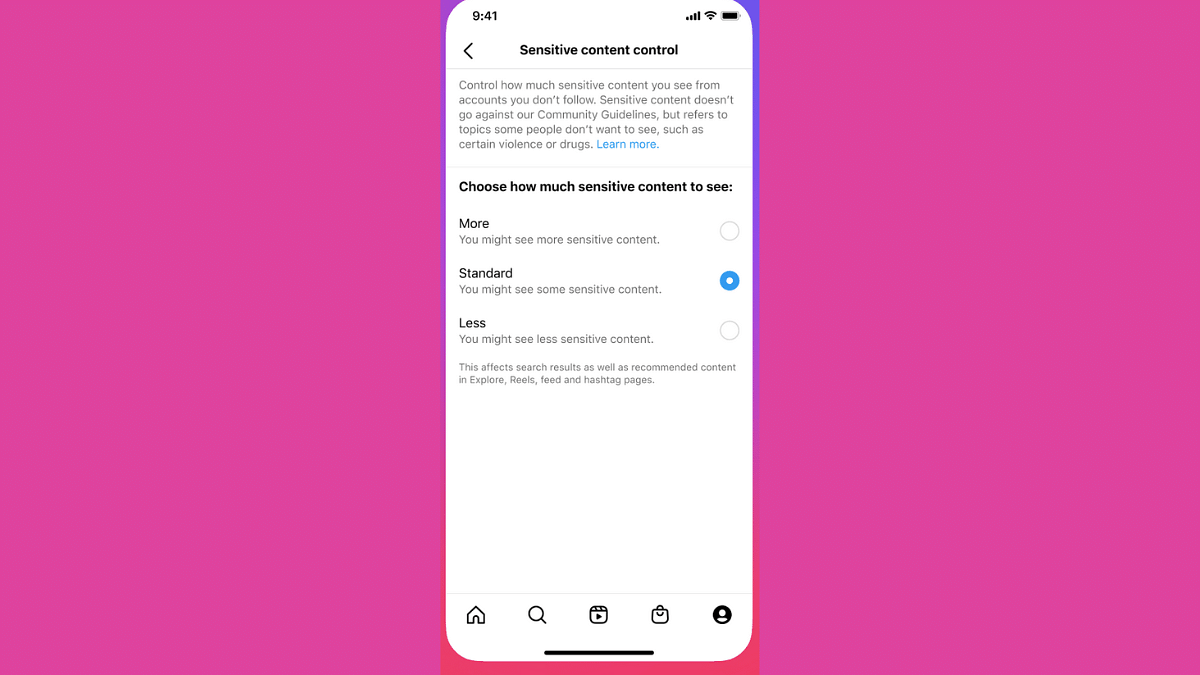
Step 6: Select Less or More or Standard option as per your preference.

Step 7: Click Confirm to save the settings.

Categories
Apps Featured

100+ BTS Suga-inspired Username Ideas For Your Instagram Fan Account

Key Highlights

  • Instagram username is the key to capturing the essence of BTS Suga
  • Improve your fan account and connect with fellow enthusiasts
  • A username should resonate with the spirit of BTS’s Suga

Ever wondered how to fill the charming spirit of BTS’s Suga into your Instagram fan account? Your journey begins with a single question: What’s in a username? Uncover the secret to an engaging and Suga-inspired online identity as we present a handpicked collection of username ideas. Each suggestion is crafted to echo the charisma and musical brilliance of Suga, inviting you to embark on a unique fan account journey that resonates with the heart of the BTS fandom. Let’s explore the perfect username ideas that speak volumes about your admiration for Suga.

Also Read | Are You A BTS Fan? Here Are The 100 Best Instagram Names For BTS Army

Trendy BTS Suga-inspired Username Ideas

Suga Sonic VibesGleaming AgustDYoongi Harmony Hub
Melody Maestro SugaYoongi MelodiesSerenade Suga
AgustD AdmirerSilver Suga VerseMoonlit Min Yoongi
Dreaming SugaBTS_Suga SpotifyMystical AgustD
MicDrop MavenAgustD AlchemyRap Lines Rhapsody
Serendipity SugaDreamyDrapperStarlit Suga Verse
Min Yoongi MagicNoona Crush SugaYoongi Whisperer
Suga SymphonySugarCoated VerseEthereal AgustD

Catchy BTS Suga-inspired Username Ideas

Suga of BTS
Suga InspirationsAgustD SonneteerEthereal Yoongi
AgustD SerenaderDreamCatcher SugaCosmic Sonic Suga
Honeyed HarmoniesSuga Soul SerenityGolden Harmony Suga
Whispering SugaEchoing AgustDWhispering Magic Suga
Melodic_MinYoongiSeraphic Suga StyleSerenading Yoongi Soul
Serene Suga SynergySuga SymphonizerStellar Suga Verse
SugaVerse VirtuosoStar Struck SugaAgustD_Aura
Celestial YoongiAgustD_EnchantmentsCelestialSuga

Also Read | 100+ Best Channel Name Ideas For YouTube Account Dedicated To BTS Army

Cute BTS Suga-inspired Username Ideas

Dreamy Naptime SugaSuga Snack CrazeYoongi Yawn Master
Doodle Delight YoongiDreamy Doodle BugSleepy Suga Smiles
Snuggle Buddy SugaGiggly Snuggle SugaAdorable AgustD
Doodle Dash SugaDreamscape SugaPlayful Yoongi Paws
Cozy Dreams YoongiSnuggle Up Suga BearChubby Cheeks Suga
Suga Cuddly CloudSuga Snack AttackSmiley Suga
Cute Snooze SugaYoongi Snuggle BugSweet Dreamy Suga
Giggly AgustDSnuggle Puff SugaYoongi Yawns Galore

Creative BTS Suga-inspired Username Ideas

Suga of BTS
Symphony Of SugaYoongiMelodistOh Suga
Enchanted AgustDSugaStarlitSoundsSuga World
Yoongi_SonicDreamAgustD_EchoChordDreamweaverAgustD
AgustDHarmonizerSugaVerseWhisperVerseVoyageSuga
SugaVerseVibesNo One Like YoongiYoongiMysticMelody
EchoesOfYoongiMarry Me YoongiSuga_SonneteerSoul
EtherealDreamSugaCelestialSonicSugaHarmoniousAgustD
HarmonicSugaHuesMelodicMagicSugaEchoingVerseSuga

Also Read | K-pop Vibes: 100+ Top Instagram Usernames Ideas For Blackpink Fans

Verdict

As you embark on your journey to create a vibrant Instagram fan account dedicated to BTS’s Suga, choose a username that encapsulates the magic of his artistry. Let your creativity shine, forging connections within the fandom as you celebrate the brilliance of Suga’s musical legacy.

For the tech geeks, stay updated with the latest cutting-edge gadgets in the market, exclusive tech updates, gadget reviews, and more right on your phone’s screen. Join Giznext’s WhatsApp channel and receive the industry-first tech updates.

Categories
Apps Featured How To

Instagram AI Tips And Tricks: How To Create And Share AI-Generated Stickers For Stories Chats

Key Highlights

  • Instagram now has AI tools for messaging and media sharing
  • AI stickers can be shared as messages during chats
  • AI-generated stickers can be uploaded via Stories

Instagram has been making its platform all-advanced for the masses and has definitely taken up the top spot in the social media space. Ever since Meta took over the photo-sharing app, the platform has improved exponentially in terms of features. And since this is an AI era, how can Instagram be left behind. Meta has added a whole lot of AI-features to Instagram which can be accessed in DMs/ chats, stories, and posts.

One such features that Instagram has released for the masses is the option to send a AI-generated stickers to any chat. In addition to sharing the Instagram messages, AI-generative stickers can also be uploaded as stories. This creates a whole new experience while using Instagram for messaging or sharing posts. If you are also trying to level-up for messaging and content uploading game with Instagram, do check out the steps with which you can send AI stickers in chat or add them to story.

For the tech geeks, stay updated with the latest cutting-edge gadgets in the market, exclusive tech updates, gadget reviews, and more right on your phone’s screen. Join Giznext’s WhatsApp channel and receive the industry-first tech update.

Also Read: Unable To Connect AirPods With MacBook: How To Fix AirPod And MacBook Pairing Issues?

How To Send AI-Generated Stickers To Any Contact In Instagram Chat

Step 1: After launching the Instagram mobile app, go to the DM or the chat section

Step 2: Go to the chat window or type in the user name to whom you wish to send AI stickers

Step 3: You will be able to see a bunch of options right next to the message typing box. From here, tap on the “+” icon.

Step 4: ow, click on the Imagine+ option

Step 5: In the search box, type in the prompt that you wish to create as a sticker

Step 6: You will get the stickers generated by AI as per your prompt.

Step 7: Select the appropriate sticker and tap on the Send option.

Step 8: If you wish to animate the sticker, press and hold it before sending.

Also Read: Update Your Aadhaar Card For Free Before September 14: Here’s How

How To Add AI-Generated Stickers To Instagram Stories

Step 1: Open the Instagram app and click on the ‘Add’ button to create a new post.

Step 2: Tap on the sticker icon from the top before sharing a photo or video as a story

Step 3: Now, click on AI Stickers.

Step 4: Enter the text prompt for the AI sticker

Step 5: Click on the Generate button

Step 6: Once the sticker is created, tap on it to add it to Instagram Story feed

Categories
Apps Featured How To

Google Messages Photomoji: What Is It? How To Use?

Key Highlights

  • Google Messages allows creating custom emojis from phots
  • Feature called photomoji
  • Allows using facial expressions or personal photos to create emojis

Android is one of the most powerful mobile platforms that is being used by almost every major smartphone OEM nowadays. Google has created a massive ecosystem of apps and tools to give the users an ultimate experience with Android devices. You even get AI-enabled features with the new version of Android. Google Messages which is the default messaging app for Android devices has also been updated just like the remaining in-house Google Apps with several advanced features. We earlier shared the tips and tricks to create and share a selfie GIF using Google Messages. This time, we are sharing the steps with which you can create and share a Photomoji using Google Messages. But what exactly is this Photomoji feature and how can you share it with your contacts? Read on the steps below:

Also Read: Unable To Connect AirPods With MacBook: How To Fix AirPod And MacBook Pairing Issues?

What Is Photomoji Feature In Google Messages?

Photomoji is cool messaging feature that you can access using Google Messages apps. This feature essentially lets you create an emoji using your personal photos, facial expressions, or any random object that you have clicked using your phone’s camera.

Do note that the Photomoji feature is available to use in the RCS chat feature of Google Messages which is nothing but the Android version of iMessages. You can use Photomojis as reaction to any message and can be shared in separate tabs to be used later. To use the Photomoji feature on your smartphone, you will need Android 8.0 OS or higher version.

Also Read: Enhance WhatsApp Security: How To Protect IP Address On WhatsApp Calls And Silence Unknown Callers?

Steps To Create Google Photomoji As A Sticker

Step 1: On your Android phone, launch the Google Messages App

Step 2: Go to any conversation or start fresh

Step 3: Click on the message box

Step 4: Select Emoji icon and then tap on Create

Step 5: Tap on the photo that you want to create as a photomoji reaction from the gallery

Step 6: You can adjust the subject that you wish to use as the reaction

Step 7: Click on Send

Steps To Create And Share Photomoji Reaction Using Google Message

Step 1: Launch Google Messages app

Step 2: Open any conversation and tap and hold the message to which you want to react

Step 3: Now, click Create

Step 4: Select the photo that you want to share as an emoji reaction

Step 5: Hit the Send button.

Categories
Apps Featured How To

Android Cool Tips And Tricks: How To Customize Google Chrome Themes With Generative AI

Key Highlights

  • Google has added AI features to most of its apps and services
  • Google Chrome has also received AI support
  • Aesthetics can be improved with AI customizations in Chrome

Google is actively integrated AI services to its entire range of apps and services which are available in Android. Gemini AI is the Google’s advanced AI-powered assistant helping the masses with a plethora of tasks ranging from research, marketing, and even customer services. Google has been gradually making the AI-features available with the different apps in a bid to improve the overall user experience. Google Chrome which is the dedicated emailing platform has also been updated with AI tools with which the users get a simplified yet advanced emailing services. Customizations with Google Chrome has been one the already available features which now have received AI support. But you can now customize the appearance of Google Chrome using AI. Interested in changing Google Chrome theme with AI? Find out the steps below:

For the tech geeks, stay updated with the latest cutting-edge gadgets in the market, exclusive tech updates, gadget reviews, and more right on your phone’s screen. Join Giznext’s WhatsApp channel and receive the industry-first tech update.

Also Read: Android Tips And Tricks: How To Maximize Battery Health And Reduce Battery Drain

Steps To Create A Customized Google Chrome Theme With Generative AI

As mentioned above, creating a personalized Chrome theme is now possible using generative AI. One can create themes by selecting any specific subject, style, or mood.

Step 1: Power on your laptop/ PC and open Google Chrome web browser.

Step 2: Launch a new home page on Google Chrome.

Step 3: Once the new tab page is open, look at the bottom right for “Customize Chome” option. Tap on it.

Step 4: Now, you’ll see the Change theme option. Click on it.

Step 5: Select the Create themes with AI option.

Step 6: You will now need to feed in the requirements in the “Add optional details”. In this menu you will get “Select a style”, “Select a mood”, and “Select a color” options. Fill the apt details.

Step 7: If you wish to use any specific color theme, tap on the “custom color” option,

Step 8: Tap on the Create your AI theme option

Step 9: Choose the theme to apply it to a new page. It is worth noting that up to 10 seconds can be taken for the entire customizations to be applied.

Categories
Apps Auto Tech Featured

Enhance WhatsApp Security: How To Protect IP Address On WhatsApp Calls And Silence Unknown Callers?

Key Highlights

  • WhatsApp allows securing IP address during a voice call
  • Dedicated privacy settings have to be enabled
  • Muting unknown callers is also an option

From two-factor authentication to view once messages , the privacy features on WhatsApp ensure you get a safer platform for your personal and professional conversations. It’s not just the text messages that get these security layers. For the audio and video calls too, WhatsApp provides a secure environment to the users. For instance, WhatsApp has added the provision for the users to protect the IP address while making a voice call and also lets users silence unknown callers. The steps for the same are mentioned below:

For the tech geeks, stay updated with the latest cutting-edge gadgets in the market, exclusive tech updates, gadget reviews, and more right on your phone’s screen. Join Giznext’s WhatsApp channel and receive the industry-first tech update

Also Read: Unable To Connect AirPods With MacBook: How To Fix AirPod And MacBook Pairing Issues?

Steps To Protect IP Address During WhatsApp Calls

This feature helps safeguarding the IP address of a user’s device from other users during WhatsApp voice calls. In this feature, the voice calls aren’t connected directly which helps masking the IP address which the call’s receiver won’t be able to see.

Step 1: Launch WhatsApp app on your smartphone or tablet

Step 2: Click on the More (three dots) option from the top of the app’s homepage

Step 3: Tap on the Settings menu

Step 4: Click on Advanced option

Step 5: Enable the Protect IP address in calls.

Also Read: Google Play Store Update: How To Download And Update Multiple Apps In One Go

How To Silence Unknown Caller On WhatsApp

WhatsApp lets users make phone call to the saved contacts. However, even if there isn’t a number saved in your contacts, you can get the calls from the same user. By modifying the privacy settings, you either can block a spam or unknown number or silence it. After muting the unknown callers, you automatically enhance the privacy levels on your device and be less bothered with the stranger calls.

Step 1: Open WhatsApp mobile app on your smartphone

Step 2: Tap on the three dots (More) option

Step 3: Click on the Settings menu

Step 4: Tap on the Calls option

Step 5: Enable the ‘Silence unknown callers’ option

Categories
Apps Featured Info

Google Updates Circle to Search With Automatic QR And Barcode Scanning

Key Highlights

  • Circle to Search now auto-scans QR codes and barcodes
  • A chip directs users to the website with one tap
  • Rolling out to devices like the Galaxy S23 Ultra

Google’s feature Circle to Search continues to grow. Now, its latest update adds a new functionality that is bound to make information gathering even easier. This feature, which allows users to search for information by circling objects on their screens, now includes automatic scanning of QR codes and barcodes. This means users can quickly access relevant websites or details without extra steps.

Also Read | How to Use Google Circle to Search: Your Step-by-Step Guide

How Circle to Search Scans QR Codes And Barcodes

With the new update, Google’s Circle to Search feature automatically detects and scans any QR code or barcode visible on your smartphone screen. This feature simplifies the process of accessing websites or product information associated with these codes.

For example, if you have a QR code displayed on your phone, you no longer need to manually circle it within the app. Instead, Circle to Search will automatically recognize the code and provide a handy chip on the screen. This chip serves as a shortcut. This allows you to visit the linked website or retrieve information with just a single tap.

Improved User Experience

The introduction of this automatic scanning feature may seem like a minor update, but it improves the user experience by saving time and reducing effort. Earlier, users had to manually draw a circle around QR codes or barcodes within the Circle to Search app, which could be a bit tedious. Now, with this automated scanning, getting the desired information is quicker and more convenient. Moreover, this feature aligns with Google’s broader strategy of integrating AI and machine learning into its ecosystem.

Also Read | How to Draft Emails with Voice in Gmail: A Step-by-Step Guide

Availability And Rollout

Initially, Google revealed the QR code and barcode scanning feature for Circle to Search back in July 2024. However, there was no immediate confirmation regarding its release for the stable version of the app. Now, the feature is finally being rolled out to multiple devices, including the popular Samsung Galaxy S23 Ultra.

For the tech geeks, stay updated with the latest cutting-edge gadgets in the market, exclusive tech updates, gadget reviews, and more right on your phone’s screen. Join Giznext’s WhatsApp channel and receive the industry-first tech updates.

Categories
Apps Featured How To

Android Tips And Tricks: How To Create Your Selfie GIF And Send Via Google Messages

Key Highlights

  • Google Messages can be used to send multimedia messages
  • One can also create a selfie GIF on Google Messages
  • Option available with newer version of Android

Android is currently the most powerful OS which is driving modern-age smartphones and tablets. Each year, Google releases a new version of Android with several enhancements and upgrades so that masses get the best experience with its usage. Over the years, all the Google apps and tools have got advanced with the latest technologies allowing for a refined user experience overall. With the Android OS, calling and messaging experience is also taken to whole new level. You now don’t have to solely rely on your mobile networks for calling/ SMS. Rather this can be done if you have an active internet connection on your device.

Also, sending multimedia messages has become easier than ever with Google-powered devices. You don’t need a third party app to share photos or videos with your friends or families. The same can be done using the standard Google Messages app. Yes, you read that right. The option to send multimedia messages including pics and short videos can be accessed on Google Messages. And to make messaging more fun, Google Messages also let you create a GIF of your selfie which you can later share with any contact. Interested in knowing the steps? Read on below:

For the tech geeks, stay updated with the latest cutting-edge gadgets in the market, exclusive tech updates, gadget reviews, and more right on your phone’s screen. Join Giznext’s WhatsApp channel and receive the industry-first tech update.

Also Read: YouTube Music To Apple Music: Here’s How To Transfer Your Playlists With Ease

Steps To Create And Share Selfie GIF Using Google Messages

Step 1: Unlock your smartphone from which you wish to send your selfie as a GIF

Step 2: Go to the Google Messages app and open it

Step 3: Start a new conversation or open the conversation window where you want to send the selfie GIF

Step 4: In the message compose box, you’ll see a bunch of options including the camera. Tap on it. It’s worth adding that this feature will be available with the newer Android versions.

Step 5: Tap and hold the Camera icon placed next to the message type box.

Step 6: You will see a countdown window which essentially will be the buffer for you to get prepared for the selfie.

Step 7: The selfie video will be recorded automatically.

Step 8: Once the GIF is captured, simply tap on the Send icon to share the selfie GIF with the contact.

It’s worth adding that these selfies captured in the Google Messages can’t be edited. Instead, you’ll need to tap on the Restart button for the new recording. Furthermore, the selfie GIF that is recorded by the Google Messages has only 3 seconds of duration. The GIFs will be saved on the device’s camera roll which you can access later from the Photos or gallery app.

Categories
Apps Featured How To

Google Play Store Update: How To Download And Update Multiple Apps In One Go

Key Highlights

  • Play Store now allows downloading multiple apps at the same time
  • Update your Play Store app to start downloading multiple apps
  • You can also update multiple apps simultaneously

Have you ever been frustrated by the slow process of downloading and updating apps on your Android device? Well now, you will be delighted to know that the Google Play Store has finally introduced a new feature. Until recently, the Play Store allowed only one app to download at a time, making the process really slow especially when installing multiple apps. Now, the Google Play Store has rolled out a new feature that will let you download and install up to three apps simultaneously.

Also Read | Google Play Store Alternatives: Best Android App Store Substitutes For Google Play

How To Download Multiple Apps In Google Play Store

Step 1: Firstly, you have to make sure that your Google Play Store app is updated to the latest version.

Step 2: Now, go to the Play Store for the first app you want to download and open its page.

Step 3: Click on the Install button to start downloading the first app.

Step 4: After that, without waiting for the first download to finish, search for the second app and tap Install. Do the same for a third app.

Step 5: Now, all three apps will download and install simultaneously, saving you time.

This update meaningly reduces waiting time. This is very useful when setting up a new device or refreshing your current one with new apps.

Steps To Update Multiple Apps On Google Play Store

Not only can you can download multiple new apps at once, but you can also update your existing apps simultaneously. Here’s how:

Step 1: Open the Play Store and click on your profile picture in the top right corner.

Step 2: Select My Apps & Games from the menu.

Step 3: In the Updates tab, you will see a list of apps that have pending updates. Simply tap Update All, and the Play Store will update up to three apps at the same time.

Also Read | How To Lock Play Store On Your Android Phones? Ways To Enhance Privacy With Google Play Store

This new feature brings Google Play Store on par with other app stores. This offers user a more efficient and user-friendly experience. Whether you are setting up a new phone or just keeping your apps up-to-date, this update will save you time and hassle.

For the tech geeks, stay updated with the latest cutting-edge gadgets in the market, exclusive tech updates, gadget reviews, and more right on your phone’s screen. Join Giznext’s WhatsApp channel and receive the industry-first tech updates.

Categories
Apps Featured How To

YouTube Music To Apple Music: Here’s How To Transfer Your Playlists With Ease

Key Highlights

  • Transfer your YouTube Music playlists to Apple Music easily
  • Only user-created playlists can be transferred
  • Changes post-transfer won’t sync between platforms

Good news for YouTube Music users. You can now transfer your favorite playlists over to Apple Music. How? The answer is Google’s playlist portability feature. This is a significant step-forward in cross-platform compatibility. It will allow users to seamlessly transition between music streaming services without having to lose their carefully curated collections. This feature is a game-changer, whether you are thinking about switching or just want to check out Apple Music’s offers without having to start from zero.

Also Read | Google To iOS: How To Transfer Google Contacts Directly To iPhone

How To Transform Your Playlists From YouTube Music To Apple Music

The process of transferring your playlists is simple. But before you begin, there are a few things you should consider. Firstly, make sure that your Apple Music subscription is still active. The transfer would not be possible without it. Here are the simple steps that can help you move your playlists:

Step 1: Start by heading over to your Google Account Dashboard.

Step 2: Scroll down to the YouTube section, either under ‘Recently used Google services’ or ‘Other Google services.’ After that, select ‘Transfer Data’ to start the process.

Step 3: You will be prompted to select the specific playlists you want to move. Remember, only playlists you have created personally can be transferred. Saved playlists from other users cannot be copied.

Step 4: Choose Apple Music from the drop-down menu as your destination platform. Click on Continue.

Step 5: To complete the transfer, you must log into your Apple Music account and provide Google Takeout permission. You will receive an email with a link to access your playlists on Apple Music after the process is complete.

Important Details To Remember

Keeping in mind these two crucial points is essential. To start with, this is a one-time transfer. Following the transfer, any changes that you make to your playlists on YouTube Music or Apple Music won’t sync between the services. Additionally, Google suggests using third-party services like Soundiiz or TuneMyMusic if you wish to move your playlists to other music services that do not offer this feature natively.

Also Read | Need To Transfer iPhone Data To Your Laptop? A Step-by-Step Guide On How To Do It

The partnership between Google and Apple is not just one-way. Apple Music users can also transfer their playlists to YouTube Music. The process is similar and involves visiting Apple’s Data and Privacy page and following the on-screen instructions.

For the tech geeks, stay updated with the latest cutting-edge gadgets in the market, exclusive tech updates, gadget reviews, and more right on your phone’s screen. Join Giznext’s WhatsApp channel and receive the industry-first tech updates.