It features Intel 12th Gen Core i9 HX series of processors
The laptop has NVIDIA RTX 3080 Ti
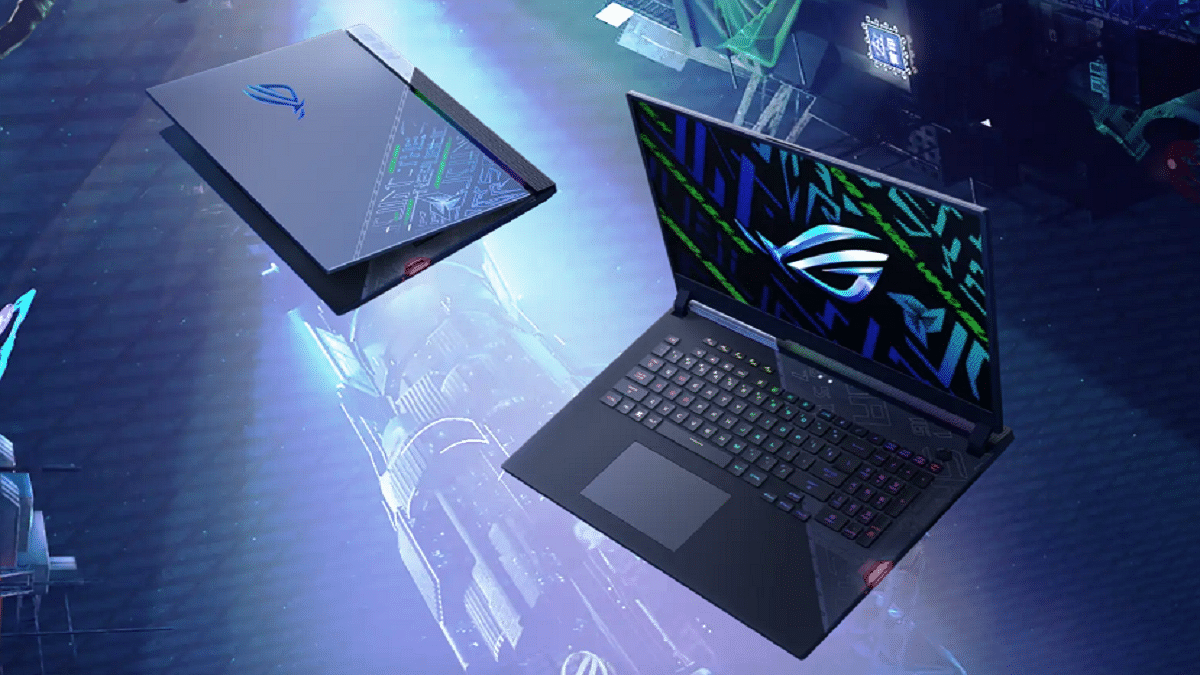
Asus has announced the upgrade to its ROG Strix Scar 17 PCs with the Special Edition (SE) launch in India. The new laptop offers gamers enthusiasts of the nation gameplay experiences and unmatched performance. Here’s everything you need to know about the newly launched Asus ROG Strix Scar 17 Special Edition Laptop:
Asus ROG Strix Scar 17 Special Edition Laptop Specifications
The lid design of the Asus ROG Strix Scar 17 Special Edition has been updated. It is powered by an NVIDIA GeForce RTX 3080 Ti and an Intel 12th Gen Core i9 12950HX CPU. The laptop sports a 17.3-inch QHD screen with a 240Hz refresh rate, a 3ms response time, and Dolby Vision HDR compatibility.
It contains a 4TB PCIe Gen4 SSD and 32GB of 4800MHz DDR5 RAM, which can be expanded to 64GB. On the audio front, the ROG Strix Scar 17 Special Edition has a quad-speaker audio system with Dolby Atmos support.
The keyboard allows users to change light settings based on the game they are playing, supports Aura Sync, and offers per-key RGB lighting. The switches are designed to last more than 20 million presses, claims Asus.
It has a 90Whr battery which Asus claims can be quickly charged to 50 percent in just 30 minutes. Along with the laptop, the company is including a bunch of peripherals, including a ROG Backpack, ROG Delta Headset, a FullHD 60FPS camera, and a ROG Strix Impact Mouse.
The Taiwanese electronics brand Asus says they used Conductonaut Extreme Liquid Metal thermal paste from Thermal Grizzly on the GPU and CPU. This helped to lower the ambient temperature by about 15 degrees Celsius.
Asus ROG Strix Scar 17 Special Edition Laptop Price In India
The ROG Strix Scar 17 Special Edition Laptop can be purchased online from Asus, Amazon, and Flipkart for a starting price of Rs. 3,59,990. The device is also available from all Asus authorized dealers as well as Asus Exclusive Stores, ROG Stores, Vijay Sales, Croma, and Reliance Digital.
There’s more to the dialer screen on your smartphone than meets the eye. Besides its obvious purpose of calling people, there’s a vast array of secret codes you can input to troubleshoot your device, reveal important information, make anonymous phone calls, and so much more.
The secret codes mentioned here are applicable to any brand of Android phone including Chinese mobile phones like OnePlus, Vivo, and Xiaomi. Let’s check them out:
List Of Useful Secret Codes For OnePlus, Vivo, And Xiaomi
For Factory Reset: System and app data and settings; Google account settings kept in the smartphone; All downloaded apps
*#*#34971539#*#*
To get information about the camera of the mobile phone: Update camera firmware on SD card; Update camera firmware in the image; Get firmware update count; Get camera firmware version
*2767*3855#
The data, files, and settings on the phone’s internal memory will be formatted and deleted. The firmware of the phone will also be reinstalled.
*#*#273283*255*663282*#*#*
This code will launch a File copy screen where you can back up media files including movies, songs, photographs, and more.
*#*#7594#*#*
To modify the “End Call / Power” button option, enter this secret code.
*#*#197328640#*#*
This code is used to enter service mode so that various tests and setting adjustments can be made.
Useful Secret Codes For Factory Tests
Secret Code
Purpose of Use
*#*#0*#*#*
LCD Test
*#*#3264#*#*
RAM Version
*#*#0673#*#*
Melody Test
*#*#0588#*#*
Proximity Sensor Test
*#*#0283#*#*
Packet Loop Back
*#*#2664#*#*
Touch Screen Test
*#*#2663#*#*
Touch Screen Version
*#*#0842#*#*
Vibrator and Backlight Test
WLAN, GPS, And Bluetooth Secret Codes
Secret Code
Purpose of Use
*#*#1472365#*#*
GPS Test
*#*#232339#*#*
WLAN Test
*#*#8255#*#*
To launch GTalk Service Monitor
*#*#232338#*#*
Displays WiFi MAC Address
*#*#232337#*#
To Display Bluetooth Device Address
*#*#232331#*#*
Bluetooth Test
Please take note that one should use these secret codes at their own risk. If you are a beginner, then we suggest obtaining the advice of some professional or experienced user before using these codes. These helpful secret codes are designed to be used by knowledgeable users, not novices.
Smartphones nowadays are one of the most commonly used gadgets by the masses for communication and also entertainment, photography, and gaming. Vivo is one of the largest players in the smartphone industry that has several lineups catering to affordable and premium users. The Chinese maker is consistently improving the user experience with its smartphones by integrating the best and newest technologies.
Vivo also provides a secure ecosystem for its smartphones and users. Most Vivo budget smartphones are packed with basic security features such as PIN and password protection. Face Unlock is another common security feature that you will find on Vivo handsets.
If you buy a mid-range or premium range Vivo smartphone, you’ll get an additional physical security feature including a side, rear, or under-display fingerprint scanner. While setting up a Vivo smartphone, you get the option to add any of the aforementioned security layers. You can set up File Safe or privacy app lock for specific apps to safeguard your data.
If you are using a Vivo phone, you can also add a screen lock that can be unlocked using the PIN and password protection. It’s difficult to breach the security layers on Vivo smartphones. This is why it could be a task for you to login into a locked Vivo smartphone. Only a correct password or fingerprint is required to unlock the Vivo phones. But what if you have forgotten the password if you have modified it recently? In that case, you can reset the password by following the steps below:
What To Do If Forgot Privacy Space Or App Lock, File Safe Password On Vivo Phones?
Step 1: Open the Settings menu on your respective Vivo smartphones. Note, that the steps mentioned here will work for Funtouch OS 3.0 and above versions.
Step 2: Scroll down to the Fingerprint, face, and password option.
Step 3: Click on Security.
Step 4: Tap on Privacy and app encryption.
Step 5: Select the Forget password option.
Step 6: You’ll get the security answer option where you can enter the answer that you must have added while setting up the app lock. Simply verify and reset the password set for apps or file safe. If in case, you don’t remember the security answer, you can follow the on-screen steps to retrieve and change the old password for app lock.
How Can You Unlock Vivo Phones’ Screen Password If Forgotten?
The steps to reset the password on any Vivo handset if you don’t remember it is quite easy.
Step 1: Lock your Vivo phone to launch the lock screen. If it’s already locked and you have forgotten the password, follow the remaining steps listed below.
Step 2: Enter the incorrect password five times. This will take you to the password reset screen.
Step 3: You will see the Forgot password option. Tap on it.
Step 5: The password recovery option will open up. Enter the security answer and reset your password.
How To Reset Vivo Phone Password If You Don’t Remember Security Answer?
Step 1: You can use perform these password reset steps if you don’t remember the security answer on FunTouch OS 3.0 and above versions.
Step 2: Open the Settings menu.
Step 3: Click on the Fingerprint, face password option.
Step 4: Tap Security.
Step 5: Click ‘turn off Lock Screen password and Privacy and app encryption.
Step 6: Reset the security question and use when the next time your device is locked and you don’t remember the password. Notably, these steps will only work if you are able to enter the phone.
Cool and unique Instagram usernames are the identity of a gamer
Instagram username must be according to long-term goals
Here you will find classy Instagram name ideas for your inspiration
Choosing a cool username on Instagram for your game might seem simple, but most catchy usernames are already taken. It could take you some time if you’re new to online gaming to realize how important having a catchy username for games is.
Gaming names should be chosen with consideration, taking into account your personality and playstyle. With all that in mind, we’ve put together a list of game names for players to choose from or get inspired by. Browse through our extensive selection of the top gaming names to find one that suits your preferences.
Choose a name that you know has been liked for years and reflects your personality. For instance, if you generally play as a sniper in a Battle Royale game, you can pick a name like ‘Deadly Sniper’ etc. Besides, many websites and applications are available that help generates game names based on keywords, you can also search for them.
Call recording is one nifty feature in OnePlus devices
The audio message notification can be annoying and might affect the secrecy aspect
Users can turn off the call is now recorded message on their OnePlus 10 series
OnePlus is one of the most advanced players in the Android smartphone market. The brand has earned a high rapport for being a flagship killer with its value flagship phones. The OnePlus 10 series is currently the brand’s latest bid in the flagship smartphone category.
The OnePlus 10R, OnePlus 10 Pro, and the OnePlus 10T 5G are the latest generation premium range 5G smartphones by OnePlus in India and the global markets. Like most of the premium range smartphones, the latest lot is also available with top-tier hardware and firmware.
OnePlus uses Google’s Android services for both its mid-range premium smartphones and tops it with a custom OxygenOS interface on top. And like most of the OEMs, OnePlus also makes sure to add additional security features to its smartphone lineups. Be it the OnePlus Nord or the high-end OnePlus handsets, you’ll get all kinds of privacy aspects present. The same is the case with the new OnePlus 10 models.
With OnePlus devices, call recording is one nifty feature that can be useful in numerous scenarios. However, as soon as you push the recording key on any OnePlus handset, specifically the recent models, you will get a warning notification saying “this call is now being recorded”. We got this notification while recording calls using the latest OnePlus 10T.
This audio message notification can be annoying and might affect the secrecy aspect. However, strict guidelines have been issued by the Indian government for recording calls and audio without other user’s concern. Google has also released similar guidelines and removed third-party apps that support call recording from the Play Store.
Also, the “call is now being recorded” announcement is not just with the OnePlus 10T but other recent and previous-gen models including the OnePlus 10 Pro, OnePlus 10R, OnePlus 9 series (all models), OnePlus 8 series, and the OnePlus Nord models. Is there any way with which you can turn off the call is now recorded message on your OnePlus 10 series or any of the aforementioned models? We have listed the working way for the same:
Cal Now Being Recorded Message On OnePlus 10 Series And Other Models
Stop OnePlus Automatic Voice Call Recording Message Notification Via Different Text-To-Speech Engine
You can alter the default dialler app engine and start making calls on the OnePlus 10 series and previous-generation models including the OnePlus 9 and OnePlus 8 series and also the OnePlus Nord models. TTSLexx is one of the best options for the same. You can download this using the Google Play Store and then follow the remaining steps listed below:
Step 1: Open the Google Play Store and search the TTSlexx app.
Step 2: Once the app is installed go back to the OnePlus 10 and other models’ settings menu.
Step 3: Scroll to the Text-To-Speech option.
Step 4: You’ll see the service engine option. Tap on it and select TTSlexx instead of Google.
Step 5: Now, open the phone’s settings app again and go to the App’s page.
Step6: Select Google Phone dialler.
Step 7: Clear the cache and storage. If you don’t clean the Google dialler app’s cache files, the TSSlexx wouldn’t function properly.
Step 8: Now, make calls and record audio without notifying the end users on your OnePlus 10 and other recent models.
As mentioned above, OnePlus uses Google’s dialler app on all its smartphone lineups. The same is the case with the OnePlus 10 series phone and the previous-gen models. But the stock dialler app isn’t available on the Google Play Store for direct download. You’ll need to download the apk file separately online.
To do so, you can open any web browser on your respective smartphones and download the stock OnePlus dialler app. We are adding a new link here with which you can easily download the secondary dialler app for OnePlus. Make sure you have allowed outside sources from the settings to complete the installation process. The remaining steps are below:
Step 1: To make a call, open the stock OnePlus dialler app on your respective OnePlus 10 or other models.
Step 2: Make sure you set this app as default to record calls. You can do so from your phone’s setting menu.
Step 3: Now, toggle on the automatic recording option within this app. To do so, click on the app’s setting menu and scroll to the call recording option. Step 4: Set automatic recording on. With this, the calls will be recorded without any sound as soon as it’s received/made.
Many phones come with Google Phone or dialer as the default calling/dialing app
Google dialer app comes with a lot of unpleasant features
The call recording announcement is arguably the most irritating feature
Many Android phones today come with Google Phone or dialer as the default calling/dialing app. The Google dialer app has a lot of unpleasant features. The call recording announcement, however, is arguably the most irritating. As soon as you begin recording a call, the app plays a pre-announcement to both parties saying “This call is now being recorded.” When you end the call recording, it similarly plays “Call recording ended.”
Many individuals assert that if the other party finds out that the call is being recorded while it is happening, what use will it serve to record the call? We have therefore developed a fix for this issue that enables you to turn off call recording announcements. Let’s find out:
Step 8: You have successfully finished all the necessary actions.
Step 9: Call someone now and try recording the call; it won’t make the previous announcement.
Method 2: Steps To Turn Off Call Recording Announcement Via Third-Party App
Downloading a third-party dialer and setting it as your default dialer on your Vivo smartphone is another approach to stop the announcement. You can covertly record calls with this. The app also allows you to activate the automatic call recording option.
Method 3
Flash the operating system of your smartphone with an appropriate ROM created for your country to permanently disable the call recording announcement. You must do this because, in an effort to avoid being sued, some manufacturers do not include this type of ROM with their dialers.
Google is offering a wide range of services for smartphones and tablets falling in the Android ecosystem. The search giant is making consistent upgrades with Android OS driving new-generation smartphones and tablets. Google is currently developing Android 13 which as the name suggests is the 13th generation of the company’s in-house mobile operating system. With the Android OS, Google has opened up new opportunities for smartphone and tablet users.
And we have seen some major upgrades with tablet hardware and the user interface. The user possibilities are endless with big-screen tablets. That’s one of the reasons why laptops are somewhat getting replaced with new-age Android tablets. A stylus pen support for creative work is one of the most prominent highlights of modern tablets. Connecting a wireless keyboard or mouse for professional tasks is another.
You can easily convert your tablet into a portable laptop-style gadget by adding a wireless keyboard or mouse to the device. After connecting a mouse, you can use the Auto click (dwell timing) feature available with Android 11.0 and above versions. This option lets you set automatic cursor actions when it stops moving for a certain period.
Google has designed this feature for users with motor impairment. You need a tablet with Android 11 OS or above to use this feature. Android mobile users can also try this feature. Once a successful connection is established between the tablet and the wireless mouse, you can set up the Auto click (dwell timing) feature.
Step 1: On your tablets, open the Settings app.
Step 2: Scroll down to the Accessibility tab.
Step 3: Locate the Auto Click (dwell timing) option. This option could be present with the ‘Click after pointer setting’ name in some select tablet models.
Step 4: Now, you can set the preferred automatic clicks timer. The automatic click will happen as per the timer you will select. You can choose from Short (0.2 seconds), Medium (0.6 seconds), Long (1 second), or custom.
How Can You Use The Auto Click (dwell timing) Feature Post Setup
Step 1: Scroll the cursor to the position you want to click.
Step 2: Stop using or moving the mouse once you are on the required position.
Step 3: The auto click will happen as per the time frame you have selected during the setup.
MacOS Monterey brought a fair amount of developments to the platform. Low Power Mode is one of the more crucial changes for people who need to get the most battery life out of their devices. The feature is already well-known to anyone who owns an iPhone. By doing this, the device is set up to preserve as much battery life as possible.
By automatically reducing screen brightness and slowing the CPU clock speed, this lowers energy usage. This not only aids in lowering energy use but also keeps your MacBook quieter because the fans won’t be running (thanks to the lower CPU clock speed). Here’s how you can toggle on the Low Power Mode on macOS Monterey. Let’s check out:
Steps To Turn On Low Power Mode On macOS Monterey
On macOS Monterey, activating the Low Power Mode is a rather simple process. Although we will manually demonstrate how to toggle it on, you can also ask Siri to turn it on immediately.
Make sure you are using the most recent stable macOS Monterey version before we begin because it will probably work better.
Step 1: In the top left corner, click on the Apple icon.
Step 2: Tap on ‘System Preferences’.
Step 3: Now, click on ‘Battery’. It is located at the bottom next to the ‘Printers & Scanners’ and ‘Date & Time’ options. If you still don’t find it, simply search for it in the top right corner.
Step 4: Once you open the Battery settings, at the left bottom of the sidebar, tap on ‘Battery’.
Step 5: After you follow the above step, you should be able to see the ‘Low Power Mode’ option. To turn it on, tap on it.
The Low Power Mode will then be turned on and will start working. Turning on the Low Power Mode may provide you with a little additional juice, but you should be aware that the performance might not be exactly the same as previously. Don’t worry, though; your Mac will continue to operate in much the same way while using less energy.
MediaTek Helio G series has some powerful chipsets for budget and premium Android smartphones. The Helio G37 is one of the brand’s gaming chipsets for mid-range smartphones. The Infinix Hot 12 and Motorola Moto G22 are some of the recent Android budget phones equipped with this gaming MediaTek processor.
Qualcomm, on the other hand, has been marking its presence in the mobile chipset industry with Snapdragon series processors. The Snapdragon 662 is the company’s bet in the mid-range segment. A bunch of popular phones with this processor have been competing with the lot mentioned above. The Poco M3, Xiaomi Redmi 9 Power, and the Vivo Y51A are a few of examples. But, why are we speaking of both these chipsets? Well, we have done a quick comparison between both these mid-range chipsets. Read on here:
MediaTek’s Helio G35 processor is built on 12nm fabrication with a 2300MHz frequency range. The processor has octa-cores including four Cortex-A53 cores clocked at 2.3GHz and the other four clocked at 1.8GHz. The Qualcomm Snapdragon 662 processor is also an octa-core chipset but is fabricated using 11nm process and has 2000MHz frequency range. This processor has four Cortex A73 cores and four Cortex A53 cores clocked at 2.3GHz and 1.8GHz respectively.
The Helio G35 gets PowerVR GE8320 GPU integration with 650MHz base frequency. The processor has two execution units and 96 shading units. The GPU integrated within the Helio G35 is the Adreno 610, a part of Adreno 600 Architecture. It has a 650MHz GPU frequency, two execution units, and 32 shading units. Both these MediaTek and Qualcomm processors feature the same 1.1 Vulkan version and DirectX 12 version. Both the chipset brands have designed the SD 662 and the Helio G37 as a capable processors that can offer a smooth daily user experience and also perform lag-free with apps.
Helio G37 Vs Snapdragon 662 Processor: Memory, Multimedia (ISP)
The MediaTek Helio G37 processor comes with LPDDR4X RAM support. This is the same with the Snapdragon 662 processor. The memory frequency range is different. The Helio G37 processor has a 1866MHz memory frequency range, while the Qualcomm Snapdragon chipset has a 1600MHz memory frequency.
Both Helio G37 and the SD 662 have up to 8GB maximum RAM support. The storage compatibility is eMMC 5.1 on both chipsets. However, the Snapdragon variant has an additional UFS 2.1 storage. The Helio G37 has 1080 x 2400 pixels max display resolution support, while the Snapdragon 662 has 1080 x 2520 pixels display resolution compatibility (maximum).
The former offers 1 x 25MP and 2x 13MP max camera resolution whereas, the SD 662 has 1x 48MP and 2x 16MP max camera resolution. The video playback compatibility is 4K@30fps with the Snapdragon chipset and 1k@30fps with the MediaTek processor.
You can make Informed Choices for Budget Smartphones
Unisoc is one of the emerging players in the mobile chipset market. The brand has created its niche with budget smartphone processors and we have seen multiple popular OEMs integrating a Unisoc series chipset into their entry-level phones. Realme, Micromax, and a couple of noted Android mobile players are a few examples.
On the other hand, primary mobile chipset players, including MediaTek and Qualcomm, are also frequently designing new mobile chipsets for entry-level phones. The former even has game-centric chipsets for affordable Android phones. The MediaTek Helio G35 is of the most commonly found chipsets in the entry-level segment. How well does it compete against the Unisoc T606 in terms of GPU and CPU performance? Let’s find out:
Unisoc T606 Vs MediaTek Helio G35 Processor: CPU Comparison
The Unisoc T606 entry-level chipset has octa-cores and is designed using a 12nm fabrication process. The Instruction set is ARMv8.1-A with a base frequency of 1600MHz. The chipset is equipped with two Cortex A-75 cores and six Cortex-A55 cores clocked at 1.6GHz respectively.
MediaTek has also fabricated the Helio G35 processor on a 12nm fabrication process. This processor is based on an ARMv8.2-A Instruction set and has a 2300MHz base frequency. This low-end gaming processor has eight Cortex-A53 cores clocked at 2.3GHz. Both these chipsets’ CPU performance is powerful for daily tasks such as web browsing, media playback, and also occasional gaming. But the Helio G35 is a bit better with performance optimization.
Unisoc T606 Vs MediaTek Helio G35 Chipset: GPU Comparison
The GPU integrated with the Helio G35 is the IMG PowerVR GE8320 which is based in Rougue Architecture and has a 680MHz frequency range. The MediaTek Helio G35 has the Mali-G57 MP1 GPU integration which uses Valhall architecture and offers a 650MHz frequency range.
The Unisoc T606’s GPU has 16 shading units compared to 32 shading units of the Helio G35. The former’s OpenCL version is 2.0, OpenCL version is 1.0, and DirectX version is 11. The latter’s Vulkan version is 1.1, OpenlCl version is 1.2, and DirectX version is 12.
Unisoc T606 Vs MediaTek Helio G35 Processor: Memory, Multimedia (ISP)
The Unisoc T606 and the MediaTek Helio G35 have the same LPDDR4X RAM memory support. Both chipsets have also identical 1600MHz memory frequency but the max memory size support is different. The Unisoc T606 only supports up to 8GB RAM, whereas, the MediaTek Helio G35 has up to 6GB RAM compatibility. The former supports eMMC 5.1, UFS 2.0, and UFS 2.1 storage types, while the latter comes with only eMMC 5.1 storage.
Unisoc has made the T606 compatible with a max display resolution of 1080 x 2160 pixels and a max camera resolution of 1x24MP and 2x16MP. The display resolution support with the Helio G35 is 1080 x 2400 pixels, while the camera resolution is 1x25MP and 2x 16MP. The video recording and video playback compatibility is the same with both processors, i.e., 1K@30fps and 1080p@60fps respectively.