Categories
Auto Tech Featured How To

Android Auto Tips And Tricks: How To Fix Voice Commands Not Working Issue With Android Auto

Key Highlights

  • Android Auto allows voice controls for hands free usage
  • Resetting voice command feature is one of the fixes
  • Volume issues can be resoled with quick troubleshooting

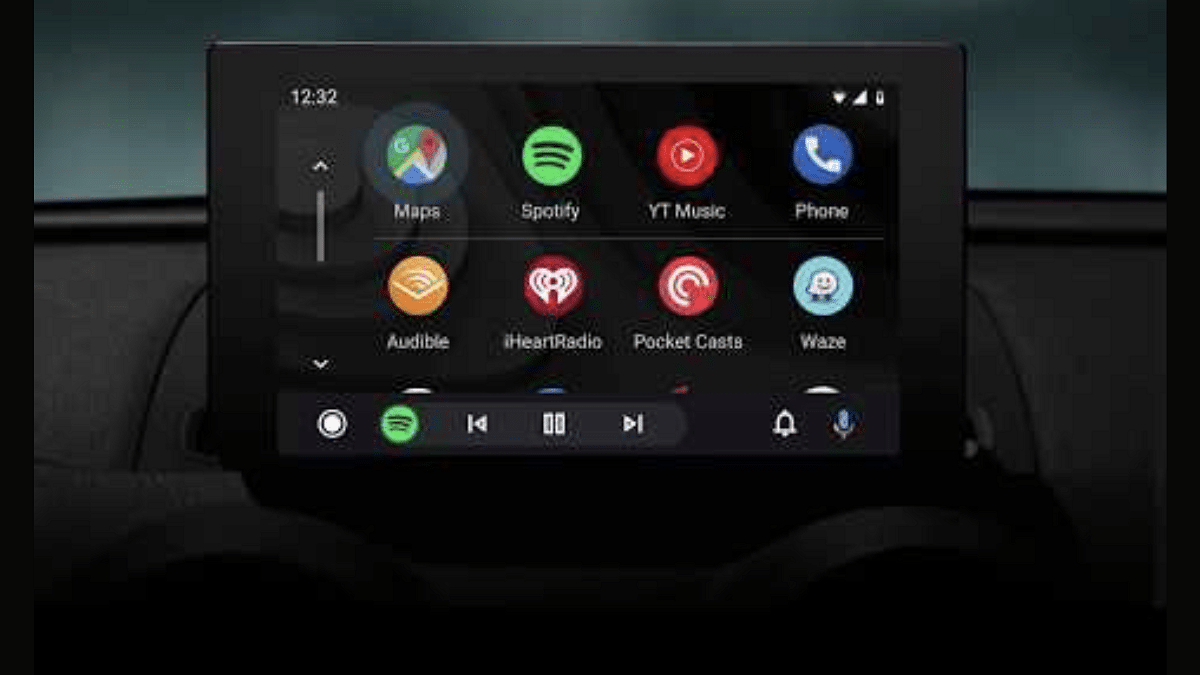
Google has also created a vast ecosystem for the consumers to use a variety of mobile services. Besides smartphones, Google has developed an entire operating system, i.e., Android to drive smartphones, tablets, and smart TVs. But the search giant hasn’t stopped expanding its wings and had also introduced a dedicated suite for four wheelers called Android Auto. Google Android Auto is a direct answer to Apple CarPlay providing a whole ecosystem of mobile apps such as multimedia, navigation, and instant messaging.

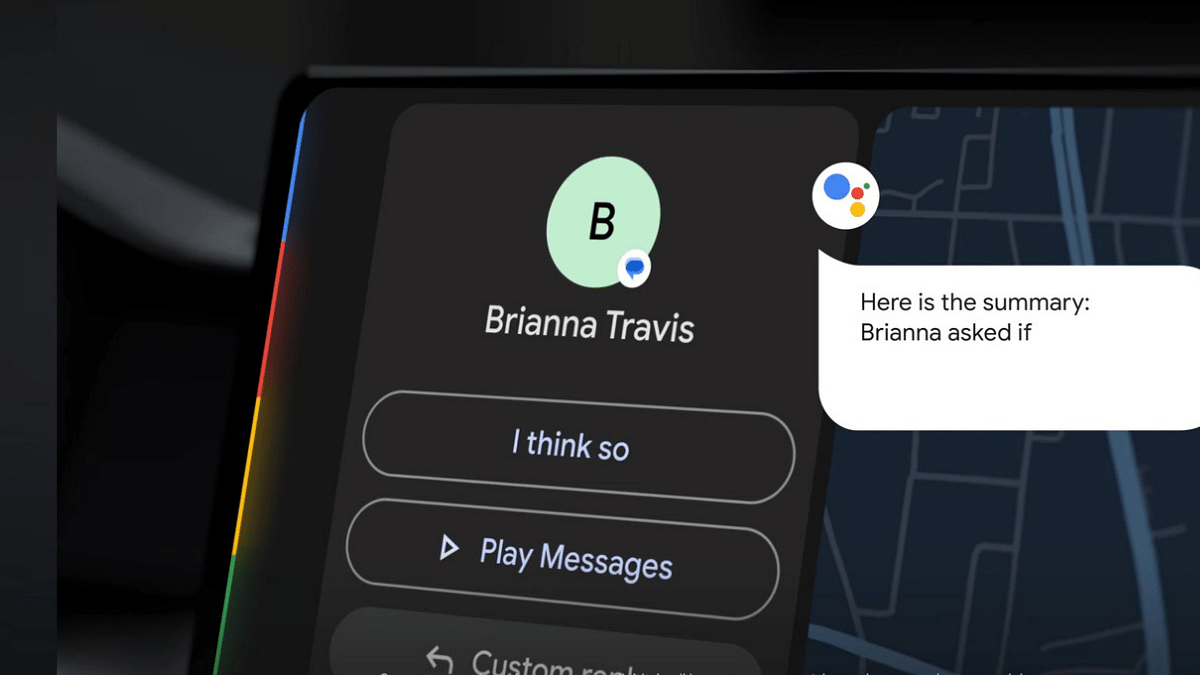
Wireless and hands free usage is one of the best experiences provided by Android Auto. You can give direct voice commands to start navigations, make or receive calls, and also music playback. All you need to do is summon the Google Assistant by giving the standard voice commands such as “Ok Google” or “Hey Google” followed by the task that you need the Android Auto to perform.

Using Google Assistant for different tasks allows for a premium user experience while driving any four wheelerhe . However, there could be times when the voice assistant system might not work smoothly on your Android Auto-enabled car’s infotainment system. This could be due to a random bug or any another issue. If you also have come across issues with the digital voice assistant system of your car’s Android Auto, then the quick fix is mentioned below:

For the tech geeks, stay updated with the latest cutting-edge gadgets in the market, exclusive tech updates, gadget reviews, and more right on your phone’s screen. Join Giznext’s WhatsApp channel and receive the industry-first tech updates.

Also Read: Android Auto Waze Navigation: What Is It? How To Use?

Steps To Fix Issues With Android Auto Voice Assistant Feature

Step 1: Turn on your car’s infotainment system

Step 2: Press and hold the voice command key on the car’s steering wheel and give “Ok Google” or “Hey Google” voice command. You can also use the microphone key on the car’s infotainment screen.

Step 3: Ensure that you hear the beep tone before giving the “Ok Google” voice command. This is when you are using the button on the steering wheel for the voice command setup.

Step 4: Exit from Android Auto and restart if the beep audio isn’t there despite long pressing the key on the steering wheel.

Step 5: Make sure there is least background noise when you are giving the voice command or are setting it up.

Step 6: If this is an aftermarket speaker that you are using then you need to get the microphone checked.

These are some general fixes that could help you with the ongoing issues affecting the voice commands feature on you Android Auto backed car.

Categories
Featured How To TV

Smart TV Storage Crisis? How To Get Additional Storage For Your Smart TV To Install Games, Apps

Key Highlights

  • Smart TVs now come with built-in storage space
  • From 8 GB to 16GB, various storage options available
  • Onboard storage helps with downloading and installing third party apps
  • Freeing up storage is required for downloading new apps

Smart TVs is the modern take on big screen entertainment. Over the years, we have witnessed a rapid evolution in the TV market with the OEMs opting for newer panels and technologies that helps with delivering a home-theater like viewing experience right from the comfort of your homes. We have been sharing various tips and tricks that help you get the best performance out of your smart TV. In one of recent articles, we mentioned the ways with which you can improve the speeds and overall performance of any new-age smart TV.

And since we are speaking of the storage capabilities, we would like to guide you with the methods that will allow you to get additional storage space for on your TV. Why is it required? Well, the extra storage on your smart TV helps with making up space for more apps and games. Also, the less the memory of the smart TV is clogged, the better is its performance with app loading and streaming videos at online platforms. But what are the ways that can help you with getting extra storage for your smart TVs? The steps are listed below, take a look:

Also Read: Smart TV Speeds Getting Slow: Steps To Clear Cache For Lag-Free Usage

Get Additional Space By Removing Unwanted Apps Or Games

Step 1: Power on your smart TV

Step 2: Head to the Home Screen

Step 3: Go to the Settings option (gear icon)

Step 4: Scroll down to the Device option and click on it

Step 5: Select the Apps category

Step 6: Now, tap on the ‘Downloaded’ option. You will see the list of apps that have been downloaded on your smart TV.

Step 7: Tap on the app that you wish to uninstall.

Step 8: Click Uninstall

Step 9: Tap on OK.

After the uninstallation is complete and the app is removed, you will see free up space on your TV.

Also Read: Top 55-Inch Smart TVs For A Thrilling Sports Viewing Experience In 2024: Options Under Rs. 40,000

Get Extra Space On Your Smart TV Using Compatible External USB Drives

Using external hard drives and portable drives, you can add up extra space on your smart TV. You can use these external drives to store various files of different formats specifically multimedia files that can be played using the TV’s media player.

Step 1: Power on your smart TV once again

Step 2: Locate the USB ports on your TV

Step 3: Hook up a USB drive

Step 4: Ensure the drive being connected is formatted to NTFS or FAT formats

Step 5: Once connected, you will be able to transfer or access different media files on your TV

It is worth mentioning that with the external drives, you won’t be able to store the apps or games that have been downloaded using the Play Store. Instead, you only get to store files externally for a later use.

Categories
Featured How To TV

Smart TV Speeds Getting Slow: Steps To Clear Cache For Lag-Free Usage

Key Highlights

  • Downloading third party apps is now an option with TVs
  • Often clogged storage leads to slower speeds
  • Cleaning cache memory helps improving performance

Smart TVs have evolved to be more than just big screens for entertainment. The new-age smart TVs offers endless possibilities with usage. You can now hook advanced gaming consoles, access internet, pair external audio peripherals wirelessly, and more. Internet connectivity along with the availability of built-in storage space now lets users download third party applications as well on smart TVs. You can either directly go ahead with app download on your respective smart TVs using the Play Store or via sideloading method using smartphones.

Most of the modern age smart TVs offer this option to download the companion apps but when the storage gets clogged, you might experience slow speeds with its operations. The same goes for all the older data which isn’t in use, yet takes up space hampering the performance delivery. It’s fairly a simple process to get rid of cache memory when you are using a smartphone. But what can you do when it’s a smart TV? Is there any direct method of clearing any downloaded app’s cache files? Well, you would be relieved to know the steps are easy with TVs too. Take a look below:

For the tech geeks, stay updated with the latest cutting-edge gadgets in the market, exclusive tech updates, gadget reviews, and more right on your phone’s screen. Join Giznext’s WhatsApp channel and receive the industry-first tech updates.

Also Read: Top 55-Inch Smart TVs For A Thrilling Sports Viewing Experience In 2024: Options Under Rs. 40,000

Steps To Clear App Cache Memory In Smart TVs For Improved Speeds

It is worth mentioning that you the steps to clean up cache memory on any smart TV is almost same for all brands. There would be only a few differences with app or icon name depending on the models. The steps we have listed is general and can be followed

Step 1: Power on your smart TV using the TV remote

Step 2: From the home screen, tap on the Settings menu (gear icon)

Step 3: Locate and tap on the Device Preferences tab

Step 4: You will see a bunch of options including ‘apps’ and ‘Storage’

Step 5: Select the one which your TV’s settings menu shows

Step 6: Click on the app or the Internal storage option which will be listed depending on the TV Model. It’s primarily the UI difference.

Step 7: Now, tap on the Clear Cache data option.

Step 8: Tap on OK to clear the cache memory

Once these steps are performed, you will notice the improvements with your smart TV’s performance and overall speeds.

Categories
Featured How To Mobile

iOS 18.1 Beta Brings Call Recording Feature: Here’s How To Use In Your iPhone

Key Highlights

  • iOS 18.1 introduces Call Recording feature
  • A notification alerts all participants
  • Recorded calls are saved in the Notes app

Call Recording is one of the most awaited features for iPhone users. Now when the iOS 18.1 developer beta is here, one can finally give this new feature a try. Here, we are discussing how to install the iOS 18.1 developer beta use the Call Recording feature. Let’s check out.

Also Read | iOS 18 Public Beta: Check Steps To Install On Your iPhone For Early Access

Steps To Install iOS 18.1 Developer Beta

If you want to try the Call Recording feature, you must have installed the iOS 18.1 developer beta on your iPhone. Follow the listed simple steps for the same:

Step 1: To have access on the beta version, you will need a developer account.

Step 2: Then, download the iOS 18.1 beta profile from the Apple Developer website.

Step 3: Now, upload the downloaded profile. For that, go to Settings > General > Profile.

Step 4: After that, navigate to Settings > General > Software Update and download the iOS 18.1 developer beta.

Requirements For Call Recording

Call Recording is an Apple Intelligence feature, which means it requires specific hardware abilities. To get this feature, you need an iPhone 15 Pro or iPhone 15 Pro Max. If you own one of these smartphones and have installed the iOS 18.1 developer beta, you are all set to give Call Recording a try.

How To Use Call Recording On iOS 18.1

Now that you have the necessary hardware and software, let’s dive into how to use the Call Recording feature.

Step 1: Open the Phone app and start making normal calls.

Step 2: When the call is in progress, you will see a record button in the upper left corner of the screen. Click this button to start recording.

Step 3: You will hear the message “This call will be recorded”, informing everyone on the call that the recording is in session.

How To Manage Recorded Calls

Once the call is recorded, it will be saved in the Notes app. Here’s how to access and manage your recorded calls:

Step 1: Open the Notes app and browse to the saved recordings. You can listen directly from the app.

Step 2: The Notes app gives you access to a complete record of the call, which can be useful for keeping detailed records.

Step 3: If you don’t need the full text, you can choose a summary of the call.

Also Read | What’s Coming In iOS 18? Check Out The Top Five Most Anticipated Features

Important Considerations

Since this feature is part of the developer’s beta, there may be bugs and other flaws. It is important to back up your iPhone before installing the iOS 18.1 developer beta to avoid any data loss. Despite the potential issues, Call Recording promises to be a valuable addition to iOS. This will allow users to record important calls and review them quickly.

For the tech geeks, stay updated with the latest cutting-edge gadgets in the market, exclusive tech updates, gadget reviews, and more right on your phone’s screen. Join Giznext’s WhatsApp channel and receive the industry-first tech updates.

Categories
Featured How To mobile

OnePlus Free Screen Replacement Program India: Eligible Models, How To Get?

Key Highlights

  • OnePlus free screen replacement offer announced
  • Will address repeated issues with AMOLED displays of specific models
  • Eligible models include OnePlus 8 and OnePlus 9 series

OnePlus has come up with a new program in India which will surely be a big respite for the users that have been struggling with the frequent screen issues. For the unaware, multiple OnePlus smartphone users are experiencing a green line issue hampering the visual experience which is now being addressed officially. The latest initiative from OnePlus will bring a permanent solution for the ongoing display issues with certain models. The brand has come up with a free screen replacement program as a part of the fix. Here is the list of eligible devices for the OnePlus free screen replacement program:

For the tech geeks, stay updated with the latest cutting-edge gadgets in the market, exclusive tech updates, gadget reviews, and more right on your phone’s screen. Join Giznext’s WhatsApp channel and receive the industry-first tech updates.

Also Read: Tech Guide: How To Connect Any OnePlus Smartphone With Apple MacBook

OnePlus Free Screen Replacement For Green Screen Issue: Eligible Devices

OnePlus Free Screen Replacement program has been announced for the OnePlus 8 series which comprises the OnePlus 8T and the OnePlus 8 Pro models along with the OnePlus 9 series which includes the OnePlus 9 and the OnePlus 9R. Only these models have been made eligible for the free screen replacement program.

Also Read: CMF By Nothing Phone 1 Review: A Budget-Friendly Smartphone That Stands Out

Who All Can Avail The Offer? How To Get Free Screen Replacement?

As mentioned above, only the OnePlus 8 and OnePlus 9 series users who have been frequently dealing with the green line display issue with their units can avail the free screen replacement offer. Also, OnePlus has specified that no other damaged screen or out of warranty and externally repaired units will get the benefit of the free screen replacement.

It is being reported that OnePlus has developed a new and improved screen technology in partnership with its suppliers specifically for the old models that have been taken off the shelves. The new panel developed by OnePlus is said to have better protection from various natural elements including moisture for longevity of the panels.

As for the steps to avail the offer, take a look below:

Step 1: Unlock your OnePlus smartphones

Step 2: Go to the Settings menu

Step 3: Enter the Red Cable Club section

Step 4: If you are eligible for the offer, you will be able to see the free screen replacement offer

Categories
Apps Featured How To

Starting Up New Venture: How To Add Your Business On Google Maps For Better Customer Reach

Key Highlights

  • Listing a business on Google Maps is now an option
  • One can create a Business profile for the same
  • Helps gain customers

Google Maps is more than a simple navigation tool helping users to reach from point A to point B. Over the years, Google has made Maps super advanced by adding up a host of smart features ranging from speedometer to toll calculator and what not. Searching for emergency services to finding near by such as medical, fuel, hotels, etc., have also been made available to the masses.

But what makes Maps a standout navigational app in the market is the option to list businesses. A feature that is useful for the new business owners who wish to reach a larger audience base. Google helps with brand awareness by allowing general users yo list their businesses on the Maps. If you are also trying to look for methods to get your new shop or business to be visible on Maps, here are the steps that you need to follow:

For the tech geeks, stay updated with the latest cutting-edge gadgets in the market, exclusive tech updates, gadget reviews, and more right on your phone’s screen. Join Giznext’s WhatsApp channel and receive the industry-first tech updates.

Also Read: Google Maps Speed Limit, Speedometer Feature Rolling Out For iPhone, CarPlay: How To Use?

Step 1: Create Your New Business Profile On Google

To lost your business on Google Maps, you would need to first create a Business profile on Google. You’ll need to provide some basic details such as location of the business, type, etc.

  • Open any web browser and visit this link
  • Create your business profile
  • Follow the on-screen steps for profile creation
  • Enter location, category, website, phone number, and opening hours details of your business
  • Claim the business profile’s URL or the short name. These will show up on Google Maps in the search,

Step 2: Get Your Business Profile Verified On Google

This is an important step which will make Google aware that you are the owner of the business that’s getting listed.

  • You can request for the business postcard which will be sent along with a 5-digit verification code.
  • This same code you need to enter on your Google Business Profile using website or the mobile app
  • Verification via phone or email is also an option

Step 3: Business Profile Optimization

  • Enter all the details required for your Business profile
  • Complete profiles helps with better audience reach
  • Make sure you add your business short name that you have claimed
  • Also, include the URL
  • Clear cover photos for the business profile helps too
Categories
Featured Gaming How To

Paris Olympics 2024: Dates, Venues, And How To Watch Live

Key Highlights

  • India’s events start on July 25, and the opening ceremony is on July 26
  • The Olympics run until August 11, across 33 venues in France
  • Watch on Sports 18 and Viacom 18, or stream free on JioCinema

The excitement for the Paris Olympics 2024 is building up as the games officially kick off on Friday, July 26. However, India’s journey in the Olympics will start a day earlier with the archery ranking rounds on July 25. This year, the Paris Olympics will host over 10,000 athletes from 200 National Olympic Committees, with more than 590 sportspersons from the USA among them. They will compete in 329 medal events across 32 sports.

Also Read | Your Guide To Free YouTube Movies: How To Watch On Mobile And PC

Opening Ceremony Details

A four-mile floating procession will mark the grand inauguration celebration, which is expected to be a major event on the Seine River. 160 boats carrying athletes will be navigating through Paris as the Eiffel Tower is lit up to add to the opulence. At Trocadero, where the parade ends, an amazing Olympic journey will officially begin.

India’s Schedule At The Olympics

The women’s archery ranking round will begin India’s Olympic participation on Thursday, July 25, at 1 pm. The tone for the games will then be set on July 26 at the opening ceremony. The Indian men’s hockey team will play their first pool game against New Zealand on Saturday, July 27. Other sports, including badminton, boxing, shooting, and table tennis, will also begin on this day.

How To Watch The Paris Olympics 2024

If you’re eager to catch all the action live, you have several options:

  • TV Broadcast: The Paris Olympics 2024 will be telecast on Sports 18 and the Viacom 18 network, ensuring widespread coverage across India.
  • Live Streaming: For those who prefer streaming, the JioCinema app will provide live coverage of all the events for free. This is a great option for viewers who want to watch the games on the go or from the comfort of their homes.

Also Read | Discovery Plus: How To Watch On Television, Plans, And More

Venues And Dates

There will be 33 locations for the Olympics in Paris, France, and other French regions. The games are scheduled to run through August 11, 2024.

For the tech geeks, stay updated with the latest cutting-edge gadgets in the market, exclusive tech updates, gadget reviews, and more right on your phone’s screen. Join Giznext’s WhatsApp channel and receive the industry-first tech updates.

Categories
Featured How To Telecom

How To Port Your Mobile Number To BSNL: Here’s A Step-by-Step Guide

Key Highlights

  • Airtel, Vodafone Idea, and Jio have increased rates
  • BSNL has kept its prices unchanged
  • Follow our guide for a smooth transition to BSNL

Due to recent tariff increases by for-profit telecom firms like Airtel, Vodafone Idea, and Jio, many customers are thinking about switching to BSNL, which has maintained its rates. If you’re searching for better service or pricing, switching to BSNL can really transform your life. Regardless of whether you’re switching from Jio, Airtel or Vodafone Idea, the process will go smoothly with our detailed instructions. Let’s check it out.

Also Read | Here’s How To Block BSNL SIM? See All Steps Here

How To Port Your Current SIM To BSNL

Step 1: Getting a Unique Porting Code (UPC) is the first step in porting your Jio, Airtel, or Vodafone Idea number to BSNL. To start the porting process, write an SMS by typing PORT (your 10-digit mobile number) and send it to 1900 in order to receive your UPC. For example, you would send PORT 9876543210 to 1900 if your number is 9876543210.

Step 2: Once you receive your UPC, keep in mind that it is typically valid for 15 days in most regions. However, in Jammu & Kashmir, Assam, and the North East licensed areas, the UPC is valid for 30 days. It’s critical that the porting procedure be finished during this validity window. The exact validity period will also be mentioned in the message you receive along with your UPC.

Step 3: With your UPC in hand, visit the nearest BSNL store or an authorized retailer. You will need to bring your UPC, a passport-sized photograph, and a valid ID proof (such as an Aadhaar card, voter ID, or passport). At the store, you will fill out a Customer Application Form (CAF) and pay a nominal porting fee.

Step 4: Submit the required documents along with the filled CAF to the BSNL representative. After verifying your documents, they will provide you with a new BSNL SIM card. Make sure to keep this SIM card safe until the porting process is complete.

Step 5: Both your current operator and BSNL will handle your porting request; this could take many days. During this period, you will receive an SMS from BSNL with the date and time when your number will be ported. On the specified date, your current SIM will stop working, indicating that the porting process is complete.

Step 6: At the specified time mentioned in the SMS, replace your SIM with the new BSNL SIM card. Your BSNL SIM should start working immediately. If you encounter any issues during this process, you can contact BSNL customer care at 1800-180-1503 (from any operator) or 1503 (from BSNL) for assistance.

Also Read | How To Stop/ Deactivate Airtel, Vodafone, BSNL, JIO SIM Flash Messages On Android, iOS?

Conclusion

By following these steps, you can easily switch your Jio number to BSNL and continue enjoying uninterrupted mobile services without worrying about tariff hikes. The process is simple and designed to be as convenient as possible for users.

For the tech geeks, stay updated with the latest cutting-edge gadgets in the market, exclusive tech updates, gadget reviews, and more right on your phone’s screen. Join Giznext’s WhatsApp channel and receive the industry-first tech updates.

Categories
Accessories Featured How To

Hearing Loud Noise Or No Audio While Calling On OnePlus Buds? How To Fix?

Key Highlights

  • OnePlus Buds TWS earbuds offer premium audio under budget
  • Loud noise issue often reported during calling
  • Is general issue that can be fixed manually

OnePlus at its Summer Event 2024 held this week unveiled its new-generation Nord TWS earbuds. The brand has gradually been building up its expertise with wireless audio accessories specifically in the TWS category. OnePlus Buds is well known for its rich audio profile in addition to the premium aesthetics. All ofthe OnePlus earbuds available in the market today offer advanced features and allows calling on-the-go. You can expect a clear calling experience using the OnePlus TWS earbuds be it from the high-end Buds series or the pocket-friendly Nord series. But have you ever experienced loud or screeching noise while making or answering any call? If yes, then you aren’t alone. This is addition to no audio are the general audio issues with the OnePlus earbuds reported frequently by the users. We have brought you the trouble shooting steps with which you can easily resolve loud noise during an audio call taken on OnePlus TWS earbuds.

For the tech geeks, stay updated with the latest cutting-edge gadgets in the market, exclusive tech updates, gadget reviews, and more right on your phone’s screen. Join Giznext’s WhatsApp channel and receive the industry-first tech updates.

Also Read: Instagram Rolls Out 20-Track Reels: Here’s How To Use It Like A Pro

OnePlus TWS Earbuds Loud Noise Issue: What Are The Causes?

The most common issue when you listen to loud noises while answering or making any call using OnePlus TWS earbuds is the exposure to noisy environment. Also, in some cases general issues and bugs also can lead to the faulty performance of the buds. But the fix is quite simple if it’s not any major hardware damage.

Also Read: WhatsApp Rolls Out ‘Favorites’ Filter: What It Is And How To Use

Steps To Fix Loud Noise Error With OnePlus Earbuds During Calls

Step 1: Disconnect the ongoing call and re-connect. Often network issues lead to noises during calling.

Step 2: Ensure mobile network have a good strength while calling

Step 3: Visit a quieter corner to check if the earbuds are still producing screeching loud noise. If there isn’t any disturbances then, the environment is the temporary issue and not the earbuds.

Step 4: Pair your OnePlus earbuds with another smartphone and check if the issue persists. If not, then the TWS earbuds are working fine and its the smartphone that you need check.

Step 5: Try resetting the earbuds if the call quality doesn’t improve.

Step 6: If in case resetting also doesn’t resolve the issue, you might have to pay a visit to the nearby service center.

Categories
Apps Featured How To

Instagram Rolls Out 20-Track Reels: Here’s How To Use It Like A Pro

Key Highlights

  • Instagram now lets you add up to 20 music tracks to a single Reel
  • Align audio with text, stickers, and clips to the Reel
  • Update your app to create and edit your Reel with multiple tracks

Instagram users in India have a new way to enhance their creativity with the introduction of the Multi Audio Tracks on Reels feature. This update allows users to add up to 20 music tracks to a single Reel. The announcement was made via an Instagram post, stating, “Starting today, you can add up to 20 tracks to a single reel and visually align audio with elements like text, stickers, and clips while you’re editing in the app.”

Also Read | The Insta-Famous Five: Check Top Five Most-Followed Instagram Accounts

The new feature not only enables the addition of multiple audio tracks but also allows users to align these tracks with visual elements like text, stickers, and clips. This alignment ensures that the audio and visuals are perfectly synchronized. According to Instagram’s Head, Adam Mosseri, this feature is designed to provide more creative freedom for users.

Focus On Short-Form Videos

Instagram’s shift towards enhancing short-form video content has been evident. Mosseri has previously stated that long-form videos are less compatible with Instagram’s core mission of connecting people with friends. Short-form videos, such as Reels, facilitate more interaction and content sharing among users. By focusing on short-form content, Instagram aims to strengthen its community by encouraging more engagement.

Steps To Add Multiple Audio Tracks To Your Reel

To make the most of this new feature, follow these simple steps:

Step 1: Ensure your Instagram app is updated to the latest version on your Android smartphone or iPhone.

Step 2: Launch the app on your smartphone.

Step 3: Tap the Plus icon at the bottom of the screen, then select the Reels option.

Step 4: Capture the video content you wish to share.

Step 5: Swipe up to enter the editing mode.

Step 6: Tap the ‘Tap to add Audio’ option.

Step 7: Select the first track you want to add and adjust its length.

Step 8: Repeat the process to add up to 20 tracks, adjusting the length of each as needed.

Step 9: Add stickers, text, and other elements to your Reel.

Step 10: Once satisfied with your edits, tap the Share button to post your Reel on Instagram.

Also Read | How To Remove A Single Image From Instagram Carousel

Conclusion

With the ability to add up to 20 audio tracks to a single Reel, Instagram users in India now have more tools at their disposal to create engaging and dynamic content. This feature, combined with the platform’s focus on short-form videos, aims to foster greater creativity and interaction among users.

For the tech geeks, stay updated with the latest cutting-edge gadgets in the market, exclusive tech updates, gadget reviews, and more right on your phone’s screen. Join Giznext’s WhatsApp channel and receive the industry-first tech updates.