In order to help its customers to unsubscribe from its services, Amazon Prime is expected to come up with new measures that will allow users to do it with two clicks. The OTT platform will enable users to delete or unsubscribe from the platform easily. Notably, this development comes after a few customers have filed a complaint about confusing choices and complicated navigation menus.
According to the Reuters report, OTT platform users are allowed to cancel subscriptions from the applications for almost all products in the European Union.
“Opting for an online subscription can be very handy for consumers as it is often a very straightforward process, but the reverse action of unsubscribing should be just as easy. Consumers must be able to exercise their rights without any pressure from platforms. One thing is clear: Manipulative designs or ‘dark patterns’ must be banned. I welcome Amazon’s commitment to simplify their practices to allow consumers to unsubscribe freely and easily,” said justice commissioner, Didier Reynders.
Amazon Statement On Cancel Subscription
Meanwhile, the OTT platform issued a statement and said that the process is very simple for both to sign in and cancel the access. “By design, we make it clear and simple for customers to both sign up for or cancel their Prime membership. We continually listen to feedback and look for ways to improve the customer experience, as we are doing here following constructive dialogue with the European Commission,” an Amazon spokesperson said.
It is worth noting that currently, this facility is only available in the European Union. But, the company allows you to unsubscribe from the services via a few steps.
Reliance Jio launched Jio Phone Next 4G at its 44th Reliance Jio AGM conference at Rs. 6,499.
Now, the Jio Phone Next is priced at Rs. 4,324 on the e-commerce website Amazon.
The JioPhone Next comes with the company’s in-house apps like JioSaavn, MyJio, JioTV, JioCinema, and more.
Reliance Jio launched the JioPhone Next year in India. The smartphone was launched at the 44th Reliance Jio AGM conference for Rs. 6,499 along with some offers or easy monthly installment options. Now, new offers have been introduced on its first 4G smartphone.
It is worth noting that the smartphone is listed on Amazon for Rs. 4,324. In addition, the buyers will get a Citibank card offer, which again its prices down. So, let’s take a look at the details of the Reliance Jio Next details, specifications, and more.
Reliance Jio Phone Next Smartphone: Price Cut Details On Amazon
The first 4G smartphone by Reliance Jio comes at a discounted price on the e-commerce website Amazon. It is worth noting that the JioPhone 4G is available for Rs. 4,324 on Amazon. In addition, Citibank credit card users will get a 10 percent discount on the same smartphone.
For the unaware, the JioPhone Next is originally priced at Rs. 6,499 in the country. However, the customers have to pay Rs. 1,999 upfront and have to pay the balance amount via EMI plans.
Jio Phone Next Smartphone: Specifications And Features
The Jio Phone Next 4G runs Android 11 out of the box and has custom-developed PragatiOS that was developed in partnership with Google. Besides, the device comes with local languages that increase the overall user experience.
Additionally, the smartphone comes with pre-installed applications like JioSaavn, MyJio, JioTV, JioCinema, and more. In addition, you will find that the device has a 5.45-inch HD+ display, 2GB of RAM, and 32GB of storage.
Moreover, you will find an expandable memory option through a microSD card up to 512GB. On the imaging front, the device supports a 13MP camera on the back and an 8MP camera on the front. It also has Snapdragon 215 SoC under the hood.
Although texting might provide quick gratification, there are occasions when it makes more sense to wait until an appropriate time to send a message. It can be helpful to plan out your text messages in advance.
Despite the fact that Apple didn’t directly build this functionality into its Messages app, the iPhone can send scheduled text messages. New possibilities open up with the option to schedule the time and date for a message to be sent. For instance, it is possible to schedule reminders to friends and family in advance, and ideas that might pop up in the middle of the night can be sent during working hours.
How To Schedule Text Messages On iPhone?
If you have the latest iPhone model with iOS 13 or a newer operating system, you have the option to schedule the message in advance. However, you should be aware that iMessage does not give you the option to schedule messages directly.
The Apple app itself offers a solution, though. The app is called Shortcuts and it is accessible on your iPhone. Download it from the App Store if you haven’t already. Here is the step-by-step guide to scheduling a text message on your iPhone.
Step 1: Open the Shortcuts app on your iPhone.
Step 2: Now click on the Automation option available at the bottom of the screen.
Step 3: Tap ‘Create Personal Automations’ if this is your first time doing this. Otherwise, simply select ‘Create Personal Automations’ by clicking the + sign in the top right corner of the screen.
Step 4: Here, click on the ‘Time of Day’ and make the necessary adjustments. Then, decide how frequently you want it to repeat. Keep in mind that this creates an automatic message shortcut on a frequent basis.
Step 5: Once you set the time, tap Next and select Add Action.
Step 6: Select the contact and tap Next.
Step 7: Now, click on Message and then continue after typing your message.
Step 8: Check your automation and deselect the Ask before running option. Then, tap Done.
However, you can simply delete the automation once the message is sent if you want to keep the message scheduled for a single time. You will need to swipe the name of the action to the left and tap Delete and you are all done.
One handy smartphone feature that practically all of us use when we want to share something with someone or simply preserve it for ourselves is the ability to capture screenshots. Sometimes, you might want to take a screenshot of a conversation or other content that doesn’t fit on one screen. For such occasions, you can take full-page screenshots to take longer screenshots.
Apple allows iPhone users to capture the entire pages as PDFs. The snapshot can be taken from a web page, a document, or even a lengthy email thread that spans more than the phone’s display. This is one of the best iPhone hacks that eliminates the necessity to take numerous screenshots to save the data. This is an in-built feature in iPhone and you do not have to install any apps.
How To Take Full Page Screenshots On Your iPhone
If you are trying to find a way to capture full page screenshot on your iPhone or iPad, here are the steps you should follow:
Step 1: Go to the website or chats you wish to capture on your iPhone or iPad.
Step 2: You can take a screenshot by pressing and holding both the side button and volume up buttons. You need to press the home button and the power button together on an iPhone 8 or earlier in order to snap a screenshot.
Step 3: Now, tap the image preview at the bottom left corner of your device.
Step 4: Now, at the top right corner, tap on ‘Full Page’.
Step 5: Now you can select the content you want to capture by tapping the crop button in the top menu.
Step 6: You now have the option to directly share the screenshot with others or save it as a PDF.
Step 7: Tap the share button in the upper right corner and choose the contact to send the screenshot to.
Step 8: If you wish to save the screenshot, click ‘Save PDF to files’ after selecting ‘Done’ in the top left corner.
Step 9: After that, choose the location to save the file to and tap on ‘Save’.
Isn’t it frustrating when you have to answer phone calls while eating, or driving, or when the phone is far away from your reach? Don’t worry, you can answer or decline your incoming calls from far away with this simple trick. Apple iPhones come with some in-built features that let users accept or decline their calls from a distance.
You can use your voice through Voice Control or Siri or even depend on your AirPods to do so. One can also set calls to be automatically answered by making a few changes in their iPhone’s settings. However, in this article, we will help you know how you can answer your phone calls by making use of the ‘Call Audio Routing’ option. Let’s check it out:
How To Answer Calls On iPhone Without Touching?
There are many ways to answer or decline your incoming calls without touching the screen of your phone. One such feature is the ‘Call Audio Routing’. For this, you need an iPhone that is compatible with an operating system iOS 13 or higher. Here’s a step-by-step guide on how you can accept or decline a call even from a distance:
Steps To Receive A Call Without Touching The Screen
Step 1: Open your iPhone and go to the ‘Settings’ app.
Step 2: Then, head to the Accessibility tab.
Step 3: Scroll downwards and find the ‘Physical and Motor’ section.
Step 4: Now, click on the ‘Touch’ option and then tap ‘Call Audio Routing’.
Step 5: Turn on the ‘Auto Answer Calls’ toggle and you are all done.
Users can enable this feature as many times as they need. They can even select how many seconds the phone call should be answered after ringing.
Once the set-up is done, you can pick up or decline any phone call without even touching the screen of your iPhone. Not only phone calls but this function also works with FaceTime and WhatsApp calls too.
Apart from Call Audio Routing, you can use Siri to answer phone calls. Just ask Siri to take the call when your phone rings and you are all set.
Google has the largest ecosystem of different services and tools that helps the masses with an easy lifestyle. Maps are one of the brand’s most useful tools that are helping commuters with navigation. Reaching an unknown destination is now hassle-free with the availability of maps on both smartphones and laptops/ PCs. And not just for Android users, the Google Maps is also available for iOS users.
If you are an Apple iPhone or an iPad user, you can download and install the Google Maps application from the App Store. You will get access to all the features that are available for Android users. Downloading an offline route is one such feature that Apple iPhone and iPad users can access on their devices.
For the unaware, Google Maps had introduced the offline feature that lets users download a route so that they can travel even without the internet. This also is suitable for users traveling to remote locations with low internet coverage in the area.
Downloading a destination’s route offline on Google Maps is quite a simple task. Most Android users might be aware of it. But, if you are trying to download Maps offline on iPhone you will have to follow the same procedure as on the Android devices. We have listed down the steps to download and use offline Maps on Apple iPhones and iPads. Below are the steps:
How To Download And Use Maps Offline On Apple iPhones and iPads?
Step 1: Unlock your iPhone or iPad and open the app store.
Step 2: Download and install Google Maps. Launch the app if you already have this app installed.
Step 3: You would now need to search for the destination that you want to download offline.
Step 4: Scroll down to the bottom and tap on the name or address of the place where exactly you are traveling.
Step 5: You will see the More option (three horizontal dots). Tap on it.
Step 6: Select the Download. The Maps destination will be downloaded for offline use later.
What All Features You Can Access In Offline Maps On Apple iPhones And iPads?
Once you have downloaded the Maps offline on your respective Android and iOS devices, you’ll be able to use different features. With the offline Maps, you can get directions and use the standard navigation features as well. You will also be able to search for different locations in that area with the offline Maps.
Poco has recently launched the F4 smartphone in the mid-range segment and now it is up for sale for the first time. However, as the launch offer, buyers will get an instant discount of Rs. 3,000 with SBI credit card, debit card, and EMI transactions.
Besides, the company offers additional discounts up to Rs. 1,000 with debit and credit cards. So, let’s take a look at all offers and specifications on the Poco F4.
Here’s How To Get Rs. 4,000 With HDFC Bank On Poco F4
“Quite a few of you have reached out to me and the brand claiming you don’t have access to an SBI card and facing issues in transactions, basis on your feedback we have good news for you. We’re now also partnering with HDFC Bank,” Himanshu Tandon, the new India Head of POCO said in a Tweet.
See All Offers On the Poco F4 5G
Notably, the Poco F4 5G is available on Flipkart for Rs. 3,000 discount with HDFC debit, credit card, and EMI transactions. Secondly, the company is providing Rs. 3,000 instant discount with SBI credit, debit, and EMI transactions. In addition, the company is providing Rs. 1,000 discount to debit and credit card holders. Rs. 3,000 on extra exchange offer on other phones. Besides, the buyers will get Disney+ Hotstar mobile membership for free. Additionally, buyers will get a YouTube premium membership for free and a five percent cashback on Flipkart Axis Bank Card.
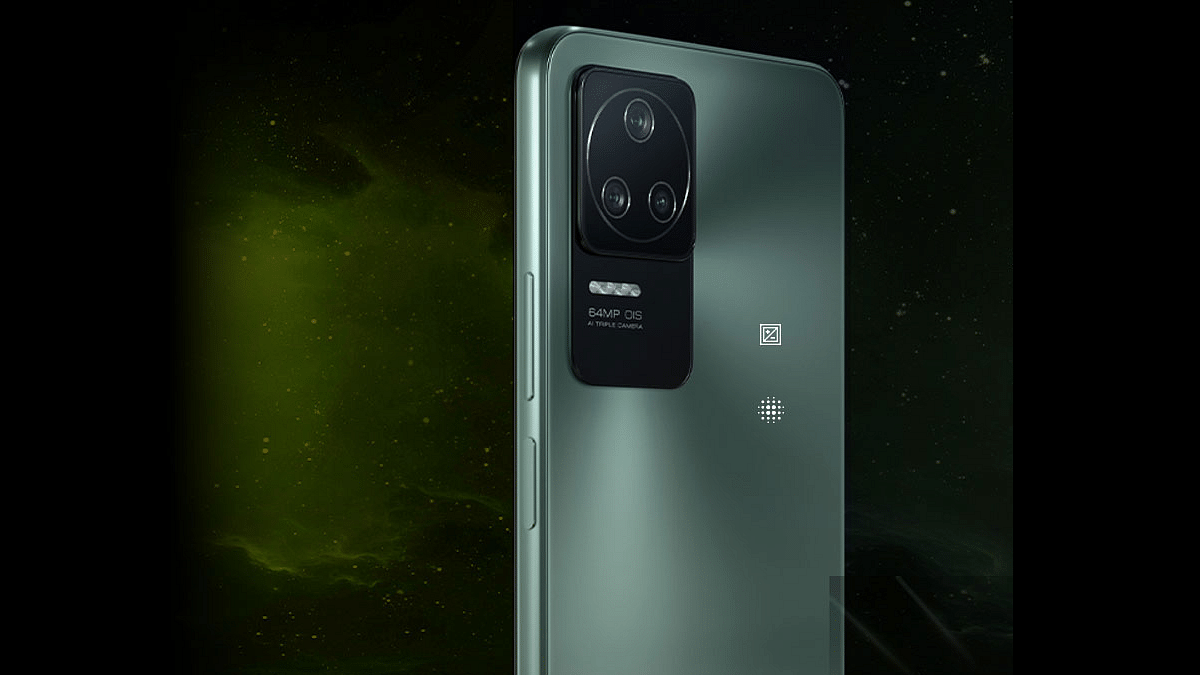
POCO F4 5G Smartphone: Specifications And Features
The Poco F4 5G comes with a 6.67-inch E4 AMOLED panel along with a 120Hz screen refresh rate, support for Dolby Vision, and 1300nits brightness. The device is powered by an octa-core Snapdragon 870 processor. It is paired with 12GB of RAM and 256GBof storage as well.
On the optics front, the device comes with a triple camera at the back, including a 64MP primary sensor along with OIS and EIS support. Besides, the Poco F4 5G has 8MP ultra-wide-angle lens and a 2MP(f/2.4) macro snapper. On the front, the device has a 20MP camera.
Moreover, the 6GB of RAM and 128GB of storage of the Poco F4 5G price starts from Rs. 29,999 and 12GB+256GB variant will cost you Rs. 33,999.
WhatsApp is one of the most secure platforms for personal and professional conversations that you can download on Android, iOS smartphones, and also on laptops/ PCs. It is the end-to-end encryption model that makes WhatsApp the preferred mobile application for private chats. The company has been making improvements to the privacy aspects of its platform and has released several updates to enhance all the security aspects.
Off late, WhatsApp has started imposing bans on users and accounts that came under the radar for sharing objectionable posts and content. The company has been taking account of all the suspicious activities carried out by any profile and banning them based on the complaints and reports. What exactly can get your account banned on WhatsApp and what should you do to avoid it? Also, if in case your account has already been blocked or banned accidentally by WhatsApp, what can be done in such a scenario? This article will help you with all the details. Take a look:
When Is An Account Banned On WhatsApp?
WhatsApp generally bans an account on its platform for violating its Terms of Services. There are several scenarios wherein WhatsApp can take the extreme measure of banning any account on its platform. The primary ones remain spamming or scamming other users. Also, if any user reports the objectionable content shared from your account, you will be notified of the account ban.
Even if any account or user is trying to compromise other’s security, WhatsApp might impose a ban on the account. There are instances where accidental red flags on an account lead to an account ban on WhatsApp. That’s when you can need to follow the steps mentioned below to revoke the ban on your accounts.
How To Know If Your WhatsApp Account Is Banned?
If in case WhatsApp has already imposed a ban on your account, you will not be able to access the application and use its services for messaging. In such scenarios, a message stating “This account is not allowed to use WhatsApp.” will show up as soon as you launch the application. You will see the option to request a review in such scenarios for the ban to get lifted from your WhatsApp account. Below are the steps for the same:
Step 1: As soon as you launch the app, you’ll see the “Support” option. This will be right below the info message stating your account has been banned. Click on it.
Step 2: A “Contact Support page” will open up wherein you will be able to type in the message request to unblock your account. You will also get the option to add relevant screenshots that will help revoke the ban on your account.
Step 3: Click on Next.
Step 4: A new email page will open up from where you can send the request to remove the ban from your WhatsApp account.
Step 5: Once you have raised the request successfully, WhatsApp will look through the case and will revoke the ban if it is accidental.
It is worth mentioning that WhatsApp will not remove the ban from your account if you have indeed violated the Terms of services on the application. So, it is always advised to follow all the protocols on WhatsApp and not share any objectionable content to other users.
WhatsApp introduces period tracker chatbot with Sirona
Tracks menstrual and ovulation cycles easily
Enhances women’s health awareness
These days, WhatsApp is becoming more than just a messaging app. It continues to roll out new updates almost every alternate day. This time, the Meta-owned platform has focused on women by introducing a period tracker chatbot through which women can track their ovulation cycle, menstrual cycle or periods, and more.
In collaboration with Sirona Hygiene Pvt. Ltd., WhatsApp has unveiled a new period-tracking chatbot. Sirona is an Indian company that manufactures feminine hygiene items. This new feature will help women to track their cycles.
How To Use ‘Period-Tracking’ Feature On WhatsApp?
The Period tracker can be used to track three goals, i.e., track periods, conceive, and avoid pregnancy. The chatbot will keep a record of the user’s period information and specifics of their most recent period after which it will give reminders and upcoming cycle dates in accordance with the user’s objectives.
Women will benefit from the period-tracking chatbot’s ability to follow their ovulation cycle. This will aid them in pregnancy. In order to get full benefits from WhatsApp’s period-tracking feature, females can follow the mentioned steps to use the feature:
Steps To Track Your Periods On WhatsApp
Step 1: Save the contact of Sirona (9718866644) on your mobile phone.
Step 2: Find the contact in WhatsApp and send ‘Hi’.
Step 3: Now, Sirona will provide you with a list of options.
Step 4: To track your periods, you have to write ‘period tracker’ in the chat box.
Step 5: Then, you will be asked to enter your menstrual/period details.
Step 6: Sirona will then provide you details like your ovulation details, next period, fertile window, last period, and your cycle length.
All this information depends on the accuracy of the users’ shared information. Any change or shift in your menstruation cycle could result in the wrong prediction from a chatbot. In addition to this, users can view their three menstrual cycles using the chatbot as well. Also, it will let users view their three menstruation cycles.
According to Sirona, the chatbot was created using the WhatsApp Business Platform. The company also has a separate app dedicated to a complete ecosystem surrounding menstruation health and hygiene.
For the tech geeks, stay updated with the latest cutting-edge gadgets in the market, exclusive tech updates, gadget reviews, and more right on your phone’s screen. Join Giznext’s WhatsApp channel and receive the industry-first tech updates.
Google has established itself beyond just being a massive search engine. The California-based tech giant has a plethora of services to offer to the general as well as professional users globally. Be it entertainment, navigation, or digital wallets, Google has marked its presence in almost every segment. Most Google services require an active internet connection to function properly. However, the company has been improvising with the advancements in the tech field and adding options to use its different apps and tools without an internet connection.
Google has made it possible for users to access Maps and YouTube features offline. Now, Google’s dedicated email service, i.e., Gmail has also joined the list of services and apps that you’ll be able to use without any active internet connection or in areas with low internet connectivity. If you are one of those users who rely on Gmail for personal and professional emails, you should read this article to know all the steps:
Gmail Now Available Offline: Is It For All Users?
Google has officially announced Gmail’s offline availability for the users going forward. The search giant has confirmed that Gmail users will now have the ability to read as well reply to emails even if there is no active internet connection. All the Gmail users will be able to access this offline email feature on the Gmail desktop version.
This offline email option on Gmail would come in handy for the users traveling to remote destinations or for the masses living in areas with low internet speeds. To use the Gmail offline feature, you would first need to activate this option and also bookmark the dedicated link for easy access in the later stages.
How Can You Bookmark Gmail Offline?
Google itself is recommending all users to bookmark the Gmail offline link for easy usage.
Step 1: Download and install the Google Chrome web browser on your respective laptop/ PCs or smartphones to bookmark the Gmail offline link.
Step 2: In the address bar, type in mail.google.com and hit enter.
How To Toggle On Gmail Offline Feature
Step 1: Open Gmail offline settings on the Chrome browser.
Step 2: Select the “Enable offline mail” option.
Step 3: You will now need to select the number of days till when you wish your messages to syn.
Step 4: Confirm and save the changes.
Now that you have made desired changes to activate the Gmail offline settings, you will now need to bookmark this page.
Step 1: Open Google Chrome once again and go to the Gmail inbox.
Step 2: On the right of the address bar, you’ll see the “Star” option. Select it.
That’s it, you have successfully bookmarked Gmail offline for easy access in later stages. It is worth adding that when you’ll be sending mails in the offline settings, the messages will be shown in the “Outbox” folder. As soon as you get connected to the internet, the email will show in the sent messages folder.
If for some reason, you wish to turn off the Gmail offline feature and also remove the synced offline data, you can follow the steps mentioned below:
Steps To Turn Off Gmail Offline
Step 1: Open Gmail offline settings.
Step 2: Now, untick the “Enable offline mail” check box.
Process To Unistall Gmail Offline
Step 1: Open Google Chrome web browser.
Step 2: Click on the three dots option and select “Settings”.
Step 3: Scroll down to the bottom and select “Advanced”.
Step 4: Click on “Privacy and security”.
Step 5: Tap on “Content Settings”.
Step 6: Select Cookies > See all cookies and site data> Remove all.
The last step will clear all the saved offline synced data in Gmail.