Allows seamless money transfers and enhances financial security
Nominee can be added online via EPFO platform
Any family member can be added as a nominee in EPFO
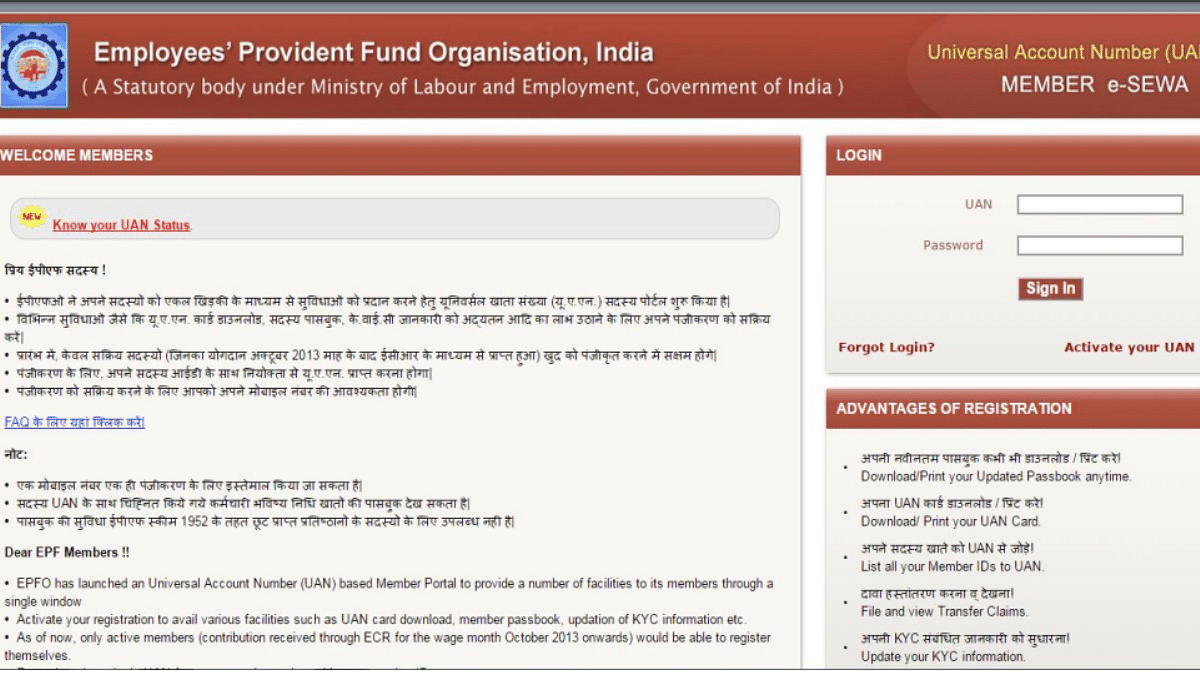
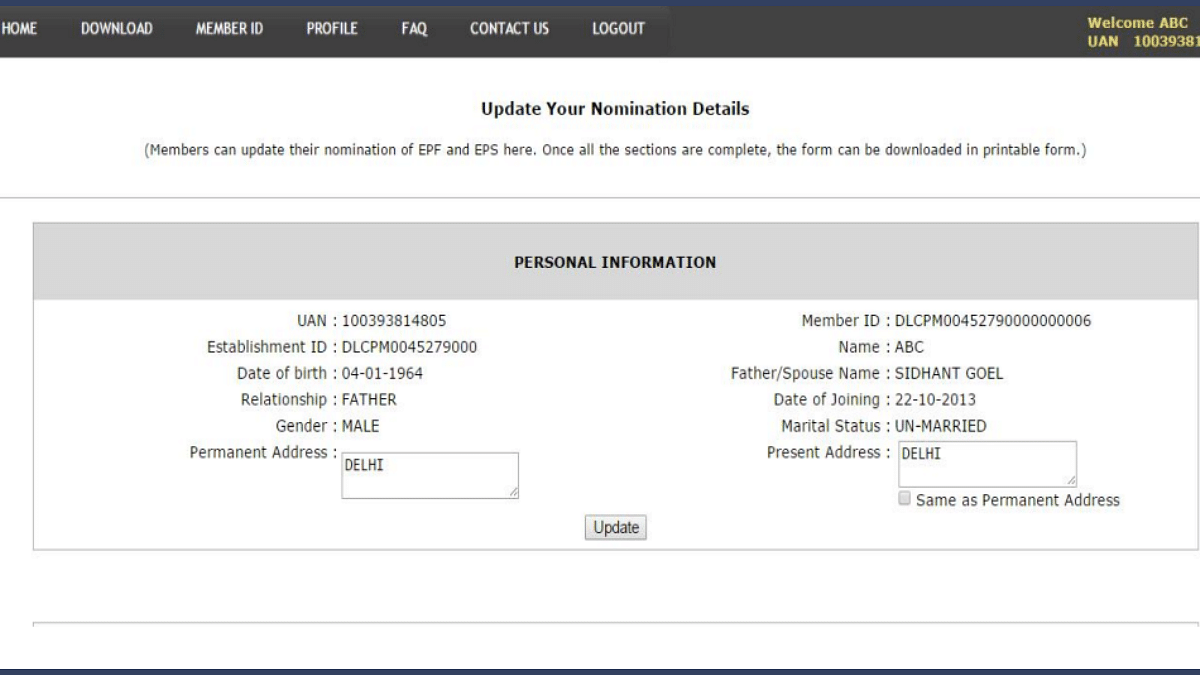
EPF (Employee Provident Fund) is one of the most beneficial services available for the taxpayers in India. Managing and accessing all EPF services is now easier with the official website. Updating profile, linking aadhaar, and much more can be done via EPFO website. Adding nominee is one of such crucial procedure that you should complete if haven’t already. You can add a family member as a nominee to receive funds and more. In this guide, we are sharing the steps to add a family member or your spouse as a nominee to your EPF account.
For the tech geeks, stay updated with the latest cutting-edge gadgets in the market, exclusive tech updates, gadget reviews, and more right on your phone’s screen. Join Giznext’s WhatsApp channel and receive the industry-first tech updates.
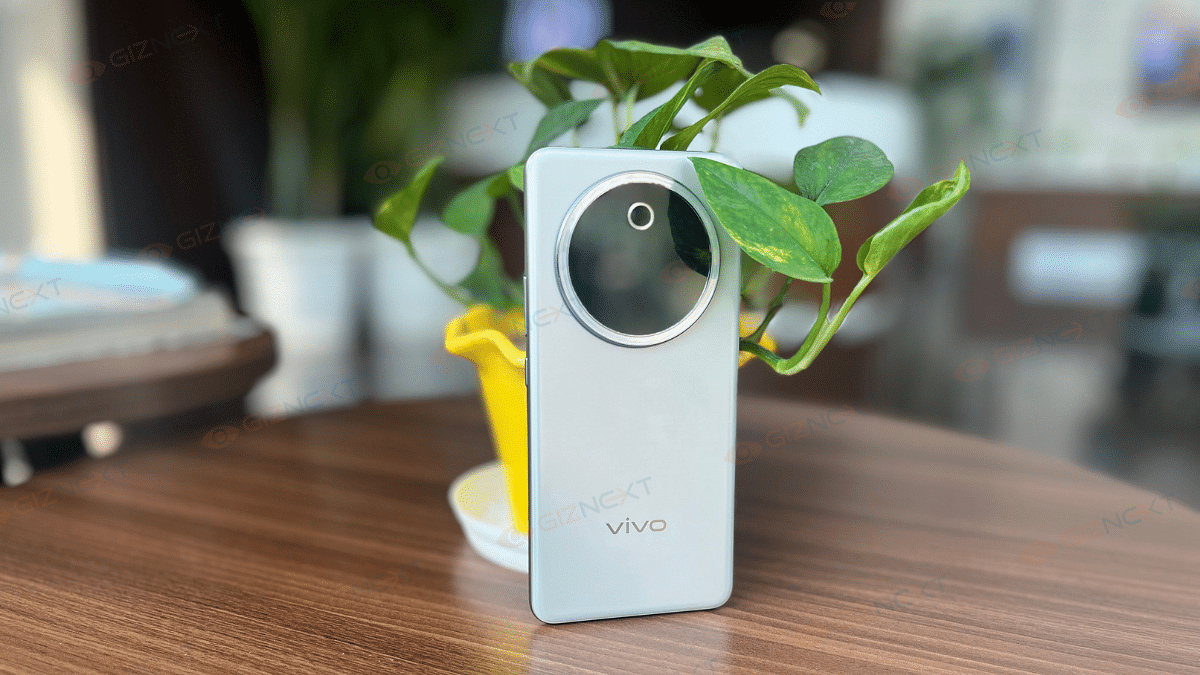
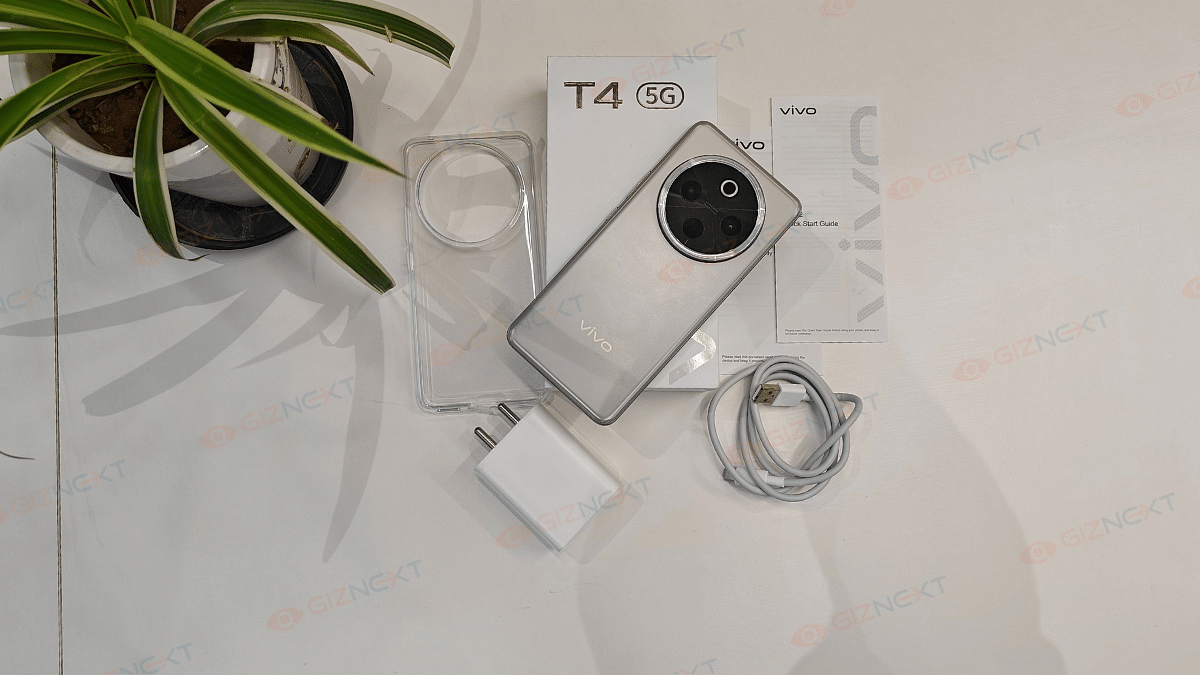
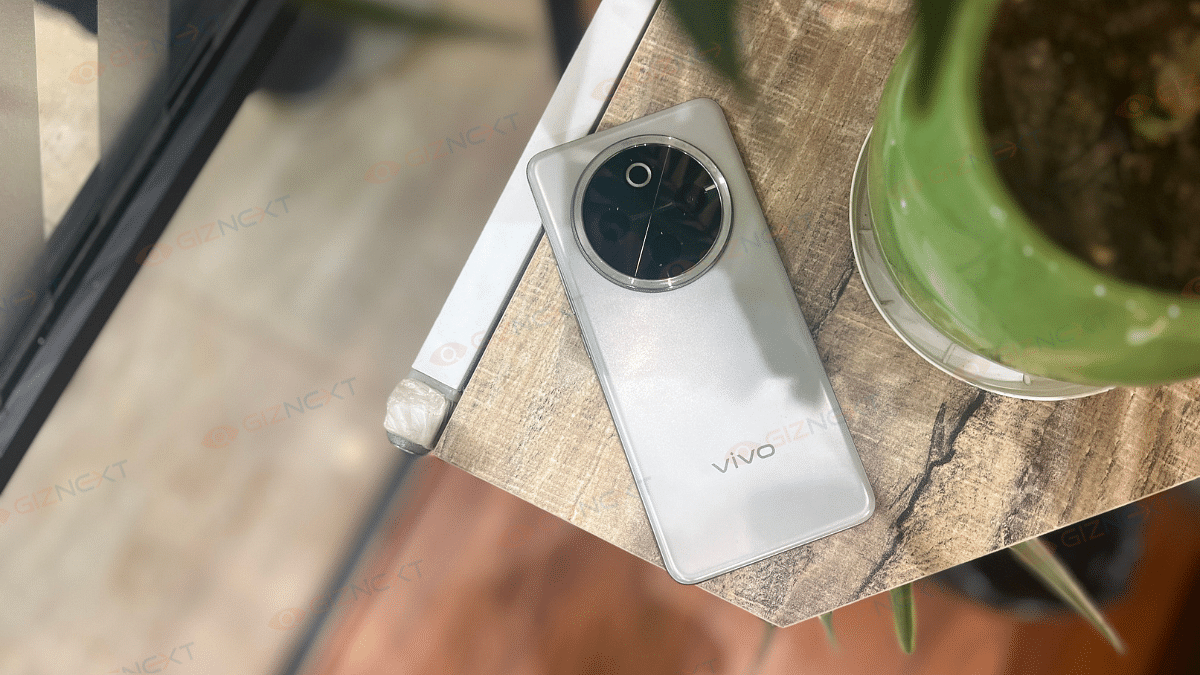
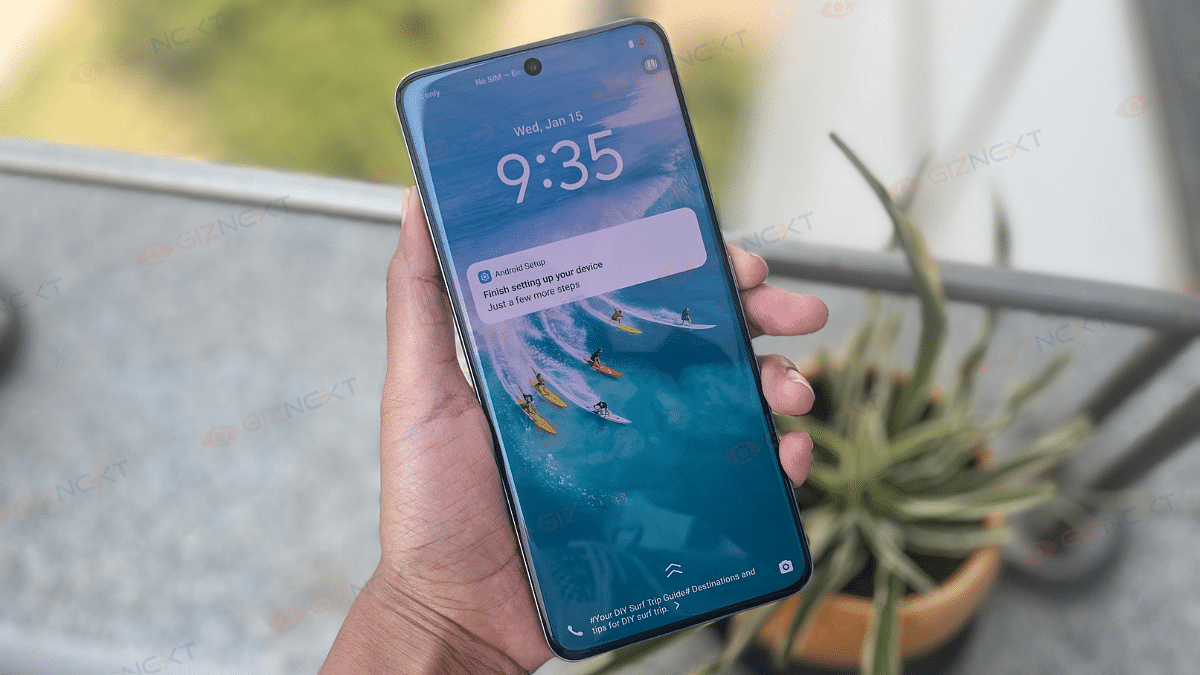
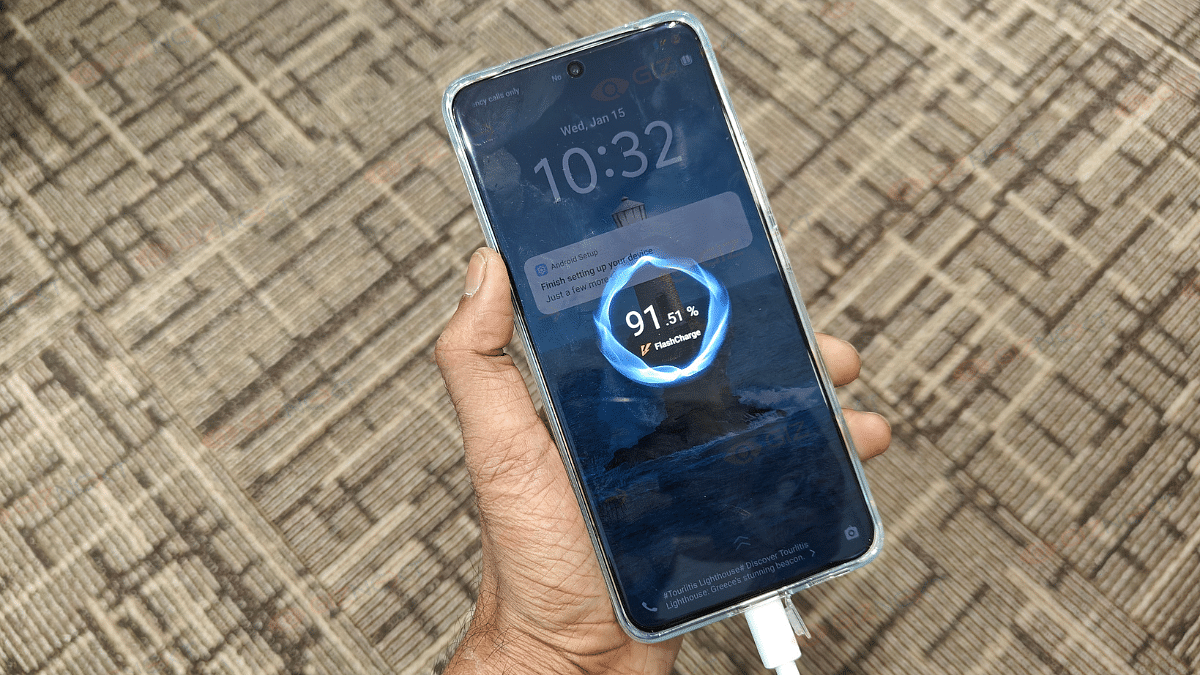
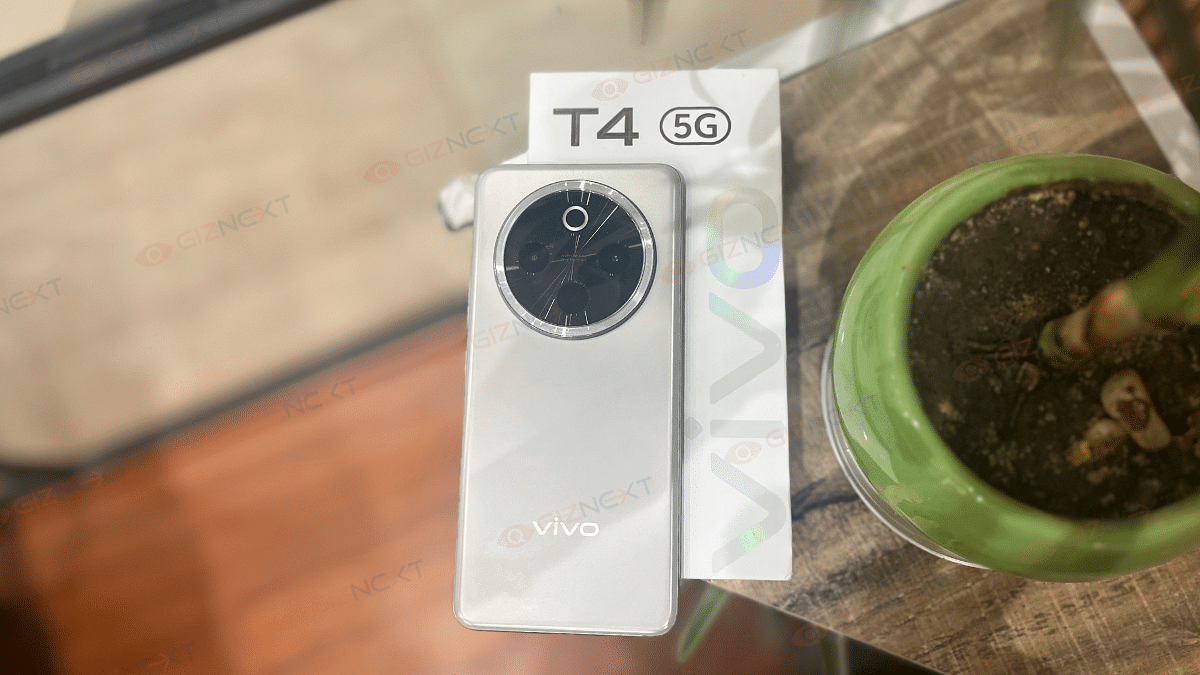
If you think big batteries mean bulky phones, the Vivo T4 5G is here to prove you wrong. Yes, I’ve got my hands on it to tell you how. With a massive 7,300mAh battery packed inside a surprisingly slim and stylish body, this phone instantly caught my attention. I’ve been testing it out, scrolling endlessly, binging shows, and clipping photos to see if it really lives up to the hype. Is the Vivo T4 5G just another mid-range phone with flashy specs, or does it actually deliver where it counts? Stick around because this one might just surprise you.
When I first held the Vivo T4 5G, I was surprised. The phone feels quite light and thin for a device with a massive 7,300mAh battery. It doesn’t feel heavy in the hand at all, even if you use it for long hours. The phone has smooth curved edges on the front and back which makes it easy to hold and gives it a nice, premium feel.
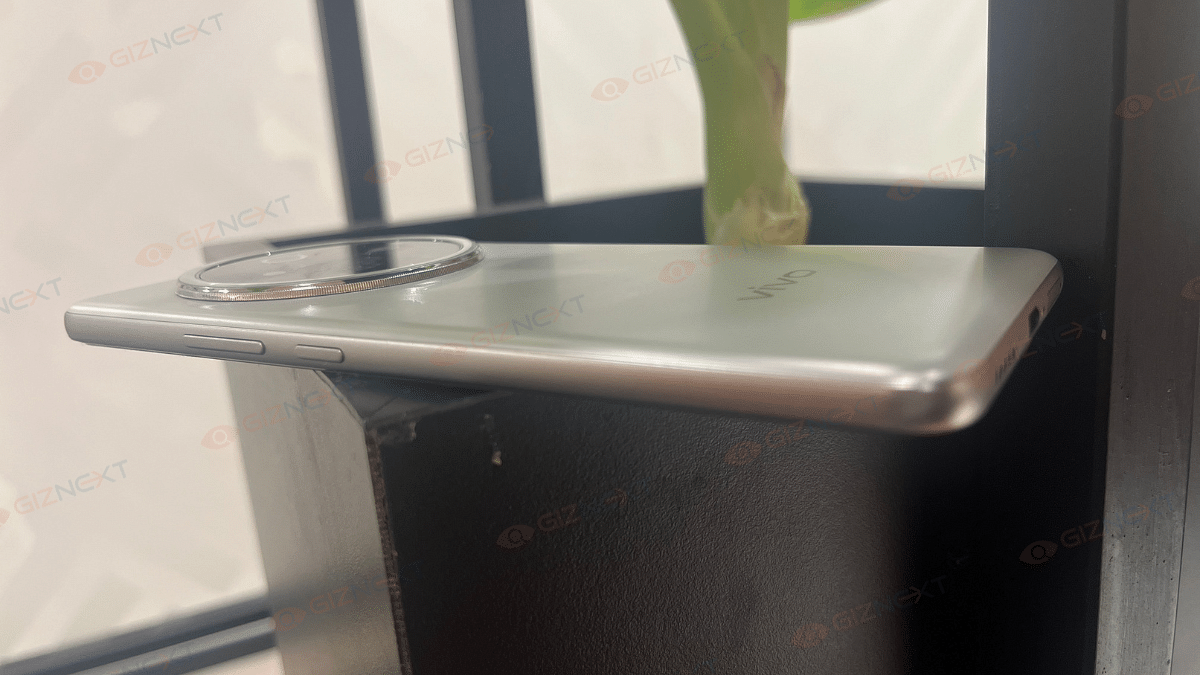
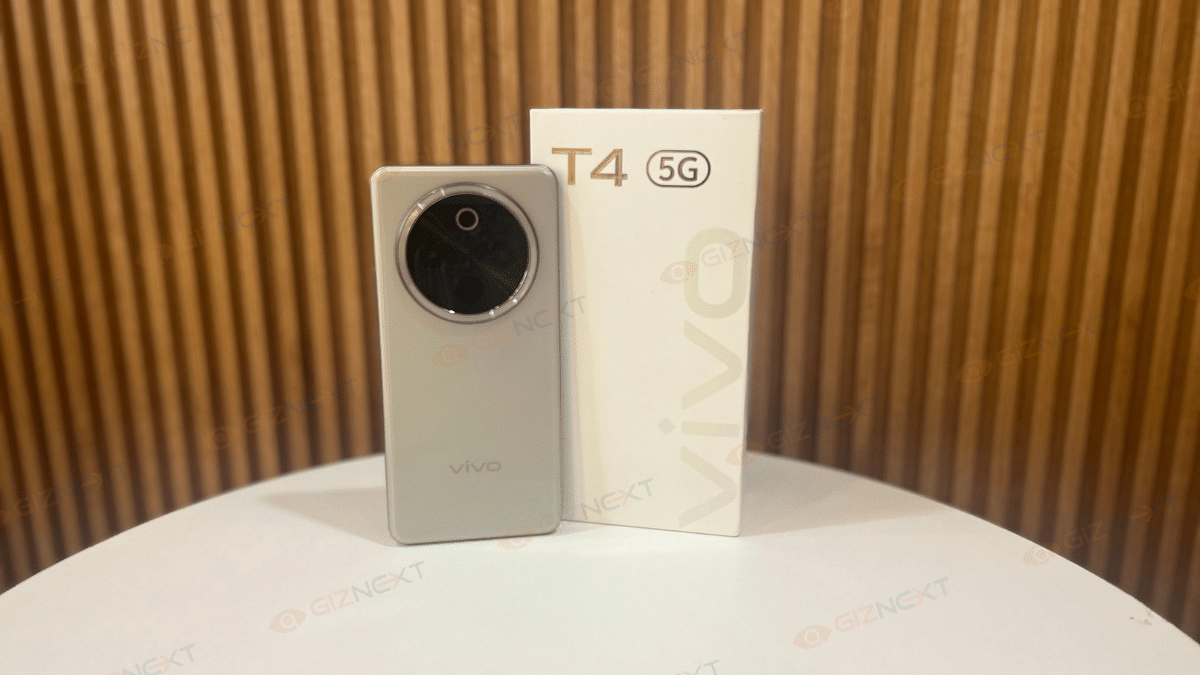
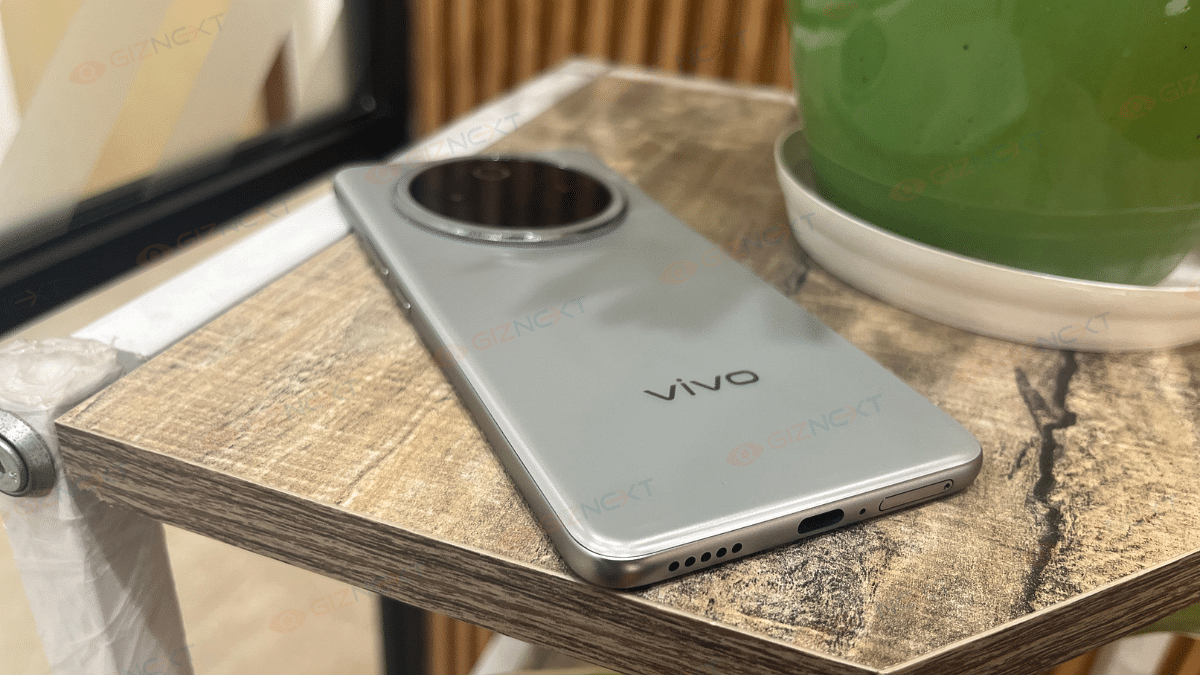
I’m using the Phantom Grey variant, and it looks classy. It has a soft metallic shine, not too bright, but stylish. The back is made of plastic, but it doesn’t get smudgy with fingerprints, which is great. The camera ring at the back adds a nice touch, though it sticks out just a little which is again great.
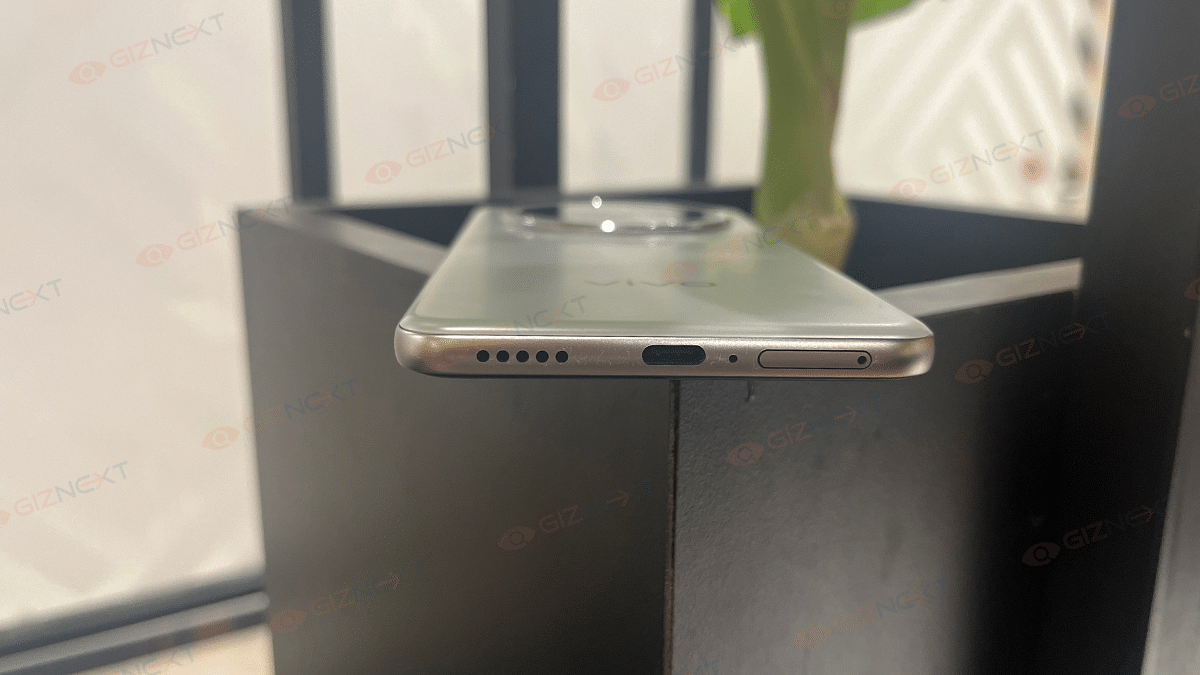
The buttons are placed well, easy to reach, and it even has an IR blaster in the camera area, which is useful for controlling your TV or AC. At the bottom, you get the SIM tray, speaker, and charging port. The left side is clean.
Furthermore, the smartphone comes with an IP65 rating, so it can easily handle dust and small water splashes, perfect for everyday use. On top of that, Vivo has tested it with military-level checks for drops and heat, which makes it build quality tougher.
Overall, the Vivo T4 5G looks nice, feels good in the hand, and is built to last. For a mid-range phone, Vivo has done a great job with the design.
Display
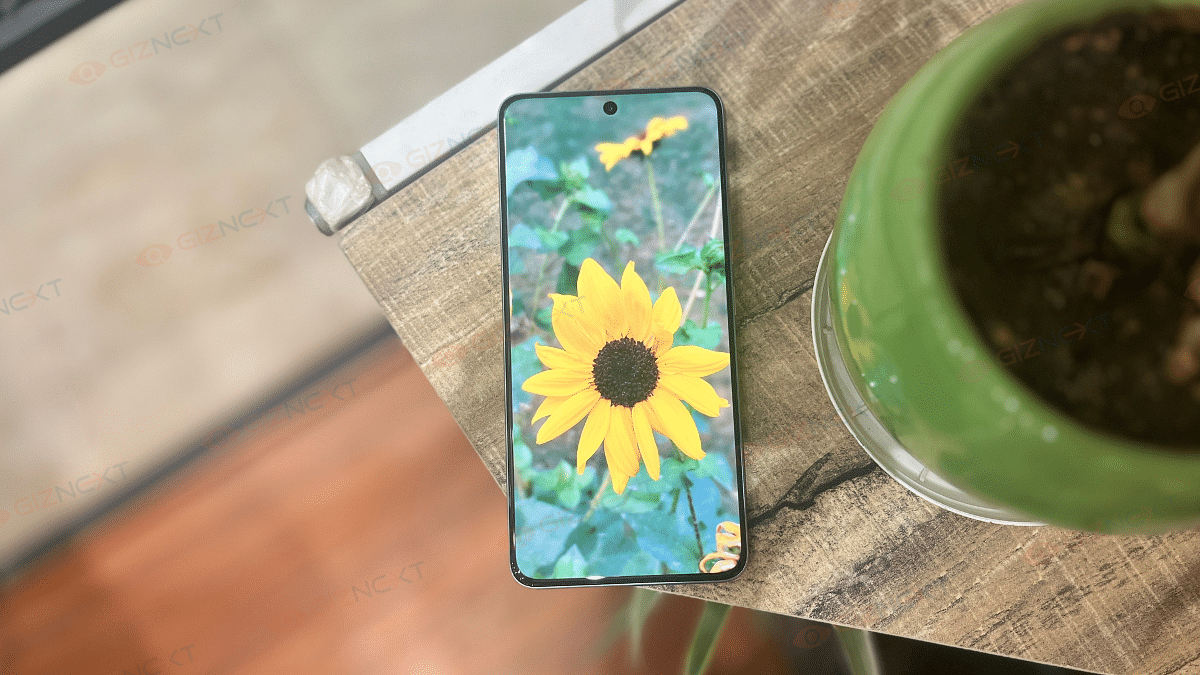
The Vivo T4 5G has a big 6.77-inch AMOLED screen with curved edges that looks and feels premium. It offers rich colors and smooth visuals, thanks to its 120Hz refresh rate. I watched YouTube and even IPL matches on it and the colors were bright, clear, and sharp. With a peak brightness of 5000 nits, it’s one of the brightest displays you’ll find in this price range.
Even outdoors under Delhi’s harsh summer sun, I had no trouble seeing the screen clearly. Vivo claims it can reach up to 5000 nits brightness, and honestly, outdoor visibility was excellent. Touch response was smooth too, and the in-display fingerprint sensor worked fine most of the time.
Though, streaming is limited to Full HD for now, but the display quality overall is top-notch for its price.
Performance
Under the hood, the Vivo T4 5G runs on the Snapdragon 7s Gen 3 processor. This is something we have already seen in many phones around this price. In daily use, it works really well. I had no issues switching between apps, scrolling through social media, or multitasking. The phone also comes with up to 12GB RAM and 512GB storage, which is great.
However, if you are into gaming, this phone might not be the best pick. I played BGMI on Smooth + Extreme settings, and while it ran okay, it was limited to 60FPS. There were noticeable frame drops during longer gaming sessions, which made the experience a bit frustrating. So, if you are a serious gamer, this might be a letdown.
Coming to the sound quality, it is just average. The Vivo T4 only has a single speaker at the bottom, no stereo setup like the previous Vivo T3. It’s loud enough for casual use, but don’t expect deep or rich sound.
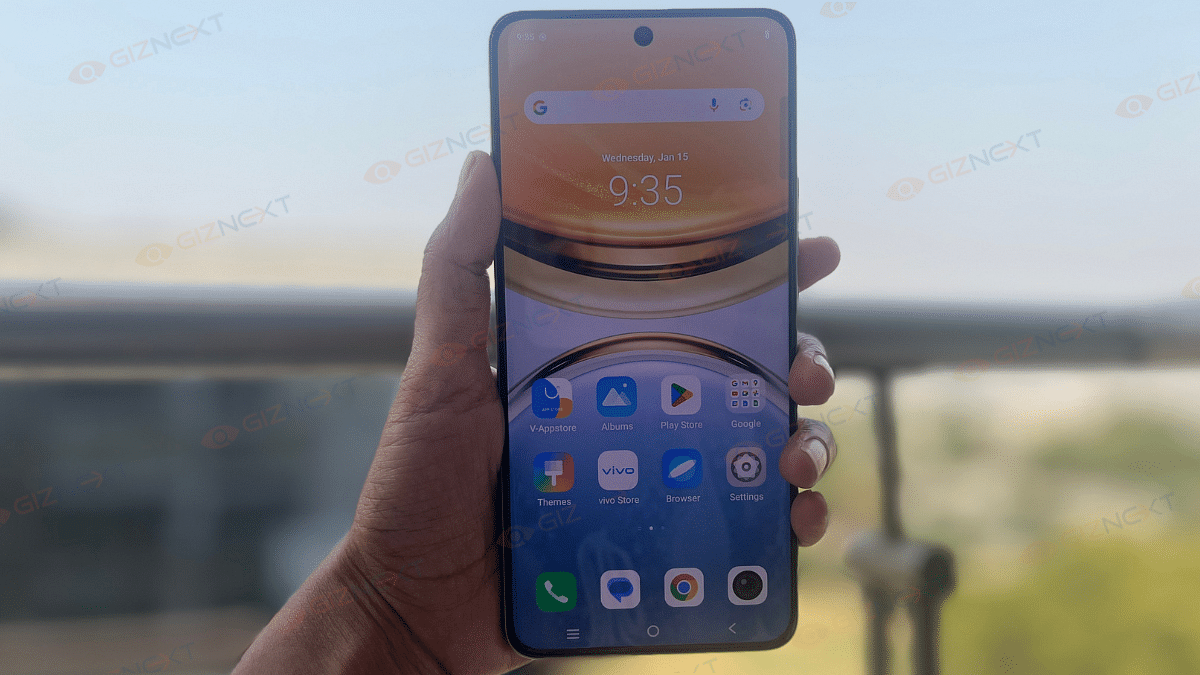
On the software side, it runs on FunTouch OS 15 based on Android 15. It feels smoother than before, and Vivo has added some useful features like AI Erase and Note Assist. You will still find a few pre-installed apps, though. Vivo promises two years of major updates and three years of security updates.
Camera
The camera setup of the Vivo T4 5G is good. A 50MP Sony IMX882 main camera with OIS is included. It captures decent shots in daylight with good details and a fairly wide dynamic range. However, the colors can be a bit off at times with skin tones sometimes looking unnaturally saturated. The portrait shots are better, thanks to good edge detection and a nice blur effect in the background.
Low-light performance, though, isn’t as strong. Without Night Mode, the images turn out soft and lack detail, especially when zoomed in. The noise reduction sometimes goes overboard, making the photos look washed out. Unfortunately, there’s no ultrawide lens, which is something many phones in this price range offer.
The Vivo T4’s 32MP selfie camera is a significant improvement over the T3’s 16MP model. The result? Great selfies! While the preview may not always show accurate colors, the final photos are clear, sharp, and definitely one of the best in this segment.
For those who want extra detail, the 50MP high-resolution mode is there, though it takes a bit longer to process. The Supermoon mode lets you zoom up to 20X, though I found anything beyond 10X to be too soft.
In short, the Vivo T4 5G’s camera does a good job for casual photography and selfies. But it could use some improvements, especially for low-light shots and color accuracy. If you’re not expecting top-tier camera performance, it’s still a solid choice.
Battery
If there’s one thing that makes the Vivo T4 5G stand out, it’s the massive 7,300mAh battery. This is the biggest you’ll find in any phone in this price range right now. I’ve been using it for a while, and honestly, the battery life is incredible.
With regular use like calling, browsing, social media, and a bit of video watching, the phone easily lasted me two full days. If you are someone who uses the phone lightly, you can even stretch it to three days without needing to charge.
Charging is also fast, thanks to 90W FlashCharge support. It takes a little over an hour to fully charge, which is great considering how big the battery is. If long battery life is a top priority for you, the Vivo T4 5G won’t disappoint.
The Vivo T4 5G is a solid mid-range phone. It offers an impressive 7,300mAh battery, sleek design, and decent camera performance for Rs. 21,999. Its large battery life, good display, and fast charging are standout features. However, gaming performance could be better, and the camera struggles in low-light conditions. Overall, it’s a good purchase for everyday users but not ideal for gamers or camera enthusiasts.
For the tech geeks, stay updated with the latest cutting-edge gadgets in the market, exclusive tech updates, gadget reviews, and more right on your phone’s screen. Join Giznext’s WhatsApp channel and receive the industry-first tech updates.
Lenovo Tab K11 flaunts premium dual-tone metallic body
Landscape front camera positioning makes it convenient for video calls
Wi-Fi+ cellular 5G network option
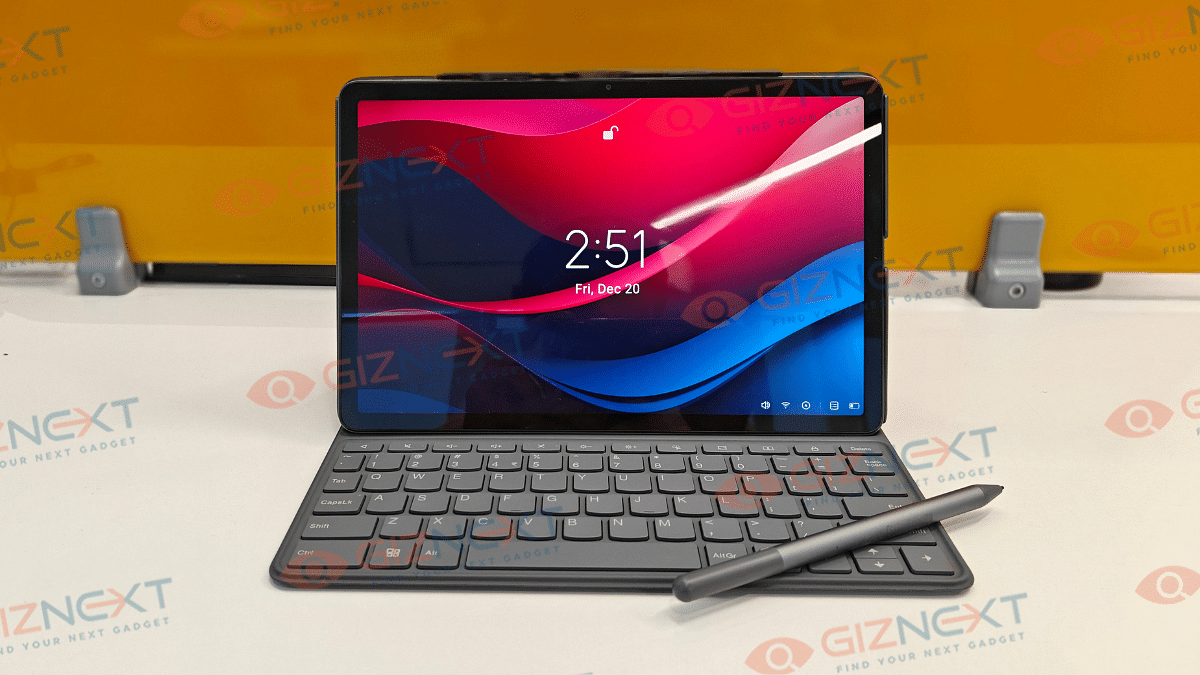
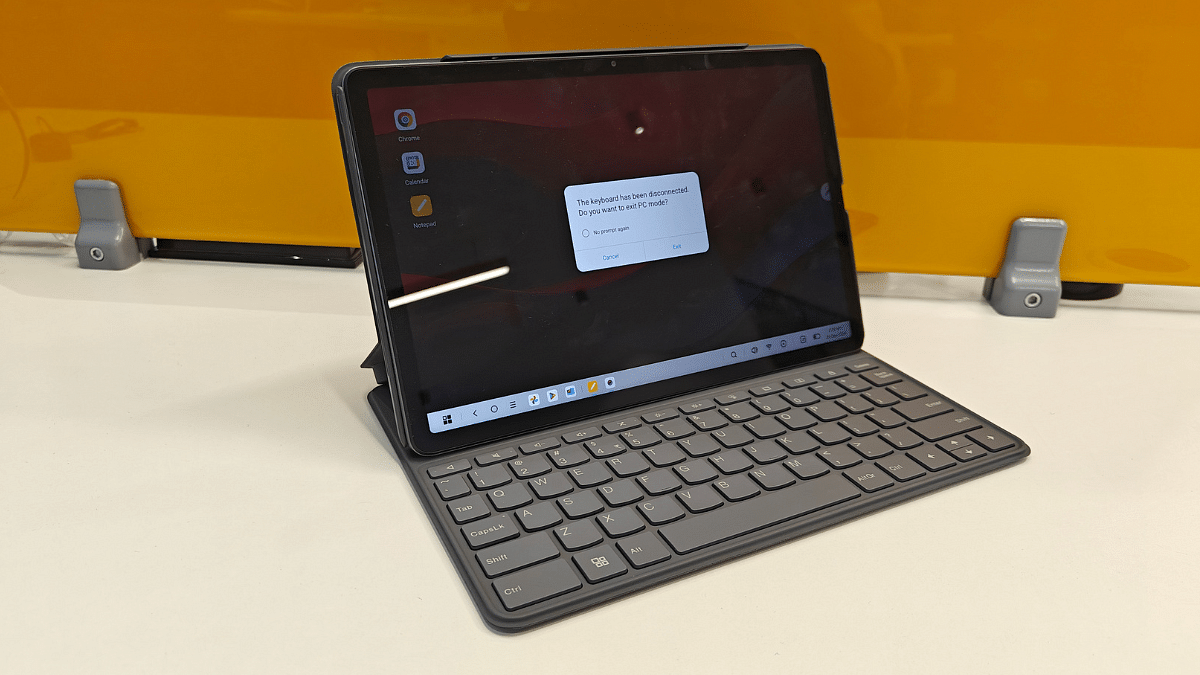
Comes with stylus pen and folio keyboard
Cons
Slow 10W charging speeds
Display comes void of HDR compatibility
Average low-light photography with primary camera
Dated Android 13 OS pre-installed
Lenovo has been at the forefront of PC and laptop industry and the brand has established itself as a strong player in the tablet market too. And its a wide audience segment Lenovo is catering to with its tablets range. Specifically, with the budget segment, Lenovo has been showing off its expertise and is frequently updating the catalogue as well. The Tab K11 Enhanced Edition is one of the newest members in the Tab K series that focuses on productivity and creativity aspects. At Rs. 26,999, the Tab K11 Enhanced Edition seems to be a well-rounded package specifically with the added folio keyboard and the stylus pen. But does it really justify its price tag? Its time to find out:
For the tech geeks, stay updated with the latest cutting-edge gadgets in the market, exclusive tech updates, gadget reviews, and more right on your phone’s screen. Join Giznext’s WhatsApp channel and receive the industry-first tech updates.
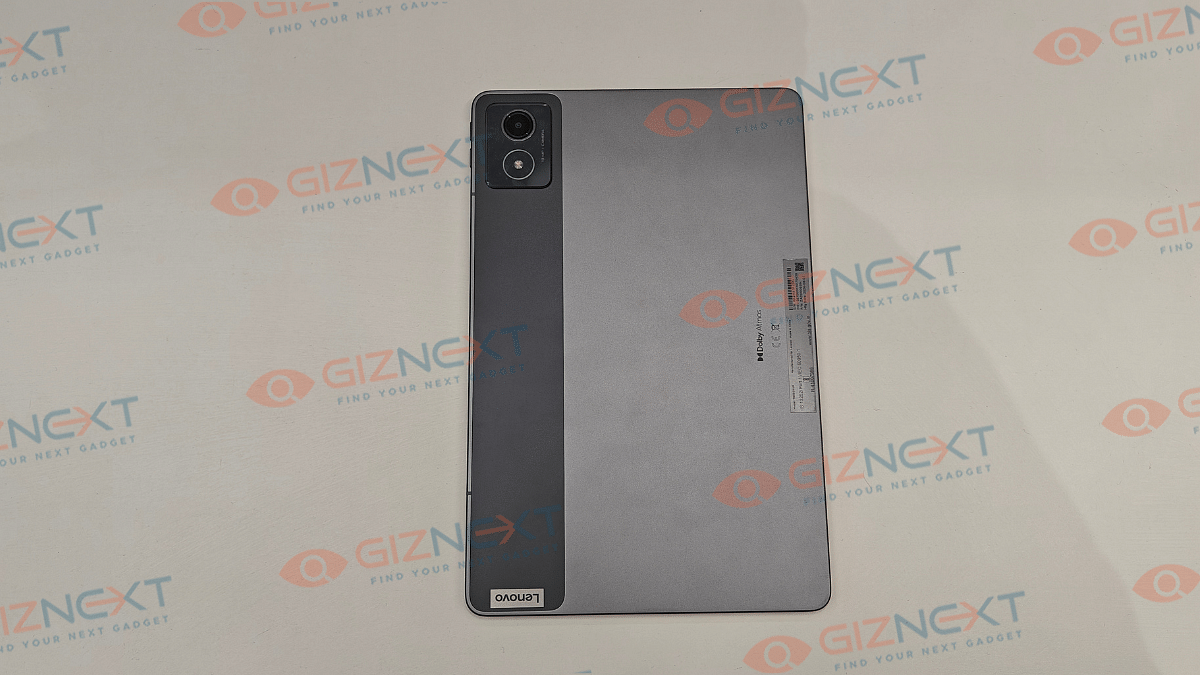
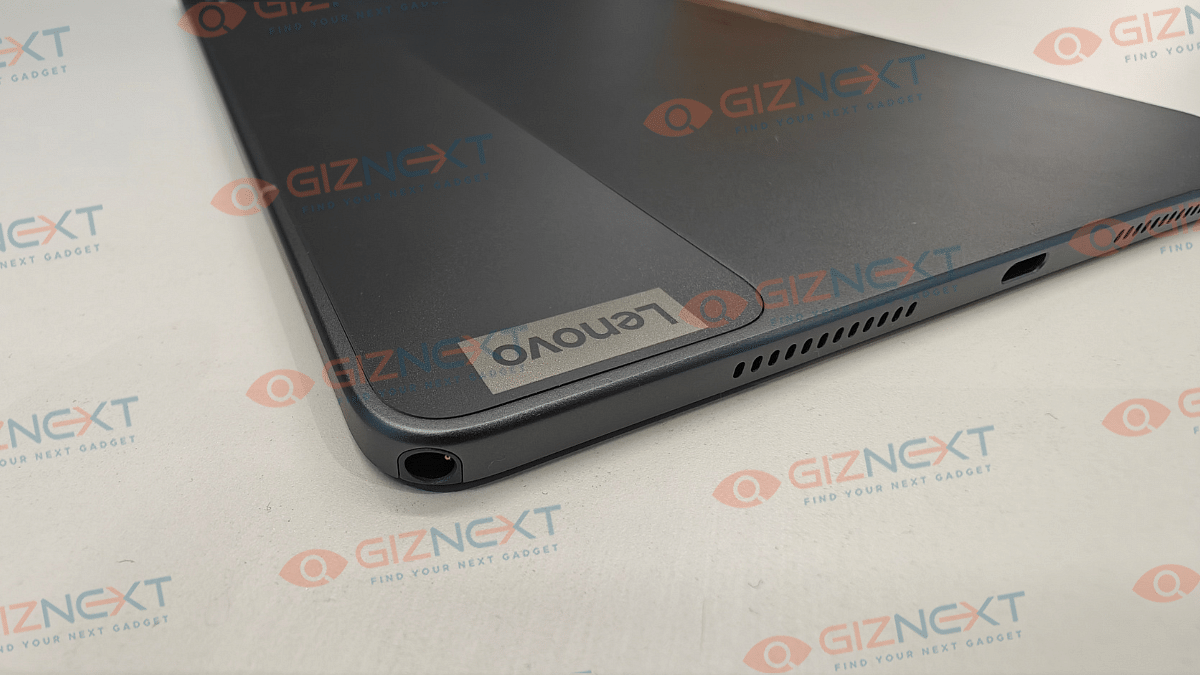
Lenovo has given a familiar design silhouette to the Tab K11 (Enhanced Edition) as its other budget-oriented tablet models. It also has a robust metallic body construction complemented with a dual-tone shade. For refrence, you ca opt from Luna Grey and Seafoam Green shades where we recieved the former for review at Giznext.
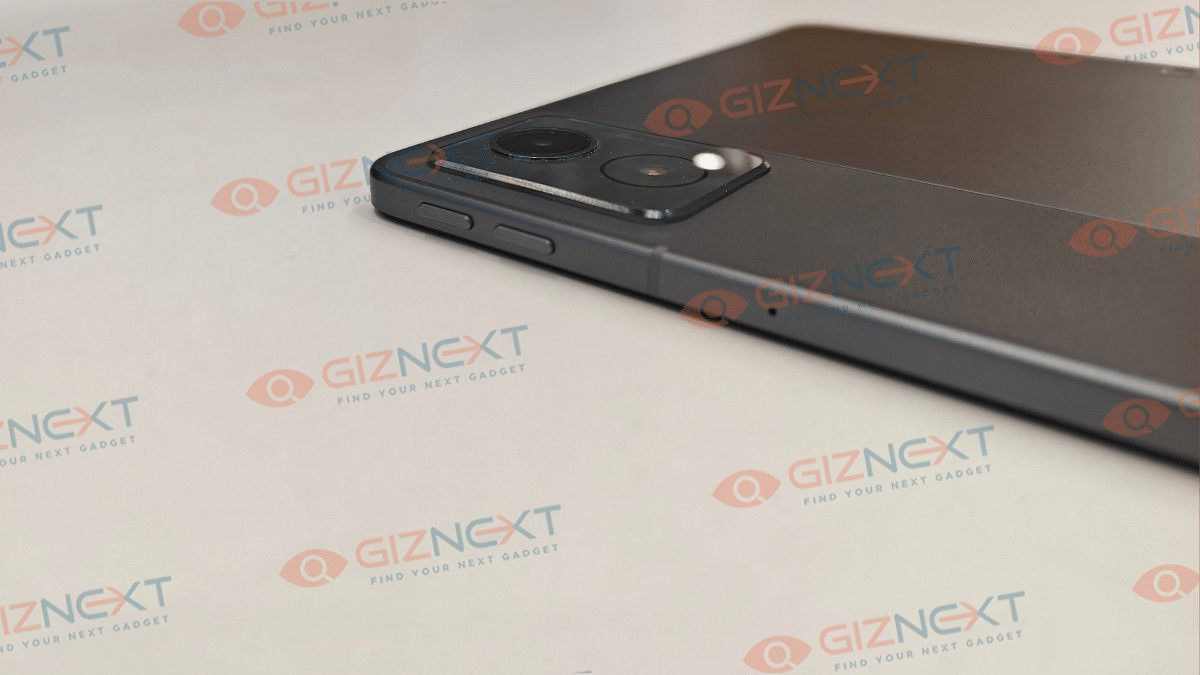
A single camera lens is housed inside the rectangular camera island on the top left of the back panel (on the dark gray vertical frosted polycarbonate strip). Right next to the camera island (housing a 13MP primary lens) on the right spine, there are the volume adjusters.
The flat frame-lightweight design along with the full-metal chassis gives confidence to hold and use the tablet with single hand. But eventually, you’ll have to use both your hands for extensive and creative tasks considering the tablet’s big form factor. Bottom panel includes a USB Type-C port sandwiched in between the speaker grilles and the stylus pen slot (on the top right bottom corner).
The Tab K11 comes void of any physical fingerprint scanner, but it offers Face Unlock as added privacy besides the standard PIN and Password protection. Summing it up, the Tab K11 Enhanced Edition while sporting a conventional design is practical for daily usage with its slim, lightweight rugged profile.
Lenovo Tab K11 Enhanced Edition has a substantially large display panel that measures at 11-inches. It is a standard LCD panel as is the case with most of the budget segment tablet. Panel specs offered by the Tab K11 Enhanced Edition includes an FHD screen resolution of 1200 x 1920 pixels and a 90Hz refresh rate. The display has Widevine L1 certification but comes void of Dolby Vision and HDR compatibility.
While two of these crucial display aspects are missing, it doesn’t mean the panel quality is compromised. The colors produced by the Tab K11 Enhanced Edition’s screen are good. The clarity levels are also satisfactory despite it being the conventional LCD screen.
The Tab K11 Enhanced Edition’s display offers 400 nits peak brightness levels. While you won’t face any difficulties with the brightness levels indoors, you might struggle a bit to view content outdoors under direct/ harsh sunlight. That’s one of the few shortcomings with the screen here.
Lenovo Tab K11 (Enhanced Edition) like most of the budget and mid-range tablet’s is equipped with a single rear and a single front camera setup. The sensors are also standard where the rear panel accommodates a 13MP lens with AF (Autofocus), while at the front there is an 8MP snapper with FF (Fixed Focus) and front flash.
Optics hardware with tablets aren’t as evolved as with smartphones. However, the imaging setup on all the tablets are suitable for basic usage. The same is the case with the Lenovo Tab K11 (Enhanced Edition), where the 13MP rear snapper is apt for capturing stills, scanning documents, and similar tasks. Overall clarity offered by the primary camera is decent.
That said, the selfie snapper upfront integrated in a landscape positioning is makes it convenient for video calling or conferencing. So if you need a device majorly for online conferences and don’t wish to invest heavily into a laptop, this tablet could serve the purpose well.
Lenovo Tab K11 (Enhanced Edition) is powered by the Helio G88 chipset. This MediaTek processor has standard 4G network support and is powering a majority of low-end and entry-level Android devices. The Helio G series focuses on refining the gaming and overall performance experience which we found to be true to some extent with the Tab K11 (Enhanced Edition).
You get this tablet with 8GB LPDDR4X RAM and 128GB eMMC 5.1 storage space. Storage expansion to up to 1TB is also possible via an external microSD card. This means no storage crunch issues even if you store large sized files and documents on this tablet.
The Helio G88 chipset performs well when you throw basic tasks at it which can range from general web browsing to streaming videos on YouTube and OTT platforms. You wouldn’t notice any major lags or frame drops with the basic tasks mentioned above. However, we found the tablet struggling slightly when there is any extensive game or app launched.
The app launch isn’t instant; specifically if there are multiple apps opened in the background already. The same feedback is with gaming where lightweight titles don’t experience any lags, but on the other hand, extensive game play can feel jittery at times. That said, it still is potent as a daily driver if you use it for moderate apps and games.
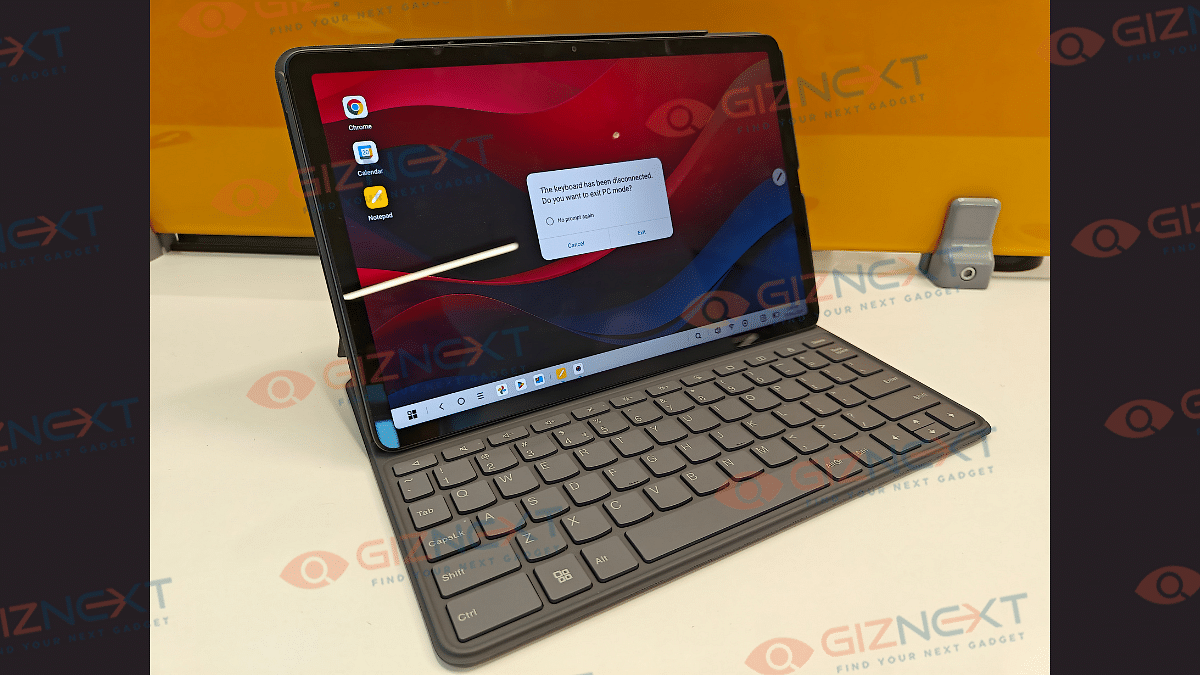
Lenovo Tab K11 (Enhanced Edition) Accessories (Stylus and Keyboard)
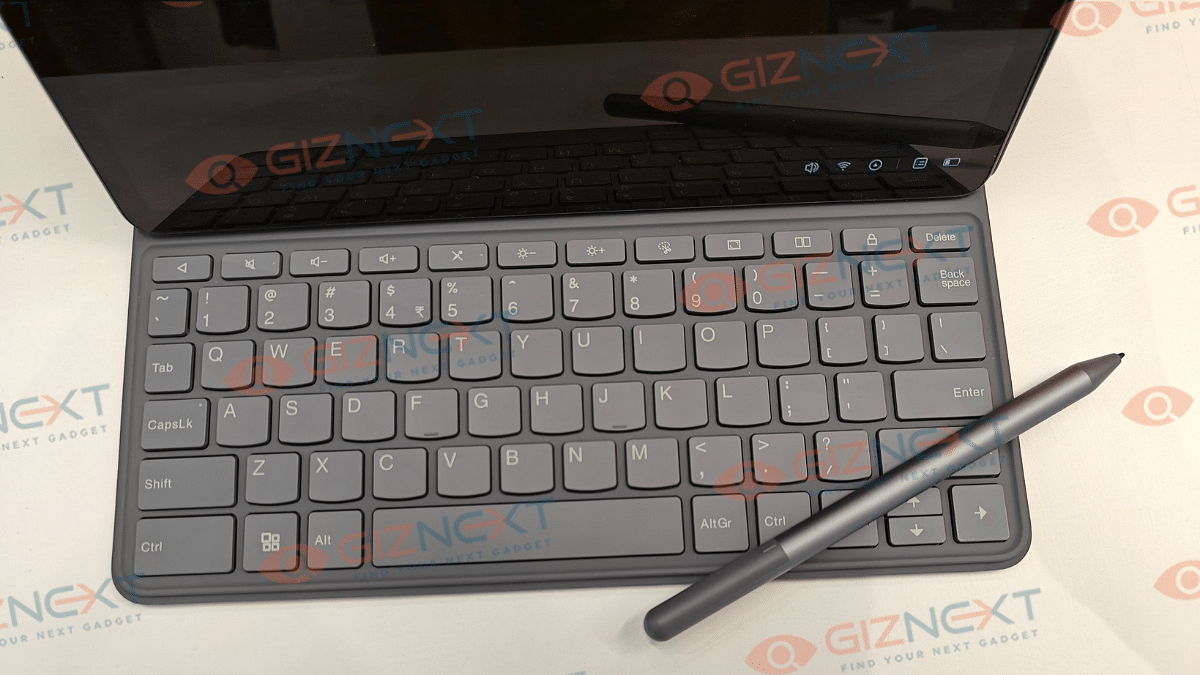
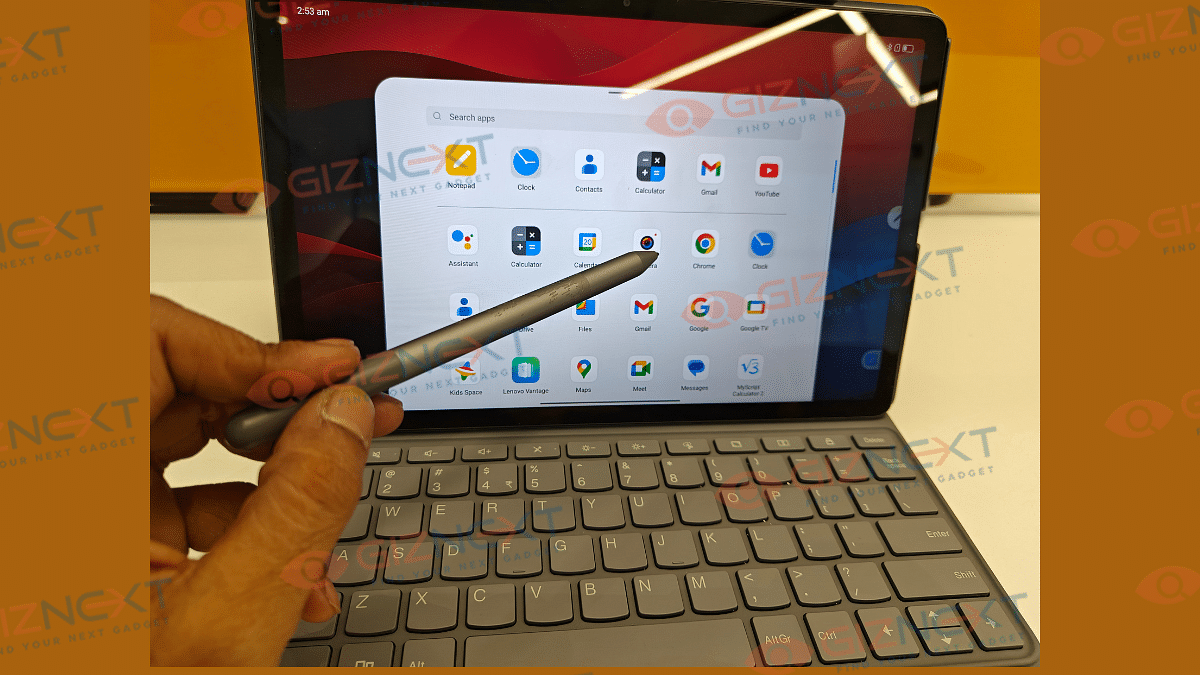
The Lenovo Tab K11 (Enhanced Edition) ships with a stylus pen and a Folio keyboard out-of-the-box. These added accessories definitely adds worth to this product. The stylus pen does’t get magnetic charging feature rather it uses a single AAA battery to power up. The thicker pen design allows ideal grip for writing and sketching. There is also a Palm rejection feature which functions well with taking notes.
There are dedicated apps to use with stylus such as Nebo (converting handwritten texts) and MyScript calculator that allows working on handwritten notes and equations. There are additional pen tips included with the stylus pen that can be replaced and used in case the default tip stops functioning properly.
Another important accessory that the Tab K11 (Enhanced Edition) ships with is the Folio keyboard. It latches on magnetically to the tablet via pogo pins. Keyboard’s functionality is good and you will find the keys nimble to press.
Backing up the Tab K11 (Enhanced Edition) is a 2-cell 7040 mAh (Li-Ion) battery pack. The big battery module tucked inside the slim tablet body is decent with backup. It is capable of lasting an entire day with a single charge with extensive usage.
You won’t necessarily need an additional plug in until the next day. Expect the battery backup to extend to up to two days if you use it lightly with basic tasks such as browsing and online conferencing. Media playback and gaming if done extensive will drain the battery by the end of the day. This brings us to the charging speeds, the Tab K11 (Enhanced Edition) comes with 10W charging support. It takes close to 4 hours to charge this tablet from 0- 100 percent.
Lenovo Tab K11 (Enhanced Edition) Final Verdict: Worth Buying?
Lenovo Tab K11 (Enhanced Edition) is a well rounded package overall in the budget segment. It justifies its price tag with its robust build, vibrant screen, and the stylus pen/ folio keyboard accessories. This tablet is suitable for working professionals and students who need a daily use tablet for tasks such as online conferencing, taking notes, and media playback, etc. It wouldn’t be wrong to say that the Tab K11 (Enhanced Edition’s) added accessories is what gives it an edge over the standard version and the counterparts in this segment.
Netflix has introduced a brand-new feature to make watching shows and movies with subtitles much smoother and more focused. The platform now offers dialogue-only subtitles, starting with season five of its popular thriller series You. This new setting removes background audio cues and speaker names, showing only what’s being said by the characters.
This update is great news for viewers who prefer a cleaner screen while still needing subtitles. Until now, subtitles on Netflix came with extra details like ‘phone buzzing’ or ‘knock on the door’, meant for those with hearing difficulties. While helpful for some, these cues could be distracting for others who just want to follow the conversation. Let’s explore its features and how it works.
Only Spoken Dialogue: The new subtitle option displays only what the characters are saying, no sound effects or speaker labels.
Multiple Languages Supported: Dialogue-only subtitles are not limited to English. They are also available in languages like French, Italian, Spanish, Brazilian Portuguese, and more.
Two Subtitle Options Now Available: Dialogue-only subtitles and subtitles with audio cues
Language Labels Made Simple: English: Dialogue-only subtitles, English (CC): Subtitles with audio cues and speaker names
How To Turn On Dialogue-Only Subtitles On Netflix
Want to try this new feature? Here’s how to use it:
Step 1: On your laptop, smartphone, or smart TV, launch Netflix app.
Step 2: Choose a Netflix original title like You Season 5 or any new release.
Step 3: Tap the Play button.
Step 4: Select the option for Audio & Subtitles.
Step 5: On the right, select the language without (CC). For example, choose ‘English’ instead of ‘English (CC)’.
Step 6: Press Back to resume viewing with clearer subtitles.
This small but useful update gives viewers more control over how they watch. Whether you find audio cues distracting or just want to focus on the dialogue, Netflix now gives you that choice. This update is already live on new Netflix Originals and is expected to roll out more widely soon.
For the tech geeks, stay updated with the latest cutting-edge gadgets in the market, exclusive tech updates, gadget reviews, and more right on your phone’s screen. Join Giznext’s WhatsApp channel and receive the industry-first tech updates.
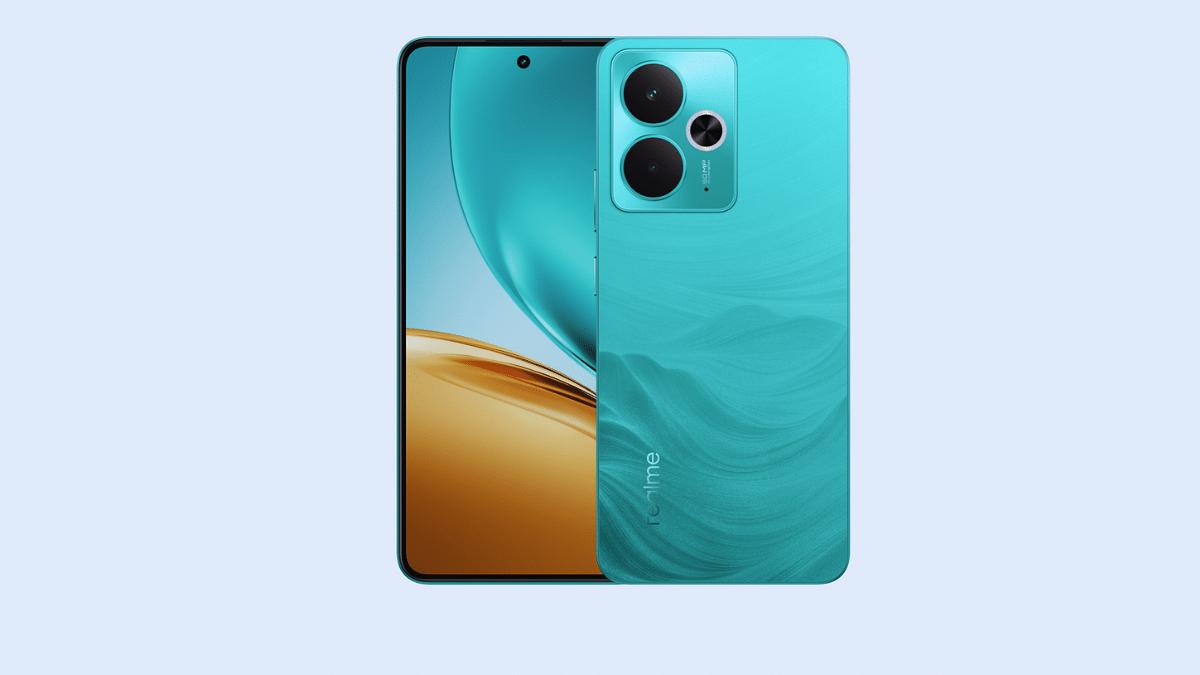
Features 50MP dual rear cameras and 16MP front camera
Price in India starts at Rs. 17,999
Realme has launched another new number series handset for the mid-range consumers in India. The latest member added to the Realme 14 series is the Realme 14T which is also a 5G-enabled handset with a starting price under Rs. 20,000. Realme 14T 5G is introduced with features like the Dimensity 6300 chipset, a 120Hz AMOLED display, 50MP dual rear cameras, and a massive 6,000 mAh battery combined with 45W fast charging. Here are the top highlights of the Realme 14T 5G in India:
For the tech geeks, stay updated with the latest cutting-edge gadgets in the market, exclusive tech updates, gadget reviews, and more right on your phone’s screen. Join Giznext’s WhatsApp channel and receive the industry-first tech updates.
Increased temperatures can hamper laptop’s speed and overall performance
Dust and dirt, extensive usage, battery degradation common reasons
Soaring summer temperatures is something that affects both human and machines. Increased workloads often leads to machines break down due to high temperatures with continuous operations. The same applies to laptop and PCs where extensive usage in peak summers can lead to frequent crashes, app shutdowns, and more. Excessive heat can even lead to damages further affecting the performance of your laptop. If you already are experiencing frequent laptop heat up and shut down issues due to the same, here’s the guide to fix this issue. We have listed top 5 effective methods that can help you fix laptop heat up issues without paying a visit to service centre.
For the tech geeks, stay updated with the latest cutting-edge gadgets in the market, exclusive tech updates, gadget reviews, and more right on your phone’s screen. Join Giznext’s WhatsApp channel and receive the industry-first tech update.
Top Effective Methods To Protect Laptop From Overheating
Method 1: Restrict App Running In Background (Extensive or Heavy apps)
Try to keep all the unused apps and software closed when not in use. Closing down unnecessary apps running in the background not only ensure swift performance but also keep your laptop’s temperature steady. It is one of the effective ways to ensure the laptop doesn’t get heated up with continuous usage.
Try using laptop with a cooling pad or a stand. You can buy a USB-powered cooling pad if your laptop usage is extensive. These pads and stands allows with a lifted placement of the laptop which further helps with proper airflow to keep the temperatures stable. These stands and cooling pads are ideal for extensive gaming and similar tasks that requires heavy processing.
Often clogged air vents of a laptop also leads to increased temperatures. Hence, it is advised to keep your laptop’s vents clean to allow proper air flow. Also, try using laptop on a flat hard surface instead of your lap, bed, or blankets for long. Doing this can block the air vents and the air flow hampering speeds and overall performance.
Method 4: Ensure All Apps And Software Are Updated To Latest Version
Older OS and software versions can also lead to laptop overheating. Downloading the latest updates ensure your device doesn’t lag with performance and also maintain stable temperature levels.
Method 5: Uninstall Unnecessary Apps And Softwares
Remove or uninstall any app of software which is not in use. Specifically, if the app size is large and it takes up extra storage space. Also, try setting up and using your laptop in a cool room to keep the components functioning well.
Multiple language support to be included such as Spanish, Hindi, Russian, Arabic, etc.
WhatsApp is the most commonly used messaging app available globally for Android and iOS devices. Meta-owned instant messaging app offers an end-to-end platform for chatting, audio/ video calling, and media transfers making it private and secure for all conversations. Over the years, WhatsApp has benefited numerous businesses globally and the brand is consistently adding on new features to further improve its ecosystem. To help its users overcome any language barrier, a new feature is getting tested. Yes, you read that right, WhatsApp is finally bringing a native language translation app on its platform; a feature that has been in demand since long. Here’s how you can use the latest in-app language translation feature on WhatsApp:
For the tech geeks, stay updated with the latest cutting-edge gadgets in the market, exclusive tech updates, gadget reviews, and more right on your phone’s screen. Join Giznext’s WhatsApp channel and receive the industry-first tech update.
WhatsApp In-App Language Translation Feature: Stable Rollout?
WhatsApp’s language translation feature currently undergoing testing. The company has not released a stable update to add the in-app language translation feature to WhatsApp mobile app yet. However, the feature has been spotted in the WhatsApp beta build 2.25.12.25 which confirms its imminent arrival. WhatsApp could release the stable version of this update in the coming months after verifying the feature works fine and is free from any technical glitches.
How To Use WhatsApp Native Language Translation Feature
As of now, WhatsApp’s native language translation app can be used only if the WhatsApp version is as above (2.25.12.25). Once the stable update is released, users will be able to translate language using the app itself on a mass level.
That said, reports indicate that once this feature is added to WhatsApp, users will be able to translate language from the downloaded language pack. WhatsApp will also allow users to set automatic translation option for specific chats besides the standard manual translation option. As for the list of languages, WhatsApp will allow users to translate languages in Arabic, Hindi, Russian, Spanish, and Portuguese (Brazil).
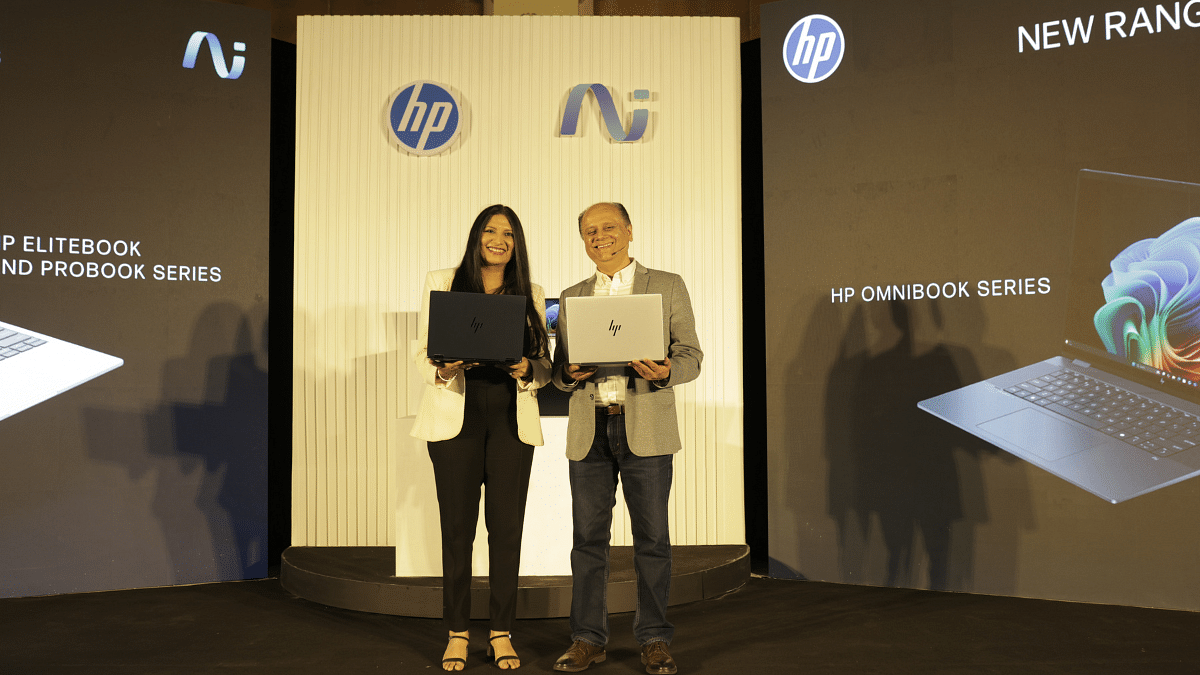
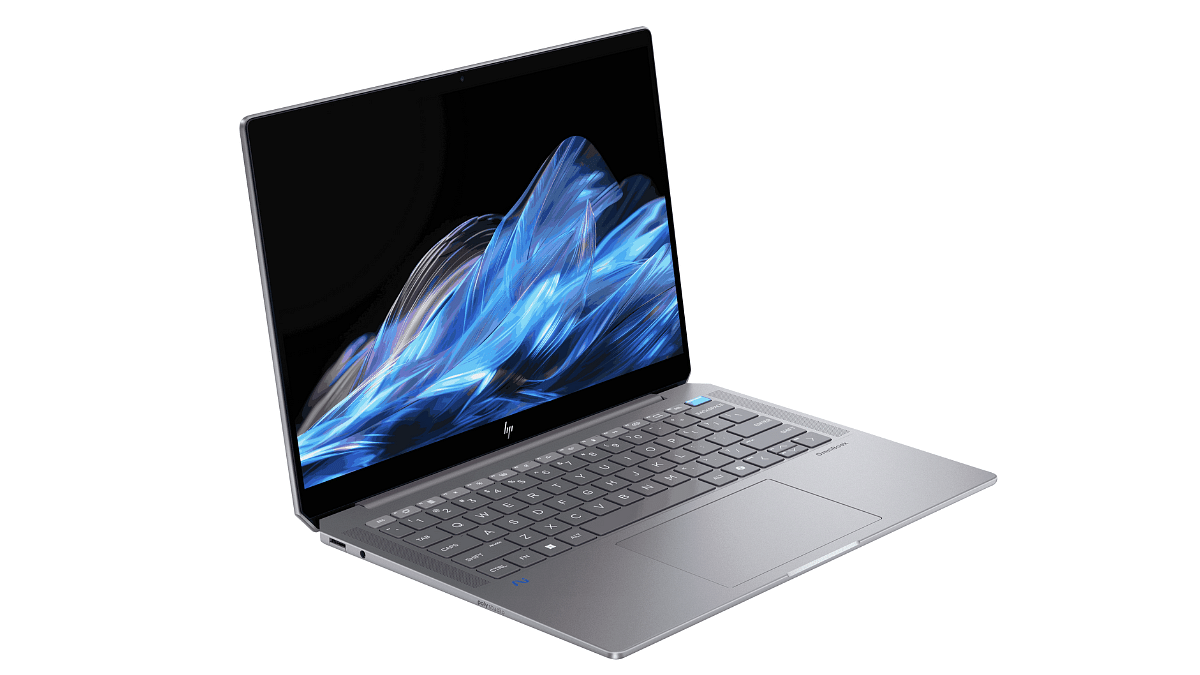
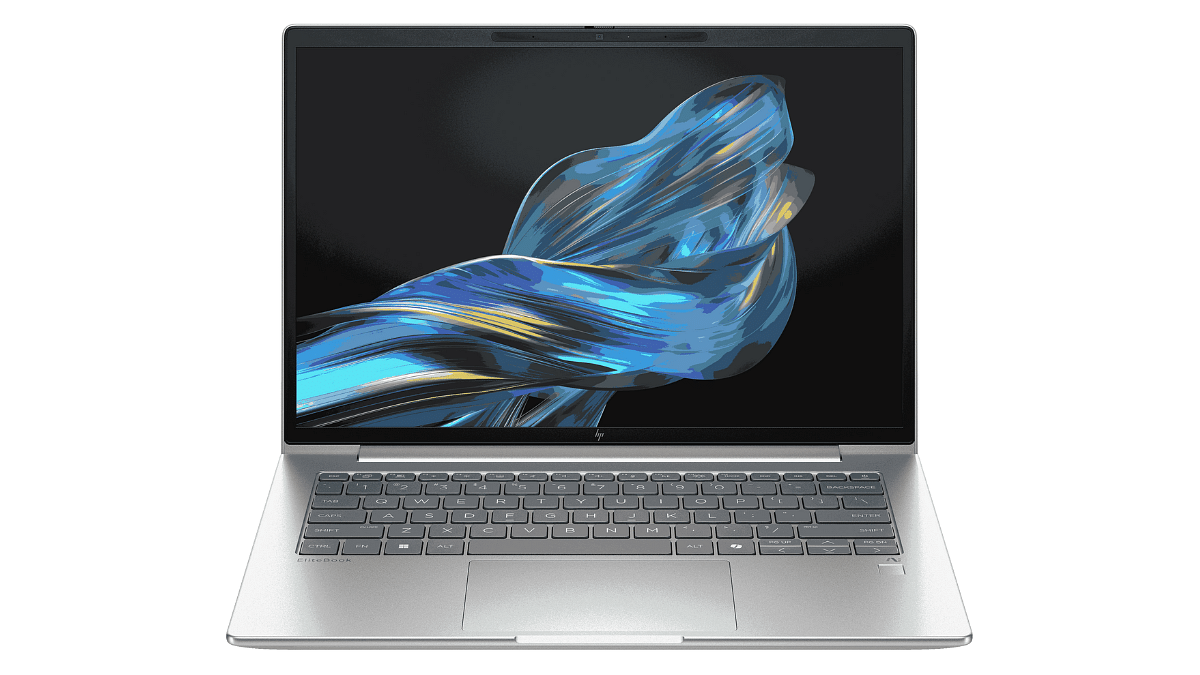
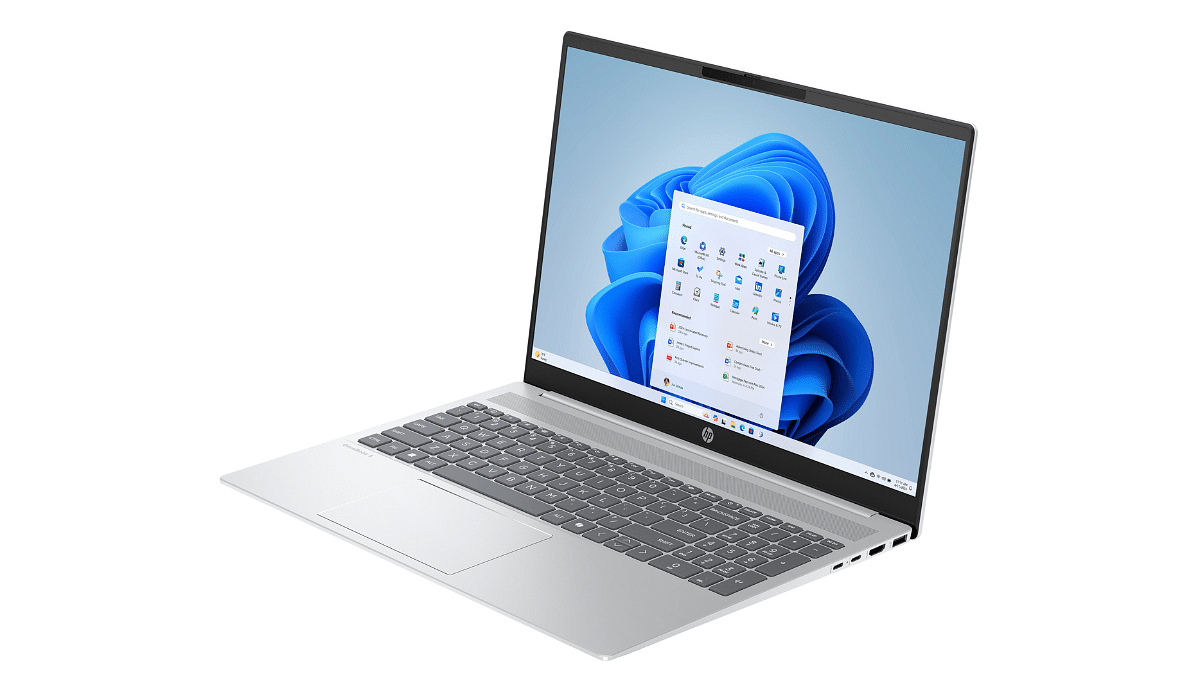
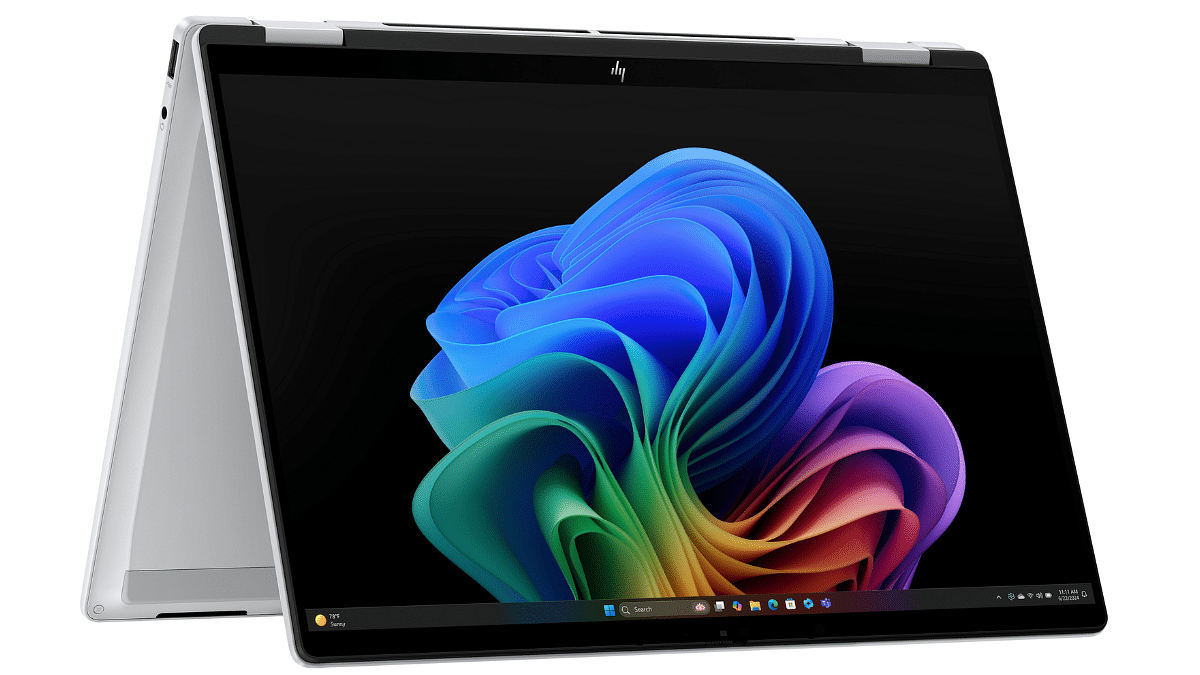
HP has just raised the bar in India’s PC market with the launch of its next-generation AI-powered laptops. The company’s new line of EliteBook, ProBook, and OmniBook laptops is made for everyone, from entrepreneurs and corporate executives to regular users and creative. These new AI PCs are packed with advanced features, smart tools, and high-end performance to make work, creativity, and collaboration smoother and faster. Let’s break down what makes these laptops truly next-gen.
Built with recycled materials including ocean-bound plastic and recycled metal.
Comes in sustainable packaging and is ENERGY STAR & EPEAT Gold certified.
Price In India
Model
Starting Price
HP EliteBook 8 G1i
Rs. 1,46,622
HP EliteBook 6 G1q
Rs. 87,440
HP ProBook 4 G1q
Rs. 77,200
HP OmniBook Ultra 14-inch
Rs. 1,86,499
HP OmniBook X Flip 14-inch
Rs. 1,14,999
HP OmniBook 7 Aero 13-inch
Rs. 87,499
HP OmniBook 5 16-inch
Rs. 78,999
For the tech geeks, stay updated with the latest cutting-edge gadgets in the market, exclusive tech updates, gadget reviews, and more right on your phone’s screen. Join Giznext’s WhatsApp channel and receive the industry-first tech updates.
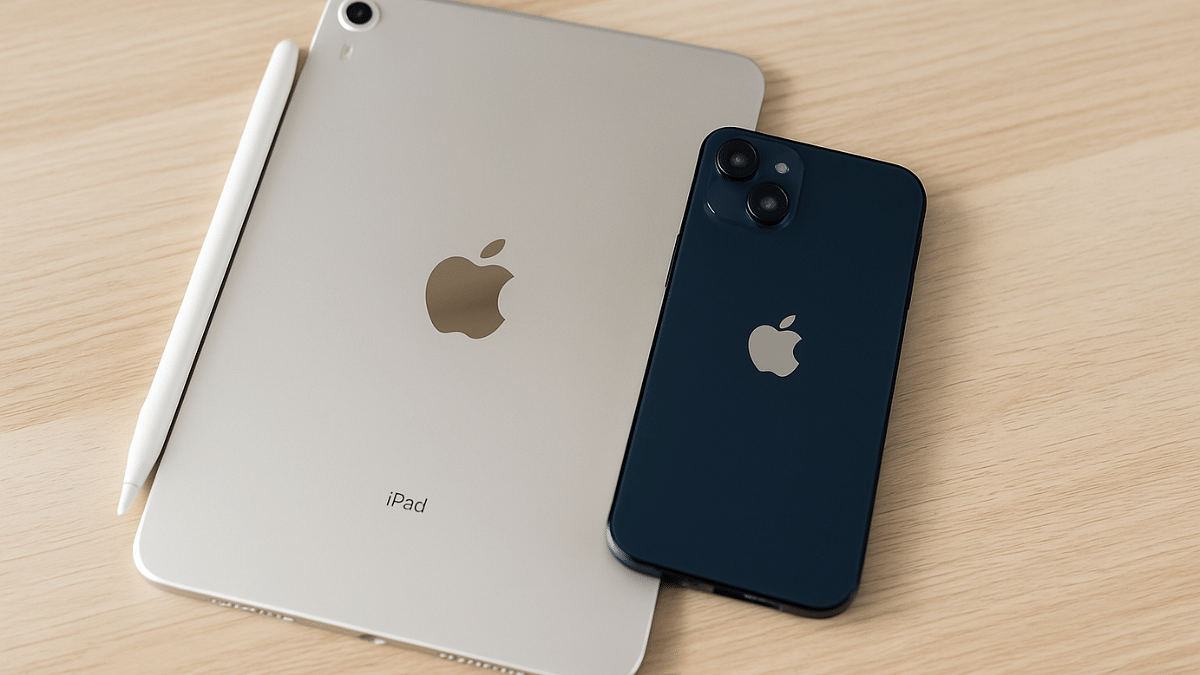
Apple allows iPhone and iPad syncing for seamless user experience
Synced devices gets calls/ messages together
Safari can also be synced on iPhones and iPads simultaneously
Photos, contacts, calendar, and notes are also synced
Apple has one of the strongest ecosystems where the Cupertino giant offers a seamless user experience across iPhones, iPads, and MacBooks. Staying connected simultaneously on multiple Apple devices with same Apple ID helps with the same. If you own both an iPhone and a iPad, you can sync both these gadgets together to sync calls, messages, browsing tabs on Safari, notes, contacts, and much more. In this guide, we are sharing the steps with which you can sync your iPad with iPhone.
For the tech geeks, stay updated with the latest cutting-edge gadgets in the market, exclusive tech updates, gadget reviews, and more right on your phone’s screen. Join Giznext’s WhatsApp channel and receive the industry-first tech update.
How To Sync Apps And Data On iPad and iPhone Without iCloud?
If you don’t wish to use iCloud to sync your iPad with iPhone, you can also use alternative methods listed below:
Method 1: Via AirDrop
Use this option to transfer and share apps data and files across iPad and iPhone seamlessly. This option allows instant data transfer wirelessly.
Method 2: Via Third Party Apps
You can also use Google Drive and similar apps to sync and transfer data on your iPad and iPhone.
Method 3: Via iTunes or Finder Sync
If you are transferring data such as books, music, and movies via Mac or PC to your iPad and iPhone, iTunes and Finder Sync options helps you with the same.
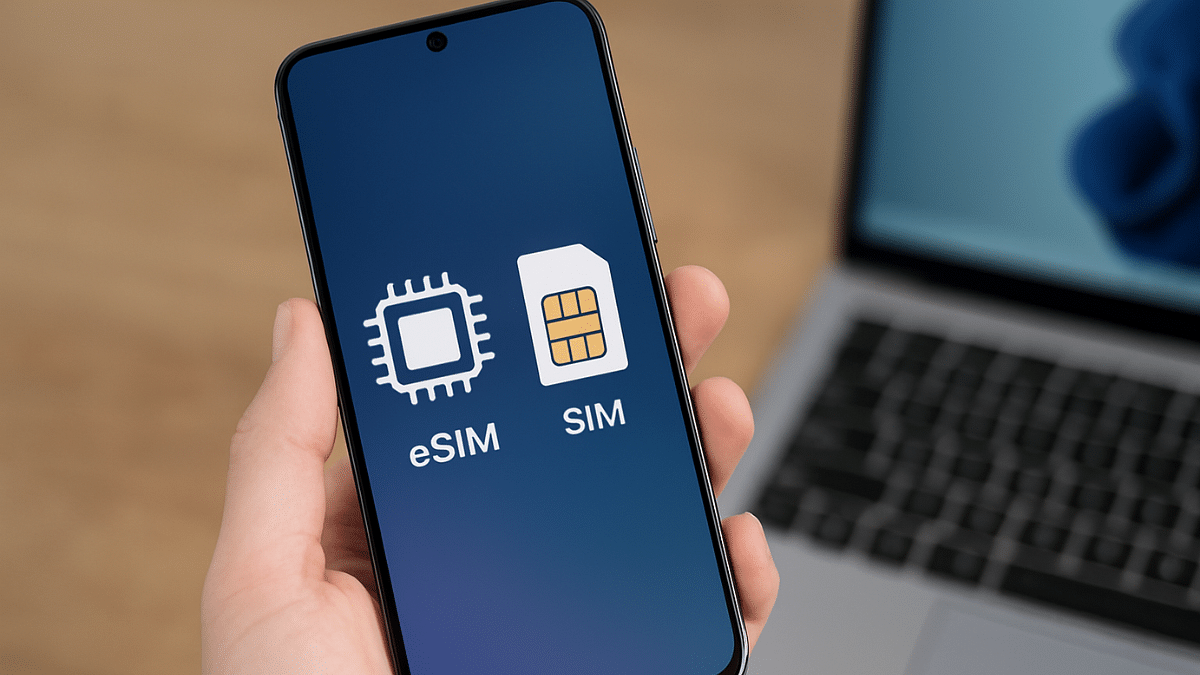
eSIM allows using cellular services without physical SIM card
Can be used with flagship-grade smartphones
eSIM can be enabled on both Android and iOS devices
Cellular services are now more efficient and reliable making communication and internet services accessible event at the remote places. Physical SIM cards have also become tinier and faster offering 5G networks for high-speed internet connectivity. But gradually eSIM (embedded SIM) technology is taking over the traditional SIM cards. This technology has made it possible to use all the carrier services such as calling, messaging, internet usage without using a physical SIM card. We previously broke down the differences between an eSIM and a physical SIM card. In this guide, we are listing down the steps to activate an eSIM on Android and iOS smartphones.
For a while Pan 2.0 scan has been reported widely by the Indian citizens. A new sophisticated scam targeted at tax payers and other Indian citizens, the Pan 2.0 scam is a big threat that we are breaking down in this article. Alongside, we will also share the steps with which you can stay safe from Pan 2.0 scam.