Categories
Apps Featured How To Info

How To Create Stickers On Instagram With Cutouts

Instagram’s new feature allow users to add a personal touch to their stories and reels with custom stickers. One exciting way to improve your content is by creating your own stickers using the Cutouts feature.

In this guide, we’ll walk you through the simple steps to craft unique stickers.

Also Read: How To Remove A Single Image From Instagram Carousel

Creating a Custom Sticker with Cutouts

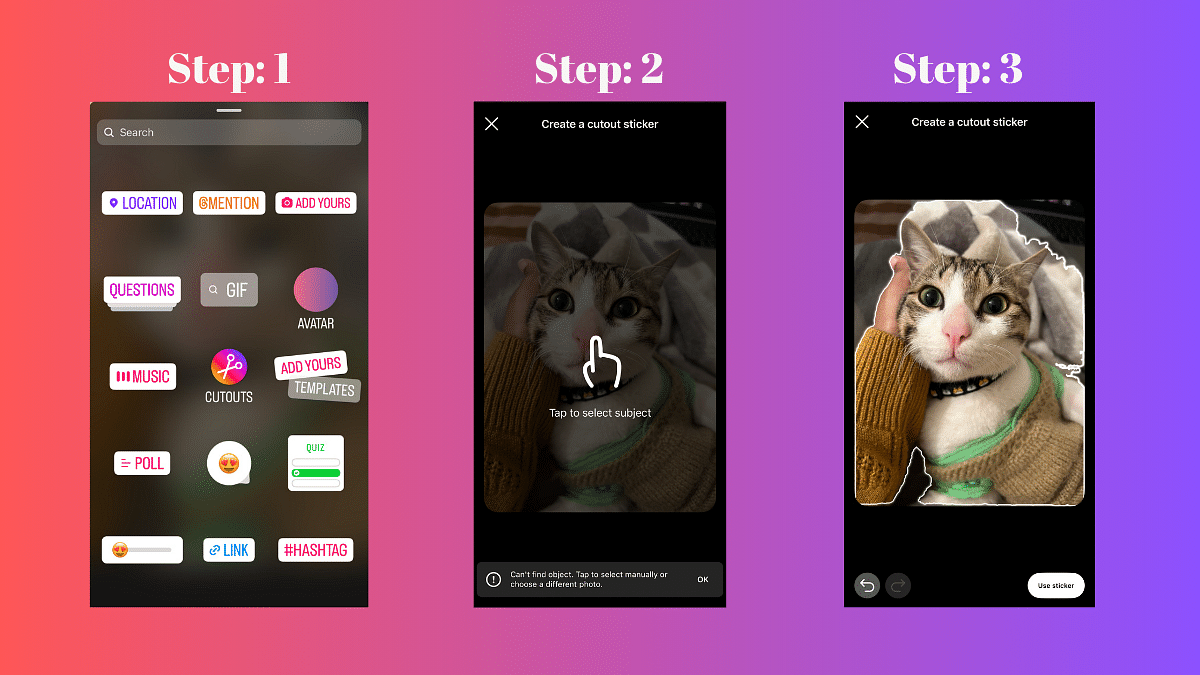
  1. Access the Stickers Menu: When crafting a reel or story, locate and tap the Stickers icon.
  2. Select Cutouts: Among the various sticker options, choose Cutouts.
  3. Choose a Clear Subject Photo: Opt for a photo with a distinct and clear subject. The sticker will be automatically generated from this photo.
  4. Manual Selection (Optional): If the auto-generated sticker doesn’t meet your expectations, manually select the desired object for your sticker. Note: Only one object can be picked at a time.
  5. Add the Sticker to Your Post: After the customization, tap Stickers again, and select the newly created sticker. Your stickers will be conveniently saved at the top of the sticker tray for future use.

Also Read: How to Use Google Circle to Search: Your Step-by-Step Guide

Creating a Custom Sticker from Someone Else’s Post with Cutouts

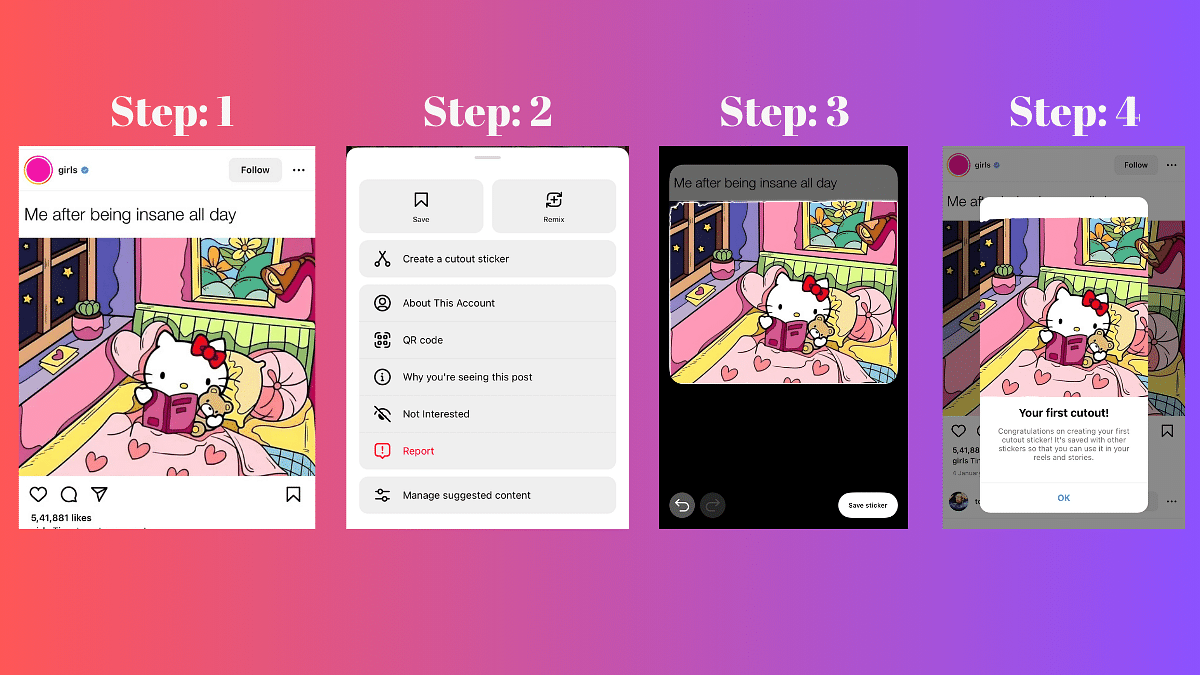
Note: You can only create a sticker from a public account that has enabled permissions for you to do so.

  1. Choose the Photo: Navigate to the photo you wish to turn into a sticker.
  2. Access Options: Tap the three dots in the top right corner of the post.
  3. Create Sticker: Select the “Create sticker” option.

Important: If the original post is deleted, the content using that sticker will also be removed.

Also Read: How to Draft Emails with Voice in Gmail: A Step-by-Step Guide

Deleting Stickers Created with Cutouts

  1. Create a New Reel or Story: Start a new Instagram Reel or Story.
  2. Access Stickers: Tap the Stickers option.
  3. Delete Sticker: In the “Your stickers” section, press and hold on the sticker you want to delete. Tap Delete.

Remember, deleting a sticker will not affect existing reels or stories, but you won’t be able to use the deleted sticker again.

Categories
Apps Comparison Featured How To Info

How to Draft Emails with Voice in Gmail: A Step-by-Step Guide

Key Highlights

  • You can now draft messages hands-free with your voice and AI.
  • Users can now save time, multitask.
  • AI will handle punctuation, edits, and even formatting.

Gmail is getting a super cool new feature: you’ll be able to write emails using your voice! No more tapping away at your keyboard, just speak your message and let Google’s AI do the typing for you.

Also Read: How to Use Google Circle to Search: Your Step-by-Step Guide

How it works

  1. Open a new email or reply to an existing one.
  2. Look for a button called “Draft email with voice.” It might pop up automatically or you might need to trigger it with a special flag (we’re not sure yet how this will work exactly).
  3. Tap the microphone button and start speaking your email.
  4. Tap the “Create” button when you’re done. Google’s AI will turn your spoken words into text and draft the email for you.
  5. Read through the draft and make any changes you want. Then send it off!

Also Read: Google Maps Bluetooth Beacon Feature For Tunnel Navigation Released: How To Use?

Why you’ll love it

  • Save time and effort: No more typing! Just speak your thoughts and let Google do the work.
  • Perfect for busy hands: Got your hands full? No problem, just dictate your email.
  • Accessibility boost: This feature is a great option for people who have difficulty typing.

Also Read: How To Avail Google One Basic Plan At Rs 100 For 3 Months: Guide

When will it be available?

We don’t know exactly when this new feature will be rolled out to everyone, but it’s definitely on its way! Keep an eye out for updates from Google.

Categories
Apps Featured How To

Ayodhya Ram Mandir Inauguration: How To Explore Traffic-Free Routes via MapMyIndia App

Key Highlights

  • UP Police collaborated with the Mappls app to offer real-time traffic information in Ayodhya
  • Get real-time traffic updates for Ayodhya’s Ram Mandir ceremony
  • Follow simple steps on Mappls to plan your routes

Ayodhya is getting ready for the Ram Mandir Pran Pratishtha ceremony, set to welcome over 7,000 visitors. The ceremony begins at 12:20 pm and is expected to conclude by 1 pm. Following this, Prime Minister Narendra Modi will address the gathering, including spiritual leaders and prominent figures. Also Read | Uber EV Auto Rickshaw Services Begins In Ayodhya: Full Details

Traffic Restrictions and Collaborative Efforts

Due to the significant event, the public will face restrictions, especially in specific areas of the city. To assist, the UP Police has partnered with Mappls, India’s own maps app, offering real-time traffic updates and notifying citizens about blocked routes.

Mappls: Your Guide For Real-Time Traffic Information

Developed by MapmyIndia, a renowned technology company, Mappls is the go-to navigation app for Ayodhya. It provides users with the latest traffic updates, real-time information on route closures, and traffic reroutes, all sourced from the Uttar Pradesh Traffic Police.

Also Read | Ayodhya Introduces EV Golf Car Service Ahead Of Ram Mandir Inauguration

How To Use Mappls For Ram Mandir Traffic Updates

Step 1: Download the Mappls app from the Play Store, App Store, or https://www.mappls.com/.

Step 2: Install the app on your mobile device.

Step 3: Enable notifications and device location.

Step 4: Activate visual traffic updates.

Step 5: Check restricted routes and any traffic diversions.

Important Traffic Information

Note that barricades and restrictions will be in place within a five-kilometer radius of the Ram Mandir Complex, even after the Pran Pratishtha. Only vehicles on the guest list, local residents with U-registration plates, and authorized vehicles with valid passes will be allowed in Ayodhya on January 21 and 22, 2024. For those planning to visit nearby cities, it is advisable to check routes in advance using the Mappls app.

Also Read | Ram Mandir Pran-Pratishtha: How And Where To Watch Live Ceremony Online

Categories
Featured How To

Ram Mandir Pran-Pratishtha: How And Where To Watch Live Ceremony Online

Key Highlights

  • The Ram Mandir Pran-Pratishtha ceremony is scheduled for January 22
  • You can watch the livestream on DD News, DD National, or their YouTube channels
  • Join the live ceremony from 11 am to 1 pm

The eagerly awaited Pran-Pratishtha ceremony for Lord Ram is scheduled for January 22, with a special invitation for virtual attendance extended by the Ram temple trust. The ceremony is not limited to the digital realm; it will also be broadcast in temples and public spaces across urban and rural areas. Varanasi priest Lakshmi Kant Dixit is assigned to perform the main rituals. Also Read | Google Maps Bluetooth Beacon Feature For Tunnel Navigation Released: How To Use?

Livestream Details

The livestream of the Pran-Pratishtha ceremony will take place from 11 am to 1 pm. Doordarshan will employ nearly 40 cameras in various Ayodhya locations, ensuring a full 4K coverage reminiscent of the G20 summit. The broadcast will be available in multiple languages through various channels.

How To Watch The Pran-Pratishtha Ceremony Live Online

Step 1: Tune in to the live ceremony on DD News or DD National channels of Doordarshan. Alternatively, access the livestream on their official YouTube channels.

Step 2: The Pran-Pratishtha ceremony is scheduled to take place from 11 am to 1 pm. Be sure to log in at the designated time to catch all the sacred rituals.

Step 3: For a seamless viewing experience, navigate to the official Doordarshan channels on YouTube. Doordarshan will utilize advanced 4K technology for complete coverage.

Step 4: If you’re located outside India, check with Indian embassies or consulates for possible broadcast options. The ceremony is anticipated to have a global reach.

Step 5: If you’re in India, keep an eye out for local booth-level broadcasts, as thousands of temples and booths are gearing up to share the live event with their communities.

Step 6: Ensure a stable internet connection to enjoy uninterrupted coverage of this historic event.

With these simple steps, you can join in and witness the Pran-Pratishtha ceremony of Lord Ram from the comfort of your home or wherever you are.

Also Read | How To Remove A Single Image From Instagram Carousel

Global Broadcast And Booth-Level Viewing

The significance of the ceremony extends globally, with Indian embassies and consulates set to broadcast the event. At the national level, the BJP has announced live coverage at the booth level, demonstrating the widespread preparation of thousands of temples and booths to share in the event.

Key Figures And Public Opening

The Pran-Pratishtha ceremony at the Ram temple in Ayodhya will witness the presence of Prime Minister Narendra Modi and other distinguished figures. Approximately 8,000 invitations have been dispatched for this monumental occasion. Subsequently, the temple complex is slated to open its doors to the public starting January 23.

Government Observance: Half-Day Closure In Honor

Recognizing the profound sentiments associated with the consecration of the Ram Temple, Union Minister Jitendra Singh announced a half-day closure for all central government offices on January 22. This symbolic decision honors the historical event and acknowledges the deep emotional significance it holds for the nation.

Also Read | How to Use Google Circle to Search: Your Step-by-Step Guide

Categories
Apps Featured How To Info

How to Use Google Circle to Search: Your Step-by-Step Guide

Google’s latest Search updates bring two exciting features to Android users: Circle to Search and a multisearch experience powered by AI. Let’s dive into how to use these features and how you can find information on your Android device.

Also Read: Samsung Galaxy S24 Ultra Top Alternatives: Google Pixel, OnePlus, And More

What is Circle to Search?

Imagine this: you’re watching a YouTube video and spot a stunning pair of shoes. Just draw a circle around them, and Circle to Search instantly displays similar styles from online retailers, all without leaving the video! This magical tool works on images and text alike, so whether it’s a curious object in a photo or an enticing restaurant menu, simply scribble, highlight, or tap to unveil relevant details and options.

But Google’s innovation doesn’t stop there. Multisearch transcends text queries, allowing you to explore the world through images and screenshots. Encounter an unfamiliar object? Take a picture and ask “What’s this?” Google’s AI will then provide a detailed overview by gathering information from the web.

Also Read: How To Pin A Message In WhatsApp Chat: A Step-by-Step Guide

How to Use Circle to Search

  1. Long press your home button or navigation bar on your Android smartphone.
  2. Circle, highlight, or tap the item you’re curious about.
  3. Explore the information that appears, including product details and purchase options.
  4. Swipe away to return to your original app seamlessly.

Also Read: How To Remove A Single Image From Instagram Carousel

How to Use AI-powered Multisearch

  1. Launch Lens through the Google app on Android or iOS (currently available in the US).
  2. Take a picture of the object or use an existing image.
  3. Ask your question, like “What’s this?”
  4. Experience the AI-powered overview filled with relevant information.

The new multisearch experience is rolling out this week in English in the US for everyone. Users outside the US can opt for the Search Generative Experience (SGE) preview in Search Labs.

Also Read: How To Withdraw Amazon Pay Balance To Your Bank Account: A Step-by-Step Guide

Circle to Search: Availability

Circle to Search arrives on January 31, 2024, for selected premium Android smartphones like the Pixel 8, Pixel 8 Pro, and Galaxy S24 series. It will be available in all languages and locations where these phones are sold.

Categories
Apps Featured How To Info

WhatsApp Channels Get Updated With Voice Notes, Multiple Admins And More: How To Use

Key Highlights

  • You can now send voice updates on Channels.
  • WhatsApp will let users get feedback and boost engagement with interactive polls.
  • Users can add upto 16 admins now.

WhatsApp Channels got a big upgrade!

Creators can now use voice messages, polls, and status sharing to connect with their followers in new ways. They can also add more admins to manage their communities better. This makes it easier to build thriving online spaces on WhatsApp where everyone can interact and share. Let’s check out these new features and see how to use them to make your Channel even better.

Also Read: How To Pin A Message In WhatsApp Chat: A Step-by-Step Guide

1. Voice Updates

Building upon the popularity of voice messages, WhatsApp Channels now allows creators to share updates directly in their own voices. This human touch adds a layer of intimacy and engagement, making information more relatable and impactful for followers.

To utilize this feature:

  • Access your WhatsApp Channel.
  • Navigate to the desired chat or thread.
  • Tap the microphone icon to begin recording your update.
  • Hold the icon while speaking and release it to complete the recording.
  • Send your voice update and connect with your audience on a deeper level.

Also Read: How To Withdraw Amazon Pay Balance To Your Bank Account: A Step-by-Step Guide

2. Engagement Through Polls

Want to gauge your audience’s opinion or gather valuable feedback? WhatsApp Channels now lets you create interactive polls. This feature fosters dynamic engagement, encouraging followers to participate and express their thoughts.

To activate polls:

  • Start a new message within your Channel.
  • Locate the poll icon, typically represented by a graph or voting symbol.
  • Craft your poll question and add multiple options for users to choose from.
  • Send the poll to your Channel and watch your followers’ voices be heard.

3. Share Updates on Personal Status

You now increase your Channel’s visibility by seamlessly sharing updates to your personal WhatsApp status. This organic marketing strategy allows you to tap into your existing network and attract new followers. To utilize this feature:

  • Simply tap the “Share to Status” option on any engaging Channel update.

Also Read: Google Maps Bluetooth Beacon Feature For Tunnel Navigation Released: How To Use?

4. Multiple Admins

Managing large and active Channels just got easier with the addition of up to 16 admins. This feature promotes efficient community and content management, ensuring a more organized and collaborative approach.

Assigning admin roles allows for:

  • Content moderation and quality control.
  • Timely responses to follower inquiries and feedback.
  • Collaborative content creation and scheduling.

Categories
Auto Tech Featured How To

NHAI ‘One Vehicle, One FASTag’ Rule: How To Complete FASTag KYC To Avoid Deactivation

Key Highlights

  • NHAI’s new guideline to deactivate multiple FASTags for single vehicle
  • KYC mandatory for each FASTag
  • Default FASTags will be blacklisted by January 31, 2025

FASTag emerged as an advanced toll collection system implemented across national highways in India. This RFID-based toll collection initiative has been successful in easing down the traffic situations at the toll plazas in the country. Amidst the rumors of GPS-based toll collection module in the works, a new guideline has been released by the government that will blacklist single accounts used for multiple vehicles starting next month. We are speaking of the NHAI ‘One Vehicle, One FASTag’ rule which requires mandatory KYC for certain accounts linked with FASTags. Know all the details below:

NHAI ‘One Vehicle, One FASTag’ Guideline: Details

NHAI (National Highway Authority Of India) has released a new guideline that aims to further improve the toll collection system using FASTags. With the new initiative, NHAI will start blocking and blacklisted FASTag accounts with no KYC. The ‘One Vehicle, One FASTag’ guideline as the name suggests mandates usage of a single FASTag for a single vehicle.

There have been reports indicating one FASTag being used for multiple vehicles. Also, multiple accounts are reportedly active without KYC which is mandate as per RBI. NHAI has also confirmed the timeline by which these accounts will be blocked.

Post January 31, 2024, all the active FASTag accounts with balances and incomplete KYC (Know your customer) process will go inactive. Hence, it is advised that users get the KYC done before the accounts get disabled.

Also Read: No Cash, No Fuss: Here’s How To Pay At Fuel Stations Using Your Car’s FASTag

Steps To Complete KYC For FASTag

Step 1: Launch any web browser and visit the official website https://fastag.ihmcl.com/

Step 2: Tap on ‘Login’ option. You can sign in using your registered mobile number

Step 3: Enter the OTP to login

Step 4: On the dashboard, go the Customer tab and select “My Profile” option

Step 5: Scroll to the KYC section and check the details before completing the registration

Step 6: Now, go to the “Customer Type” option and fill in the required details for the KYC process

Categories
Apps Featured How To Info

How To Withdraw Amazon Pay Balance To Your Bank Account: A Step-by-Step Guide

Key Highlights

  • Securely transfer Amazon Pay Balance to bank account.
  • Simple steps for smooth Amazon Pay withdrawal process.
  • Verify, confirm, and wait – hassle-free fund transfer.

Amazon Pay has become a popular digital wallet, allowing users to make quick and secure payments for their purchases on the e-commerce platform. However, many users often wonder how to withdraw their Amazon Pay balance to their bank accounts.

In this step-by-step guide, we’ll walk you through the process of converting your Amazon Pay balance into real money in your bank account.

Also Read: Amazon Republic Day Sale: Upto 85% Off On Mobile Accessories

Step 1: Check Your Amazon Pay Balance

Before initiating the withdrawal process, ensure that you have a sufficient balance in your Amazon Pay account. You can check your balance by logging into your Amazon account and navigating to the “Amazon Pay” section.

Step 2: Verify Your Bank Account

To withdraw funds, you must have a verified bank account linked to your Amazon account. If you haven’t done this yet, go to the “Amazon Pay” section and click on “Add Money” or “Withdraw Funds.” Follow the prompts to link your bank account and complete the verification process, which may involve providing some additional information.

Also Read: No Cash, No Fuss: Here’s How To Pay At Fuel Stations Using Your Car’s FASTag

Step 3: Access the Withdraw Funds Option

Once your bank account is successfully linked and verified, go back to the “Amazon Pay” section. Look for the option that says “Withdraw Funds” or something similar. Click on it to proceed.

Step 4: Choose the Withdrawal Amount

Select the amount you want to withdraw from your Amazon Pay balance. Keep in mind that there might be certain limits on withdrawal amounts, and you cannot withdraw more than your available balance.

Also Read: Best Year-End Deals On Amazon: Get up to 50% Discount On Business Laptops

Step 5: Confirm the Withdrawal

After choosing the withdrawal amount, review the details to ensure accuracy. Confirm that you are withdrawing the correct amount to the correct bank account. Click on the “Withdraw” or “Confirm” button to initiate the withdrawal process.

Step 6: Wait for Processing

The withdrawal process may take some time, typically a few business days. Amazon will process your request and transfer the funds to your linked bank account.

Also Read: How To Remove A Single Image From Instagram Carousel

Step 7: Check Your Bank Account

Once the withdrawal is complete, check your bank account to verify that the funds have been successfully transferred. You should see a corresponding entry in your bank statement reflecting the withdrawal from Amazon Pay.

Withdrawing your Amazon Pay balance to your bank account is a straightforward process, provided you have a verified bank account linked to your Amazon account. Follow these simple steps, and you’ll be able to convert your digital wallet balance into real money in no time. Remember to be cautious and double-check all details during the withdrawal process to ensure a smooth and secure transaction.

Also Read: Amazon’s Republic Day Sale 2024: Check Best Deals On OnePlus Smartphones

Categories
Apps Auto Tech Featured How To

Google Maps Bluetooth Beacon Feature For Tunnel Navigation Released: How To Use?

Key Highlights

  • Google Maps gets new Bluetooth Beacon navigation feature
  • Will allow easy navigation through tunnel
  • Option can be enabled from the Settings menu

Navigation apps have been a blessing in disguise for the modern age population. These apps have been a saviour while traveling to an unknown destination for every smartphone user. And Google Maps remains on the top list when it comes to usage globally. Google consistently upgrades Maps with new features that improves the user experience with navigation. With the latest update, Google is further making it easier for the masses to get directions even while crossing a tunnel using Bluetooth Beacons. What is this new Google Maps Bluetooth beacon navigation tech and how can you use it on you respective Android and iOS devices? Find out below:

Also Read: Google Maps Tips & Tricks: How To Use Fuel-Efficient Routing In India

Google Maps Bluetooth Beacon Navigation Feature: What Is It?

The latest Google Maps Bluetooth Beacon feature will now make it possible to get directions inside a tunnel. The Bluetooth Beacon technology uses strategically positioned Bluetooth signal emitters for improved location accuracy. This comes as a resolution to the long old shortcoming of the navigation apps where they fail to deliver the location accuracy inside tunnels.

Reports online indicate that Google Maps for Android have received the Bluetooth Beacon technology globally. Roll out for the iOS devices seems to be in the pipeline which we expect to be completed in the coming moths.

Also Read: Google Maps Live Location Feature Released: Steps To Use On Android, iOS

How To Use Bluetooth Beacon Feature On Google Maps

Step 1: Launch the Google Maps mobile app on your Android device.

Step 2: Tap on the profile icon. You can locate it on the top right edge of the app’s home page.

Step 3: Locate and click the Settings option.

Step 4: Scroll down to the Navigation option and tap on it.

Step 5: Now, scroll down again until you see the Bluetooth Beacons option

Step 6: Allow any permissions of asked for enhanced location accuracy and enable the Bluetooth beacons option

Also Read: Find And Locate Your Parked Car/Vehicle With This Google Maps Hack

Conclusion

The new Google Maps navigation feature has been long demanded. It comes at the time when navigational services offered by different apps have been resourceful except with tunnels and similar underground networks. For the users who rely on Google Maps for all different navigation and travel services this new feature will bring a peace of mind.

Categories
Apps Featured How To

Enjoy Domino’s Pizza At Lower Prices: How To Order Via PhonePe’s Pincode App On ONDC

Key Highlights

  • Unlock greater savings on your Domino’s Pizza order via PhonePe’s Pincode App
  • Pincode stands out as an ONDC app developed by PhonePe
  • Retailers now benefit from lower commission fees

The ONDC initiative is changing the game in e-commerce by offering businesses lower fees and better perks than other third-party services. Now, Domino’s Pizza is part of the ONDC network through PhonePe’s Pincode app, providing a wallet-friendly option for ordering compared to platforms like Zomato or Swiggy. Currently operating in select regions of Delhi-NCR, the app plans to expand its reach soon.

Reasons For Domino’s Higher Prices On Zomato And Swiggy

Domino’s is on popular online platforms such as Zomato and Swiggy, and they run their own delivery app. Unlike some other food places, Domino’s takes care of its own deliveries, making orders more expensive. The problem comes from the big commissions, sometimes as high as 30 percent, that third-party platforms charge Domino’s and other vendors. Sadly, customers end up paying more, and it takes away from the usual affordable experience of dining in. Also Read | How to Report Spam on Instagram: Step-by-Step Guide

How To Order Domino’s Through Pincode App

1. Explore the Pincode App

  • Users can opt to place Domino’s orders through the Pincode app
  • The app features a user-friendly interface akin to Zomato, Swiggy, and Zepto

2. Diverse Services Beyond Food Delivery

  • The Pincode app goes beyond food delivery, offering users a range of retail services
  • Explore additional offerings such as groceries, fruits and vegetables, pet care, and more

3. Cost Savings on Orders

  • When you order through Pincode, you’ll enjoy a significant price drop compared to Zomato and Swiggy
  • Get a cost advantage when you order through Pincode – usually 15-20% cheaper than other platforms

4. Consideration for Discounts

  • Although Pincode provides cost-effective options, users should note that the ongoing discounts offered by Domino’s on platforms like Zomato and Swiggy may not be applicable
  • Make an informed decision, weighing the potential savings against any exclusive discounts available on other platforms

Verdict

Thanks to the ONDC initiative, the e-commerce scene is becoming more competitive and budget-friendly. Now, consumers can relish Domino’s Pizza at a lower cost through PhonePe’s Pincode app. As the app grows, more users are likely to enjoy lower expenses and a user-friendly interface, making it a compelling choice compared to standard food delivery platforms.

Also Read | How To Remove A Single Image From Instagram Carousel