Categories
Apps Featured How To Info

How To Remove A Single Image From Instagram Carousel

Key Highlights

  • Open Instagram, find post, enter edit mode.
  • Select image, remove, and save changes.
  • Customize your carousel hassle-free for personalized sharing.

Instagram carousels offer a fantastic way to share multiple photos in a single post, allowing users to swipe through a series of images. However, what if you want to remove just one image from your carousel without deleting the entire post? Don’t worry; it’s a straightforward process.

In this guide, we’ll walk you through the steps in simple terms.

Also Read: 100+ Instagram Username Ideas For Auto Tech Influencers

Step 1: Open Your Instagram App

Begin by opening the Instagram app on your mobile device. Ensure that you are logged into the account where the carousel post is located.

Step 2: Locate the Carousel Post

Navigate to your profile and find the carousel post from which you want to remove a single image. Tap on the post to open it in full view.

Also Read: Instagram’s Upcoming Feature: Sharing Profiles In Stories, Check Details

Step 3: Access Edit Mode

Once the post is open, locate the three dots in the top-right corner of the screen. These dots represent the options menu. Tap on them to reveal a list of actions you can take.
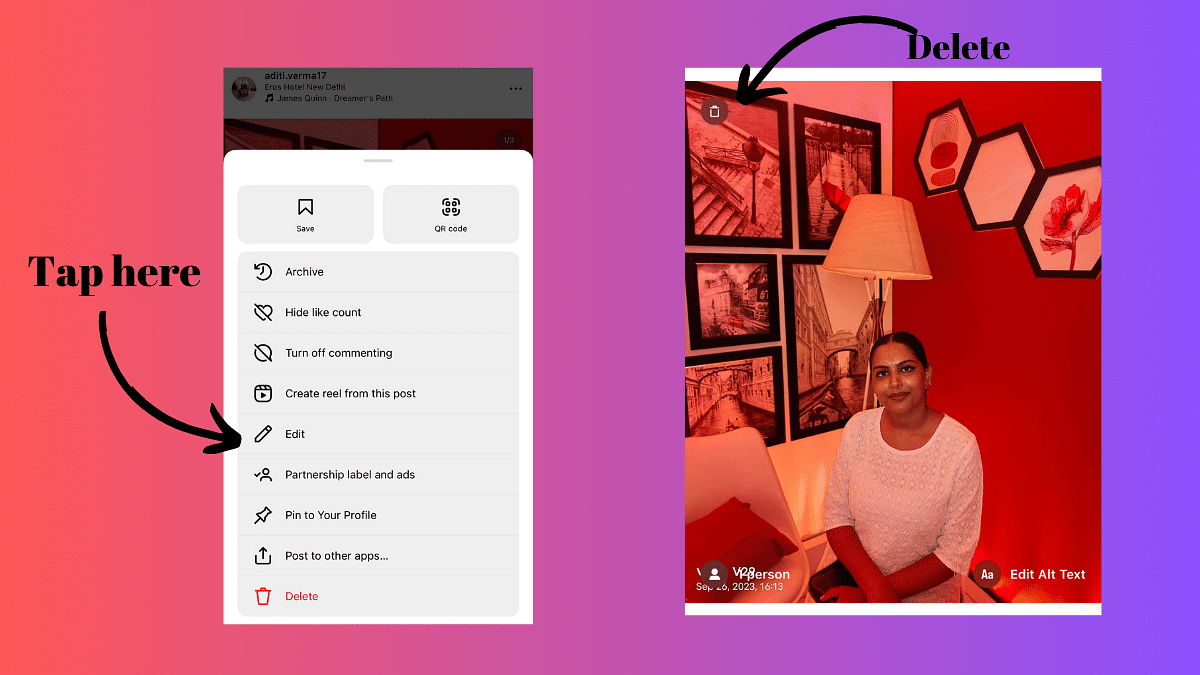
Step 4: Select Edit

From the options menu, choose the “Edit” option. This will allow you to make changes to the carousel post.

Also Read: How To Instantly Download Publicly Posted Reels On Instagram: A Step-By-Step Guide

Step 5: Identify the Image to Remove

In the edit mode, you’ll see all the images in your carousel displayed in a grid. Identify the image you want to remove and tap on it to select it.

Step 6: Remove the Image

After selecting the image, look for the option that allows you to delete or remove it. This option is typically represented by a trash bin icon on the upper left corner. Tap on it to confirm the removal of the chosen image.

Step 7: Save Changes

Once you’ve removed the undesired image, be sure to save your changes. Look for the “Save” or “Done” button, usually located in the top-right corner of the screen, and tap on it.

By following these easy steps you can customize your post without deleting the entire carousel.

Also Read: How to Report Spam on Instagram: Step-by-Step Guide

Categories
Apps Featured How To Info

How to Enable 2-Step Verification On Telegram App: Step-By-Step Guide

Key Highlights

  • Enhanced Security with Two-Step Verification.
  • Simple Setup for Added Account Protection.
  • Protect Messages: Easy Steps for Privacy.

Telegram is a popular messaging app that prioritizes simplicity and security. It allows users to send messages, share media, and documents in a secure way. The app features end-to-end encryption for secret chats and supports self-destruct timers for messages.

Also Read: How Can You Change Font Style In Telegram: Steps For Android, iOS, Desktop

How to Enable 2-Step Verification On Telegram

Telegram is a widely used messaging app known for its user-friendly interface and commitment to privacy and security. One key feature to enhance the security of your Telegram account is the 2-step verification process. By following a few simple steps, you can add an extra layer of protection to safeguard your messages and information.

Also Read: Telegram Introduces Stories For All Users: A 10th Anniversary Gift

Step-By-Step Process:

1. Access Menu: To get started, swipe left on your screen or tap on the hamburger menu icon to open the menu interface.

2. Navigate to Settings: Within the menu, find and select “Settings” to proceed to the app’s settings.

3. Privacy and Security: Once in the Settings menu, choose “Privacy and Security” to access security-related options.

4. Select Two-Step Verification: Under Privacy and Security, tap on “Two-Step Verification” to initiate the setup process.

5. Set Additional Password: Telegram will prompt you to set up an additional password for added security. Choose a strong and unique password.

6. Add Password Hint and Recovery Email: For enhanced account recovery options, enter a password hint and provide a recovery email. This ensures you can regain access to your account if needed.

7. Verification Code: Telegram will send a verification code to the recovery email provided. Input this code to complete the two-step verification process.

By following these straightforward steps, you can protect your messages and information from unauthorized access, enhancing the overall privacy and integrity of your communication on the platform.

Also Read: Top Five Hacks To Protect Your Privacy On Telegram

Categories
Apps Auto Tech Featured How To

Find And Locate Your Parked Car/Vehicle With This Google Maps Hack

Key Highlights

  • Google Maps is the most convenient navigational app for smartphone users
  • Offers hassle free commute directions
  • Can be used to find parked cars and other vehicles

Google Maps have made it convenient for smartphone users to commute to unknown destinations; specifically for the one who are driving through the roads. Over the years, Google has added numerous tools and services to enhance the navigational experience for the masses. From finding a shorter route to getting live traffic status, Google Maps offer a whole wide range of navigation features but also aids with finding grocery stores, fuel stations, hospitals, and much more. But are you aware that Google Maps can also help you locate your parked vehicles. Let’s know more of this useful Google Maps feature and how can you use it to save time finding your parked vehicles.

Also Read: Google Maps Tips & Tricks: How To Use Fuel-Efficient Routing In India

Google Maps Saved Car Parking Feature: Functionality

The Google Maps “Save Parking” is an essential feature that helps consumers to find their parked vehicles. This option makes it super convenient for the users to locate their cars, scooters, and motorcycles with just a tap.

Specifically, if the vehicle is parked in any busy street or locality or even in a big parking lot where it might get a bit difficult to locate the parked vehicle. A dedicated point can be marked where the car is parked which helps with cutting down the confusion of finding the exact spot where it has been parked.

Also Read: Google Maps Live Location Feature Released: Steps To Use On Android, iOS

Steps To Create And Add A New Parking Lot/ Garage On Google Maps

Step 1: Launch Google Maps on your Android/ iOS device or open the desktop version

Step 2: Now, search a location that you wish to add as a new parking lot or garage

Step 3: Click on “Directions” option

Step 4: Locate the “Steps & Parking” option and tap on it

Step 5: Now, select the “Find parking near destination” option

Step 6: You will now be able to select a parking lot or garage by simply tapping on the “Add Parking” tab

Step 7: Hit the Start button

Also Read: Avoid Overspeeding Traffic Challans: How To Enable Speed Limit Warning In Google Maps

How To Save Parking Location On Google Maps

Step 1: Open the Google Maps mobile application on your respective devices

Step 2: Enter the destination

Step 3: Once you have reached the destination, you’ll see the blue navigation icon on the screen. Tap on it.

Step 4: You’ll see a bunch of options from where you need to select “Save parking”

Step 5: That’s all you need to do to save the parking location

Also Read: Want To Report Accidents And Road Closures On Google Maps? Learn How To Do It

Steps To Find Parked Car Or Vehicle Using Google Maps

Step 1: After launching the Google Maps app, go to the profile section

Step 2: Tap once on the search bar

Step 3: Select the Parking location and hit on Directions

Categories
Apps Featured How To

Google Maps Live Location Feature Released: Steps To Use On Android, iOS

Key Highlights

  • Live location sharing feature has been missing from Google Maps
  • Option added to share live location directly using Google Maps
  • Feature can be used on both iOS and Android

Google Maps is one of the most advanced navigation apps that one can use on a variety of gadgets including smartphones, tablets, and laptops. It is one of those applications that has made it easy for the masses to travel to unknown destinations while commuting via public or personal transports. Google has been updating Maps with new features and has also improved its interface for the ease in operations. A new feature has been added to Google Maps which will now allow live location sharing directly from the application. What is this live location feature added to Google Maps and how can you use it on Android and iOS devices? Find out the details below:

Google Maps Live Location Sharing Feature: What Is It?

The live location feature sharing on Google Maps is the same as offered by the popular instant messaging app WhatsApp. This new feature will allow users to send live location to any contact using the Maps app directly.

Also Read: Google Maps Tips & Tricks: How To Use Fuel-Efficient Routing In India

Google Maps Live Location Sharing Feature: Time And Sharing Guide

The maximum limit that Google has set on Maps for sharing live location to any other user is infinite. For this one has to select the “Until you turn this off” option. The minimum limit is set for 15minutes which can be extended to up to 1 day.

Once you set the time limit, you will see a bunch of apps that support Maps and using which you can share the live location.

Also Read: Google Maps Partners With ONDC For Metro Ticket Booking In India

How To Share Live Location On Google Maps Using Android, iOS

Step 1: Launch the Google Maps application on your Android or iOS device

Step 2: Click on the Profile option. Placement of the profile icon may vary depending on the Android or iOS device you are using

Step 3: Tap on the Location Sharing option

Step 4: Now, select the “Share Location” option

Step 5: Adjust the time limit

Step 6: Select the app using which you wish to share your live location

Also Read: Find Nearest Grocery Store: Here’s How To Locate Closest Grocery Store Using Google Maps

Conclusion

It has been long since the third party messaging applications have been using Google navigational support for sharing live locations. And Google’s native navigation app itself remained void of this feature. Now, no more third party application will be required as users will get the option send their live location directly from the Maps app.

Categories
Apps Featured How To Info

How To Avail Google One Basic Plan At Rs 100 For 3 Months: Guide

Key Highlights

  • Exclusive Offer: Google One Basic Plan at Rs 100
  • Simple Steps: Download, Upgrade, and Unlock Storage Discount
  • Limited Time: Get 3 Months of 100GB Storage for Rs 100

Google One, the cloud storage solution offered by Google for storing photos, videos, documents, and other files, is currently running a limited-time promotion on its plans. The Basic plan, which typically costs Rs 130 per month or Rs 1,300 annually, is now available for just Rs 100 for the first 3 months. This step-by-step guide will walk you through the process of availing this discounted offer, applicable to both desktop and mobile users.

Also Read: How To Activate Spam Protection In Google Messages: Guide

1. Download and Install the Google One App

The first step is to download and install the Google One app on your mobile device. Ensure that you sign in using the Google account for which you want to purchase the plan. The app is available on both Android and iOS platforms.

2. Sign In and Tap on ‘Upgrade’

After installing the app, sign in with your Google account credentials. Once signed in, locate and tap on the ‘Upgrade’ button within the app. Google One will then display all the available plans, including the discounted prices for the first 3 months.

Alternative Method: Unlock Storage Discount via Photos App

Alternatively, you can access the discounted plans through the Photos app. Open the Photos app on your device, tap on the profile picture at the top right of the screen, and click on the ‘Unlock storage discount’ button to view and purchase the plans.

3. Festive Offer on Desktop

For users who prefer to purchase a desktop, visit the Google One website and sign in with your Google account. The website will showcase the available plans in your country, allowing you to choose the desired plan with promotional pricing.

Also Read: Google Launches Gemini: Most Advanced AI Model Yet

What’s Included in the Google One Basic Plan?

The Google One Basic plan offers 100GB of free cloud storage, accompanied by additional perks such as the ability to share the storage with up to five members, access to Google experts, and a dark web scan for your information like email and phone number. Subscribers also gain access to advanced editing features in Google Photos, including Magic Eraser, Portrait Blur, Portrait Light, Colour Pop, Sky suggestions, and more.

Also Read: Google Unveils OpenAI Competitor Gemini 1.0

Bonus: Check for Manufacturer Trials

Some phone manufacturers, such as Oppo and Pixel, offer a 6-month Google One trial. If you own a device from these manufacturers, check the Google One app to see if this additional trial is available for your phone.

It’s important to note that Google’s policy on storage changed recently, and images and videos uploaded via Google Photos now count towards the available storage space. With these steps, you can make the most of the current promotion and enjoy the benefits of Google One at a discounted rate for the initial 3 months.

Also Read: What Kept India Googling? Google’s ‘Year in Search 2023’ Has The Answers

Categories
Apps Featured How To Info

How To Use Instagram’s New 2-Second Video Notes

Key Highlights

  • Now Instagram will let you record 2-Second Video to put on notes.
  • Emojis, Photos, and Audio Enhance Engagement!
  • Simple Steps: Open Inbox, Record, Add Text, and Share!

Instagram has recently introduced an update to its platform, unveiling a new video status feature that lets users create snappy 2-second video notes. Unlike the familiar Stories feature, these video notes are super short, captured exclusively through the front camera within the app, and cannot be imported from your device’s storage. Once shared, these bite-sized videos are visible to your close friends and mutual followers for a brief 24-hour window.

Also Read: 100+ Best Instagram Usernames For Car Lovers

How to Use the Video Feature

Step 1: Open Instagram and Navigate to Your Inbox

To start using the new Video Status feature, open your Instagram app and head straight to your inbox. Look for the tray containing your notes, where you’ll see a camera icon at the left .

Step 2: Tap on Your Photo in the Notes Tray and Click the Camera Icon

Once you’ve located the camera icon, tap on your photo in the Notes tray. This action will open up the camera, ready for you to capture your brief moment.

Step 3: Record a 2-Second Video Using the Front-Facing Camera

Record a quick 2-second video using the front-facing camera. Express yourself, share a funny moment, or capture a snippet of your day – the possibilities are endless in this short time frame.

Step 4: Add Text for Context, Then Post

You can now enhance your video by adding text for context. Whether it’s a quick caption, an emoji, or a brief explanation, this step allows you to provide a bit more detail to your audience. Once done, hit the post button, and your 2-second video will be shared with your selected audience.

Also Read: How To Instantly Download Publicly Posted Reels On Instagram: A Step-By-Step Guide

Interactive Replies: More Than Just Texts

Engagement is key on Instagram, and with the new Video Status feature, interactive replies take it to a whole new level. Users can respond to your notes with more than just text – audio, photo, video, and stickers are now part of the conversation. Whether it’s a heartfelt message, a funny photo, or a creative video response, the options for interaction are now more diverse than ever. Enjoy the enhanced communication and connection with your Instagram community!

Also Read: Instagram Close Friends Feature Takes Center Stage In Main Feed: How To Use

Categories
Apps Featured How To Info

How To Use WhatsApp’s Music Sharing Feature On iPhone During Video Calls: A Step-by-Step Guide

Key Highlights

  • iPhone users can share music during a video call on WhatsApp.
  • Playing audio on the device automatically shares the music with participants in the video call.
  • This feature allows users to enjoy their favourite music while engaged in a video call.

WhatsApp is always on the lookout for innovative features to enhance user experience. After the successful rollout of the screen-sharing feature a few months ago, the platform is now testing a music-sharing feature, adding a new dimension to video calls. This feature, currently in beta, is specifically designed for iOS users, allowing them to share and listen to music during video calls.

Also Read: How To Use WhatsApp’s New Voice Chat Feature For Group Calls: Step-By-Step Guide

The Beta Testing Phase

WABetaInfo first spotted this upcoming feature, and it’s important to note that it won’t function during audio-only calls. Although there is no official timeline for the rollout to Android users, this new addition promises to make WhatsApp video calls more engaging and interactive.

How It Works

Step-by-Step Guide to Using WhatsApp’s Music Feature During Video Calls:

1. Ensure App and Device Compatibility:

  • Confirm that you have the latest version of WhatsApp installed on your iPhone.
  • Ensure that your device is running the necessary iOS version supporting this feature.

2. Initiate a Video Call:

  • Start a video call with your desired contact by selecting the video call icon within the chat.

3. Enable Screen Sharing:

  • During the video call, locate and tap on the “Screen Share” option. This may be found in the call interface, typically as an icon representing screens or devices.

4. Play Music or Video:

  • Once screen sharing is activated, open your preferred music or video player on your iPhone.
  • Play the desired music or video file that you want to share with your contact.

5. Real-Time Audio Sharing:

  • As you play the music or video, the audio will be shared in real-time with all participants in the video call.
  • Enjoy an immersive audio-visual experience, creating a shared atmosphere with your friends.

Limitations And Compatibility

  • This feature works exclusively during video calls and is not compatible with voice calls on WhatsApp.
  • Additionally, it won’t function if the video is turned off during the call.
  • In case the feature doesn’t work, ensure that both you and your contact have the latest versions of WhatsApp.
  • Verify that your device and iOS version meet the requirements for this feature.

What’s Next For WhatsApp?

This music-sharing feature follows the August rollout of the screen-sharing feature, which simplifies collaborative tasks during video calls. Whether it’s sharing documents in a work meeting or showcasing a presentation, WhatsApp’s screen-sharing feature has become a valuable tool.

In addition to the music-sharing feature, WhatsApp is exploring new capabilities, including directly sharing WhatsApp Status updates to Instagram. This aligns with Meta’s vision of achieving cross-platform compatibility across all its applications.

Also Read: WhatsApp Beta Update: AI Chatbot Access Button Rolled Out To Selected Users

Categories
Auto Tech How To

Need To Charge Your Electric Car At Home? Here’s A Step-by-Step Guide

Key Highlights

  • You need to choose the right charging equipment for your EV
  • Hire a certified electrician to ensure proper Level 2 charger installation
  • Use a smartphone app to monitor the charging process

With the growing popularity of electric vehicles, many individuals are making the switch to cleaner and more sustainable transportation. One of the conveniences of owning an electric car is the ability to charge it at home. Charging at home not only saves time and money but also contributes to reducing your carbon footprint. In this step-by-step guide, we’ll walk you through the process of charging your electric car at home. Also Read | 2024 EV Update:Top Upcoming Electric Scooters In India

How To Charge Your EV At Home

Step 1: Before you can charge your electric car at home, you’ll need to invest in the right charging equipment. There are generally two types of home charging stations: Level 1 and Level 2.

  • Level 1 Charger (120V): This charger plugs into a standard household outlet and is suitable for overnight charging. While it’s the slowest option, it is convenient for those who have more time between trips.
  • Level 2 Charger (240V): This charger provides a faster charging speed compared to Level 1 and is the most common choice for home charging. It requires professional installation and may need additional electrical work, but it significantly reduces charging time.

Step 2: For Level 1 charging, simply plug the charger into a standard household outlet. However, for Level 2 charging, it’s recommended to hire a certified electrician for proper installation. The electrician will assess your electrical system, install a dedicated circuit, and mount the charging station in a convenient location.

Step 3: Different electric car models come with various charging ports and connectors. Make sure you have the correct charging cable for your vehicle. Most EVs come with a standard Level 1 charger, and for Level 2, you may need to purchase a separate charging cable or use the one provided by the car manufacturer.

Also Read | Spark Or Strain? The Pros And Cons Of Choosing An Electric Vehicle

Step 4: Once the charging station is installed and the appropriate cable is selected, it’s time to connect your electric car. Open the charging port on your vehicle and plug in the charging cable securely. Ensure that the connector is properly aligned and fully inserted to establish a good connection.

Step 5: Modern electric cars often have a dashboard display or a smartphone app that allows you to monitor the charging process. Keep an eye on the charging status, remaining time, and battery level. This information will help you plan your charging routine effectively.

Step 6: Once your electric car is fully charged, safely unplug the charging cable from both the vehicle and the charging station. Store the cable in a secure and dry location to prevent damage.

Verdict

Charging your electric car at home is a straightforward process that becomes second nature with time. By following this step-by-step guide, you can enjoy the convenience of home charging while contributing to a cleaner and more sustainable future. As electric vehicle technology continues to advance, the experience of charging at home will only become more efficient and user-friendly.

Also Read | Are You EV-Ready? Top Apps Every Electric Car Owner Should Have

Categories
Apps Featured How To

ChatGPT Voice Chat Feature Released: How Is It Different From Text Version?

Key Highlights

  • Open AI launches ChatGPT voice feature
  • Advanced version of text chatbot
  • Can be downloaded on both Android and iOS devices
  • Usage is free of cost

Open AI’s ChatGPT is one of the most sensational launches of 2023. The AI-enabled chat bit allows users to get answers for different queries and also get done with different projects that otherwise requires loads of research work. But now Open AI is taking ChatGPT a step ahead with the launch of the voice chat feature for the masses. Notably, ChatGPT has already released the voice feature for premium consumers including ChatGPT Enterprise and ChatGPT Plus users, but now has expanded its reach to all users. What is this ChatGPT voice feature and how can you use it?

Also Read: ChatGPT Is Now Available On Android Starting Next Week

ChatGPT Voice Feature Available For All Users: How Is It Different From Text?

In a post shared on X (formerly Twitter), Open AI has announced the launch of ChatGPT voice for all users. For reference, ChatGPT voice has been made available earlier to the Enterprise and Plus subscription users.

Now, it can be used by both Android and iOS users too. The post confirms ChatGPT voice can be used for free and no additional service charge would be required to use this new advanced chatbot feature.

As for the functionality, the ChatGPT voice is not much different from the text. The primary difference is the use of voice commands instead of text to get desired responses from the ChatGPT chatbot. Moreover, the responses received are in audio format and not text.

It is worth mentioning that the audio responses/ voice chat with the chatbot comes with multi-lingual support. This will make it convenient for the users from different global regions.

Open AI has also clarified that the audio from the voice chats will be saved in the form of transcripts. Users will get the option to access to go through these transcripts from the chat history but will not be able to listen to the audio clips.

Furthermore, users won’t need to pay any amount in order to access the ChatGPT voice feature. It can be downloaded for free from Google Play Store and Apple App Store on respective Android and iOS devices.

Also Read: OpenAI Introduces Dall-E 3: A New AI That Converts Text To Images Using ChatGPT

Categories
Apps Featured How To Info

How To Instantly Download Publicly Posted Reels On Instagram: A Step-By-Step Guide

Key Highlights

  • Global Access to Download Public Reels
  • Save Reels Directly to Your Camera Roll
  • Can Now Share Beyond Instagram Platform

Earlier this year, Instagram introduced the ability to download Reels from public accounts, initially in the United States. The good news? This feature is now going global and is now available in India and one can now save Reels directly to their camera roll. Let’s understand how you can download the reels in three simple steps below.

Also Read: How To Use Instagram’s New Song Lyrics Feature In Reels: A Step-By-Step Guide

How to Use Instagram’s Reels Download Feature In 3 Simple Steps

Instagram Head Adam Mosseri, through his Broadcast channel, confirmed the global rollout of the Reels download feature. Users can now save Reels directly to their camera roll, complete with the creator’s Instagram handle as a watermark.

Here’s a quick guide on how to download any reel in just three simple steps:-

Step 1: Locate the Reel

Start by identifying the Reel you want to download. Navigate to the public account where the Reel is located. Browse through their profile or stories until you find the Reel you wish to save.

Step 2: Download the Reel

Once you’ve found the Reel, tap on the Share button located on the bottom right of the post. A menu will appear with various options. Select the “Download” option from the menu. If the public account has allowed downloads, the Reel will be saved directly to your device’s camera roll.

Step 3: Access Your Downloaded Reel

To access your downloaded Reel, head to your device’s gallery or camera roll. The saved Reel will appear as a video file with the Instagram handle of the creator as a watermark.

If you encounter any issues downloading Reels, ensure that the public account has not disabled the download feature. Public accounts have the option to control whether users can download their Reels.

Also Read: Instagram Close Friends Feature Takes Center Stage In Main Feed: How To Use