Categories
Apps Featured How To Info

How To Use Google Collections As Your Ultimate Web Archive

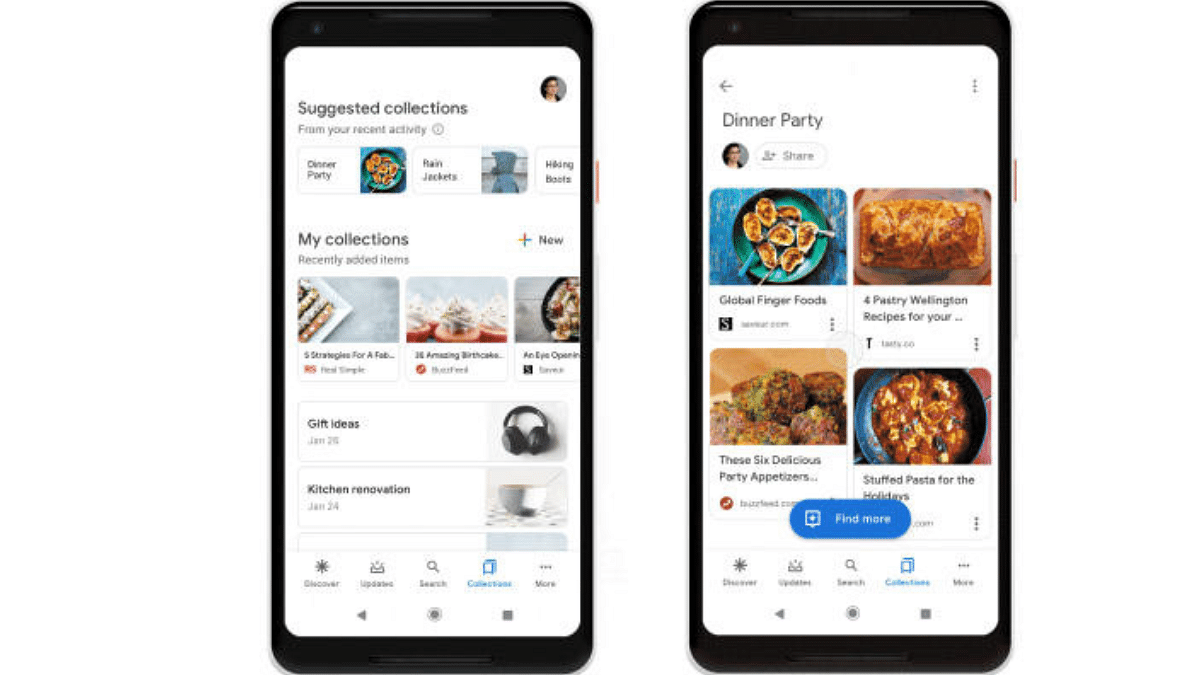
The Google app, pre-installed on most Android devices, offers a wealth of features. However, some of the most valuable features can be hidden within the app. One such gem is Google Collections, a powerful functionality that allows users to organize and save various types of content in a single place. Whether you’re an avid reader, a video enthusiast, or simply someone who wants to quickly save links for later, Google Collections can be your ultimate web archive. In this article, we’ll explore how to make the most of this handy tool.

Also Read: Have You Tried Google’s ImageFX Yet? Learn How To Use This New AI Image Generator

Why Choose Google Collections?

While other apps like Microsoft Edge offer similar functionality, they often come with limitations tied to a specific app. Google Collections, on the other hand, stands out for several reasons:

  1. Cross-Platform Availability: Google Collections works seamlessly across both Android and iOS devices. Whether you’re using a smartphone or a tablet, you can access your collections from anywhere.
  2. Integration with Google Services: Google Collections integrates with various Google services, including YouTube, Chrome, and Search. Additionally, it plays well with third-party apps, making it a versatile choice.
  3. Efficient Content Organization: If you consume a lot of content—articles, videos, images, and more—Google Collections allows you to neatly organize everything in one place. No more scattered bookmarks or saved links!

Also Read: WhatsApp Switches To Google Drive For Android Chat Backups: Details

Creating New Google Collections

Creating a new collection in the Google app is straightforward:

  1. Access Existing Collections or Create a New One:
    • Launch the Google app on your device.
    • Tap the “Saved” button located at the bottom bar.
    • On the resulting page, click the “+Create” button at the bottom right.
    • Choose the type of collection you want to create (e.g., links, saved items, or a blank collection).
    • Give your collection a name and add a description if desired. Tap “Done.”

Also Read: Google’s AI: Bard or Gemini? What You Need To Know About The Rebranding

Adding Items to Your Collections

Once you’ve created a collection, it’s time to populate it with content:

  1. Open the Google App and Tap “Search”:
    • In the bottom bar of the Google app, tap the “Search” button.
  2. Add Web Pages or Links:
    • Visit the web page you want to add.
    • Alternatively, enter the link directly.
    • You can also add web pages from the Discover feed.
  3. Bookmark the Page:
    • When the page loads, tap the “Bookmark icon” in the upper right corner.
    • You’ll receive a confirmation message indicating that the page has been added to your collection.
  4. Organize Further (Optional):
    • To add the item to another collection, tap “Edit.” You can choose from existing collections or create a new one.
    • Additionally, explore the “Saved” tab in the Google app to add links, images, and other content to your collections.

Also Read: Google Maps Levels Up: Android Users Gain Access To iOS Exclusive Weather Feature

Managing Your Collections

Google Collections offers flexibility in managing your saved items:

  • Removing Items: Easily remove items from a collection by selecting them and clicking “Remove.”
  • Renaming Collections: Edit the title of your collection by clicking “More” and selecting “Edit.”
  • Sharing Collections: Share your collections with family and friends by turning on sharing and choosing the desired link.
Categories
Apps Featured How To

Share Passwords Easily With Google’s Family Feature: Here’s How

Key Highlights

  • Google introduces a shared password feature for family plans
  • Easily share passwords via Google Password Manager for easy family access
  • Stay updated for upcoming app updates to access new features

In a recent blog post, Google unveiled an exciting update made for users of its family plans across various services. Alongside existing shared features like Google One membership and payment methods, the tech giant is rolling out a new addition: shared password sharing. Also Read | Gmail Tips And Tricks: How To Secure Your Google Account With Two-Factor Authentication

Family Password Sharing With Google Password Manager

Google is revolutionizing password management for families through its Google Password Manager. This feature, set to operate similarly to other shared services, will empower family members to securely share usernames and passwords for specific websites or services directly within the platform.

According to the Google blog post, “Accounts that are part of a family group will soon have the option to share usernames and passwords for a particular website or service directly from Google Password Manager.”

Family Connectivity With Google One

Google’s family plan via Google One allows for the inclusion of up to five additional members, enabling a total of six members to share passwords seamlessly. This expanded connectivity caters to various scenarios, from coordinating activities to accessing school assignments.

Also Read | Google Sheets Tips And Tricks: How To Add ChatGPT Extension To Google Sheets

How To Share Passwords With Family Members

To use the sharing process, Google provides simple steps:

Step 1: Navigate to Settings on your Chrome browser, whether on desktop or mobile.

Step 2: Locate the ‘Autofill and password’ tab in the left sidebar and select Google Password Manager.

Step 3: Identify the saved password you wish to share and tap on it.

Step 4: Look for the Share button next to the Edit and Delete options, and tap on it to share the password with family plan members.

Stay Updated and Connected

If the Share button isn’t immediately visible, users are encouraged to await the upcoming app update, ensuring they have access to the latest features. Alternatively, manual updates can be initiated via the google.com/chrome website.

Additional Google Updates

In addition to the password-sharing feature, Google has implemented enhancements across its services. Users now have more control over SafeSearch settings, while parents can easily access parental controls through a simple search on the Google app. This streamlined process includes a dedicated information box to facilitate the addition of a child’s Google account.

Also Read | Google Maps Tips & Tricks: How To Use Fuel-Efficient Routing In India

Categories
Apps Featured How To

Saying Goodbye To Paytm Payments Bank? Here’s How To Close It Safely

Key Highlights

  • Paytm Payments Bank faces RBI action, service restrictions from Feb 29
  • Zero balance, gather docs before closing the Paytm Payments Bank account
  • Close your account on Paytm with simple steps

In response to determined non-compliance and significant supervisory concerns, the Reserve Bank of India (RBI) has taken decisive action against Paytm Payments Bank Ltd. (PPBL), a prominent subsidiary of India’s leading payment firm, Paytm. This regulatory intervention is set to be effective from February 29, 2024. Also Read | Paytm Lite: What Is It? How To Setup And Use Paytm Lite On Smartphones?

Impact On Paytm Payments Bank Services

As a result of the RBI’s decision, PPBL is mandated to cease accepting new deposits and suspend all credit transactions, affecting various services such as popular wallets, FASTags, National Common Mobility Cards (NCMC), and other prepaid devices. Moreover, fund transfers through Paytm, including those conducted via the Unified Payments Interface (UPI), have been prohibited by the RBI.

Things To Do Before Closing Your Paytm Payments Bank Account

Ensure Zero Balance: Before initiating the account closure process, it is crucial to ensure a zero balance in your Paytm Payments Bank account. This can be achieved by either spending the existing balance, transferring it to another bank account, or sending it to another Paytm user.

Gather Necessary Documents: To streamline the closure process, keep your registered mobile number and any identification proof, such as a PAN card or Aadhaar card, readily available.

How To Close Your Paytm Payments Bank Account

Step 1: Access your Paytm account using your old phone number.

Step 2: Click on the “☰” icon situated in the top left corner of the home screen. Move to the ’24—7 Help’ section and proceed to ‘Profile Settings.’

Step 3: Under ‘I need to close/delete my account,’ choose the option to initiate the closure process.

Also Read | Paytm Unveils Guaranteed Seat Assistance Feature: Here’s How To Use

Additional Information And Considerations

Access Issues: If you encounter difficulties accessing your registered mobile number, opt for the “I am unable to access my Account” followed by the “I need to block my account” option. Submission of proof of account ownership is required to proceed.

Confirmation and Fund Transfer: Once the closure process is completed, expect a confirmation message. Your Paytm wallet balance will be transferred to your linked bank account within seven working days.

Wallet Deactivation: Note that closing your Paytm Payments Bank account will also result in the deactivation of your Paytm wallet if it is linked to the same number.

Conclusion

By following these simple steps, users can efficiently close their Paytm Payments Bank accounts and transition seamlessly to the next phase.

Also Read | Paytm App Still Working After RBI Ban? Impact On Users

Categories
Apps Featured How To Info

New WhatsApp Trick: Share Channel Posts As Status In Seconds (2024 Guide)

Key Highlights

  • You can now share Channel posts to your WhatsApp Status.
  • Users can share Text, links, pics, GIFs, and videos.
  • Follow the below-mentioned simple steps.

WhatsApp recently rolled out a new feature that allows you to share posts from channels directly to your status. This is a game-changer for anyone who wants to amplify their favourite channel content or boost engagement with their channel.

Also Read: Considering ChatGPT Plus? Here’s Why And How To Subscribe

Before we dive in, here’s a quick heads-up:

  • This feature is currently available on both Android and iOS apps.
  • You can only share text, links, photos, GIFs, and videos from channels to your status.
  • The feature is not yet available on the WhatsApp web platform but might roll out soon.

Also Read: Track Your WhatsApp Channels: Automatic Reports Coming Soon!

How to Share Channel Updates on WhatsApp

Now, let’s learn how to share channel posts as status in 3 simple steps:

1. Find the perfect post: Browse your favorite channels and find a post you want to share.

2. Forward the post: Tap and hold the post, then tap the forward arrow icon. If you want to share multiple posts, select them all first.

3. Share to your status: In the forward menu, choose “My Status” and tap the send/forward button. You’re done!

Bonus tip: You can also share a channel link directly to your status. Just go to the channel’s info page, tap “Forward,” and choose “My Status.”

Also Read: How To Remove An Image Background On Windows 11

Important Notes:

  • Only specific content types can be shared as Status: text, links, photos, GIFs, and videos.
  • The feature is currently not available on WhatsApp Web, but a future rollout is possible.

Also Read: WhatsApp Hack for Busy Groups: “Pinned Events” Feature Revealed!

Why share channel posts to your status?

  • Boost your channel’s reach: Get your channel content seen by a wider audience through your network.
  • Increase engagement: Encourage friends and family to join your channel or discover new channels you love.
  • Share valuable content: Easily spread informative, funny, or entertaining posts from your favorite channels.
Categories
Apps Featured How To

Considering ChatGPT Plus? Here’s Why And How To Subscribe

Key Highlights

  • ChatGPT Plus, $20/month, ensures smooth access, faster responses, and early access to new features
  • ChatGPT Plus features GPT-4, offering innovation, even though occasional errors may occur
  • Log in, click “Upgrade to Plus,” confirm, and checkout

When ChatGPT debuted in November 2022, it offered free access to everyone. However, the overwhelming demand led to extended wait times and blackout periods. In response, OpenAI introduced ChatGPT Plus, a subscription plan designed to alleviate delays and provide additional benefits. Also Read | ChatGPT Voice Chat Feature Released: How Is It Different From Text Version?

ChatGPT Plus: Why One Should Consider This Tool

ChatGPT Plus, priced at $20 per month, ensures users general access even during peak times. This guarantees faster response times compared to the free version.

Exclusive Benefits For Subscribers

Subscribers enjoy priority access to unreleased features and updates. These include OpenAI’s cutting-edge models like GPT-4, ChatGPT plugins, custom chatbot creation, image generation with DALL-E 3, internet access, and Advanced Data Analysis.

Enhanced Reliability for Business and Workflow

For individuals depending on ChatGPT for professional or daily tasks, ChatGPT Plus ensures uninterrupted access to the most advanced and reliable AI models. This makes it an indispensable tool for seamless and efficient utilization.

User Testimony: A Closer Look At ChatGPT Plus

Having personally tested ChatGPT Plus, it’s evident that the subscription service surpasses the free version, GPT-3.5, especially when seeking accurate answers. While GPT-4 may still exhibit occasional errors termed as “hallucinations,” OpenAI positions it as a model ten times more advanced than its predecessor.

Also Read | The Ultimate Guide To Use ChatGPT On WhatsApp

How To Subscribe To ChatGPT Plus

Step 1: Start by visiting ChatGPT’s login page. Log in to your existing account or create a new one using your email, Google, or Microsoft account.

Step 2: Once logged in, instead of initiating a chat, locate the “Upgrade to Plus” option on the right-hand bar. Click on it to proceed.

Step 3: After clicking “Upgrade to Plus,” a confirmation popup appears. If you’re ready to proceed with the enhanced features, click the green “Upgrade to Plus” button.

Step 4: After you confirm, you will go to a page where you can purchase. Just fill in your email, payment details, and billing address to finish subscribing.

ChatGPT Team Option For Collaborative Environments

Adjacent to the “Upgrade to Plus” button, you’ll find an option for ChatGPT Team, catering to collaborative workspaces. This self-serve plan includes perks similar to ChatGPT Plus, along with additional features for efficient team management.

Also Read | Chatgpt Vs Microsoft Copilot: Which One Is A Better AI Tool?

Categories
Featured How To Info

How To Remove An Image Background On Windows 11

Ever wanted to isolate that perfect portrait from its busy background? Or maybe turn your product photo into a professional-looking cutout? Well, with Windows 11, you can do just that! This guide will walk you through three simple ways to remove image backgrounds on your Windows 11 machine, no fancy software is needed.

Also Read: How To Create Stickers On Instagram With Cutouts

1. Using Paint

  • Open your image in Paint (search for “Paint” in the Start menu).
  • Click “File” > “Open” and select your image.
  • Head to the “Image” tab on the ribbon and click the magic wand icon labeled “Remove background.”
  • Paint automatically removes most of the background.
  • Use the “Zoom” tool for precision and the “Eraser” to clean up any stray pixels.
  • Click “Save” to keep your transparent masterpiece!

Also Read: Apple CarPlay Not Working? Here’s How to Fix It

2. Photos App

  • Open your image in the Photos app (right-click the image and choose “Open with” > “Photos”).
  • Click the “Edit image” button (pencil icon) at the top or press Ctrl+E.
  • Look for the “Background” button (person with lines behind) and click “Remove.”
  • Photos do the heavy lifting, but you can fine-tune with the “Background brush tool.”
  • Click “Keep” or “Remove” to adjust the selection, and hit “Done” when happy.
  • Click “Save a copy” to preserve your transparent image.

Also Read: Here’s How You Can Recover Lost Or Deleted Data In Windows 11 Laptops, PCs

3. Microsoft Office

  • Open your image in a Microsoft Office program like Word, PowerPoint, or Excel.
  • Click on the image to select it.
  • Go to the “Picture Format” tab (right-click and choose “Format Picture” if needed).
  • Click “Remove Background” – it’s like magic for presentations and documents!
  • Use the “+” or “-” buttons to adjust the selection area.
  • Click “Keep changes” when you’re satisfied and save your file.

Bonus Tip: For complex images with hair or detailed edges, these built-in tools might not be perfect. Consider online background removers or dedicated photo editing software for more advanced results.

Categories
Apps Featured How To

Have You Tried Google’s ImageFX Yet? Learn How To Use This New AI Image Generator

Key Highlights

  • AI image generator transforms ordinary photos into visual masterpieces
  • This new tool is built upon the Imagen 2 model
  • Learn to enhance images effortlessly with ImageFX

Google has recently introduced ImageFX, an independent artificial intelligence image generator, as part of its AI Test Kitchen. This innovative experiment builds upon the Imagen 2 model, the backbone behind image generation in the Bard chatbot. Unlike previous Google AI image experiments, ImageFX focuses exclusively on creating pictures. Also Read | How To Remove A Single Image From Instagram Carousel

Limited Availability And Language Support

Currently, ImageFX is available only in English and select countries, including the United States, Australia, New Zealand, and Kenya. Operating similarly to Google’s MusicFX experiment, ImageFX employs “chips” and keywords to refine prompts for image creation.

How To Use Google’s ImageFX

Step 1: Navigate to Google Labs and explore the AI Test Kitchen, featuring various experiments such as MusicFX and TextFX for creative phrasing.

Step 2: Click on ImageFX, prompting you to sign in with a personal Google account.

Step 3: Begin with the default image suggestion, a descriptive phrase accompanied by a “tab” button. Hit the tab and then generate to see the default image.

Step 4: ImageFX stands out by converting keywords into “chips,” allowing users to easily modify and create alternative versions. Change or delete chips and click generate to observe the changes.

Step 5: Remove all chips and input a custom prompt. ImageFX will convert keywords into chips automatically. Click generate to view your customized image.

Also Read | Gmail Tips And Tricks: How To Secure Your Google Account With Two-Factor Authentication

Step 6: Beneath the input box, ImageFX offers additional keywords. Click on any to customize your image further. Generated keywords become chips for modification.

Step 7: Each image generation results in a set of square-format images added to the library on the right. Click arrows to review previous generations.

Step 8: Click on any image to view it in more detail. This view allows users to see the seed, download the image, or copy the prompt.

Step 9: For more options, hover over the image. To download, click the download button. Copy the image or prompt by selecting the respective option.

Step 10: Enhance your image by adding text using the same prompt. Include text-related instructions in your prompt and click generate to see the result.

Verdict

Google’s ImageFX marks a significant addition to the realm of AI image generators, offering users an in-built and customizable approach to creating visuals based on prompts. Explore the possibilities and celebrate the artistic potential of this new tool.

Also Read | Google Bard’s ImageFX AI Image Generator Launched: No More DeepFake Mishaps!

Categories
Apps Featured How To Info

Instagram Tests “Flipside”: What It Is, How It Works, and Why It Matters

Instagram is testing a new feature called Flipside, promising a dedicated space for sharing with your closest circle. This could be a game-changer for privacy and authenticity on the platform, but it’s still in the early stages. Let’s dive into what Flipside is all about and how it might work.

Also Read: How To Create Stickers On Instagram With Cutouts

What is Flipside?

Imagine a hidden Instagram profile, accessible only to a select group of friends. Flipside allows you to create a custom profile with a unique name, bio, and photo. Here, you can share exclusive content, like photos, videos, and stories, that won’t be visible to your broader audience.

Also Read: How To Remove A Single Image From Instagram Carousel

Why is Flipside being developed?

Two main reasons:

  • Combat Finstas: Fake “finsta” accounts have become a popular way for users to share more personal content with close friends. Flipside offers a native, secure solution within Instagram, eliminating the need for separate accounts.
  • More Private Sharing: Many users crave a space for less curated, more authentic content with their closest crew. Flipside provides that space, fostering deeper connections without sacrificing privacy.

Also Read: How to Draft Emails with Voice in Gmail: A Step-by-Step Guide

How might Flipside work?

Details are still under wraps, but based on leaks and expert insights, here’s a possible scenario:

  • Creating your Flipside: You’ll likely access it through a toggle or hidden icon on your main profile. Customize your profile picture, name, and bio to reflect your inner circle persona.
  • Adding friends: Choose who gets to see your Flipside content. You can select specific friends or create custom lists.
  • Sharing on Flipside: Post photos, videos, and stories just like on your main profile, but choose “Flipside” as the audience. Your chosen friends will see it in their feeds, while others remain oblivious.

Also Read: Apple CarPlay Not Working? Here’s How to Fix It

The Future of Flipside

Whether Flipside becomes a permanent fixture on Instagram remains to be seen. Meta is carefully considering user feedback and weighing potential downsides. But if successful, Flipside could revolutionize how we share and connect on the platform, promoting more genuine and private interactions with our closest circles.

Stay tuned for updates! As Flipside evolves, we’ll keep you informed about its features and potential impact.

Categories
Auto Tech Featured How To Info

Apple CarPlay Not Working? Here’s How to Fix It

Apple CarPlay seamlessly integrates your iPhone with your car’s infotainment system, transforming your driving experience with music, navigation, and hands-free calling. But what happens when CarPlay suddenly goes silent? Don’t stress – these troubleshooting steps will get you back on the road with your favourite tunes in no time.

Also Read: Apple Vision Pro Missing Key Apps: Spotify & Youtube Not Included

1. Check the Basics

  • Connections: Use a certified Lightning cable to securely plug your iPhone into your car’s USB port. If using wireless CarPlay, confirm Bluetooth connectivity on both devices.
  • Compatibility: Verify if your car model and iPhone are compatible with CarPlay. Apple provides a comprehensive list on their website.
  • Software Updates: Update your iPhone and car’s infotainment system to the latest versions. Outdated software can cause compatibility issues.

Also Read: How To Create Stickers On Instagram With Cutouts

2. Restart and Reset

  • Soft Reboot: Sometimes, a simple restart can work wonders. Turn off your car and iPhone, wait a few seconds, and then turn them back on.
  • Hard Reset: For iPhone, force a restart depending on your model. For most car models, consult the user manual for a system reset procedure.

Also Read: Apple Music Tips And Tricks: Here’s How To Create Collaborative Playlists

3. Advanced Troubleshooting

  • Forget and Reconnect: If the above steps fail, try forgetting your car in the CarPlay settings on your iPhone. Go to Settings > General > CarPlay, tap your car, and select “Forget This Car.” Then, reconnect your iPhone to your car following the initial setup process.
  • Restrictions: Check if CarPlay is restricted in Screen Time settings. Go to Settings > Screen Time > Content & Privacy Restrictions > Allowed Apps and ensure CarPlay is enabled.
  • System Issues: In rare cases, system issues on your iPhone or car’s infotainment system might be at play. Contact Apple support or your car manufacturer’s service centre for further assistance.

Also Read: Apple Rolls Out iOS 16.0.3 Update: Here’s What’s New

4. Advanced Solutions

  • Wired Connection Issues: Try a different USB port on your car or a different Lightning cable. If your car supports wireless CarPlay, consider switching to that.
  • Bluetooth Glitches: Forget the Bluetooth connection on both devices and re-pair them. Ensure Bluetooth is enabled on both.
  • System Corruptions: As a last resort, consider resetting all settings on your iPhone or performing a factory reset (remember to back up your data!).
Categories
Apps Featured How To Info

Android Auto Not Working: Try These Troubleshooting Tips

Hitting the road with your trusty Android Auto setup is a convenient way to navigate, listen to music, and stay connected while driving. But what happens when Android Auto suddenly stops working? Don’t panic! Here are some troubleshooting tips to get you back on track:

Also Read: Android Auto Galaxy AI-Powered Features For Galaxy S24 Series: What Are The Benefits?

1. Check the Basics:

  • Restart your phone and car: Sometimes a simple reboot can fix minor glitches.
  • Ensure a secure connection: Use a high-quality USB cable (ideally under 1 meter) and avoid hubs or extensions. For wireless connections, double-check Bluetooth and Wi-Fi settings.
  • Update software: Keep your phone, Android Auto app, and car infotainment system updated to the latest versions.

Also Read: Living Smarter: Home Automation Trends And Global Tech Leaders Of 2024

2. App-Specific Issues:

  • Force stop and restart the Android Auto app: Go to Settings > Apps > Android Auto > Force Stop, then relaunch the app.
  • Clear app cache and data: This can sometimes resolve corrupted data issues. Go to Settings > Apps > Android Auto > Storage & cache > Clear cache/Clear storage.
  • Reinstall the Android Auto app: If the above steps fail, uninstall and reinstall the app.

Also Read: Uber EV Auto Rickshaw Services Begins In Ayodhya: Full Details

3. Car Compatibility:

  • Verify car compatibility: Not all cars support Android Auto. Check your car’s manual or manufacturer’s website for confirmation.
  • Consult your car’s manual: Look for troubleshooting steps specific to your car’s infotainment system.
  • Restart the infotainment system: Some systems require a manual restart to refresh the connection. Refer to your car’s manual for instructions.

Also Read: YouTube Music: How To Enable Auto-Add Songs To Your Last Playlist

4. Additional Tips:

  • Forget and re-pair Bluetooth connection: If using wireless Android Auto, forget the Bluetooth connection on both your phone and car, then re-pair them.
  • Check for app permissions: Ensure Android Auto has all necessary permissions, like location and storage access.
  • Report the issue: If none of these tips work, report the issue to Google through the Android Auto app or online support forum.

Also Read: Google Android Auto Smart AI Features: Enhanced And Improved Driving Safety

Remember, these are general troubleshooting steps. Specific solutions might vary depending on your phone, car model, and encountered issue.