Categories
Apps Featured How To

Facebook Protect: Here’s How To Activate On Your Account

Facebook is blocking people who haven’t activated their accounts. Notably, a leading social media platform has sent an email titled Your account requires advanced security from Facebook Protect’ so that users can activate Facebook Protect in their accounts.

“As part of our ongoing improvements to security, we’re expanding Facebook Protect, a program designed for people that are likely to be highly targeted by malicious hackers, including human rights defenders, journalists, and government officials,” Facebook said.

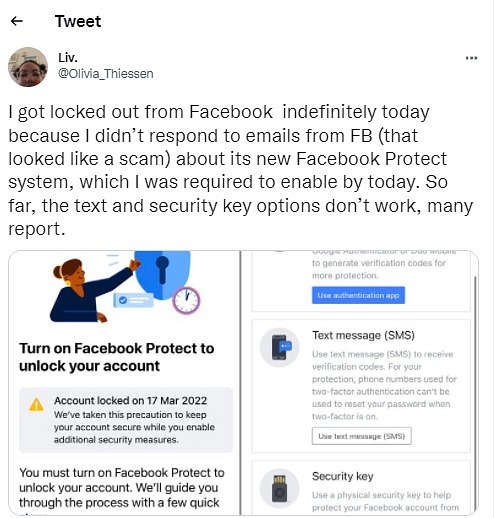
This development comes after several users started complaining about the same. It is worth noting that Facebook has sent an email to all users whose accounts are under threat; however, users misunderstood the email and took it as spam. In fact, many users ignored the email and took it as phishing.

“These people are at the centre of critical communities for public debate. They enable democratic elections, hold governments and organizations accountable, and defend human rights around the world. Unfortunately this also means that they are highly targeted by bad actors,” the app added. But, if you are facing a similar issue, then you need to follow these steps to protect your account.

Steps To Protect Your Facebook Account

Step 1: First, you need to click on the downward-facing arrow at the corner of Facebook.
Step 2: Click on the Setting and Privacy, then you have to click on the Security and Login option.
Step 3: Now, you have to open Facebook Protect and tap get started.
Step 4: Then, on the welcome screen, you have to click on the next option.
Step 5: On the Facebook Protect benefits screen You have to click on the next option.
Step 6: After that, the company will check your account for all issues and suggest you make changes to protect your account.
Step 7: Tap on the Fix Now option and follow all instructions to protect your account.

Categories
Apps Featured How To Mobile

How Can You Change YouTube Channel Name Using Smartphone App, Desktop

Despite the onset of major OTT players such as Netflix, Amazon Prime Videos, DisneyPlus, and others, YouTube still is one of the go-to platforms for the masses across online video streaming.  The Google-owned video service is popular not just amongst the general users but also professional content creators. YouTube has seen a major surge in the user base in recent years and numerous new users have signed up on the platform as content creators.

We bet YouTube is one of your favorite past times if you are a content creator; specifically, a budding one, you would have at least one channel under your name. You can create a YouTube channel easily from the official website or the Android and iOS mobile app. Editing your channel profile is a handy provision that YouTube offers.

Selecting the right user’s name for a channel could be a task since this is one of the factors that decide the popularity of a channel. But what if you have created a channel and want to rename it later on when it has started attracting an audience? Well, that’s quite easy if you have your smartphone handy or even a laptop or PC. So, how can you change your YouTube channel name using Android, iOS smartphones, and also Windows/ macOS laptops and PCs?

How To Change YouTube Channel Name Using Smartphones And Laptops?

Before you proceed with the steps to change the YouTube channel name, you would need to log into that specific YouTube studio account to get started.

Step 1: Once you have logged into the desired YouTube studio account click on the profile picture option.

Step 2: After you click on the profile picture option, you will see multiple options including the “Channel”. Tap on it.

Step 3: Enter the new channel name.

Step 4: Hit on the “Save” option and your channel will be renamed to the new one.

Notably, the aforementioned steps are to be performed on smartphones. You can also change the YouTube channel using the desktop version.

Step 1: Open any web browser and open the YouTube website.

Step 2: Log into the YouTube studio account and click on the menu option placed on the left.

Step 3: You would now need to click on the customization option.

Step 4: Tap on the “Basic info” option and then select the “Edit” tab.

Step 5: Select the “channel name” option and enter the new name.

Step 6: Lastly, select the “Publish” option to rename your YouTube channel.

Categories
Apps Featured How To

Country Change Setting On Amazon Application: Here’s How To Do It?

In case if you are looking for ways to buy products internationally, then Amazon is the right platform for you. Yes, you heard it right as an e-commerce platform has recently added a shortcut option to the app and website so that users can shop from other countries, where the platform is available.

For the unaware, the services were launched in 2018 and allow you to buy all products like Electronics, Books, Clothing, Shoes, Toys, and much more.

“Customers have been asking for a way to easily find and shop only for products available to be shipped to them. The International Shopping experience solves this customer need and makes it simple to browse, shop and ship more than 45 million products to over a hundred countries around the world, ” the company said while launching the services.

“The International Shopping experience displays clear pricing, shipping costs, and import duty estimates, with Amazon coordinating with courier services for customs clearance on behalf of the customer so there are no surprises at the time of purchase or delivery,” the company added.

However, to access the services you should know some steps. So, in order to help you to buy products internationally, we are listing some steps.

Step 1: First, you need to open the Amazon shopping app and click on the menu icon at the left corner.

Step 2: After that, you’ll see the setting option with the flag of the country, you have chosen. Then, you need to click on the Change Country option.

Step 3: Then, you’ll see the entire list of countries where you can shop. You just need to select the region and language.

Step 4: After that, a new window will appear along with the message. Now, tap on the continue option in the box and this will redirect you to the country page that you are looking for.

Step 5: You are allowed to purchase a product from the Amazon page in the selected country. Now, you can see the product list that you are allowed to purchase from the same country.

Do follow GizNext Tech Enthusiast Telegram group and GizNext Tech Enthusiast WhatsApp group for more latest tech updates.

Categories
Featured Gaming How To Tech News

How To Get Free Diamonds, Redeem Codes In Free Fire Game

Android is one large platform that hosts versatile mobile apps for different user requirements. There has been a massive surge in downloads with mobile games. Out of all PUBG has been one of those games which took the entire mobile gaming industry with a storm. However, an official ban by the Indian government on PUBG paved the way for other players in the FPS shooting game segment. Free Fire or Garena Freefire is one such popular mobile shooting game for Android users.

Similar to PUBG or BGMI, you the Garena Free Fire is a battle royale game that has been developed by 111dots studio. This game is quite popular amongst iOS users as well as setting up new records with user downloads and daily active users count. Garena Free Fire has the provision for in-app purchases wherein you can buy diamonds. Using these diamonds gamers can easily upgrade their costumes, guns, skins, and more.

Playing the game and completing missions is one of the ways to get free diamonds in the Free Fire game. However, you can fast-track the process if you don’t want to wait to level up in the game for the same. And that too without paying a single penny. Yes, you read that right. We have listed down the ways with which you can get free diamonds in the Free Fire game on both Android and iOS devices.

How To Get Free Diamonds In Garena Free Fire Game On Android and iOS?

Using Redeem Code Method

Step 1: You can get diamonds free in the free fire game using redeem codes that are officially shared by the brand. These redeem codes are often shared by the company at special events for the game. You can later use these codes to claim rewards in form of diamonds To do so, type in https://reward.ff.garena.com/en in any web browser to open the Garena free redeem code home page.

Step 2: You can log in using your Google, Apple, or Facebook account and enter the redeem code in the next page and claim your reward.

Dedicated Apps For Free Free Fire Redeem Codes

There are several apps that you can download separately from Google Play Store or Apple App Store for free fire redeem codes. Booyah! app, Easy Rewards, Google Opinion Rewards, and the Poll Pay app. Using these apps is the easiest way to get diamonds free in the Free Fire game. You just need to answer a few quizzes to earn rewards which you can later claim as free diamonds for free fire game

If you want to stay updated with more such gaming tips and tricks, you can follow the GizNext Tech Enthusiast Telegram group and GizNext Tech Enthusiast WhatsApp group.

Categories
How To Tech News TV

Mirror Phone To TV: Check All Step Here

Smartphones are getting bigger and better every day, but still, people enjoy watching movies and shows on a big screen as no other medium can match the seamless experience. In fact, you can mirror or cast your smartphone content on the big screen.

In case you have an 8 to 10-year-old television, then a dongle also goes well as it is the easiest or most convenient way to watch content on televisions. However, all the latest television comes with Google Chrome cast support or Apple’s Airplay technology. So, to help you, we are listing all steps that will help you to connect your smartphone with the television. However, first, you should know about what is screen mirroring.

What Is Screen Mirroring Or Casting?

For the unaware, screencasting or mirroring is available on all the latest smart televisions. It allows you to cast the phone content on other devices, especially on smart televisions and computers. Besides, this seems a good option if in case you enjoy watching shows and movies on big screens.

However, you should have two things in common before casting your smartphone on the television. First, smart television and smartphone should be connected to the same Wi-Fi network.

Secondly, your smart television should have a Chromecast feature. On the other hand, to watch content on the old television set you need to have media stick to cast the content on the TV and computers.

Categories
How To Laptop

Five Ways To Capture Screenshot In Laptop And PCs

Gadgets such as laptops and smartphones have made it easy for the masses to store documents. You can save files in different formats on your laptop’s internal storage that you can access whenever required. The current generation has made a major shift towards digital platforms with the majority of the professional work being done via online portals.


While downloading or saving a necessary file/document might be the first approach for most of the users, it might not the option at some cases. Grabbing a screenshot from a laptop will be an easy workaround in such scenarios. Thanks to smartphones, users nowadays are more familiar with grabbing screenshots.

But the option to capture a screenshot via laptops and PCs has been present for a long. You can use different key combinations on a Windows laptop to capture a screenshot. Also, you can use dedicated built-in tools to capture a screenshot on laptops. This article lists all the easy tricks that will let you take a screenshot from laptops and PCs.

How To Take Screenshots Using Laptops And PCs?

Step 1: The old-school Print Screen key method. This is the easiest way to capture screenshots on laptops and PCs. Do note that using the Print Screen option will capture the entire screen and not just a specific portion.

However, you can edit the screenshot later using MS Paint or other supported software. Notably, once you use the Print Screen key to capture a screen from the laptop it will be saved into the clipboard and not in the device’s onboard storage. You will have to paste the captured screenshot into MS Paint and other such apps to save it on your laptop or PC.

Step 2: If you need to take a screenshot of a single page or window on your laptop or PC, you would need to use the Alt+ Print Screen key combination. Once you press and hold both these keys simultaneously, the screenshot of the selected page will be copied to the clipboard. After copying the screenshot of the web page or document from the laptop, you will need to paste and save it using another supported application.

Step 3: You can also use the Windows + Print Screen key combination if you want to capture a screenshot of an entire page from your laptop. This method saves the screenshot directly into the laptop’s onboard memory as an image file. You won’t require to perform additional steps to save the screenshot.

Step 4: Another keyboard shortcut combination to capture an entire page’s screenshot on a laptop is Windows + Alt + Print Screen. Likewise, in the above step, the captured screenshot will be saved directly into the laptop’s storage.

Step 5: Dedicated screenshot tool such as Snip & Sketch tool in laptops is another easy method. Using a snippet tool on laptops and PCs will not only let you capture a screenshot but also crop and edit as per requirements.

For more such tips and tricks articles, you can also follow GizNext Tech Enthusiast Telegram group and GizNext Tech Enthusiast WhatsApp group.

Categories
Apps How To

How Can You Upload Instagram Stories In High-Quality

Key Highlights

  • Upload high-quality Instagram Stories posts without any quality loss
  • This is an easy and fast process that doesn’t require any third-party tools

Instagram is getting a fair share of recognition amongst content creators across the globe. In fact, this is one of those platforms that has popularized the concept of social media influencers in the online space. But Instagram also has to offer a plethora of activities for the general masses as well.

Apart from posting pictures and videos in the home feed, the Instagram story feature is what the audience is hooked to. You get the provision to highlight any of your favorite videos, or picture and even promote your newly created Reel video.

Also Read: 100 Best Instagram Name Ideas For Graphic Designers

You just need to add the required content from the device gallery for the Instagram status update. The app also lets you enhance the posts by adding music, filters, and more. While uploading an Instagram status post is a simple task, quality deterioration in this process is a common issue.

You might experience this issue despite recording a high-resolution video that you might be trying to upload from your mobile gallery. So, what can you do in such scenarios? Are there any modifications that you can make to your Instagram profile to upload high-resolution statuses? Below are the methods:

Also Read: 100 Best Instagram Boys Name With Alphabets M To Z

How To Upload Instagram Status Without Compromising Quality?

Step 1: Launch the Instagram application on your respective devices and log into your profile.

Step 2: Next, you will need to click on the menu option (hamburger tab).

Step 3: Now, tap on the Settings option.

Step 4: From the next window, click on the “Account” tab.

Step 5: In the next step, you will need to tap on the “Cellular Data Usage”.

Step 6: You now need to toggle off the “Data Saver” option.

This is the primary modification in the settings menu that you need to make in order to upload high-resolution content be it images or videos on Instagram status. This is due to the fact the Data Saver option compresses an image or video file before an upload so that less internet data is exhausted during the process.

Apart from this, you can also change the resolution settings of an image or video in the camera app. Selecting 60fps video settings will do the trick. Do note that by Instagram Status we are referring to stories here.

Also Read:100 Best And Catchy Instagram Names For Makeup Artists

Instagram has been updating the Stories features as well similar to other tools and options on the photo-sharing app. Instagram has now made it possible for users to upload longer-duration stories. Now, you can share or upload up to 60 seconds of videos as stories on Instagram instead of the older 30-seconds format. You can read the steps to upload longer-duration Instagram stories here.

For the tech geeks, stay updated with the latest cutting-edge gadgets in the market, exclusive tech updates, gadget reviews, and more right on your phone’s screen. Join Giznext’s WhatsApp channel and receive the industry-first tech updates.

Categories
How To Mobile

How Can You Restart Smartphones When Power Key Is Broken?

Using a touch screen smartphone is undeniably a fun user experience. Smartphone OEMs are consistently upgrading the touch response with new generation smartphones. However, you still get a set of physical keys without which smartphones are incomplete; specifically, the power button.

Common day usage of the power key isn’t solely limited to switching off a handset, but also locking/unlocking, and restarting a device. There are instances when the power key of your smartphone might break down due to different factors. In such situations, you might not be able to restart your smartphones if the performance gets laggy. So, are there any workarounds to reboot your phones without the power key? Let’s find out:

How To Restart Smartphones Without Power Key?

Using Recovery Mode On Android Smartphones

Step 1: This is the common way to restart an Android smartphone without the power key. You can enter the phone’s recovery mode to get this done. Note, the steps to open the device recovery mode might vary on different smartphone models. However, it’s mostly the combination of volume and power keys.

Step 2: From the recovery mode, select the restart option. The volume keys will be used to move up and down on the menu options in the recovery mode.

By Installing Dedicated Third-Party Apps

Both Android and iOS smartphones have a plethora of apps that you can use to restart your smartphone if the power button is broken. Button Savior, Button Map, Shutdown is a few of such apps that you can download on use on your respective Android smartphones to restart without the power key. These apps will offer on-screen commands to restart and operate other aspects of a smartphone.

Set Scheduled Device Power On/Off Timer

You can also use the automatic power on/off feature that comes as a part of the firmware. Majority of the Android devices; specifically, the ones running on the newer generations of Android smartphones. You can find this option in the settings menu. The steps are listed below:

Step 1: Open the settings menu and go to the “Scheduled power off” option. Toggle it on.

Step 2: Once this option is on you need to set the “Power off time”.

Step 3: Scroll down below and toggle on the “Scheduled power on”.

Step 4: Set the “Power on time”. Note, you need to also select the “Repeat” option and set it to “Every Day”.

Make sure you share your feedback and drop comments below. You can also follow GizNext Tech Enthusiast Telegram group and GizNext Tech Enthusiast WhatsApp group for more latest tech updates.

Categories
Apps How To

How Can You Lock Your Facebook Profile or Account? Step By Step Guide

Facebook remains a trending social media app across the globe for smartphones as well as desktop users. Re-monikered as Meta, this platform has been offering a plethora of services to the masses. The company has been consistently upgrading its platform and has been roping in newer technologies for the best user experience.

Facebook’s popularity isn’t fading despite several players’ ventures into this space. A secure user platform along with multiple other features is the prime factor for its successor amongst the audience. Currently, Facebook has over 2.9 billion daily active users who access their profiles and other services almost on a daily basis. Creating a user account or profile is the first step you would require to access Facebook’s services.

The social media app has been gradually added new security features to keep a user profile or account protected from unwanted threats. The Facebook Profile Lock option is one of the newest security measures that the social media giant has introduced on its platform for added privacy. If you wish to keep your Facebook profile data including general posts, photos, video uploads, etc., at bay from strangers or even hackers, locking it is the best option to prevent it.

Once you lock any Facebook profile, none of the Facebook profiles that aren’t added to your friends will be able to view your account’s posts and other personal information. So, how do you lock your Facebook account or profile? We have listed the steps that you can perform to lock your Facebook account. Take a look:

How Can You Lock Your Facebook Account Or Profile?

Step 1: The option to lock a Facebook profile is present on both mobile app and the desktop version. Launch the Facebook app on your respective devices and log into your profiles using valid credentials.

Step 2: Tap on the menu option (three dots) that you can locate right next to the “Edit” profile option.

Step 3: You will see several options to modify accounts settings including the “Lock Profile” tab. Click on it. The next page will show all the benefits of the Facebook profile lock feature.

Step 4: Now, you will need to select the “Lock your profile” option to complete the Facebook profile lock process.

If you need more of such tech tips and tricks, make sure you follow GizNext Tech Enthusiast Telegram group and GizNext Tech Enthusiast WhatsApp group.

Categories
Apps Featured How To

Twitter Tips And Tricks: How To Download And Save Twitter Videos on Android, iOS Smartphones, Laptops/PCs

Social media platforms have seen a major boom in the last few years. Several apps and websites have been developed to cater to different audience requirements. Amongst the top user preferences are Facebook, Twitter, Instagram, etc. Twitter stands out from the remaining for being a microblogging platform that helps masses with sharing their valuable thoughts on different topics. Major brands and professionals from different organizations also keep the audience posted with the latest updates using Twitter threads.

Like other major social media portals, Twitter is also a feature-rich microblogging website that lets users perform multiple tasks. Video playback is one popular option that Twitter has also added to its platform to make social posts more engaging. The platform is a host to both user-generated and professional videos.

You must have stumbled upon at least a bunch of random videos that you would have wanted to download on your respective smartphones or laptops/ PCs. So how do you do it? Does Twitter provide any direct provision of downloading videos from its mobile app or desktop version? Well, in this article we are making it easy for you to download a Twitter video on your smartphones (Android, iOS) and also laptops/ PCs.

How To Download Twitter Videos Easily On Android and iOS Smartphones?

Twitter doesn’t allow direct downloading of videos either on its mobile app or the desktop version (externally). You will need a third-party app for the same. Several apps with good user ratings are available on both Google Play Store and Apple’s App Store.

If you wish to save the Twitter video in your mobile gallery (Android and iOS), you can search the respective app stores for Twitter video downloaders.

Step 1: Open Google Play Store or Apple App Store on your respective smartphones and download the supported apps such as Twitter Video Downloader, TWSaver, and Save Tweet Video (for Android phones). For iPhones, you can look for My Media Application on the App Store.

Step 2: Once the download and installation are complete, launch the application.

Step 3: Now, go to the Twitter feed and open the video that you want to download externally in your mobile gallery.

Step 4: Click on the Share tab from the Twitter video.

Step 5: Copy the video link and then head to the downloaded app and enter the link.

Step 6: Hit the download button from the bottom right of the app’s home screen to save the Twitter video into your mobile gallery.

Notably, the UI might be different on all the apps on both and Android iOS. However, the procedure to download Twitter videos remains similar on all these third-party apps. You just need to copy the link from a select Twitter video, paste and download it from the third-party apps.

How Can You Download Twitter Videos On Laptops/ PCs?

Likewise the mobile version, Twitter videos can also be downloaded on laptops/ PCs using the desktop version. You can either use third-party video downloader websites or can also use dedicated extensions on Google Chrome, Mozilla Firefox, and other browsers. Twitter Video Downloader, Video Downloader professional are a few examples. The remaining procedure to download any Twitter video on laptops and PCs remains the same as for mobile users.

Step 1: Once you have downloaded the dedicated extension on web browsers, go to the Twitter feed and download copy the video link.

Step 2: Paste the video link on the URL box on the designated website. If you are using an extension, you will see a notification pop up to download the Twitter video. Click on it and you are all set.

You can also follow GizNext Tech Enthusiast Telegram group and GizNext Tech Enthusiast WhatsApp group for more latest tech updates.