Smartphones nowadays are all advanced with the brands embedding their new products with myriads of features for a better user experience. You can do all possible things if you own a modern generation smartphone right from gaming to photography and more. Even communication with these handheld gadgets isn’t restricted to just voice calls or texting. You get the option to make or receive video calls and also use dedicated messaging apps for voice and video calls using the internet.
Smartphone OEMs are also gradually routing towards adding an eSIM support instead of a physical SIM. This is one of the major changes that we have seen with smartphones; specifically, the new-generation models. Apple has also been integrating eSIM support with iPhones. The iPhone XS, iPhone XS Max, and the iPhone XR and above models are equipped with the eSIM feature. Just yesterday, we covered the procedure to set up and manage eSIM on iPhones.
This article is centered around the ways with which you can transfer your eSIM or physical SIM during setup. We also have mentioned the method to convert your physical SIM to an eSIM on iPhone and the steps to transfer a physical SIM or eSIM to a current iPhone after setup.
Steps To Transfer eSIM or Physical SIM While Setting Up An iPhone
While setting up an iPhone, you will be asked to Transfer your Cellular Plan. This will be done in the Quick Start setup.
Step 1: You need to select the mobile numbers that you wish to transfer to the new iPhone during the setup process. Click on Continue from the bottom of the page. You can also select the option to decide later.
Step 2: You will see a set of instructions on the screen with which you can finish the setup process.
Step 3: Make the first call using your new iPhone. This is to check if you have active cellular connectivity before removing the cellular plan from the previous iPhone.
As soon as the cellular services are activated on your new iPhone, they will be discontinued from the old iPhone. You can then discard the physical SIM from your previous phone.
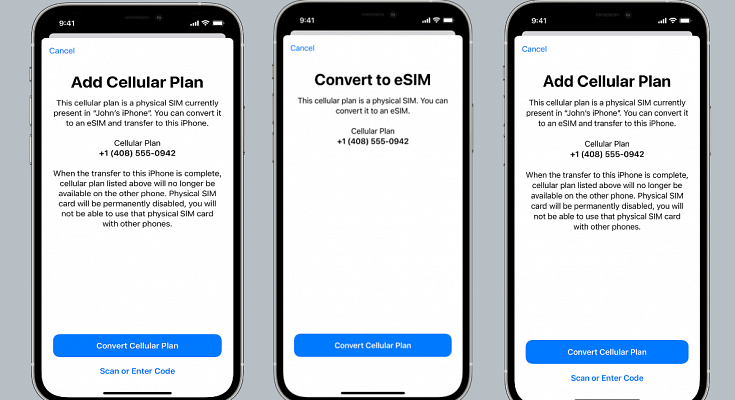
Steps To Transfer Physical/ eSIM On Your Current iPhone To eSIM On New iPhone Post Setup
Step 1: Unlock your iPhone and scroll to the Settings menu.
Step 2: Move to the Cellular option.
Step 3: Tap on Add Cellular plan option.
Step 4: Select the Convert Cellular Plan option.
Step 5: Click on the Convert eSIM tab.
Step 6: You will now need to hit the OK tab. A notification will pop up asking for transfer approval on the previous iPhone.
Step 7: Now, on your older iPhone, select the transfer option.
Step 8: You will have to wait for the eSIM to activate. Once it is done, you can remove the physical SIM from your iPhone.
Step 9: Now, wait until the cellular plan is activated on your new iPhone. The previous SIM card will be deactivated when the new cellular services are active.
Step 10: A new notification will show with Finish Setting Up Your Carrier’s Cellular Plan. Select this option.
Step 11: Click Continue and you will be redirected to the carrier webpage to transfer your eSIM.
How Can You Convert Physical SIM to eSIM On Same iPhone Model
Step 1: Open iPhone and scroll to the Settings menu.
Step 2: Click the Cellular option.
Step 3: Tap on Convert to eSIM.
Step 4: Tap Covert To eSIM in the next step.