Categories
Apps Auto Tech Featured How To

Apple Maps Offline Download Guide: Steps You Use Apple Maps Without Internet

Key Highlights

  • Apple Maps supports offline download feature
  • Allows Maps access without internet
  • Can be used for turn-by-turn navigation offline

Apple Maps comes as the dedicated in-house navigational apps for iOS devices. Apple has made updated the Maps app significantly over the past few years. Now, with iOS 17 and above, one can download and use Maps offline making navigation easier in challenging network scenarios and during long trips. The steps to use Apple Maps offline are mentioned below:

Also Read: Google Maps Now Has Geospatial AR Content Support: What Is It? How To Use?

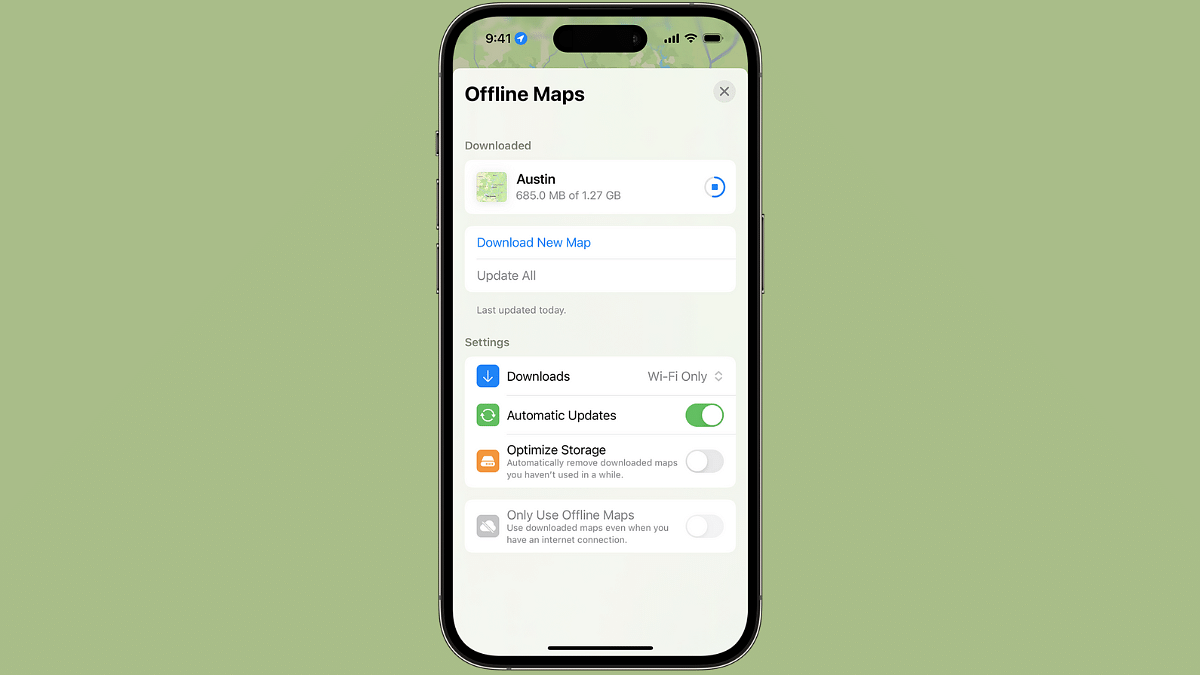
Apple Maps Offline: What All Can Be Done?

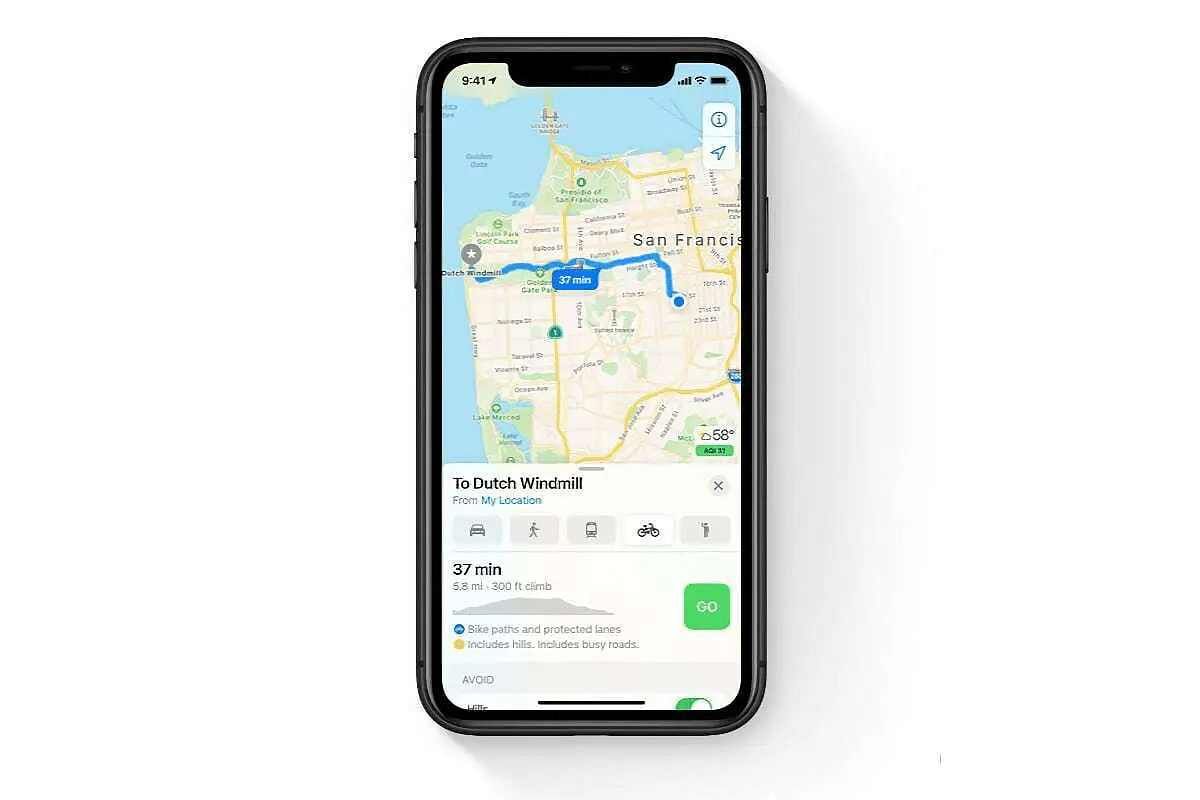
Just like Google Maps, the features available for offline usage with Apple Maps ranges from getting navigational alerts to locating nearby hotels, hospitals, fuel stations etc,. Even if you don’t have access to an active internet connection be it WiFi or mobile data, you will be able to get turn-by-turn navigation, estimated arrival times, and more. To use Apple Maps offline, your iPhone or iPad must have iOS 17 or above.

Also Read: Pilot License From Google Free: How To Get And Fly Aircraft From One Airport To Another?

Steps To Download And Use Apple Maps Offline

Step 1: Open Maps application on your iOS devices

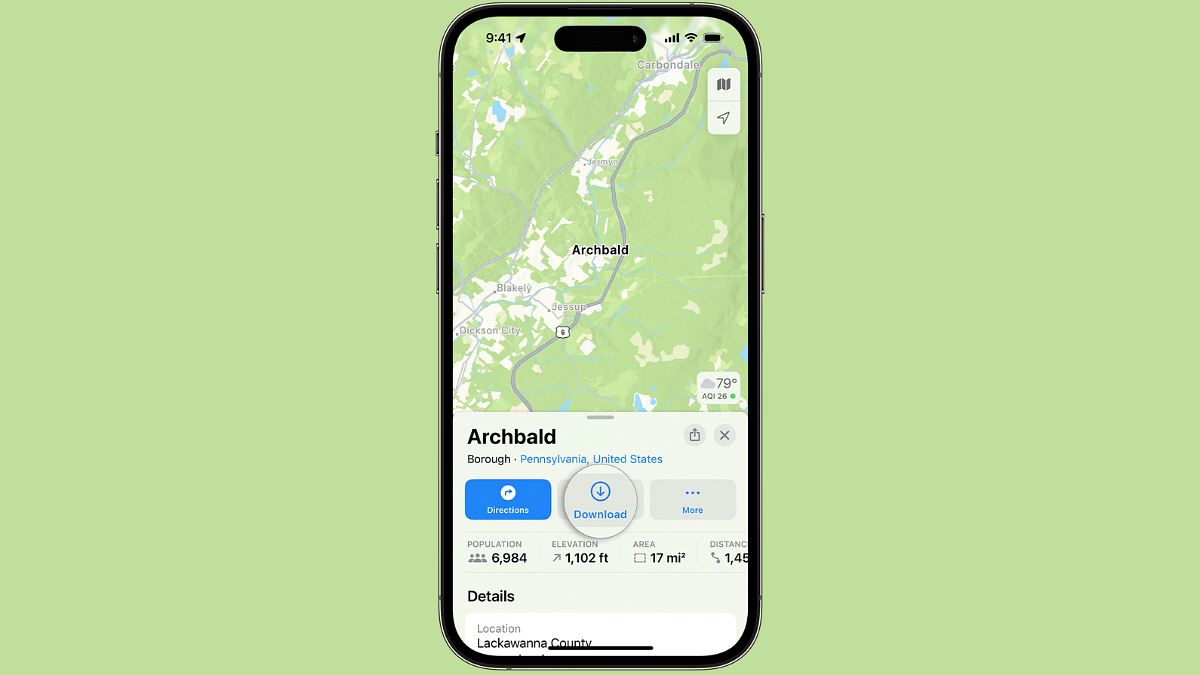
Step 2: Search for a destination

Step 3: If the Download option is available by default, tap on it.

Step 4: If Download is unavailable directly then tap on ‘More’ (three dots) and select ‘Download’ option.

Step 5: You can also drop a Pin location to download a specific region’s offline map.

Steps To Use ‘Drop A Pin’ Feature For Offline Maps Access

Step 1: Launch Maps application

Step 2: Select the area where you want to drop a pin by tapping on it

Step 3: Once the Pin is dropped on the Maps, click on Download.

Step 4: Make required modifications for adding specific areas by adjusting the maps.

Step 5: Hit Download

Categories
Apps Featured Info

OpenAI Introduces Custom GPTs And More To Free ChatGPT Users

Key Highlights

  • OpenAI has introduced GPT-4o to free ChatGPT users
  • GPT-4o supports text, vision, and audio inputs
  • Free users have limited access compared to paid subscribers

OpenAI has announced exciting updates for free ChatGPT users, now allowing them access to advanced capabilities previously available only to paid subscribers. This new development includes the release of GPT-4o, a multimodal large language model (LLM) that enhances the user experience with its speed and versatility. Here’s a closer look at what this means for ChatGPT users. Also Read | No Sign-Up Needed: OpenAI Enables Account-Free ChatGPT Access

What is GPT-4o?

GPT-4o is the latest iteration of OpenAI’s language models, designed to be faster and more efficient than its predecessor, GPT-4. It significantly improves upon existing text, vision, and audio capabilities, making it a powerful tool for a wide range of applications. GPT-4o is multimodal, meaning it can handle multiple types of input, such as text, images, and audio, seamlessly.

New Features For Free Users

One of the most notable changes is that free users can now access custom GPTs created by others. This opens up a world of possibilities, allowing users to leverage specialized models tailored for specific tasks or industries. Additionally, users can now ask questions about images and have the chatbot analyze charts. These capabilities were previously limited to paid subscribers.

Enhanced Interactivity and Multimodal Capabilities

GPT-4o brings several advanced features to the table. Users can utilize data analytics tools, vision capabilities, and even upload files for detailed analysis. This makes GPT-4o a versatile assistant for both personal and professional use. The model’s ability to understand and process different types of data inputs enhances its usefulness in various scenarios.

Voice interaction has also been improved, with reduced latency making conversations smoother. GPT-4o can understand nuances such as tone and background noises, and it can even convey emotions in its voice, providing a more engaging and human-like interaction. The model also supports multiple languages, broadening its accessibility to users worldwide.

Capacity and Limits

While free users have access to these powerful features, there are some limitations. Paid subscribers will enjoy up to five times the capacity limits compared to free users. Once free users exhaust their GPT-4o limits, the system will automatically switch to GPT-3.5 to continue the conversation, ensuring uninterrupted service.

Safety and Reliability

OpenAI has emphasized the safety of GPT-4o, incorporating filtered training data and refined model behavior post-training. This makes GPT-4o not only more reliable but also safer to use, minimizing the risk of inappropriate or harmful outputs.

Also Read | OpenAI Introduces GPT Store: Premium Users Can Now Buy Custom AI Models

Conclusion

The introduction of GPT-4o to free ChatGPT users marks a significant step forward in making advanced AI technology more accessible. With enhanced capabilities in text, vision, and audio processing, along with improved interactivity and safety measures, GPT-4o promises to deliver a superior user experience. Whether for personal, educational, or professional use, the new features of GPT-4o open up exciting possibilities for ChatGPT users everywhere.

Categories
Apps Featured How To

Google Maps Useful Tricks: How To Download Offline Maps For Internet-Free Navigation

Key Highlights

  • Google Maps offline download option available
  • Allows navigation without active internet connection
  • Feature can be accessed manually on the Google Maps mobile app

Google Maps has gradually crawled up the top ladder in the navigational app ecosystem. Available for almost all Android and iOS devices, the navigation app is getting all advanced and has made traveling to new destinations super easy. You can simply search for a new destination where you are traveling to be aware of the routes. Google Maps can also be used to find nearby essential services such as fuel stations, medical centers, nearby eateries and shopping complexes, etc.

An active internet connection is required to use Google Maps services. With inactive or intermittent internet services, Google Maps might not display accurate route directions or re-route if any wrong path has been taken. Don’t worry, you don’t have to get stranded at such situations if you are aware of the ‘offline maps’ feature. Here in this article, we have shared the steps with which you can download offline map of any new location and can use Maps for navigation even without a working internet connection. What all do you need for the same? Find out below:

Also Read: Google Maps Now Has Geospatial AR Content Support: What Is It? How To Use?

Steps To Download Map Offline For Navigation Without Internet

Step 1: On your Android or iOS device, launch the Google Maps mobile app.

Step 2: You will need an active internet connection initially to download any location’s map offline.

Step 3: Verify if your Google account is signed in to the Maps app.

Step 4: Now, search for the destination where you wish to travel and save it offline.

Step 5: Once the name of the destination pops up on the bottom of the screen, tap on it.

Step 6: Click on More or three vertical dots.

Step 7: You’ll see the Download offline map option. Click on it.

Also Read: Control What Your Family Watches: How To Adjust Maturity Ratings On Netflix

How To Select And Save Specific Location On Map

Step 1: Launch the Google Maps mobile app.

Step 2: Now, go to the profile icon option and tap on it.

Step 3: Select the Offline Maps option

Step 4: Now, adjust your desired location on the map to select the specific location you wish to download offline

Step 5: Hit Download

Categories
Apps Featured How To

Looking To Broadcast? Here’s How You Can Create Your Telegram Channel Easily

Key Highlights

  • Telegram channels are ideal for broadcasting messages to a large audience
  • Suitable for businesses to connect with customers or individuals to share thoughts
  • Follow a simple guide to create and manage your Telegram channel effectively

Creating a Telegram channel is a great way to broadcast messages to a large audience. Whether you’re a business looking to connect with customers or an individual wanting to share your thoughts with the world, a Telegram channel is an excellent tool. Here’s a step-by-step guide to help you get started. Also Read | How to Enable 2-Step Verification On Telegram App: Step-By-Step Guide

How To Create A Telegram Channel

Step 1: First, you need to have Telegram installed on your device. Telegram is available on multiple platforms including Android, iOS, and desktop (Windows, macOS, and Linux). Download and install the app from the official Telegram website or your device’s app store.

Step 2: If you don’t already have a Telegram account, sign up by entering your phone number. You’ll receive a verification code via SMS. Use this code to create your account. If you already have an account, just log in.

Once you are logged in, follow these steps to create your channel:

Step 1: Open the app on your device.

Step 2: On Android, tap the three horizontal lines in the top-left corner. On iOS, tap the “Chats” icon at the bottom.

Step 3: Choose “New Channel” from the menu options.

Step 4: You will be prompted to enter the channel name, a description, and an optional profile picture. The name should be catchy and relevant to the content you plan to share. The description should give potential subscribers an idea of what to expect.

Step 5: Choose whether your channel will be public or private. Public channels can be found by anyone through the Telegram search, while private channels can only be joined via an invite link.

Step 6: After setting up your channel, you can start inviting members. If it’s a public channel, share the link with your audience on social media or other platforms. For a private channel, you can invite people directly from your contacts or share the invite link.

Now that your channel is set up, you can begin posting content. Here are a few tips:

  • Consistency: Post regularly to keep your audience interested and engaged.
  • Quality Content: Share valuable and interesting content to attract and retain subscribers.
  • Interaction: Encourage interaction by asking questions and responding to comments. Although channel members can’t comment directly on posts, you can link a discussion group to your channel where members can interact.

How To Manage Your Channel

To manage your channel, tap on the channel name and select the “Manage Channel” option. Here, you can edit the channel info, add administrators, and view analytics to track the performance of your posts.

Also Read | Top Five Hacks To Protect Your Privacy On Telegram

Conclusion

Creating a Telegram channel is simple and offers a powerful way to communicate with a large audience. By following these steps, you can set up your channel and start sharing your content effectively. Whether for business or personal use, a well-managed Telegram channel can help you reach and engage with your audience in a meaningful way.

Categories
Apps Featured Info

Truecaller And Microsoft Team Up For Custom Digital Voice Feature: Details

Key Highlights

  • Truecaller partners with Microsoft to let users create digital versions of their own voices
  • Truecaller introduces a web client for Android users
  • The features are being gradually introduced worldwide

Truecaller has announced a significant partnership with Microsoft. This collaboration will see the integration of Microsoft’s ‘Personal Voice’ technology from Azure AI Speech into Truecaller’s AI Assistant. This new feature allows users to create a digital version of their own voice, enhancing the functionality of the AI Assistant. Also Read | Truecaller Tips & Tricks: Check Steps To Turn Off Last Seen Feature On Android

Enhancing The AI Assistant Experience

Introduced in 2022, Truecaller’s AI Assistant incorporates various AI technologies designed to make call management more efficient. The AI Assistant can automatically answer phone calls, respond on the user’s behalf, screen calls, take messages, and record calls for later review. With the addition of Microsoft’s Personal Voice technology, Truecaller users can now have their digital assistant sound just like them when handling incoming calls.

Raphael Mimoun, Product Director and General Manager of Truecaller Israel, highlighted the significance of this feature. “The personal voice feature allows our users to use their own voice, enabling the digital assistant to sound just like them when handling incoming calls. This groundbreaking capability not only adds a touch of familiarity and comfort for the users but also showcases the power of AI in transforming the way we interact with our digital assistants,” Mimoun said.

Rolling Out Globally

The new personal voice feature is being gradually rolled out across all of Truecaller’s markets. This means that users who already have an AI Assistant on their app can now enhance their experience with a more personalized touch. Callers will hear an authentic version of the user’s voice instead of a generic digital assistant.

New Web Client For Android Users

In addition to the personal voice feature, Truecaller has introduced a new web client for Android users. This allows users to link their PC or Mac to their Truecaller account via a QR code, similar to the web versions of WhatsApp and Telegram. Currently, Indian users can only activate one web session at a time, and they will be automatically signed out after 30 days of inactivity. Users can also de-link a browser from the settings.

Strong Growth In India

Truecaller continues to see robust growth, particularly in India. The company reported an 8 percent increase in net sales in India for the first quarter (Q1) of the calendar year 2024. India accounted for 74.2 percent of Truecaller’s total net sales. The app has 314 million daily active users (DAU) worldwide, with 234.4 million of those based in India.

Also Read | Ever Wondered Who’s Calling? Learn How To Check Truecaller For A Number During Calls On iPhone

Conclusion

The partnership between Truecaller and Microsoft marks a significant step forward in the evolution of AI-powered digital assistants. By enabling users to create a digital version of their own voice, Truecaller is enhancing the personalization and user-friendliness of its AI Assistant. As this feature rolls out globally, it is set to redefine the way users interact with their digital assistants, making the experience more natural and comfortable.

Categories
Apps Auto Tech Featured How To

Google Maps Now Has Geospatial AR Content Support: What Is It? How To Use?

Key Highlights

  • Geospatial AR content comes to Google Maps
  • Offers interactive UI for exploring popular landmarks and desitinations
  • Mass rollout to be initiated gradually

Google’s I/O 2024 event has been all about AI with the brand introducing the new Gemini AI version and also a plethora of service upgrades with AI integration. Google Maps also silently received a new geospatial AR feature which will allow users to get an interactive view of popular buildings, landmarks, and streets. Here’s how unique user experience the new geospatial AR content feature with Google Maps:

Also Read: Google Maps 3D Building View: What Is It? How To Enable?

Google Maps Geospatial AR View Feature: What Is It?

Google has been working constantly to provide an interactive user experience with the Maps app. The recent additions of 3D buildings feature has been the most advanced navigational feature. But during the recent I/O 2024 developer conference, Google revealed another new AI feature for the Maps called geospatial AR content.

With this new feature’s rollout, Google aims to provide the user a real life AR experience on the Maps app itself when any popular landmark or building is nearby. This new feature is designed to make Maps app a complete travel companion where it will also act as a guide whenever required.

Also Read: Steps To Use Google Maps Navigation Using Apple Car Play

How To Use Google Maps Geospatial AR View Feature

The geospatial AR view for Google Maps is set to commence as a pilot project soon. Users in Singapore and Paris will be the first to receive this new Maps AR feature on their Android and iOS devices. Google will possible begin with the mass rollout by early 2025 in the remaining markets.

As far as usage is concerned, the geospatial AR feature once available will bring up an AR Experience tile whenever a popular landmark or building is nearby. Once the AR tiles pop up, users can simply tap on the photo roll of the respective landmark and Maps will display all the important facts and history of the location. This will be helpful to get insights of any popular destination without specifically hiring any guide or searching through multiple online websites and apps.

Categories
Apps Featured

Google I/O 2024 Keynote: Gemini AI Major Announcements

Key Highlights

  • Google I/O 2024 has been all about Gemini AI
  • Enhancements coming to native apps
  • Google search to get AI integration

Google’s I/O 2024 keynote at Shoreline Amphitheatre in Mountain View, California has been headlined by the Gemini AI. The keynote showcased the new-gen Gemini AI’s capabilities that are being extended to Google’s services and apps. Google has finally launched the Gemini AI mobile app which both Android and iOS users can download on their respective devices. Take a look at the top Gemini AI highlights that Google has announced during the I/O 2024 keynote.

Also Read: Google And HP Team Up To Redefine Video Conferencing With Project Starline

Google Ask Photos

With the Gemini AI integration, Google Photos have become smarter. Users will be able able to give voice commands to find and search for certain photos. An example shared during the presentation revealed the process of asking Photos for certain pics and how it uses AI to get the results. This new feature will also make it simple to find older certificates and even your vehicle’s registration/ license plate. Google Ask Photos will also be able to solve complex queries and help pull up results with old memories. The results will be shown in a photo package for an easy access.

Also Read: Steps To Use Google Maps Navigation Using Apple Car Play

Gemini 1.5 Pro Easy Access For Workspace apps

Google has added Gemini 1.5 Pro access to a range of in-house apps. The advanced AI model can be accessed in Gmail, Docs, Slides, and Sheets. It will be available on the side panel of all these apps. Users will be able to ask a wide range of queries to get insightful responses generative by the Gemini AI. The summaries and prompts will pop up on the side panel. The Gemini AI enabled Workspace panel will be accessible to the business and general consumers via add-on subscriptions of the Google One AI Premium Plan.

Also Read: Google Cloud Next 2024: AI-powered Features Enhance Gmail, Docs, Sheets, And More

Improved Circle To Search

Circle to Search also gets its share of enhancements with the AI integration. With Circle to Search, students will get help with complex tasks and get necessary information on any subject. Circle to search will also be able to take on some of the tricky mathematics and physics questions and provide accurate step by step solutions too.

Also Read: Google I/O 2024: Trillium Takes Center Stage As Pichai Announces Sixth-Gen TPUs

Generative AI in Search

Google Search will now be backed with Generative AI. Now, we can expect more accurate and detailed results of our queries. Users will also be allowed to modify their AI Overview while using the search with which they will be able get detailed analysis of any unknown or a new topic. The enhanced multi-step reasoning capabilities is said to allow search to get responses for the most toughest of queries.

Categories
Apps Featured How To

Create Your DigiLocker Account In Minutes: Here’s How

Key Highlights

  • DigiLocker is a free digital document storage platform by the Government of India
  • Users can store Aadhaar, driving license, PAN card, and educational certificates
  • DigiLocker promotes digital empowerment by offering secure document management

Digitalization has simplified many aspects of our lives, and managing important documents is no exception. DigiLocker, a government initiative, offers a secure and convenient platform for storing and accessing various documents digitally. Here’s a step-by-step guide on how to sign up for DigiLocker and create your account. Also Read | Lok Sabha Elections 2024: Here’s How To Download Your Voter ID Card Online In Minutes

What Is DigiLocker?

DigiLocker is like your virtual document locker, where you can store important documents such as Aadhaar card, driving license, PAN card, and educational certificates. It’s a free service provided by the Government of India to promote digital empowerment.

How To Create Account On DigiLocker

Step 1: To get started, visit the official DigiLocker website using your web browser.

Step 2: On the homepage, you’ll find the “Sign Up” option. Click on it to start the registration process.

Step 3: You will be asked to provide your mobile number. Enter your mobile number and then click on “Continue”.

Step 4: You will receive an OTP on the mobile number you provided. Enter the OTP in the designated space and click on “Verify OTP”.

Step 5: After OTP verification, you need to choose a username and password for your DigiLocker account. Make sure to choose a strong password that includes a mix of letters, numbers, and special characters for security.

Step 6: Next, you’ll need to fill in your personal details such as name, date of birth, and email address. Make sure all the information provided is accurate.

Step 7: Set up security questions and answers. These will help you recover your account if you forget your password.

Step 8: Read through the terms and conditions of using DigiLocker carefully. Tick the box to accept them if you agree.

Step 9: Once you have filled in all the necessary information, click on the “Sign Up” button to complete the registration process.

Step 10: You may receive an email asking you to verify your email address. Click on the verification link in the email to confirm your email address.

Your Account Is Ready

Congratulations! You have successfully signed up for DigiLocker. Now you can start uploading your documents and accessing various government services online.

Also Read | Online Safety: Eight Essential Cybersecurity Tips For Kids

Conclusion

Signing up for DigiLocker is a simple process that allows you to access your important documents anytime, anywhere, digitally. By following these easy steps, you can create your account and take advantage of the benefits of digital document storage and access.

Categories
Apps Featured How To

Control What Your Family Watches: How To Adjust Maturity Ratings On Netflix

Key Highlights

  • Set maturity rating on Netflix to control what content is available for viewing
  • Access settings on both the Netflix app and web browser to adjust maturity ratings
  • Manually block specific titles for additional control over content accessibility

Netflix, the popular video streaming service, offers a wide range of content across various genres. However, some shows and movies are meant for mature audiences, typically those over 18. If you’re a parent and want to ensure your kids only watch suitable content, you can set a maturity rating on Netflix. Similarly, you can also adjust settings to view content appropriate for grown-ups. Here’s how you can do it. Also Read | Hotstar vs Netflix vs Amazon Prime Video: The Best OTT Platform?

How To Set Maturity Rating On Smartphone, Tablet

Step 1: Tap on the Netflix app icon on your smartphone or tablet.

Step 2: At the bottom right, click on “My Netflix”.

Step 3: Navigate to Manage Profiles: Tap on the hamburger icon (three horizontal lines) in the upper right corner and then select “Manage Profiles”.

Step 4: Select the profile you want to edit.

Step 5: Tap on “Viewing Restrictions”.

Step 6: Tap on “Maturity Rating”.

Step 7: Enter your Netflix account password to proceed.

Step 8: Choose Rating Level: Netflix offers five options: U (Universal), U/A 7+, U/A 13, U/A 16+, and A for Adult content. Uncheck the maturity levels you want to restrict, then tap back.

How To Set Maturity Rating On Web Browser

Step 1: Open Netflix.com on your web browser.

Step 2: At the top right corner, click on your profile.

Step 3: Go to “Manage Profiles”.

Step 4: Choose the profile you want to edit.

Step 5: Click on “Edit” below “All Maturity Ratings”.

Step 6: Enter your Netflix account password.

Step 7: Choose from the five maturity rating levels available.

Also Read | From Hindi To Korean: Learn How To Change Languages In Netflix

How To Block Titles

You can also manually block specific TV shows or movies:

Step 1: In the Maturity Rating section, tap on “Block Titles”.

Step 2: Find the show you want to block and tap on it.

Step 3:  Finally, tap on “Save” to confirm.

By setting the maturity rating, Netflix will only display content suitable for the chosen age group, which is helpful for parents monitoring their children’s viewing habits. Additionally, manually blocking titles gives you more control over what content is accessible.

Categories
Apps Featured

Pilot License From Google Free: How To Get And Fly Aircraft From One Airport To Another?

Key Highlights

  • You can fly airplanes using Google’s Pilot license
  • Primarily a Flight simulator
  • Feature accessible on Google Earth pro

Google is one of those brands which has always been at the technology forefront providing endless service support to tech consumers globally. Apart from its popular search engine, Google offers an array of tools and services to smartphone, tablet, laptop, and PC users. Navigational services is another key expertise of Google where it provides real-time road and traffic status via Maps. But if you wish to see a 3D landscape and satellite-based aerial representation of any location, Google Earth is what comes to the rescue. But what if we tell you that getting a pilot license from Google is also a possibility. Not only you get a pilot’s license but also can fly an aircraft from one destination to other. Here’s the quick hack:

Pilot Licence From Google For Free: Can You Apply And Fly Planes?

With Google Earth Pro, you will be able to not only get a pilot’s license but also fly any aircraft. And there’s is hardly any cap on the destination that you can cover while flying an aircraft using Google Pilot licensee.

Also Read: Want Free Games On Your PS5? Here’s How To Download It On Your Gaming Console

What’s The Catch?

Well, this pilot license we’re speaking of is flight simulator feature which you can access on Google Earth Pro. All you would need to do is head to any web browser and install Google Earth Pro on your respective PCs and laptops. Simply launch the application and use the flight simulator feature to fly an aircraft to any corner of the world. But what are the steps to run flight simulator using Google Earth Pro? Take a look below:

Also Read: Google Maps 3D Building View: What Is It? How To Enable?

Steps To Use Flight Simulator Using Google Earth Pro For Free

Step 1: Launch Google Chrome or any other website on your laptop or PC.

Step 2: Search for Google Earth Pro. You can also tap on this link to continue.

Step 3: Scroll down and locate download and install option. Click on it.

Step 4: Launch the installer and complete the on screen steps to complete the installation of Google Earth Pro.

Step 5: Now, launch the application

Step 6: Go to the Tools option

Step 7: Select the ‘Enter Flight Simulator’ option

Step 8: Now, select the airport from where you want your flight to take off and use the keyboard shortcuts or joystick to fly the plane