Categories
Apps Featured Info Smart Watch

Best Fitness Apps To Download For Your Smartwatch To Stay Fit

Key Highlights

  • Smartwatches provide health and fitness information in addition to notifications
  • Fitness apps designed for smartwatches help users stay in shape by tracking vital signs, workouts, sleep, and food consumption
  • The article reviews five fitness apps and discusses their features and benefits for gym enthusiasts

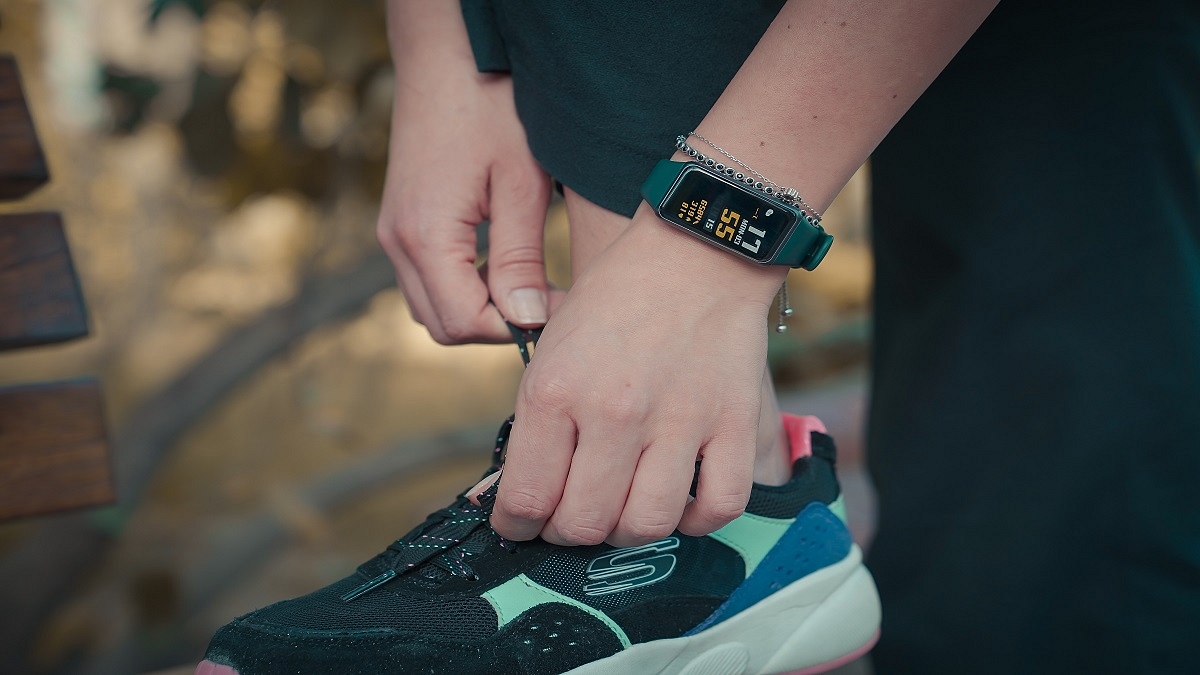
Smartwatches not only bring notifications to your wrist but they also have another great use, i.e., health and fitness information. One of the many advantages of wearing a smartwatch is that it can help you stay in shape. There are numerous fitness apps available to assist smartwatch users in staying in shape.

The apps allow you to keep track of your body’s vital signs, workouts, sleep, food consumption, and more. But which fitness apps are best for your personal use? In this article, we’ll look at five fitness apps and see what they have to offer the gym enthusiast in you. Also Read | Unlock Exclusive Deals: Five Best Coupon Apps For Online Shopping In India

Google Fit

Google Fit tracks your workouts, runs, walks, and bike rides in real time. This app records your speed, route, race, elevation, sleep time, weight, and calorie intake. It generates reports based on the data collected and even allows for data synchronization with a variety of supported apps. Google Fit uses your smartwatch to track your fitness data on a regular basis.

Strava

Strava is often regarded as the best cycling app available. You can use your smartwatch to start, stop, pause, and continue ride tracking. Users may even use their wearable to start a run or a bike trip using voice instructions. The fitness app will show stats including average time, speed, run splits, distance, heart rate, and real-time segments.

Also Read | Mastering A New Tongue? Here Are The Best Mobile Apps For Learning A New Language

Map My Run

Map My Run is another fitness app on our list. It is compatible with Apple Watch as well as WearOS smartwatches. This health and fitness app can keep track of your heart rate in real-time, workout duration, and more. It also offers GPS support and adaptable training regimens making it suitable for marathon training.

Adidas Runtastic

Runtastic is best for audio training and enhanced fitness tracking using GPS. It tracks your walks and runs along with distance, duration, elevation, cycling, walking, and jogging. The fitness app also calculates the calories you burned through workouts and assists in creating and reaching exercise targets.

Progression – Workout Tracker

Progression is a simple fitness app that tracks lifted weights instantly after an exercise session. After you complete your workout, you’ve navigated to the history page which displays your previous reports as well as the latest one. The app also has a rest timer that ensures you get enough rest after regular time intervals. It comes with 300+ fun exercise modules that help you exercise better.

Also Read | Never Get Lost Again: Four Best Navigation Apps For Travelers

Categories
Apps Featured How To

Want To Pin Location In Google Maps? Here Are The Steps

No doubt, Google Maps is a major discovery. It is one of the most widely used smartphone applications worldwide. The platform lets you find the routes to the places you want to go. You only need an internet connection and the address of the destination.

Google Maps can trace you where you are automatically. It lets you know how long it will take you to get there and can inform you about delays in reaching your destination because of heavy traffic congestion in your route. Additionally, the app enables you to save regularly visited destinations so that all you need to do is choose your destination and Google Maps will begin telling you the route.

Google Maps: How To Drop A Pin?

Dropping a location on the map, saving it, and sharing it with your loved ones is one of the key features that Google Maps provides. The feature is available for iOS, Android, and desktop users. Here are the steps you can follow to drop pin location in Google Maps on your mobile phone and desktop.

Steps To Pin Location In Google Maps From Your Mobile

Step 1: Open the Google Maps app.

Step 2: Long press on the desired location, and you will see a red pin on that location now.

Step 3: You will see a bunch of options for that location at the bottom.

Step 4: You can now start navigating by tapping on ‘directions’ and ‘start’.

Users have the choice to ‘share’ and ‘save’ the pin location on other social media channels including WhatsApp.

Steps To Pin Location In Google Maps From Your Desktop

Step 1: Open your browser and log in to your Google account.

Step 2: Navigate to Maps by clicking the Google applications icon.

Step 3: Look for a location using the search bar.

Step 4: Select the pin icon next to the location you wish to save.

‘Favorites’, ‘Want to go’, and ‘Starred Places’ are the three categories in which you can save the pin location. In the app, you can add or remove categories and lists. Users can even select whether these lists are public, private, or shared with other users.

Categories
Apps How To

Discovery Plus: How To Watch On Television, Plans, And More

Discovery started its internet streaming business last year in India. The company has launched its app called Discovery Plus wants to be the number one app for factual entertainment, lifestyle, and more. The one-stop app offers original content, shows related to food, exclusive shows, and more.

The company said that it has 24 million customers as of March 2022. However, if you are looking for ways to watch content on television, then you have to follow these steps.

Here’s How To Watch Discovery Plus On Television

It is worth noting that the app is available on Amazon Fire TV and Roku TV. In addition, you can watch the app access on the Amazon Fire TV, Samsung Smart TV, and LG TV from 2018. Plus, you will get access to Google Chromecast.

Besides, Apple users will get Discovery Plus access on iPhone, iPad, iPod touch, and Apple TV. You will get the browser version on the PC or Mac computer.

Steps Watch Discovery Plus Content On Firestick

Step 1: Go to the home screen on your Fire TV device. Tap on the search section.
Step 2: Check the directional pad and write Discovery Plus. Now, select it from the entire list.
Step 3: Click on the directional keypad and select it. Again tap on the centre button to get the application and now, launch the application.

Steps To Watch Discovery Plus On Roku TV

Step 1: Tap on the home button of the remote. Now, open the channel Store.
Step 2: Type the Discover Plus in the search box and now, purchase the Disney Plus channel as it is a paid channel.
Step 3: Install the channel and enter the Roku account PIN. Now, enter the PIN.

Discovery Plus Plans And Languages In India: Details

Notably, the company is providing two plans in India. The first plan is priced at Rs. 199 per month and Rs. 399 plan for a year in India. Both plans offer one screen.

Moreover, the app is available in several languages, including Hindi, English, Tamil, Telugu, Kannada, Malayalam, and Bangla. In addition, premium subscribers are getting never-seen-before Premium Discovery titles, originals, exclusive, and must-watch documentaries.

Categories
Apps Featured How To

Paytm Hacks: How To Transfer Or Send Paytm Wallet Money To Bank Accounts

UPI and digital wallet apps have seen a major boom in the Indian market ever since the government demonetized old Rs. 1,000 and Rs. 500 currency notes. It has become one of the essential payment modes in the country with more users subscribing to digital wallets each month. Paytm is one of the first UPI apps introduced in India which now has several other competitors such as GPay and PhonePe.

Despite the availability of other popular UPI apps, Paytm is one the most used services, Paytm is still the first choice for many users for its user-friendly UI and advanced set of features that makes digital wallet transactions secure and hassle-free. One of the most useful and common features offered by Paytm is the Paytm Wallet.

This feature essentially allows users to add money to their UPI wallets so that they can make online payments at merchants, receive money via other accounts, and also send money directly to bank accounts. Adding money to Paytm wallets doesn’t cost you any extra charges; neither does sending money via Paytm wallet.

Notably, Paytm users can register their bank accounts with which they can add money to their wallets. Also, if some other contacts are sending you money via Paytm, it will be either received in your wallet or bank account (via UPI). If in case you have some extra amount in your Paytm wallet, you also have the provision to send it to your personal bank account. But what are the steps with which you can send or transfer money from your Paytm wallet to a bank account? Well, we have listed down the steps for the same:

How To Transfer Paytm Wallet Money To Your Personal or Any Other Bank Account

 Step 1: Open the Paytm app on your respective Android and iOS smartphones.

Step 2: Tap on the “Passbook” option from the app’s homepage.

Step 3: Now, select the “Paytm Wallet” option.

Step 4: After completing the above steps, you will need to select “Send Money to bank” option followed by “Transfer”.

Step 5: Enter the amount that you need to transfer from your Paytm wallet to your bank account. Do make sure you have a sufficient balance in your account before you go ahead with the transfer process.

Step 6: You will now need to enter the banking details such as account number and IFSC code. If you already have the banking credentials added select the account.

Step 7: Now, all you need to do is click on “Confirm” to complete the money transfer process from Paytm wallet to your bank account. It is worth adding the same steps can be performed to send money from Paytm wallet to any other bank account using any Android or iOS smartphone running the latest version of Paytm app.

Categories
Apps Featured How To

WhatsApp Allows Individual Users Mute, Message Other Participants In A Group Call: Here Are The Steps

Highlights

  • WhatsApp new udpate allows individual users mute and message other users in a group chat
  • Feature available for both Android and iOS users

WhatsApp has gradually transitioned into one of the essential models of modern-day communication. WhatsApp has evolved its platform for not just personal but also group conversations. The brand has added a slew of features to both its Android and iOS mobile application in the last few weeks. The company seems to be majorly improving the group chat feature with the new updates. Earlier, the company released manual request approval for the new users in any group chat. Now, the company is making it easy for individual group users to mute other participants. What is this new feature and how can you use it? The steps are mentioned below:

WhatsApp New Update For Group Chats

WhatsApp Android and iOS app is now getting a new feature that will allow users to mute other participants in the group and also text them if they have forgotten to mute their mic. This new option’s availability has been revealed by WhatsApp Chief, Will Cathcart via Twitter.

We have seen multiple scenarios in group calls or meetings conducted via WhatsApp group chat where one or the other member have to continue with their personal chores without muting the mic. A personal phone call or message at times is required to make such users aware of the situation.

In other scenarios, such unmuted accounts can also create an echo during the ongoing calls. But to improve the overall group calling experience, WhatsApp has introduced this new feature wherein individual users will get the right to mute different participants individually. WhatsApp is eventually giving more dynamic control to the individual users in the group.

How To Mute Users Individually In A WhatsApp Group Chat?

Step 1: Open the WhatsApp app on any Android or iOS device. If in case you already are in a group call, follow the steps below.

Step 2: From the user profile tiles in the group, press and hold the user badge whom you want to mute or message.

Step 3: Select the “Mute” option if in case you want to mute the user.

Step 4: If you wish to text the user, select the “Message” option.

That’s all the steps you need to perform to mute or message any group user individually if they somehow have forgotten to mute themselves.

Categories
Apps Featured How To

How To Share Your Uber Ride Status With Friends And Family: Here Are The Steps

Key Highlights

  • Users can share their current location and expected arrival time on Uber
  • Users have to add them to Uber’s “Trusted Contacts” section
  • Uber Users can also share their ride status

When you are traveling in an Uber to meet relatives or friends, they may want to ask you where you are exactly. On the other hand, there can be circumstances such as when you’re in danger—where you want to alert relatives or friends where you are and where your Uber car is without them having to ask. Well, Uber makes this simple as long as you set it up in advance.

You can share your current location and expected arrival time for journeys with up to five people. You only have to add them to Uber’s “Trusted Contacts” section. By sharing your travel location with trusted contacts, people who are expecting you can know exactly where you are and when you will arrive. Here are the steps you can follow to inform your friends about your Uber travel status:

Also Read | Amazon Prime And Uber Partnership: How To Book UberPremier For The Price Of UberGo

How To Set Up ‘Trusted Contacts’ On Uber?

Step 1: Open the Uber app on your mobile phone and go to ‘Settings’.

Step 2: Click on the ‘Manage Trusted Contacts’.  

Step 3: Now tap on the ‘Add Trusted contacts’.

Step 4: Type out the names of these contacts from your contact list.

Step 5: After completing the process, you have three alternatives to choose from: ‘Don’t remind me, I’ll manually share my trips,’ ‘Remind me at night (9 pm to 6 am),’ or ‘Remind me before every journey.’

Step 6: Now every time you are on a ride, you can simply swipe up and tap on ‘Share My Trip’.

Users can also share their ride status by copying a link at the bottom by tapping ‘Send Status’ and pasting it on other apps like WhatsApp, SMS, and more if they haven’t already set up their trusted contacts list or don’t want to.

Regardless of whether they use the Uber app, the receiver will receive real-time location updates along with the driver’s name and car details. If they come across anything questionable, the trusted contacts can contact authorities.

Users can also set them as Uber emergency contacts. So, if an emergency occurs and you can’t get in touch, Uber can contact your emergency contact instead.

For the tech geeks, stay updated with the latest cutting-edge gadgets in the market, exclusive tech updates, gadget reviews, and more right on your phone’s screen. Join Giznext’s WhatsApp channel and receive the industry-first tech updates.

Also Read | Book An Uber Ride Using WhatsApp: Follow These Steps

Categories
Apps Featured How To

Here’s How To Auto-Delete Your YouTube History: A Step-By-Step Guide

YouTube is a popular video streaming platform with millions of users across the world who watch content on their connected TVs, laptops, desktops, and mobile devices. Apart from online video viewing, the YouTube videos can be downloaded to your device and can be watched when you are not connected to the internet.

Anyone who has access to your device, laptop, tablet, or mobile, and third-party apps that collect information for marketing purposes can get access to your YouTube watch and search history. Due to privacy concerns, the tech giant Google allows users to delete their watch history easily if they want to.

How To Auto Delete Your YouTube Search And Watch History

After a certain amount of time, you can choose to have your YouTube search and watch history deleted automatically. Here’s a step-by-step method to deleting your YouTube history automatically.

Steps To Clear Your YouTube Search And Watch History On The Web

Step1: Go to your Google Account on your PC.

Step 2: Click on ‘Data & Personalization’ on the top left screen.

Step 3: Tap on ‘YouTube History’ under ‘Activity controls’, then click ‘Auto-delete’.

Step 4: Select the auto-delete time frame you want.

Step 5: Now, click ‘Next’ and then ‘Confirm’ to save your auto-delete activity choice.

Step 6: At the bottom right of the pop-up, click on Confirm.

Steps To Delete Your YouTube Search And Watch History On An Android Phone

In order to clear your search or watch YouTube history, listed are the steps you can follow:

Step 1: Open the YouTube app on your Android Phone.

Step 2: Tap on the ‘Library’ option located in the bottom right corner.

Step 3: Choose ‘History’ and then in the top right corner, click on the vertical three dots.

Step 4: Now, select ‘History Settings’.

Step 5: You can now choose to ‘clear watch history’ or ‘clear search history’ now.

Steps To Clear Your YouTube Search And Watch History On TV, Media Streaming Box, Or Game Console

Step 1: Open YouTube on your device.

Step 2: Go to ‘Settings’ in the menu option.

Step 3: Select ‘clear search history.’

Now, the videos are permanently deleted from your YouTube account’s watch and search history.

Categories
Apps Featured How To Tech Gadgets

WhatsApp New Update: How To Hide Last Seen, Profile Photo, Status From Select Contacts

WhatsApp is the most downloaded instant messaging application that is available for download on Android and iOS smartphones and also for laptop and PC users. Privacy is one of the most crucial aspects of its popularity amongst consumers. Specifically, the end-to-end encryption service is what makes it reliable for personal and professional conversations. WhatsApp has released several new features in recent times and has also been testing on several others simultaneously. One of such security features that the company has been working on and has finally released after all the wait is the Status and Last Seen hide option from select contacts. Here are the steps to hide WhatsApp Status from select contacts:

WhatsApp New Update Improves Status, Last Seen Privacy

WhatsApp had introduced the Status option a long back and has improved the security aspects over the last few years. Until now the app only had the provision to hide status uploads from “My Contacts”, “Everyone”, and “Nobody”. However, users have been asking for the option to hide status as well as last seen from individual users.

WhatsApp took to its official Twitter handle to announce the availability of this long-awaited privacy feature. Following the latest update, a new option will be visible in the privacy section when you restrict someone from viewing your Status uploads of last seen.

Once you try to modify the privacy settings, you will be able to the new option, i.e., “My Contacts except”. It is worth adding that not just the Status or Last Seen, this privacy option is also made available for profile photos. Below is the step-by-step guide to hide WhatsApp last seen, profile photo, and Status uploads from select unwanted friends or contacts:

How Can We Hide WhatsApp Last Seen, Profile Photo, Status From Select Users?

Step 1: Open WhatsApp mobile application.

Step 2: Click on the three dots from the top right of the app’s homepage.

Step 3: Select Settings.

Step 4: Click on the Accounts option on the next page and then select Privacy.

Step 5: Now, select the option that you wish to hide from the unwanted friends, i.e., “Last Seen”, Profile Photo”, “Status”, and “About”.

Step 6: You will now need to tap on the “My Contacts Except” option to hide your WhatsApp last seen, profile photo, and status from selective users.

Categories
Apps Featured How To

Want To Change Your Phone Number On Amazon Account? Here’s How To Do It

Amazon has become the go-to online store for billions for just about anything they need to buy online. It has maintained control over the world’s most powerful economic and cultural forces. The company has made its app and web user interfaces user-friendly. One significant aspect of e-commerce is how customers enter/change their contact details and addresses so that their packages can be delivered to them.

How To Change Your Amazon Phone Number

Whether you’ve changed your phone number or simply want to use a different number, changing mobile numbers in your account is a simple process. We’ll help you learn how to do it on both your mobile phone and desktop.

Steps To Change Mobile Number From Your Mobile Phone

Step 1: Open the Amazon app on your mobile phone and log in to your account.

Step 2: In the bottom right corner, click on the three horizontal lines.

Step 3: Go to ‘Your Account’ and open ‘Login & Security.’

Step 4: Sign in again when prompted.

Step 5: Then, you will get an SMS notification that will be sent to your registered mobile number.

Step 6: Click on the link to ‘approve’ or ‘deny’

Step 7: Go back to your Amazon page. Next to the account information, you will see the option to ‘Edit’.

Step 8: Follow the instructions on the screen and ‘Save Changes’.

Step 9: Once it is over, tap on ‘Done’.

Steps To Change Mobile Number From Your Desktop

On your desktop computer, like Windows, Linux, Mac, or Chromebook, use the official Amazon website to change to your phone number.

Step 1: Visit the Amazon website and log in to your account.

Step 2: Click the ‘Accounts and Lists’ section in the top right corner.

Step 3: Go to the ‘Your Account’ page, and choose ‘Login & Security.’

Step 4: Then, tap on the ‘Edit’ option next to ‘Mobile Phone Number’.

Step 5: Enter the new phone number.

Step 6: Hit ‘Save changes’ once done.

From the same ‘Login & Security’ option, you can change your email address, residential address, name, and more. Notably, there is no limit on how many times this information can be updated. You can make changes to personal information as many times as you want. However, the e-commerce platform Amazon only allows one mobile number and email address.

Categories
Apps Featured How To Tech Gadgets

Social Media App Hacks: How To Mute Annoying/Unwanted Messages On Instagram, WhatsApp, Facebook Messenger

Key Highlights

  • Facebook has its in-house messaging application called Facebook Messenger
  • Users can now stop unwanted messages without blocking or notifying the end-user
  • The app offers a provision to mute messages from unwanted or annoying contacts

Social media apps are seeing an all-time high in terms of the consumer base. Countless users join social media platforms such as Instagram and Facebook on a daily basis. The modern masses rely on these apps and websites not just for entertainment but also for communication. That’s despite the availability of dedicated instant messaging applications such as WhatsApp on both Android and iOS mobile ecosystems.

Facebook, now called Meta also has its in-house messaging application called Facebook Messenger, while Instagram has a DM section on the app itself that helps the audience with conversations with their contacts and other users. However, there are situations when flooded with texts and messages from a specific contact that you might have avoided in general case scenarios.

These unwanted messages frequently popping up on your respective messaging app could be a hassle that you would wish to stop without blocking or notifying the end-user. Thankfully, most of the new-age social media apps or instant messaging applications provide a provision to mute messages from unwanted or annoying contacts. Also Read | How To Upload WhatsApp Status In High Quality (Images, Videos) On Android, iOS?

You can also mute messages and notifications from groups on WhatsApp and other social media apps. If you are unaware of the procedure to mute contacts on Facebook Messenger, Instagram, and WhatsApp then you can follow the steps mentioned below:

Steps To Mute Annoying Unwanted Messages On Instagram

Step 1: Open the Instagram app on your respective Android or iOS smartphones.

Step 2: From the homepage go to the DM (direct message) section.

Step 3: Now, go to the contact that you want to mute. Press and hold the contact until you get a certain set of options.

Step 4: You will see “Delete”, “Mute messages”, and “Mute call notifications”. You can select the last two options to mute messages and calls (voice/video) notifications from the selected contact on Instagram.

Do note that there is no time limit that you can set for the message notifications to unmute automatically on Instagram. You will have to perform the manual steps for the same.

How Can You Mute/ Stop Message, Call Notification On Facebook Messenger?

Step 1: Open the Facebook Messenger app and log in to your profile in case you haven’t done so.

Step 2: Similar to Instagram, press and hold any conversation thread that you wish to mute.

Step 3: Select “Mute” and set the time until when you don’t wish to receive notifications from the selected contact.

Step 4: You can also use the “Ignore” option for the same.

Steps To Mute Messages On WhatsApp

Step 1: Open WhatsApp on your respective phones.

Step 2: From the chat window or the contacts section, select the profile whose notifications (messages and calls) you want to mute.

Step 3: You will see a bunch of options on the top of the screen from where you need to click on the mute option.

Step 4: You will get the option to mute the selected contact for 8 hours, a week, and always. Click on the appropriate option. That’s it. You have successfully muted annoying and unwanted messages on WhatsApp.

Also Read | Best WhatsApp Status Apps To Download And Use On Android, iOS