Categories
Apps Featured How To

Use Meta AI On WhatsApp And Instagram In Three Steps: Here’s How

Key Highlights

  • Meta AI improves WhatsApp and Instagram with personalized features
  • Access Meta AI directly through the apps’ search
  • Enhances user experience and aids targeted advertising

WhatsApp and Instagram users are in for a treat as Meta, the parent company of these popular social media platforms, has initiated limited testing of Meta AI features. This move aims to enhance user experience and engagement by integrating AI directly into the messaging and photo-sharing apps. Also Read | Best Government Apps Offering AI Chatbot Support

How To Use Meta AI On WhatsApp

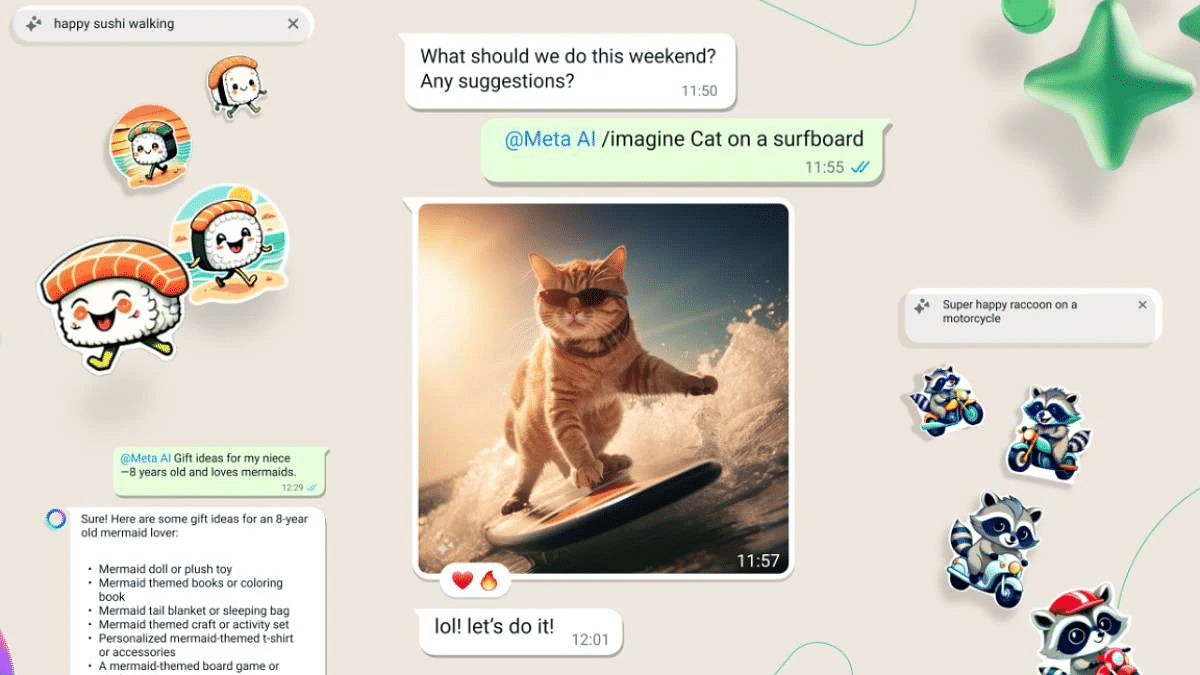
  1. Locate the Meta AI Icon: To begin, open WhatsApp and navigate to the bottom right corner of the screen where you’ll find the Meta AI icon.
  2. Access the Meta AI Chatbox: Click on the icon to access the Meta AI chatbox, where you can engage with the AI directly
  3. Engage with Meta AI: Once in the chatbox, users can ask the AI various questions, generate images, and even discuss their interests, all within the familiar WhatsApp interface.

How To Use Meta AI On Instagram

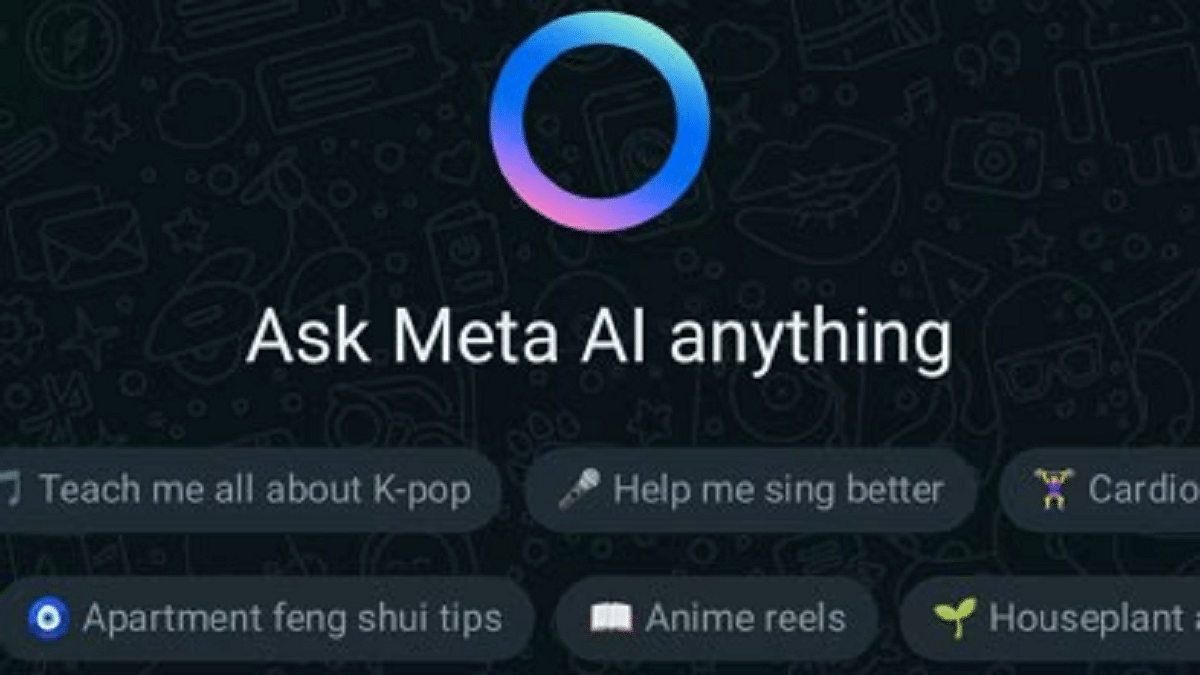
  1. Update and Open Instagram: Ensure you have the latest version of the app from the PlayStore or AppStore, then open Instagram.
  2. Tap the Search Button: Look for the search button located at the bottom of the screen and tap on it.
  3. Activate Meta AI: Upon accessing the search bar, you’ll notice a ‘Blue Ring’ indicating Meta AI availability. You can then type your questions or use the microphone to interact with the AI.

Also Read | Is Google’s Gemini A Better ChatGPT Alternative? Let’s Find Out!

More About Meta AI

According to reports from the Financial Times, Meta AI is positioned as a “fun product” for users, offering recommendations and a new search feature. While this adds to the user experience, it also holds significance from a business perspective. Chatbots, including Meta AI, have the potential to gather vast amounts of user data, enabling better targeting of content and advertisements. This data-driven approach can enhance Meta’s ability to connect with its target audience effectively.

Conclusion

The introduction of Meta AI on WhatsApp and Instagram signifies a step towards more personalized and interactive experiences for users. By seamlessly integrating AI into these platforms, Meta aims to enrich user interactions while also leveraging the data generated to improve its services and offerings. As the testing phase progresses, users can expect further enhancements and innovations, making their social media experience more engaging and enjoyable.

Categories
Apps Featured How To

Google Podcasts Shutting Down: Here’s How To Move Your Subscriptions

Key Highlights

  • Google Podcasts is closing down, starting in the US
  • Users should transfer their subscriptions to YouTube Music or another service
  • Google plans to improve podcast experience on YouTube Music by 2024

Google Podcasts, a popular app with over 500 million downloads on the Play Store, will no longer be available for streaming in the US starting from April 2. Last year, Google announced the closure of Google Podcasts through a blog post, as the company wanted to focus more on audio and video podcasts via YouTube Music. Although the app is shutting down in the US, it will stop functioning for users in other parts of the world by later this year. Also Read | Google’s Big Shift: What’s Really Happening To Gmail In August 2024?

Why Google Podcasts Is Closing?

Google has been sending reminders via in-app notifications and has also placed a warning on the app’s home page, urging users to transfer their data to YouTube Music or another podcast service.

How To Transfer Your Subscriptions To YouTube Music?

To transfer your Google Podcast subscriptions to YouTube Music, follow these steps:

Step 1: Launch the Google Podcasts app on your Android or iOS device.

Step 2: Click on the Home tab.

Step 3: Look for the Google Podcasts app shutdown notification.

Step 4: Click on “Export Subscriptions.”

Step 5: Select “Export to YouTube Music” under the Export Subscriptions option.

Step 6: You will be redirected to the YouTube Music app and asked to choose a Gmail account.

Step 7: Once selected, your subscriptions will be added to the YouTube Music app.

Note that it may take some time for all your subscriptions to be transferred.

Content Migration

However, not all podcasts you listen to will be migrated to the YouTube Music app. Some users might encounter a “Content is unavailable” message in certain cases. You can manually add a podcast by entering the show’s RSS feed link.

Also Read | Google’s Latest Math Solver App ‘Photomath’ Hits Play Store: Key Features

Google’s Future Plans

Google explained its decision to discontinue the Google Podcasts app in a blog post, citing increased investment in the podcast experience on YouTube Music. The aim is to enhance the platform for both fans and podcasters by offering unique YouTube-only features related to discovery, community, and audio/visual switching by 2024.

Conclusion

With Google Podcasts shutting down, it’s important to transfer your subscriptions to YouTube Music or another podcast service. Follow the steps provided to ensure you don’t lose access to your favorite shows.

Categories
Apps Featured How To

WhatsApp Fake Messages: Don’t Get Tricked! Here’s How To Identify And Avoid Them

Key Highlights

  • Stay cautious of unknown calls and urgent requests on WhatsApp
  • Verify the caller’s identity before disclosing any personal information
  • Activate two-factor authentication and promptly report any suspicious activity

In India, the number of cybercrimes, especially on platforms like WhatsApp, is increasing. Scammers are always finding new ways to trick people, often using WhatsApp calls to get sensitive information like banking details. But there are things you can do to protect yourself from these scams. Also Read | Fed Up With Scam Calls? Here’s How To Use Chakshu Portal For Reporting Fraud

Understanding Scams: What You Need To Know

Scams are illegal schemes where people try to trick you into giving away personal or financial information. It can occur in various settings, and anyone can become a victim. Our goal is to help you recognize and protect yourself from these tricky schemes.

How To Spot WhatsApp Scams

  • Be Careful with Unknown Calls: If you get a call from a number you don’t know on WhatsApp, be extra careful. It’s best to avoid answering if you’re not sure.
  • Verify the Caller: Before sharing any personal info, make sure you know who you’re talking to. Ask questions to confirm their identity.
  • Watch Out for Urgent Requests: Scammers often try to rush you into giving them information by creating a sense of urgency. Don’t fall for it. Take your time and think before you share anything.
  • Avoid Suspicious Links: If someone sends you a link and you don’t know them well, don’t click on it. It might redirect you to a fraudulent website aimed at stealing your information.
  • Use Two-Factor Authentication (2FA): Turning on 2FA adds an extra layer of security to your WhatsApp account. This makes it harder for scammers to hack into your account.

Also Read | Scammed On The Internet? Here’s How To Report Online Scams Via India’s Cyber Crime Portal

What To Do If You Encounter A WhatsApp Scam

  • End the Conversation: If you suspect someone is trying to scam you, stop talking to them immediately. Avoid providing any information or money under any circumstances.
  • Block and Report: Block the person’s number to stop them from contacting you again. You can also report them to WhatsApp so they can take action against the scammer.

By following these simple tips, you can protect yourself from WhatsApp scams and stay safe online. Remember to always be cautious and think twice before sharing any personal information.

Categories
Apps Featured How To

IPL 2024 Live Matches Streaming Free On JioCinema: Here’s How To Watch

Key Highlights

  • IPL 2024 streaming live on JioCinema for free
  • It offers multi-language live streaming options
  • Stream on mobile and Smart TV with JioCinema app

The 16th edition of the Indian Premier League (IPL) is currently going on, presenting an exciting clash among ten teams vying for the championship. Each team will face off twice in a round-robin format, with the top four advancing to the playoffs. The opening match between Chennai Super Kings and Royal Challengers Bangalore set the tone for the tournament. Also Read | Best Action Games For Android

Free Live Streaming: IPL 2024 On Mobile And TV

Wondering how to catch all the action without spending a penny? You’re in luck! IPL 2024 is available for free streaming on JioCinema. Viacom 18 has secured the digital rights for the Indian subcontinent, allowing cricket enthusiasts to watch matches on their mobile phones and Smart TVs at no cost. Additionally, Star Sports will broadcast the IPL matches on television.

How To Watch IPL 2024 On JioCinema

Watching IPL 2024 on JioCinema is simple. Here’s how to get started:

  • Download JioCinema App: Head to the Google Play Store or Apple App Store on your mobile device.
  • Search for JioCinema: Look for the JioCinema app and download it.
  • Installation: Install the app on your Android or iOS device.
  • Access IPL Matches: Once installed, open the app and tap on the IPL banner to start streaming the matches for free.

Also Read | JioCinema Brings In HBO And WB Shows With The Launch Of Premium Subscription Plan: See Price

Best Recharge Plans For IPL Streaming

To enjoy uninterrupted IPL streaming, consider these prepaid plans from Reliance Jio:

  • Rs. 219 Plan: 14 days validity, 3GB/day data, unlimited voice calls, 100 SMS/day, Jio app suite subscription.
  • Rs. 399 Plan: 28 days validity, 3GB/day data, unlimited voice calls, 100 SMS/day, Jio app suite subscription.
  • Rs. 749 Plan: 90 days validity, 2GB/day data, unlimited voice calls, 100 SMS/day, Jio app suite subscription.
  • Rs. 999 Plan: 84 days validity, 3GB/day data, unlimited voice calls, 100 SMS/day, Jio app suite subscription.
  • Rs. 1,499 Plan: 84 days validity, 3GB/day data, Netflix Basic subscription, Jio app suite subscription.

With these plans, you can enjoy IPL 2024 matches without worrying about data limits. So, get ready to witness cricketing brilliance and cheer for your favorite teams as they battle it out for glory!

Also Read | Best Games On Xbox Game Pass That Are Worth Playing

Categories
Featured How To Telecom

Vi Launches eSIM For Prepaid Subscribers In New Delhi: Here’s How To Get Yours

Key Highlights

  • Vi launches eSIM in New Delhi for prepaid users
  • Supported phones: iPhones, Samsung Galaxy, Google Pixel, and more
  • Simple activation process for enhanced security and flexibility

Vodafone Idea, known as Vi, has launched its electronic SIM (eSIM) service in New Delhi. This service was already up and running in Maharashtra (including Mumbai) and Goa. Now, prepaid users of Vi in the capital of India can also experience the convenience of an eSIM. Here’s all you need to know. Also Read | Want To Port Your Vodafone Number To Jio? Here’s How To Do It

Vi eSIM: Benefits

  • Simplified activation process, especially for existing customers
  • Enhanced security and safety of the SIM and your data
  • Easy device switching
  • Dual-SIM capability in certain devices
  • Environmentally friendly compared to physical SIM cards.

Vi eSIM: Supported Phones

If you own one of the following phones, you’re good to go:

  • Apple: iPhone XR and above
  • Google: Pixel 3 and above
  • Motorola: Razr, Next Generation Razr, Edge 40
  • Nokia: G60, X30
  • Samsung: Galaxy Fold, Galaxy Note 20, Galaxy Note 20 Ultra, Galaxy S21, Galaxy Z Flip, Galaxy Z Fold 2, and more
  • Vivo: X90 Pro

Also Read | How To Stop/ Deactivate Airtel, Vodafone, BSNL, JIO SIM Flash Messages On Android, iOS?

How To Activate Vi eSIM For Existing Customers

Follow these simple steps:

Step 1: Make sure your email ID is registered with Vi. If not, send ‘Email <space> Your Email ID’ to 199. You can proceed with the eSIM process after 48 hours.

Step 2: Send a message with ‘eSIM <space> your registered email ID’ to 199 to initiate the switch.

Step 3: You’ll receive a confirmation message. Respond with ‘ESIMY’ within a 15-minute window to confirm your interest.

Step 4: You’ll also receive a message asking for consent over a call.

Step 5: Once approved, you will receive a QR Code sent to your registered email ID. Scan it through your phone Settings.

Step 6: Follow the activation steps provided for your specific device. The QR code remains valid for one device for a period of seven days.

Step 7: You can rename the data plan label for the secondary SIM if you wish. Otherwise, proceed to the next step.

Step 8: Choose the default line (Primary/Secondary) for this number and then tap “Done”.

Step 9: Your eSIM will be active within 30 minutes.

How To Activate Vi eSIM For New Customers

If you’re a new customer:

Step 1: Head to the nearest Vi store to request a new prepaid eSIM.

Step 2: Provide a copy of your Aadhaar Card or another ID proof when asked by the store representative. Or, complete the Vi eSIM activation process through the official Vi website.

Also Read | Premium Mobile Number: Here’s How To Get It From Vodafone-Idea

Categories
Featured How To Mobile

Oppo Launches Self-Help Assistant For Indian Smartphone Users: Here’s How To Use

Key Highlights

  • Oppo’s Digital Self-Help Assistant offers quick fixes for smartphone issues at home
  • Available via Oppo’s website or MyOppo app, it covers all Oppo phones from the past five years
  • Users choose simulations or troubleshooting for easy problem-solving

Oppo has introduced a helpful tool for its smartphone users in India. Now, you can solve minor problems with your Oppo phone without going to a service center. This tool is called the Digital Self-Help Assistant. Also Read | Oppo Reno 11 5G Smartphone Review: Is The Stylish Design Backed By Performance?

Key Features

  • You can access this assistant through Oppo’s website or the MyOppo app
  • It provides guidance for all Oppo smartphones released in the last five years
  • This service comes just before World Consumer Rights Day on March 15

What It Offers

  • The Digital Self-Help Assistant lets you fix small issues on your phone
  • You can watch simulations or use troubleshooting options
  • It covers more than 400 settings and functions, including Camera, Memory, and Wi-Fi
  • You can learn about your phone’s features through digital guides

How To Use

Step 1: Visit Oppo’s Website or App: Go to the Support tab.

Step 2: Select Your Device: Pick your Oppo phone model.

Step 3: Choose Simulations or Troubleshooting: Decide which option suits your needs.

Simulations

  • Simulations offer step-by-step guides for various features of your phone
  • You can learn how to use your camera, manage memory, and more.

Also Read | Oppo Reno 11 Vs Poco X6 Pro: Mid-Range Android Phone Comparison

Troubleshooting

  • This section helps you fix software issues related to data, network, and device support
  • Answer a few questions to identify the problem and find a solution
  • You can rate your experience and provide feedback
  • If your issue remains unresolved, you can submit your contact details for further assistance.

Empowering Users

  • Oppo aims to empower users by providing them with the tools to solve problems on their own
  • Savio D’Souza, Director of Product Communications at Oppo India, believes this tool enhances the user experience.

Conclusion

Oppo’s Digital Self-Help Assistant is a convenient way to troubleshoot your smartphone. Whether you need guidance on features or help with software issues, this tool has you covered. By putting the power in the hands of users, Oppo is making smartphone usage easier and more convenient for everyone.

Also Read | Oppo F25 Pro 5G Quick Review: A Snapshot Of Its Pros And Cons

Categories
Featured How To

CAA Web Portal Now Live: Here’s How To Apply For Indian Citizenship Anytime, Anywhere

Key Highlights

  • New online portal launched for CAA 2019 citizenship applications
  • Eligible minority communities can apply from Pakistan, Afghanistan, and Bangladesh
  • Fill form, pay fee, attend verification

After putting rules in place for the Citizenship Amendment Act 2019, the Ministry of Home Affairs launched a new online portal. This portal is designed for individuals eligible to apply for Indian citizenship under the same act. Now, instead of going to government offices in person, people can apply for CAA 2019 from anywhere using their smartphone and the internet.

Also Read | How To Apply For Free Electricity In Karnataka’s Gruha Jyothi Scheme: Step-by-Step Guide

CAA Web Portal Benefits

This new portal supports the government’s Digital India program and makes the application process easier for people. The Citizenship Amendment Act 2019 allows minority communities persecuted in Pakistan, Afghanistan, and Bangladesh to apply for Indian citizenship. These communities comprise Hindus, Sikhs, Buddhists, Parsis, Jains, and Christians.

According to the act, people from these minority communities who came to India before December 31, 2014, are eligible to apply for Indian citizenship.

How To Apply For Indian Citizenship via CAA Website

Step 1: Open the Indian Citizenship Online Portal. The portal might take some time to load.

Step 2: Scroll down and tap on the box labeled ‘Submit Application for Indian Citizenship Under CAA, 2019’.

Step 3: Enter your email address or mobile number along with the captcha.

Step 4: Next, provide your name, mobile number, or email (whichever you haven’t entered previously), and complete the captcha.

Also Read | What Is A Masked Aadhaar Card? Here’s How You Can Download It Online

Step 5: You will receive an OTP on both email and mobile number. Enter both in the pop-up box. Also, enter the Captcha and click on Verify OTP.

Step 6: You’ll be asked to answer some questions. Following that, you’ll receive a form to fill out, where you’ll need to input your details and attach photographs. Make sure you have all required documents ready in advance.

Step 7: Finally, pay the online application fee of Rs. 50 and print out the form.

After completing the online process, you’ll receive an appointment for verification with an assigned officer. Carry the printed form to the district magistrate or collector. For those residing outside India, submit a copy to the Consular General. Your documents will be forwarded to the state government within 60 days, then to the central government. Application status updates will be sent to you via phone and email.

For the tech geeks, stay updated with the latest cutting-edge gadgets in the market, exclusive tech updates, gadget reviews, and more right on your phone’s screen. Join Giznext’s WhatsApp channel and receive the industry-first tech updates.

Categories
Featured How To

Fed Up With Scam Calls? Here’s How To Use Chakshu Portal For Reporting Fraud

Key Highlights

  • India introduces Chakshu portal to report fraud
  • Portal handles suspicious calls, messages, and WhatsApp scams
  • Complaints registered with details and screenshots on Sanchar Saathi site

The Indian government has launched a new system for people to report suspected fraud communications. It’s called the Chakshu portal, part of the Sanchar Sathi initiative by the Department of Telecommunications. This portal aims to stop fraudulent calls and messages.

Also Read | Scammed On The Internet? Here’s How To Report Online Scams Via India’s Cyber Crime Portal

What Is The Chakshu Portal?

The Chakshu portal is a new tool from the Department of Telecommunications. Its main job is to stop suspected fraud communications, like cyber scams. You can find this feature on the Sanchar Saathi website. Now, people all over India can report different types of cyber frauds. These could be fake customer service numbers, fake bank accounts, scams with payment wallets, fake gas connections, or pretending to be government workers. With the Chakshu portal, you can report these frauds through calls, messages, or even WhatsApp.

The Department of Telecommunications also made a Digital Intelligence Platform (DIP). This platform helps share information with police, banks, and other money-related groups to fight these frauds. So, the Chakshu portal and DIP should help find and stop cyber scams all across India.

Also Read | Step Into Safety: Learn How To Change Your UPI PIN On Google Pay And PhonePe

How To Use Chakshu Portal To Report Spam

If you want to report a suspected fraud call or message, you can use the Chakshu portal. Here’s how:

Step 1: Go to the Sanchari Saathi website.

Step 2: Click on “Citizen Centric Services.”

Step 3: Choose the Chakshu portal option and click “Continue.”

Step 4: Say if the fraud was through a call, text, or WhatsApp message.

Also Read | Want To Stay Ahead Of Your Period? Learn How To Set Up Menstrual Cycle Tracking On iPhone

Step 5: Choose the fraud type and attach a screenshot of the call or message.

Step 6: Give details like the suspect’s phone number, when it happened, and what was said.

Step 7: Enter your name, birthdate, phone number, and the one-time password (OTP) sent to your phone.

By following these steps, you can help fight against fraud in India.

For the tech geeks, stay updated with the latest cutting-edge gadgets in the market, exclusive tech updates, gadget reviews, and more right on your phone’s screen. Join Giznext’s WhatsApp channel and receive the industry-first tech updates.

Categories
Featured How To Mobile

Want To Stay Ahead Of Your Period? Learn How To Set Up Menstrual Cycle Tracking On iPhone

Key Highlights

  • iPhone’s Cycle Tracking simplifies period monitoring for accurate predictions
  • Gain valuable understanding of your body’s patterns for better decisions
  • Secure encryption ensures privacy control over menstrual health data

Gone are the days of relying on guesswork to predict your next period. With the advancement in technology, it’s now easier than ever to monitor your period with just a few taps on your iPhone. Apple’s Cycle Tracking feature empowers women to stay on top of their menstrual health effortlessly. It uses the information you’ve provided to forecast your upcoming menstrual cycle. By analyzing past patterns and trends, it can accurately predict when your next period is likely to start, allowing you to plan ahead and make necessary arrangements. Let’s dive into how you can make the most out of this handy tool.

Also Read | Women Can Track Their Menstrual Cycle On WhatsApp: Here’s How

Getting Started: How To Set Up Cycle Tracking On iPhone

To set up menstrual cycle tracking on your iPhone, follow these steps:

Step 1: Launch the Health app on your iPhone and tap on “Browse” from the bottom menu.

Step 2: Choose “Cycle Tracking” from the options.

Step 3: Click on “Get Started” under “Set Up Cycle Tracking.”

Step 4: A pop-up will appear informing you about the features including predictions, notifications, and cycle history. Tap on “Next” to proceed.

Step 5: Select the date when your last period started on the calendar that appears, then tap “Next.” You can skip this if you prefer to start tracking from your next period for accuracy.

Step 6: Enter the typical duration of your period in days and tap “Next.”

Step 7: Input the usual time between each cycle. If unsure, you can skip and let the app determine this gradually. Tap “Next” after entering.

Step 8: If applicable, select factors such as pregnancy, lactation, or contraceptive use. Otherwise, choose “None of These” and tap “Next.”

Step 9: Decide which data you want to monitor, such as period predictions and cycle deviation detection, and adjust the sliders accordingly. Tap “Next” to proceed.

Step 10: If desired, enable features like Fertile Window Estimates, Log Fertility, and Log Sexual Activity for conception tracking. Tap “Next” after making selections.

Step 11: Afterward, you’ll receive explanations about how the tracking feature works. Tap through these pages and tap “Done” when finished.

Step 12: Review your data in the Cycle Tracking section of the Health app. Light red circles indicate predicted cycle start dates, and under “Highlights,” you’ll see the likely start date of your next period.

Step 13: You can manually input period information by tapping “Add Period” at the top right corner of the screen.

Also Read | Car Troubles? Your iPhone Has The Solution: Here’s How To Use Visual Lookup

Fertility Awareness

For those planning to conceive or avoid pregnancy, Cycle Tracking offers invaluable fertility awareness. By monitoring your fertile window and ovulation dates, you can optimize your chances of conception or use this information for natural birth control methods. This feature empowers women to take control of their reproductive health with knowledge and confidence.

Also Read | Ever Wondered Who’s Calling? Learn How To Check Truecaller For A Number During Calls On iPhone

Conclusion

Cycle Tracking on your iPhone is a powerful tool that puts the control of your menstrual health right at your fingertips. From predicting your period to understanding your body’s unique rhythms, this feature offers a wealth of benefits. By leveraging technology to monitor and manage your menstrual cycle, you can take proactive steps toward better health and well-being. So, why wait? Dive into Cycle Tracking today and unlock the secrets of your body’s natural rhythms.

For the tech geeks, stay updated with the latest cutting-edge gadgets in the market, exclusive tech updates, gadget reviews, and more right on your phone’s screen. Join Giznext’s WhatsApp channel and receive the industry-first tech updates.

Categories
Apps Featured How To

X Introduces Audio And Video Calling To Non-Paying Users: Check How To Use

Key Highlights

  • X rolls out free voice and video calling for all users
  • Users gain the ability to call anyone on the platform
  • A concise guide explains how to make and manage calls in the X app

After much anticipation, X, formerly known as Twitter, has announced a significant update to its platform, enabling all users to make voice and video calls directly from the app. This long-awaited feature was initially introduced last October but was limited to premium subscribers. Now, in a move to democratize communication, the Elon Musk-owned company is extending this feature to non-paying subscribers as well. Also Read | Twitter Direct Message Feature Removed For Android, iOS Users: What Will Be The Impact?

Breaking Down The Announcement

Enrique Barragan, an engineer at X, shared the news via a post on the platform, revealing that the rollout of voice and video calling to non-premium users has started. While not everyone may have immediate access, Barragan assured users that the feature will be available to all within the coming days.

Expanded Calling Options

In addition to making calls available to all users, X has expanded the reach of its calling feature. Previously restricted to premium users, everyone on the platform can now start calls with any other user. This update underscores X’s commitment to inclusivity and enhancing user experience.

Also Read | Planning To Leave Twitter? Here Are The Best Twitter Alternatives To Download

How To Use Voice And Video Calling On X

For those unfamiliar with the process, here’s a step-by-step guide to making audio and video calls on X:

Making Calls On X: A Step-by-Step Guide

Step 1: Open the X app on your smartphone.

Step 2: Tap the envelope icon to access the Messages section.

Step 3: Select an existing DM conversation or start a new one.

Step 4: Tap the phone icon and choose between audio or video call options.

Manage Your Calls

Once you’re on a call, here’s how to manage your audio and video settings:

Audio Call Management

Step 1: Tap the speaker icon to switch to speaker mode.

Step 2: Toggle the microphone icon to mute or unmute your microphone.

Video Call Management

Step 1: Switch between front and back-facing cameras using the flip camera icon.

Step 2: Adjust audio settings by tapping the audio icon.

Step 3: Turn off your camera with the camera icon.

Step 4: Mute or unmute your microphone using the microphone icon.

Conclusion

With the rollout of voice and video calling to all users, X is ushering in a new era of communication on its platform. Whether it’s connecting with friends, family, or colleagues, users can now enjoy enhanced accessibility and convenience in their conversations.

Also Read | Instagram Threads: What Is It And How To Use Meta’s Twitter Alternative