ASUS has started selling the VivoWatch 5 Aero fitness tracker
The fitness tracker debuted in September at IFA 2022
It is available for 840 yuan in China
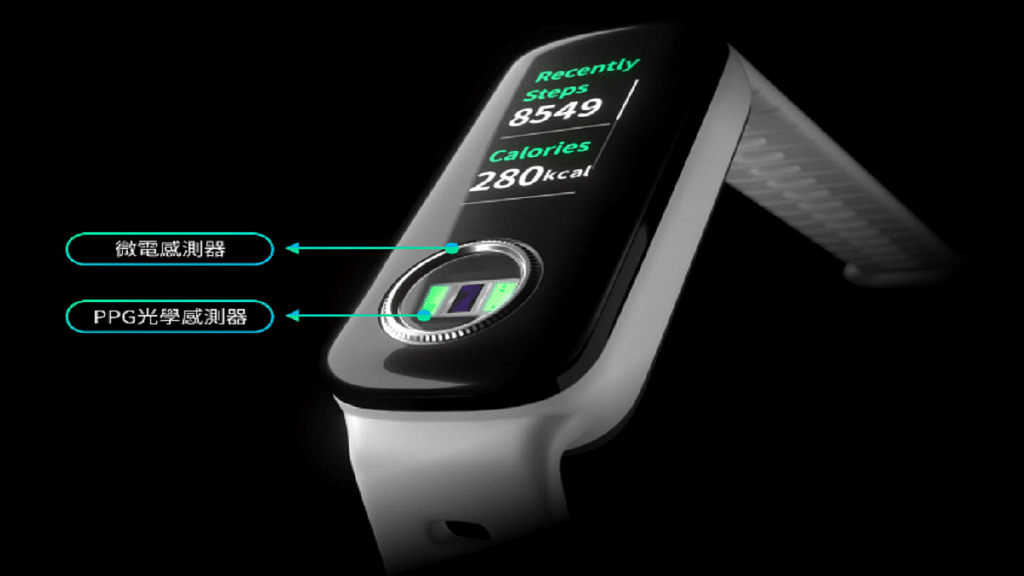
ASUS has started the process of making the VivoWatch 5 Aero available worldwide. The VivoWatch 5 Aero, unveiled in September at IFA 2022, combines a small display with a sensor array positioned beneath it. The company claims that the VivoWatch 5 Aero is the first fitness tracker in the world to provide this feature, with ECG and PPG sensors housed inside a small ring for taking measurements from a fingertip.
ASUS Vivowatch 5 Aero Wristband: Features
The new ASUS health and fitness wearable has a medical-grade triode single-lead ECG as its electrical sensing element, and it is available in black. Additionally, it has two PPG optical sensing channels. In the technology sector, smart wearables are continually evolving. Another achievement is adding support for fingertip pulse tests.
The new ECG function also has the requisite certification along with blood oxygen monitoring. These health parameters can be quickly measured by the smart wristband user using their fingertips. Heart rate, relaxation index, sleep quality, and other fitness and health parameters can all be verified by this.
Among the many supported features, it can record your running speed, distance traveled, route, and pace running. Sports modes including swimming, yoga, jogging, and walking are all available.
ASUS Vivowatch 5 Aero Wristband Battery
The ASUS Vivowatch 5 Aero Wristband weighs only 30g and has a battery life of seven days on a single charge. It is safe even when submerged underwater thanks to its 5ATM rating. This wearable is also supported by magnetic charging.
ASUS Vivowatch 5 Aero Wristband: Price
ASUS’ new health and fitness wristband is already selling for 840 yuan in China which is around Rs. 10,000 in India. It can be purchased on major domestic e-commerce platforms in the country.
Its major talking point is the innovative fingertip pulse testing available. This health feature is expected to boost demand for the product in China and beyond. ASUS has yet to release details regarding global availability and pricing for the new wristband.
An excellent time to get a new smartphone is during Flipkart Big Saving Days. You not only get access to a wide range of devices, but you also get to enjoy a lot. Who doesn’t adore deeply? Good news then! You know what that means—Big Flipkart’s Saving Days are here! The website of the online store offers fantastic discounts on a wide range of products. We’ll be concentrating more on the technological side of things in this piece. particularly smartphones. Flipkart is after all “India Ka Smartphone Destination”!
The Flipkart Big Saving Days are a terrific time to buy a new smartphone, as we have all seen in the past. You not only get a wide range of devices to choose from, but you also get to take advantage of a lot. Who is going to reject it, after all? Here is a selection of some fantastic offers at various price points to make your choice easier!
All of the flagship smartphones are found in the price range above 30,000. Apple, Samsung, Motorola, Google, and other companies are among them. These premium smartphones can be purchased at a reasonable price during the Flipkart Big Savings Days sale!
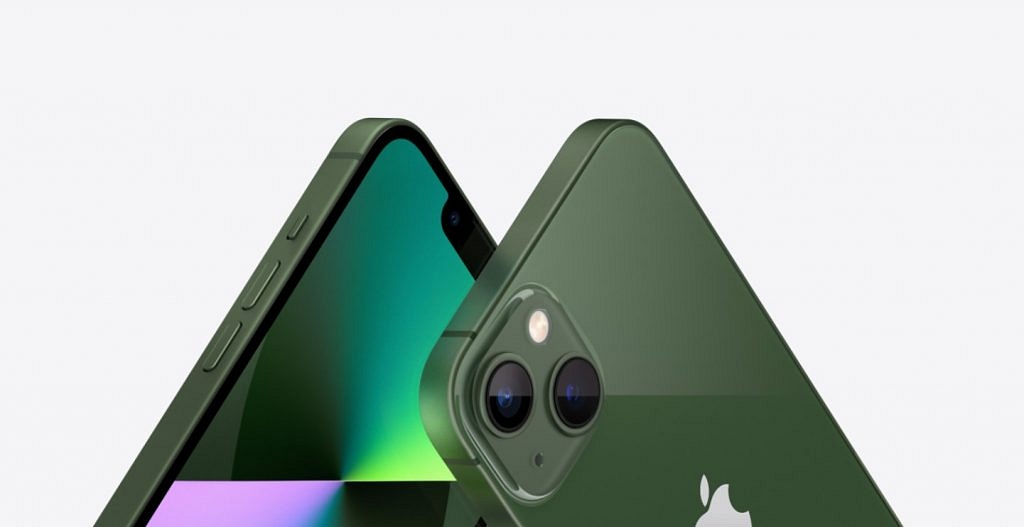
AppleiPHONE 13
Even if the Apple iPhone 13 isn’t the most recent smartphone, it can nonetheless compete with the most recent models. The device has one of the most cutting-edge dual camera systems currently available on a smartphone, along with an A15 Bionic chipset. Why not adore it?
MRP: Rs. 69,990
Final Effective Price: Rs. 62,999
Samsung Galaxy S21 FE 5G
The Samsung Galaxy S21 FE 5G is a flagship-level smartphone, and as such, it comes with a flagship-level camera system that includes a 32MP front camera with Night Mode and a pro-grade OIS camera in the rear. Therefore, whether it’s day or night, you should be able to take some fantastic pictures!
MRP: Rs. 74,999
Final Effective Price: Rs. 37,999
Google Pixel 7 Pro
The most recent Pixel smartphone is a photographer’s dream, and the Google Pixel series is renowned for its incredible camera! It has a professional-grade triple camera setup that should provide some stunning images. Additionally, the Tensor G2 chip from Google is included, which should result in outstanding performance.
MRP: Rs. 84,999
Final Effective Price: Rs. 74,999
Moto edge 30 Fusion
One of the most tastefully designed smartphones available right now is the Moto edge 30 Fusion. But a strong heart beats beneath the graceful design. The gadget is powered by a Qualcomm Snapdragon 888+ chipset. Additionally, it has a 6.55-inch FHD+ pOLED 10-bit screen with a refresh rate of 144Hz!
The pricing range of smartphones between Rs. 20,000 and Rs. 30,000 is a really interesting one. This is the point at which more cheap devices start to have access to premium functionality. This might involve innovative designs, top-tier processors like the Snapdragon 888, 144 Hz refresh rates, and other features. Users may get some incredible bargains on devices from Nothing, realme, OPPO, Motorola, POCO, and more during the Flipkart Big Saving Days sale!
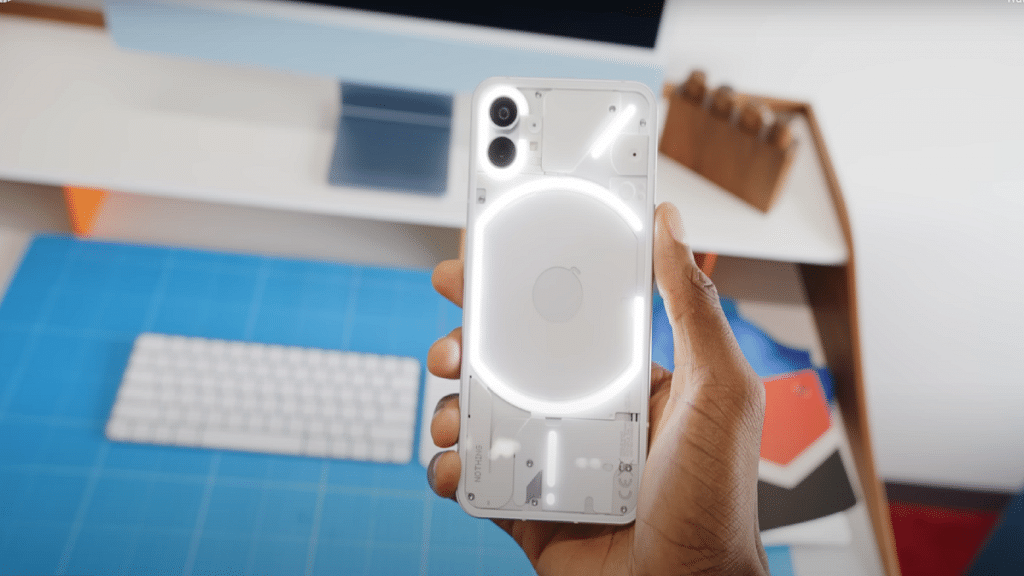
Nothing Phone (1)
One of the most distinctively styled smartphones available today is the Nothing Phone (1). This is largely due to the Glyph interface, which illuminates the rear panel! In addition to its innovative appearance, the phone has a 6.55-inch FHD+ AMOLED screen with a 120Hz refresh rate.
MRP: Rs. 37,999
Final Effective Price: Rs. 25,999
POCO F4 5G
With a Qualcomm Snapdragon 870 chipset and a 64MP triple-rear camera with OIS, the POCO F4 5G provides some very astounding flagship-level specifications. It is understandable why the phone is one of the fastest-selling flagship smartphones at this price when considering its specifications and low pricing.
MRP: Rs. 32,999
Final Effective Price: Rs. 22,999
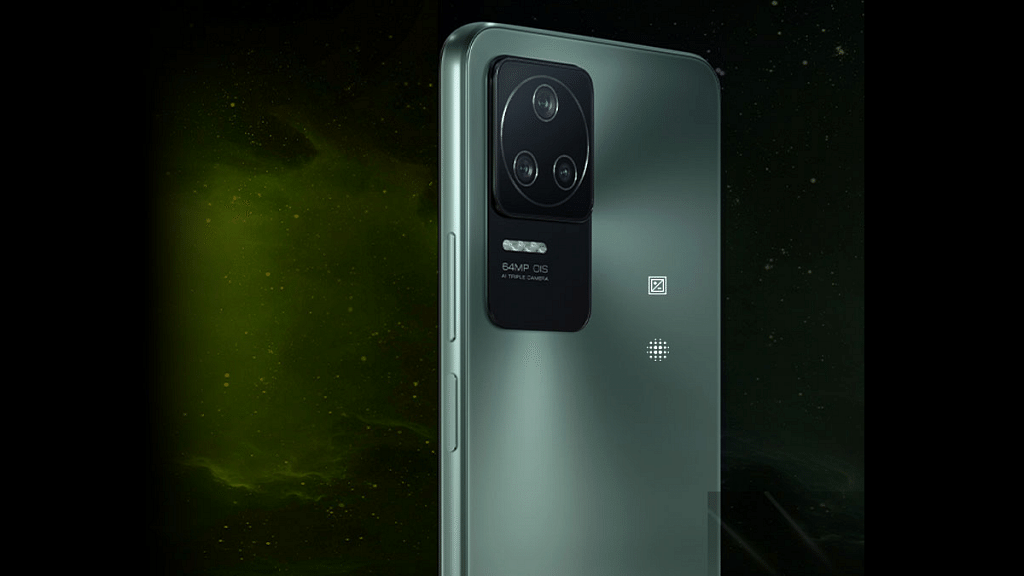
realme GT 2
The realme GT 2 has a tonne of flagship-caliber features. This has a 50MP Sony Sensor OIS camera and a Qualcomm Snapdragon 888 CPU. Additionally, it has a Paper Tech design that is distinctive and exceptional in appearance and feel.
Similar to the preceding category, the Rs. 15,000–Rs. 20,000 range offers many excellent smartphones from reputable manufacturers like Realme, Motorola, Vivo, Infinix, etc. Additionally, buyers get access to higher features and characteristics including 67W fast charging, 120Hz FHD+ displays, 64MP triple cameras, etc.
vivo T1 5G
In this pricing bracket, the vivo T1 5G is quite the potent offering from vivo. The phone features a 6.58-inch FHD+ display with a 120Hz refresh rate and a Qualcomm Snapdragon 695 chipset. The device is one of the current slimmest 5G smartphones on the market, measuring 8.25mm thick.
MRP: Rs. 19,990
Final Effective Price: Rs. 15,499
realme 9 Pro 5G
Many people believe the realme 9 Pro 5G smartphone to be one of the greatest all-around 5G phones under 20,000. When you take a look at the fantastic hardware available, this is rather obvious. The phone has a 64MP triple-rear camera configuration and is powered by a Qualcomm Snapdragon 695 chipset!
MRP: Rs. 21,999
Final Effective Price: Rs.18,999
OPPO F19 Pro+ 5G
Another smartphone that has a lot to offer is the OPPO F19 Pro+ 5G! You start off with a 48MP quad-camera arrangement with a 16MP selfie camera. It has an 8GB RAM CPU and a MediaTek Dimensity 800U processor for power. All in all, this means that for the money, you get a really good smartphone!
Smartphone manufacturers have been engaged in a rather heated competition in the Rs. 10,000 to Rs. 15,000 range. As a result, smartphone manufacturers frequently provide some really amazing features to entice customers. Buyers may find some excellent products in this price range that include features like AMOLED screens, 108P camera configurations, pOLED displays with 120 Hz refresh rates, 67W fast charging, Snapdragon 750G Chipset, and more. Because of this competition, shoppers can expect discounts from virtually all major manufacturers during the Flipkart Big Saving Days event, including realme, POCO, Samsung, vivo, Redmi, OPPO, Motorola, etc.
vivo T1 44W
The vivo T1 44W is one of vivo’s fastest-charging smartphones available in this market since it contains 44W Flash Charging technology. The phone’s 6.44-inch FHD+ AMOLED display, which allows users to enjoy vivid colours and deeper blacks, is an extra advantage.
MRP: Rs. 19,990
Final Effective Price: Rs. 13,499
Redmi Note 11 SE
The Redmi Note line is known for providing exceptional value for the money. This is also true of the Redmi Note 11 SE. The phone’s 6.4-inch FHD+ AMOLED display ought to satisfy everyone. Additionally, there is a 64MP quad-rear camera, as if that weren’t enough. In other words, the Redmi Note 11 SE is one of the most reasonably priced smartphones with a quad-camera system on the market.
MRP: Rs. 16,999
Final Effective Price: Rs. 10,999
Smartphones under Rs, 10,000
You’re in luck if you’re looking for an inexpensive smartphone. There will be a wide range of devices available during the Flipkart Big Saving Days sale, as well as fantastic deals on low-cost smartphones. In reality, for the price, you can purchase a smartphone with fairly impressive specs. This might have a 6.8-inch large screen, 50MP triple back cameras, a fingerprint sensor, a 6000mAH battery, or much more! Brands including Realme, Samsung, Redmi, Motorola, and POCO, among others, are offering deals.
Infinix Hot 12
For those seeking a fantastic value, the Infinix Hot 12 seems to be a terrific option. With typical use, the phone’s large 6000mAh battery should last more than a day for most phones. Additionally, you receive a 50MP triple AI camera. You get a phone with a big screen and a big battery when you combine this with the enormous 6.82-inch HD+ display!
With a huge 5000mAh battery, the POCO C31 should provide more than enough power for the majority of users. As if that weren’t sufficient, it also features a 13MP triple-rear camera configuration, making it one of the most reasonably priced smartphones with triple cameras that you can get. It is hardly surprising that this is POCO’s best-selling smartphone in the sub-10,000 price range given its features.
The Redmi 10 continues the Redmi series’ tradition of providing quality hardware at an affordable price. One of the most affordable Qualcomm-powered phones available is this one, which is powered by a Qualcomm Snapdragon 680 processor. The frosting on the cake is that it has a sizable 6000mAh battery, which will be especially appreciated by gamers and binge-watchers.
MRP: Rs. 14,999
Final Effective Price: Rs. 8,499
The first day of the Flipkart Big Savings Days is December 16 and lasts through December 21, 2022. Users can save even more money in addition to these offers by combining them with other discounts. This includes the Product Exchange, where Flipkart will give exceptional exchange rates on some devices up to a discount of 25,000. Additionally, No Cost EMI enables users to buy items on EMI with 0% interest. Additionally, customers can take advantage of additional savings on certain models of Supercoins and UPI Transactions.
SENS launches seven new Smart TVs across multiple screen sizes
Dwinci series and Pikaso series smart TVs are launched by the company
The televisions will include the most recent Google TV OS
SENS announced its entry into the market for smart televisions by launching seven new models on Flipkart in various categories. Starting on December 16, 2022, the platform will provide Google TV-enabled Smart TVs during its Big Saving Days sale.
The latest line of televisions from SENS will have custom “LumiSENS” and “FluroSENS” display panels in addition to some of the top features in the market, and panel sizes will vary from 43 inches to 65 inches. The televisions will include the most recent Google TV OS, which will give users access to a large variety of carefully selected content and a fluid watching experience.
The televisions, like other SENS products, are designed by in-house teams situated in India and the USA. Continuing with the philosophy of celebrating the scientific and creative geniuses of our times, SENS has named the new Smart TVs after renowned artists. With interesting names like Dwinci and Pikaso, the SENS Smart TVs are going to offer customers a blend of state-of-the-art design and cutting-edge technology, all built by the in-house teams at SENS.
Dwinci 55-inch And 65-inch QLED Google TV
A range of QLED 4K Google TVs with the Dwinci series name after the well-known painter. The TV provides a best-in-class viewing experience and makes pictures come to life with its LumiSENS panel, Dolby Vision technology, and bezel-less design.
The benefits of Google TV and the availability of more than 10,000 apps, along with the 20 Watt speakers and Dolby Atmos, offer an unmatched audio experience.
The Dwinci series is available at a special introductory price of Rs. 33,999 for the 55-inch version and Rs. 42,999 for the 65-inch version.
3 HDMI Connections 2 USB Connections 1 Mini AV Port LAN Port 2.4G+5G Wi-Fi Bluetooth 5.0 RS232 Control (Ex-Link) IP Control Support Optical Audio Output Port
Audio
Dolby Digital Plus 20 Watt 2 Channel DTS Studio Sound DTS Atmos
Accessories
SENS Smart Remote
Pikaso 50-inch And 55-inch 4K UHD Android TV
The Pikaso series, appropriately named after another well-known painter, is equipped with a FluroSENS panel. The Google Assistant-equipped smart remote that comes with the Android TV allows it to meet all content requirements. It has 20 Watt speakers and Dolby Audio & DTS featured in the smart TVs.
The special introductory price for Pikaso 50-inch and 55-inch 4K Android TV will be Rs. 24,999 and Rs. 29,999 respectively.
Picture
HDR 10 HLG/ D-LED Dolby Vision 100% Color Volume 4K UHD Game Enhancer
Design
Frameless Stealth Black
Connections
3 HDMI Connections 2 USB Connections 1 Mini AV Port LAN Port 2.4G+5G Wi-Fi Bluetooth 5.0 RS232 Control (Ex-Link) IP Control Support Optical Audio Output Port
Apple is consistently showing its expertise with consumer gadgets beyond smartphones. The Apple Watch series is currently the most powerful and feature-packed smart wearable lineup available globally. At the WWDC 2022 event, Apple released new versions of the Apple Watch including the Apple Watch Ultra, and also introduced a new set of health and emergency services that can be a life savior at certain events.
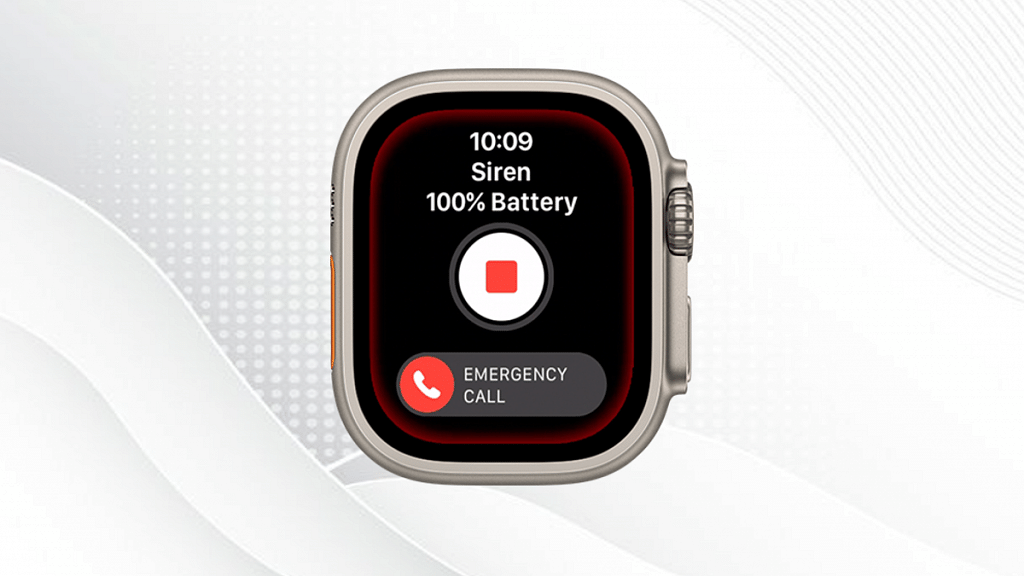
One of the nifty emergency features that all Apple Watch users can avail is the Siren. Using the siren feature on Apple Watch Ultra, individuals can instantly alert surrounding people of any mishap. This safety feature is quite simple to use with Apple Watch Ultra. The benefits of Siren along with the steps to use are listed below:
What Is Apple Watch Siren Feature? How Does It Work?
Apple Watch Ultra is a safety feature that plays a continuous sound that is audible up to 600 feet of distance.
The Siren feature produces two high-pitch sounds in alternate and repeat intervals which otherwise is not heard in general in the environment.
The Siren might take a brief pause in case there is an incoming phone call or any timer or alarm is on. However, it doesn’t auto-pause with music playback and podcasts.
The Siren audio frequency might not be loud as expected when the Apple Watch Ultra is wet. The audio levels will be back to standard when the watch dries out.
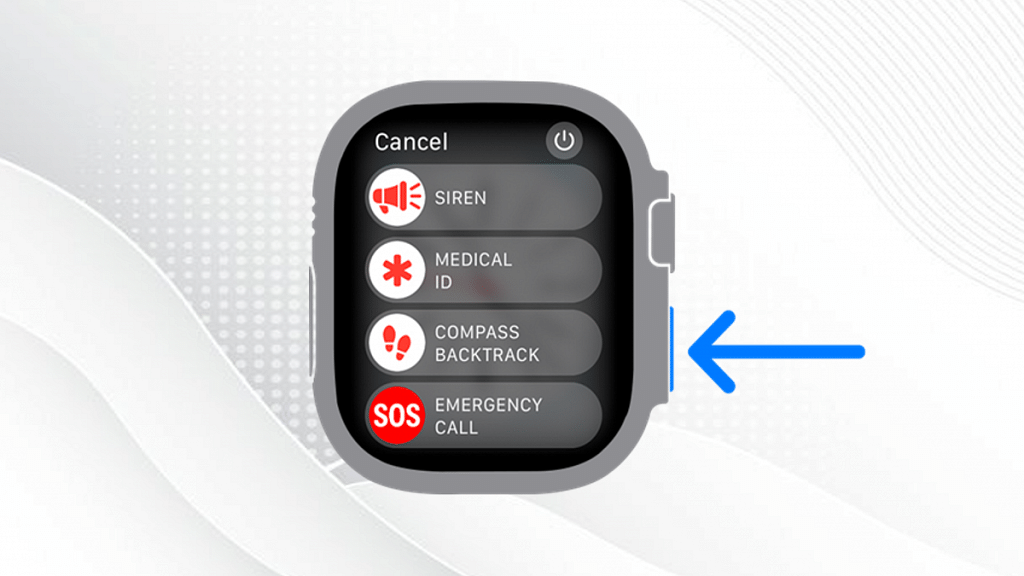
How To Enable Siren In Apple Watch Ultra
Step 1: Using the Action Button can activate Siren on the Apple watch. Simultaneously press and hold the Action button for the Siren slider to pop up.
Step 2: You would need to drag the slider option to begin the countdown.
Step 3: The Siren will start as soon as the countdown is over.
Step 4: You can also use the Side button. Press and hold the Side key on the right panel.
Step 5: Once the Siren slider appears, drag the Siren icon to start the countdown.
Step 6: The Siren will start as soon as the countdown is over.
After the launch of the budget Pova 4, Tecno is all geared up to launch its flagship grade 5G smartphone in India. The Tecno Phantom X2 is all set to break covers next month in the country. The successor to the brand’s first curved display smartphone, i.e., the Phantom X will be sold via Amazon. All the details are mentioned below:
Tecno Phantom X2 India Launch Date, Pre-Order, And Sales
The Tecno Phantom X2 will be announced on 2nd January 2023 in India. The premium mid-range 5G phone will be available for pre-orders starting the same day via Amazon. The online retailer has also updated the landing page of the Phantom X2 confirming the pre-bookings along with the sales timeline and specifications.
Tecno has scheduled the first sale starting January 9, 2023, in the country. Amazon’s product page confirms the Dimensity 9000 5G chipset under the Phantom X2’s hood. More details will be revealed in the coming weeks. As far as the pricing is concerned, the Amazon page or the official teaser doesn’t tip any information. But it’s expected to be around Rs. 25,000. This speculative pricing is as per the first Gen Phantom X’s launch price.
Tecno Phantom X2 Expected Key Specifications In India
Tecno Phantom X2
Full Specfications
Display
6.8-inch AMOLED 120Hz, FHD
Camera
64MP triple (rear) 32MP (selfie)
Chipset
octa-core Dimensity 9000
RAM
up to 8GB
Battery
5,160 mAh/ 45W fast charging
The Tecno Phantom X2 is officially confirmed to launch with the Dimensity 9000 5G chipset which is integrated with the Mali-G710 MC10 GPU. The processor is likely to be further combined with up to 8GB RAM and 256GB storage configuration. Android OS pre-loaded will be Android 12 which will be topped by HIOS 12.
The Phantom X2 is expected to debut in India with a 6.8-inch display. The AMOLED panel on the Phantom X2 will offer an FHD screen resolution of 1080 x 2400 pixels and layered with the Corning Gorilla Glass victus protection on top. The screen will also support a 120Hz refresh rate and have a punch-hole cutout accommodating a 32MP selfie lens.
The upcoming premium mid-rage Tencho Phantom series phone will be employing a triple-lens setup for primary imaging comprising a 64MP main sensor, a 13MP wide-angle lens, and a 2MP additional sensor. It will use a 5,160 mAh battery setup along with 45W fast charging.
Xiaomi is holding the most popular fan festival sale on its official website and Mi Store app
The company is giving discounts and deals during this year-end sale on the best Redmi and Xiaomi devices
Products like Xiaomi 12 Pro and Xiaomi Smart TV X50 have been discounted
The “No. 1 Mi Fan Festival” was announced by Xiaomi. Beginning on December 15 and running through December 21, 2022, the year-end sale will be available on the Mi website. The six-day sale features offers and deals on the top Xiaomi and Redmi products in the categories of smartphones, smart televisions, smart homes, and IoT ecosystem.
Xiaomi India will be hosting a number of activities that are available only on the Mi Store App to make the year-end sale even more gratifying for its fans and customers. Daily at 12 noon, the first 100 users can acquire a limited number of devices for a discount of Rs. 1,000 during the Fan Frenzy Sale. Users get the chance to win free products through Play and Win, including the Redmi 11 Prime 5G, Redmi Pad, and Mi Watch Revolve Active, among others.
By sharing their “Craziest” Fan Story on Mi.com by December 18, 2022, fans can enter the Fan Fever offer calls to win a variety of products. Customers can purchase 5G smartphones from the Xiaomi and Redmi portfolios starting at a discount of Rs. 8,000 during the six-day special sale on Mi.com. Up to Rs. 7,500 off the company’s best-selling Xiaomi and Redmi Smart Televisions will be made available.
Display, design, storage, and other features should be kept in mind while purchasing a TV
Other factors such as the price and the brand should also be considered
If you’re looking to upgrade your old TV, you have many options. In fact, most TV brands on the market offer a range of impressive models with the latest picture technology, incredibly smart features, and tons of connections for all your AV gear. But when it comes to purchases, do any brands stand out from the rest? Here, we have listed the best TVs that ruled the Indian market in 2022 that you can consider buying.
Model
Price (On Amazon)
OnePlus 43-Inch Y Series 4K Ultra HD Smart Android LED TV
Rs. 28,999
Sony Bravia 43-Inch Full HD Smart LED Google TV
Rs. 42,740
Mi 43-Inch Full HD Android LED TV 4C
Rs. 22,999
Samsung 55-Inch Crystal 4K Series Ultra HD Smart LED TV
OnePlus 43-Inch Y Series 4K Ultra HD Smart Android LED TV
The OnePlus Y Series Smart Android LED TV features a 4K ultra HD display. The device comes with DLNA, Chromecast, Miracast, Google Assistant, and auto low latency mode. Netflix, Prime Video, YouTube, Hungama, Hotstar, SonyLiv, Zee5, JioCinema, Eros Now, and Oxygen Play are among the supported apps. This smart TV offers two USB ports and three HDMI connections for connecting hard drives and other USB devices, as well as Blu-ray players, gaming consoles, and set-top boxes. It can be purchased from Amazon for Rs. 28,999.
Sony Bravia 43-Inch Full HD Smart LED Google TV
The Sony Bravia Full HD Smart LED Google TV has a 178 wide viewing angle and a 4K HDR ultra-bright display. The smart TV features include voice search, Alexa, and one-click OTT app downloads from Google Play. It also boasts 20 Watt speakers with Dolby Audio. For improved connectivity of the gaming console, setup box, and hard drives, it contains two USB ports and three HDMI ports. The Sony Bravia is priced at Rs. 42,740 on Amazon.
Mi 43-Inch Full HD Android LED TV 4C
The Mi TV is equipped with Mali-450 GPU. Voice commands can also be used to schedule your day and operate your TV. In addition to three HDMI and two USB connections for connecting hard drives, setup boxes, gaming consoles, and other devices, it has strong 20 Watt speakers for great audio quality. Since it’s a smart TV, you can use Google Play Store to download any popular OTT apps. The Mi TV will cost you Rs. 22,999 on Amazon.
Samsung 55-Inch Crystal 4K Series Ultra HD Smart LED TV
The Samsung LED TV comes with a 55-inch display. The smart TV is loaded with three HDMI and one USB port. With FHD with 4x more pixels, the 4K resolution elevates the display above standard. It contains a built-in 20 Watt Dolby audio speaker. The TV has a ton of smart functions, including a web browser and PC screen mirroring mode. The Samsung TV is priced at Rs. 45,999 on Amazon.
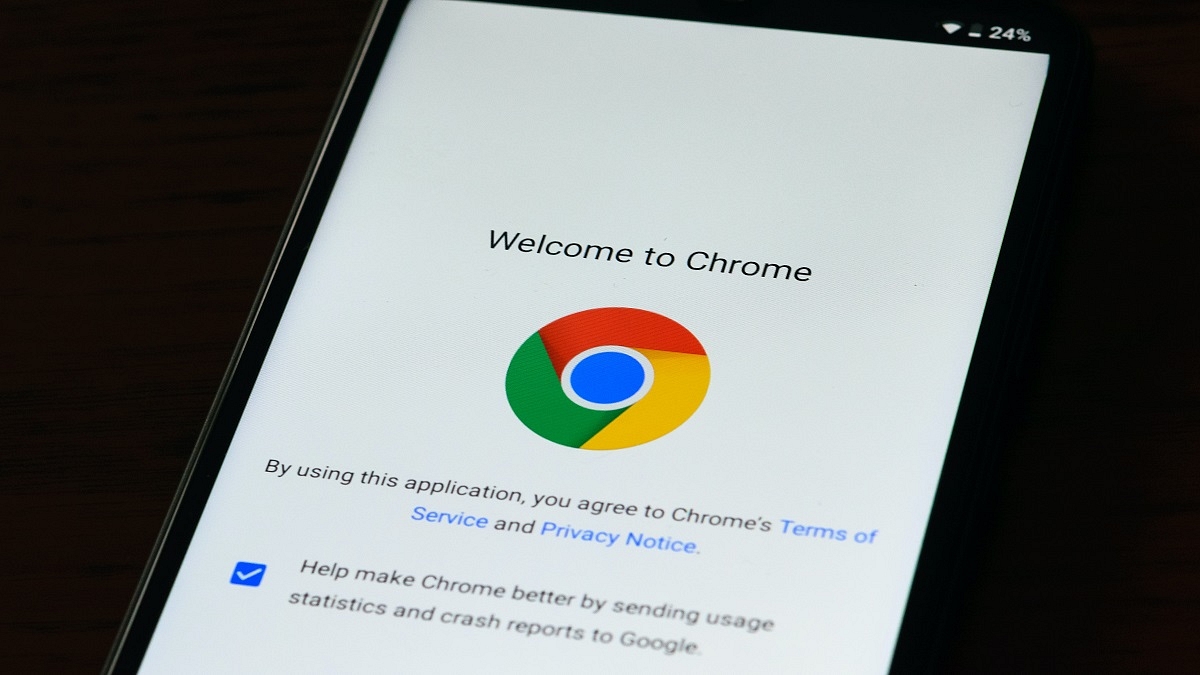
Google Chrome is the most common web browser that you can find on any Windows-powered laptop or PC. The search giant has also expanded Chrome’s web services to smartphone users allowing web browsing on the go. Google has also prioritized all the privacy aspects to make Google Chrome a secure platform for internet surfing. Downloading data such as images, documents, and videos, is also quick and easy with Google Chrome.
Users can also download large-sized files using the Google Chrome web browser on laptops, PCs, smartphones, and tablets. Additionally, the option to download browser extensions, apps ad themes is also available with Google Chrome. It’s quite a swift process with which you can download any files or apps using the Google Chrome web browser.
But at times, users get errors with the download process on Google Chrome. Connection errors are quite common with the Google Chrome web browser. But there are some additional error messages as well that users have reported frequently. Network failed, No File and Virus scan errors are a few of them.
If you come across any of such error messages while downloading data using Google Chrome you can perform a bunch of troubleshooting steps for a quick fix. The steps for the same are listed below:
How To Fix Common Download Errors On Google Chrome
Step 1: You need to check the internet connection first. An unstable internet connection or low network speeds is one of the prime reasons for connection errors with Google downloads.
Step 2: Check if the website url has any typo that could hamper the connection process.
Step 3: Once the internet connection is restored and stable, try re-downloading the file.
Step 4: Chrome also automatically resumes downloading when the internet is working fine. However, you can also manually resume the downloading by tapping on the More option.
Step 5: You can also try restarting Chrome and then downloading the file again.
Step 6: If the issue persists, reboot the laptop/ PC and then retry downloading.
How To Fix Network_Failed Download Issue With Google Chrome
Step 1: The Network_Failed download error message generally appears due to an unwanted software or app. Try identifying the software and remove it to fix the Network_Failed issue with Google Chrome downloads.
Step 2: You will need to uninstall and re-install Google Chrome if this error message re-appears during downloads.
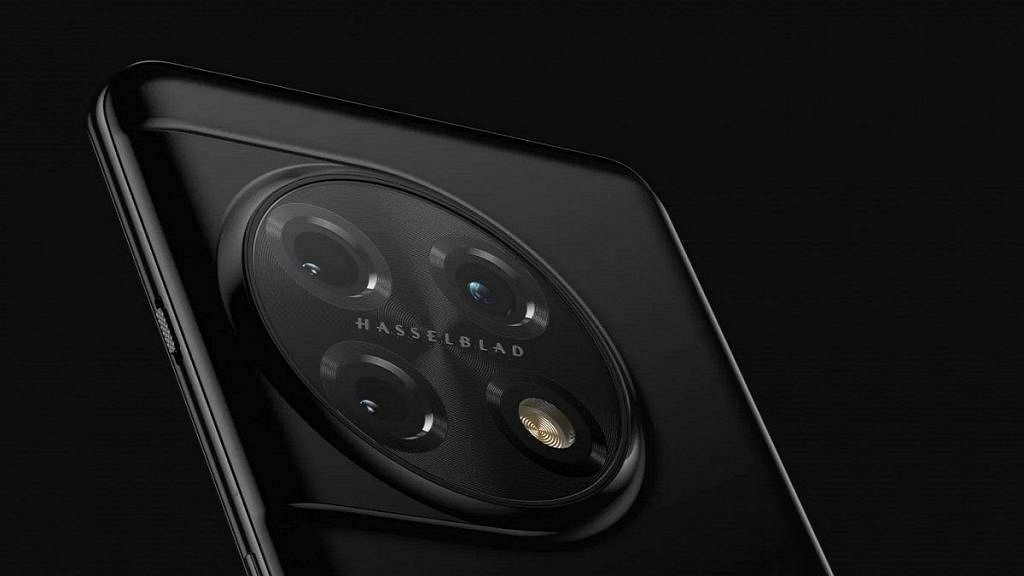
The OnePlus 11 phone might get released at the company’s 9th-anniversary event
Alleged renderings of the OnePlus 11 appeared online earlier this month
The rendering highlights the rear camera system of the circular camera module
The formal announcement of the OnePlus 11 series could happen soon. The new series will likely debut in China early next year. But with the company’s enormous popularity in India, it will also soon be available there. The OnePlus 11 and the OnePlus 11 Pro, both of which are powered by Qualcomm’s Snapdragon 8 Gen 2 CPU, may be included in the new series. The company might keep working with Hasselblad to develop its camera system. Before it is officially announced and launched, here is everything we currently know about it.
The OnePlus smartphone company has revealed that it will have an event in China on December 17 at 2:30 PM local time. The event will mark the company’s ninth anniversary. However, there are rumors that OnePlus might present its OnePlus 11 phone at the event.
“New direction, new action, new future” is the tagline on the event’s post. The company might present its OnePlus 11 series at the event, according to probability. The launch could, however, happen in the first quarter of 2023.
OnePlus 11 Series: Specifications (Expected)
First, let’s talk about the design. According to tipster and OnePlus-observer Max Jambor, the new OnePlus 11 will be available in Matte Black and Glossy Green. There will be a 6.7-inch curved 2K resolution display with a 120Hz refresh rate, 16GB RAM, and UFS 4.0 storage, according to Digital Chat Station, another notable tipper.
Along with 128GB and 256GB storage capacities, the smartphone is said to have an LTPO display that adapts its refresh rate dependent on the content. The OnePlus 11 series will come pre-installed with OxygenOS 13 which is based on Android 13.
An alleged rendering of the OnePlus 11 appeared online earlier this month. The rendering focuses on the circular camera module’s back camera system. A 48MP ultra-wide-angle camera sensor, a 32MP telephoto camera, and a 50MP Sony IMX890 main sensor could be found in the rear camera system. According to rumors, the OnePlus 11 would have a 32MP camera for selfies and video chats.
Acer Swift Edge launched in India with 16-inch OLED display
Lightweight design and alloy body material
Powered by AMD Ryzen 6800U chipset
16GB LPPDR5 RAM and 1TB PCIe Gen4 NVMe storage
Priced at Rs. 1,24,000
Acer has launched a new high-end laptop in the Indian market. The Taiwanese tech giant has launched the latest Microsoft Pluton security processor-powered notebook for productivity-oriented consumers in India. Called the Acer Swift Edge, this 16-inch notebook comes with a durable lightweight design and premium features such as a 4K display and AMD Ryzen Pro processor. Read on the pricing details along with the spec-sheet below:
Acer Swift Edge 16-inch Laptop Full Specifications And Features
Acer Swift Edge 16-inch Laptop
Key Specifications
Display
16-inch OLED 3800 x 2400 pixels resolution
Web Cam
Integrated FHD 60fps recording
Processor
AMD Ryzen 6800U
RAM
16GB LPDDR5
Windows
1TB PCIe Gen4 NVMe
Biometrics
Fingerprint scanner
Battery
54Wh
Adapter
65W PD adapter
The Acer Swift Edge laptop is a flagship-grade laptop crafted with an alloy body material. As per Asus, the material used to design the Swift Edge cuts down on the weight by up to 20 percent as compared to the standard aluminum. This productivity-centered laptop gets power for all the tasks from the AMD Ryzen 6800U chipset. This octa-core chipset is combined with 16GB LPDDR5 RAM.
This laptop will be available with a 1TB PCIe Gen4 NVMe storage option. Acer has added a 16-inch display on the Swift Edge laptop. The OLED panel comes with a 3840 x 2400 pixels screen resolution. This laptop is also integrated with an FHD webcam. This built-in camera is capable of recording up to 60fps videos.
Audio delivery is handled by stereo speakers on the Swift Edge laptop. To enhance the audio with video calling, this laptop has Temporal Noise Reduction technology. The Swift Edge laptop has multiple connectivity options. It features one HDMI port, one USB Gen 3.2 Gen 1 port, and two USB Type -C ports.
It also has Wi-Fi 6W and Bluetooth 5.2 wireless network options. A large keyboard sans keypad is also present. For security, it has a fingerprint reader on the trackpad. It also features the Microsoft Ploton security processor.
The Acer Swift Edge will ship with the Windows 11 Home Edition pre-installed. It will also bring along Microsoft Office 2021. Furthermore, the laptop comes with a 54Wh battery and a PD adapter of 65W.
Acer has announced the Swift Edge at Rs. 1,24,000 in India. The premium range productivity laptop will be up for grabs via the company’s official e-store and also Amazon.