Categories
Accessories Featured Smart Watch

Realme Buds Air 3S, Watch 3 Pro Launched In India: Check Features And Price

Key Highlights

  • Realme Buds Air 3S, Watch 3 Pro unveiled in India
  • Realme Watch 3 Pro is priced at Rs. 4,999
  • Realme Buds Air 3S is priced at Rs. 2,499

The Chinese tech giant Realme has launched the latest wearable and audio devices in India. The brand unveiled its latest TWS Realme Buds Air 3S and smartwatch Realme Watch 3 Pro today along with the launch of the Realme C33 budget phone at a virtual launch event. Here’s all you need to know about the newly launched devices:

Realme Buds Air 3S Features

The new TWS from Realme boasts a trendy and comfortable music box-inspired design, and the silicone used to make the earbuds is skin-friendly. For a compact appearance, it has a novel short earbud design, and the silicon ear wing tip ensures a secure fit.

It provides the deep sound quality possible and enables users to enjoy high-end stereo surround sound thanks to its 11mm Triple Titanium Bass Drive and Dolby Atmos compatibility.

The Realme Buds Air 3S is equipped with Bluetooth 5.3, a new generation technology that offers better communication efficiency and extremely low latency of just 69ms.

The 4-Mic AI ENC noise canceling algorithm helps its effective noise reduction technology. Besides this, the buds come with 30 hours of playback time with a large battery capacity of 43mAh for a single earbud. It further supports 10 minutes of fast charging lasting up to 5 hours in a normal mode.

The new Buds Air 3S also has smart features like dual device connectivity which lets you select the device based on your needs. Its Open up auto connection feature connects the device automatically as soon as the user opens the charging case, and google fast pairs assists with connection setup when pairing for the first time.

Price & Availability

Bass Black and Bass White are the two colors in which the Realme Buds Air 3S will be sold. It will be available on September 14, 2022, from 12 PM on realme.com, Amazon, and mainstream outlets. The device is priced at Rs. 2,499.

Realme Watch 3 Pro Features

The 1.78-inch AMOLED HD curved display on the Realme Watch 3 Pro has a slimmer chassis and fewer bezels. It has the first multi-system standalone GPS in its class and Cywee’s expert GPS positioning technology to accurately record bodily movements. Additionally, it can run continuously for up to 20 hours with GPS.

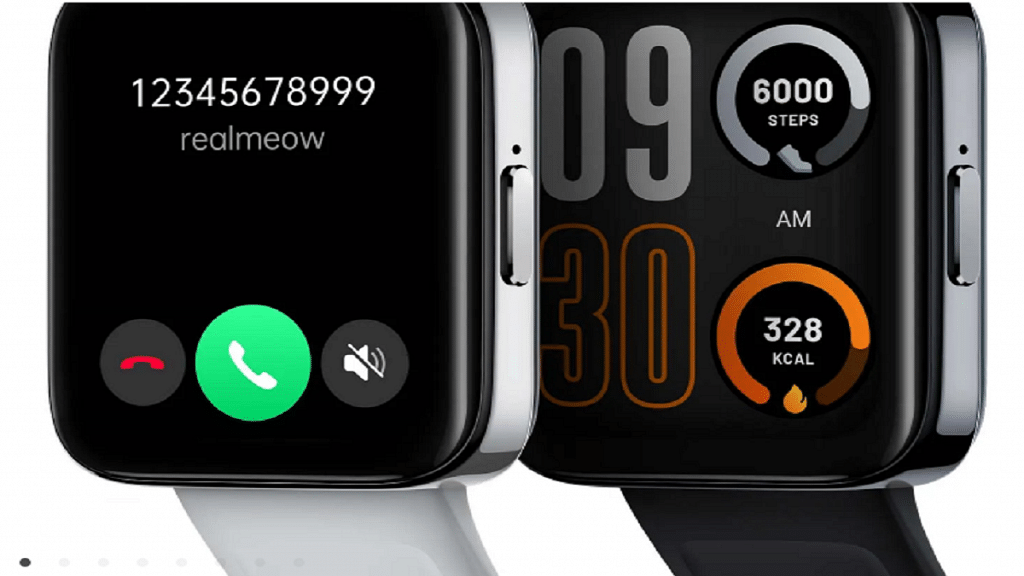
It offers an efficient Bluetooth calling feature and an integrated smart power amplifier. With a 345mAh battery capacity and a 10-day battery life, the Watch supports magnetic charging.

The Realme Watch 3 Pro includes an extensive collection of over 100 Stylish Watch Faces. Additionally, it is IP68 water resistant and offers 110+ Sports Modes for the athlete in you. Users can also count on the device for accurate health monitoring such as SpO2, heart rate, stress levels, and sleep quality.

Price & Availability

The Realme Watch 3 Pro will be available in two colors, i.e., Black and Grey. It is priced at Rs. 4,999 and will be on sale on realme.com, Flipkart, and mainstream channels on September 9 at 12 noon.

Categories
Featured Mobile

Nokia X30 5G With Snapdragon 695, 50MP Dual Cameras Marks Debut At IFA 2022: Features That Make It Unique

At the IFA 2022 ( Internationale Funkausstellung Berlin) event, the Finnish smartphone giant HMD Global revamped its product lineup with the launch of three new Nokia smartphones. The brand unveiled the Nokia X30 5G alongside the Nokia X60 5G, Nokia T1, and the Nokia C31. The company is touting the Nokia X30 5G as one of the world’s most environmentally friendly phones. How does the handset redefine smartphone designing technology and what all features does it offer? Also, when can we expect the company to release the Nokia X30 5G in the Indian market and how much is it expected to cost? Read on here:

Nokia X30 5G Design And Specifications: What’s Different?

The Nokia X30 5G is designed using recycled materials. The company has used 100 percent recycled aluminum and 65 percent recycled plastic material to craft the X30 5G. Using recycled material makes it stand out from the crowd for being environmentally friendly. The environment-friendly design is further complemented by an IP67 certification that safeguards it from dust and water splashes.

Speaking of the features, the Nokia X30 5G is a premium mid-range Android phone that is packed with an AMOLED screen. The display on the latest Nokia 5G handset measures 6.43-inches. It supports 1080p FHD+ screen resolution and has 700 nits peak brightness level that makes it sufficiently bright under direct sunlight.

The X30 5G’s display further supports a 90Hz refresh rate and is layered with the Corning Gorilla Glass Victus protection against scratches and drops. Under the hood, the Nokia X30 5G employs the latest Qualcomm mid-range 5G chipset, i.e., the octa-core Snapdragon 695 chipset.

The processor comes with Adreno 619 GPU support for graphics. For multitasking, this handset has 6GB/ 8GB RAM compatibility. Nokia has launched the X30 5G with 128GB and 256GB storage configurations and has also added support for an external microSD card for additional storage requirements.

Moving on to the camera hardware, the Nokia X30 5G has a dual-lens camera module at the back. The setup includes a 50MP main sensor and a 13MP secondary lens which is an ultrawide sensor. The device is packed with a 16MP camera up front to capture selfies and for video chats on the go.

The device will come pre-loaded with Android 12 OS and will offer a stock Android UI. This is another big highlight of the latest Nokia X series phone. Lastly, a 4,200 mAh battery unit drives the handset which has 33W fast charging support.

Nokia X30 5G: Expected Price In India, Sale Date

The Nokia X30 price is around Rs. $529 which if translated into Indian currency is around Rs. 42,200. However, Nokia is yet to announce the X30 5G’s official India launch date and the pricing details. The exact price could be lower compared to the international market. This is based on our speculation considering the hardware features. We are expecting Nokia to announce the X30 5G availability details soon for the Indian market and will keep you posted with the details.

Categories
Featured Laptop

Asus ROG Strix Scar 17 Special Edition Laptop Launched In India: Check Features, Price

Key Highlights

  • Asus ROG Strix Scar 17 Special Edition announced
  • It features Intel 12th Gen Core i9 HX series of processors
  • The laptop has NVIDIA RTX 3080 Ti

Asus has announced the upgrade to its ROG Strix Scar 17 PCs with the Special Edition (SE) launch in India. The new laptop offers gamers enthusiasts of the nation gameplay experiences and unmatched performance. Here’s everything you need to know about the newly launched Asus ROG Strix Scar 17 Special Edition Laptop:

Asus ROG Strix Scar 17 Special Edition Laptop Specifications

The lid design of the Asus ROG Strix Scar 17 Special Edition has been updated. It is powered by an NVIDIA GeForce RTX 3080 Ti and an Intel 12th Gen Core i9 12950HX CPU. The laptop sports a 17.3-inch QHD screen with a 240Hz refresh rate, a 3ms response time, and Dolby Vision HDR compatibility.

It contains a 4TB PCIe Gen4 SSD and 32GB of 4800MHz DDR5 RAM, which can be expanded to 64GB. On the audio front, the ROG Strix Scar 17 Special Edition has a quad-speaker audio system with Dolby Atmos support.

The keyboard allows users to change light settings based on the game they are playing, supports Aura Sync, and offers per-key RGB lighting. The switches are designed to last more than 20 million presses, claims Asus.

It has a 90Whr battery which Asus claims can be quickly charged to 50 percent in just 30 minutes. Along with the laptop, the company is including a bunch of peripherals, including a ROG Backpack, ROG Delta Headset, a FullHD 60FPS camera, and a ROG Strix Impact Mouse.

The Taiwanese electronics brand Asus says they used Conductonaut Extreme Liquid Metal thermal paste from Thermal Grizzly on the GPU and CPU. This helped to lower the ambient temperature by about 15 degrees Celsius.

Asus ROG Strix Scar 17 Special Edition Laptop Price In India

The ROG Strix Scar 17 Special Edition Laptop can be purchased online from Asus, Amazon, and Flipkart for a starting price of Rs. 3,59,990. The device is also available from all Asus authorized dealers as well as Asus Exclusive Stores, ROG Stores, Vijay Sales, Croma, and Reliance Digital.

Categories
Featured Info Mobile

Secret Codes To Check Chinese Smartphone Sensors

There’s more to the dialer screen on your smartphone than meets the eye. Besides its obvious purpose of calling people, there’s a vast array of secret codes you can input to troubleshoot your device, reveal important information, make anonymous phone calls, and so much more.

The secret codes mentioned here are applicable to any brand of Android phone including Chinese mobile phones like OnePlus, Vivo, and Xiaomi. Let’s check them out:

List Of Useful Secret Codes For OnePlus, Vivo, And Xiaomi

Secret CodePurpose of Use
*#*#4636#*#*Battery information, Phone information, Battery History, Wi-Fi information, Usage statistics
*#*#7780#*#*For Factory Reset: System and app data and settings; Google account settings kept in the smartphone; All downloaded apps
*#*#34971539#*#*To get information about the camera of the mobile phone: Update camera firmware on SD card; Update camera firmware in the image; Get firmware update count; Get camera firmware version
*2767*3855#The data, files, and settings on the phone’s internal memory will be formatted and deleted. The firmware of the phone will also be reinstalled.
*#*#273283*255*663282*#*#*This code will launch a File copy screen where you can back up media files including movies, songs, photographs, and more.
*#*#7594#*#*To modify the “End Call / Power” button option, enter this secret code.
*#*#197328640#*#*This code is used to enter service mode so that various tests and setting adjustments can be made.

Useful Secret Codes For Factory Tests

Secret CodePurpose of Use
*#*#0*#*#*LCD Test
*#*#3264#*#*RAM Version
*#*#0673#*#*Melody Test
*#*#0588#*#*Proximity Sensor Test
*#*#0283#*#*Packet Loop Back
*#*#2664#*#*Touch Screen Test
*#*#2663#*#*Touch Screen Version
*#*#0842#*#*Vibrator and Backlight Test

WLAN, GPS, And Bluetooth Secret Codes

Secret CodePurpose of Use
*#*#1472365#*#*GPS Test
*#*#232339#*#*WLAN Test
*#*#8255#*#*To launch GTalk Service Monitor
*#*#232338#*#*Displays WiFi MAC Address
*#*#232337#*#To Display Bluetooth Device Address
*#*#232331#*#*Bluetooth Test

Please take note that one should use these secret codes at their own risk. If you are a beginner, then we suggest obtaining the advice of some professional or experienced user before using these codes. These helpful secret codes are designed to be used by knowledgeable users, not novices.

Categories
Featured How To Mobile

Forgot Vivo Phone App Lock, Screen Lock Password? Here’s How To Reset Password With Or Without Security Code

Smartphones nowadays are one of the most commonly used gadgets by the masses for communication and also entertainment, photography, and gaming. Vivo is one of the largest players in the smartphone industry that has several lineups catering to affordable and premium users. The Chinese maker is consistently improving the user experience with its smartphones by integrating the best and newest technologies.

Vivo also provides a secure ecosystem for its smartphones and users. Most Vivo budget smartphones are packed with basic security features such as PIN and password protection. Face Unlock is another common security feature that you will find on Vivo handsets.

If you buy a mid-range or premium range Vivo smartphone, you’ll get an additional physical security feature including a side, rear, or under-display fingerprint scanner. While setting up a Vivo smartphone, you get the option to add any of the aforementioned security layers. You can set up File Safe or privacy app lock for specific apps to safeguard your data.

If you are using a Vivo phone, you can also add a screen lock that can be unlocked using the PIN and password protection. It’s difficult to breach the security layers on Vivo smartphones. This is why it could be a task for you to login into a locked Vivo smartphone. Only a correct password or fingerprint is required to unlock the Vivo phones. But what if you have forgotten the password if you have modified it recently? In that case, you can reset the password by following the steps below:

What To Do If Forgot Privacy Space Or App Lock, File Safe Password On Vivo Phones?

 Step 1: Open the Settings menu on your respective Vivo smartphones. Note, that the steps mentioned here will work for Funtouch OS 3.0 and above versions.

Step 2: Scroll down to the Fingerprint, face, and password option.

Step 3: Click on Security.

Step 4: Tap on Privacy and app encryption.

Step 5: Select the Forget password option.

Step 6: You’ll get the security answer option where you can enter the answer that you must have added while setting up the app lock. Simply verify and reset the password set for apps or file safe. If in case, you don’t remember the security answer, you can follow the on-screen steps to retrieve and change the old password for app lock.

How Can You Unlock Vivo Phones’ Screen Password If Forgotten?

The steps to reset the password on any Vivo handset if you don’t remember it is quite easy.

Step 1: Lock your Vivo phone to launch the lock screen. If it’s already locked and you have forgotten the password, follow the remaining steps listed below.

Step 2: Enter the incorrect password five times. This will take you to the password reset screen.

Step 3: You will see the Forgot password option. Tap on it.

Step 5: The password recovery option will open up. Enter the security answer and reset your password.

How To Reset Vivo Phone Password If You Don’t Remember Security Answer?

Step 1: You can use perform these password reset steps if you don’t remember the security answer on FunTouch OS 3.0 and above versions.

Step 2: Open the Settings menu.

Step 3: Click on the Fingerprint, face password option.

Step 4: Tap Security.

Step 5: Click ‘turn off Lock Screen password and Privacy and app encryption.

Step 6: Reset the security question and use when the next time your device is locked and you don’t remember the password. Notably, these steps will only work if you are able to enter the phone.

Categories
Featured How To Mobile

OnePlus Call Being Recorded Notification: How To Stop ‘Call Is Now Recording’ Message On OnePlus 10T, 10 Pro, OnePlus 9, 8 Series

Key Highlights

  • Call recording is one nifty feature in OnePlus devices
  • The audio message notification can be annoying and might affect the secrecy aspect
  • Users can turn off the call is now recorded message on their OnePlus 10 series

OnePlus is one of the most advanced players in the Android smartphone market. The brand has earned a high rapport for being a flagship killer with its value flagship phones. The OnePlus 10 series is currently the brand’s latest bid in the flagship smartphone category.

The OnePlus 10R, OnePlus 10 Pro, and the OnePlus 10T 5G are the latest generation premium range 5G smartphones by OnePlus in India and the global markets. Like most of the premium range smartphones, the latest lot is also available with top-tier hardware and firmware.

Also Read: WhatsApp Call Recording: Here’s How You Can Easily Record Call On Android And iOS

OnePlus uses Google’s Android services for both its mid-range premium smartphones and tops it with a custom OxygenOS interface on top. And like most of the OEMs, OnePlus also makes sure to add additional security features to its smartphone lineups. Be it the OnePlus Nord or the high-end OnePlus handsets, you’ll get all kinds of privacy aspects present. The same is the case with the new OnePlus 10 models.

With OnePlus devices, call recording is one nifty feature that can be useful in numerous scenarios. However, as soon as you push the recording key on any OnePlus handset, specifically the recent models, you will get a warning notification saying “this call is now being recorded”. We got this notification while recording calls using the latest OnePlus 10T.

Also Read: OnePlus 11 5G Full Review: A Step Ahead In The Right Direction!

This audio message notification can be annoying and might affect the secrecy aspect. However, strict guidelines have been issued by the Indian government for recording calls and audio without other user’s concern. Google has also released similar guidelines and removed third-party apps that support call recording from the Play Store.  

Also Read: OnePlus 10T Review: Speed Performance And Reliability At Its Best

Also, the “call is now being recorded” announcement is not just with the OnePlus 10T but other recent and previous-gen models including the OnePlus 10 Pro, OnePlus 10R, OnePlus 9 series (all models), OnePlus 8 series, and the OnePlus Nord models. Is there any way with which you can turn off the call is now recorded message on your OnePlus 10 series or any of the aforementioned models? We have listed the working way for the same:

Cal Now Being Recorded Message On OnePlus 10 Series And Other Models

Stop OnePlus Automatic Voice Call Recording Message Notification Via Different Text-To-Speech Engine

You can alter the default dialler app engine and start making calls on the OnePlus 10 series and previous-generation models including the OnePlus 9 and OnePlus 8 series and also the OnePlus Nord models. TTSLexx is one of the best options for the same. You can download this using the Google Play Store and then follow the remaining steps listed below:

Step 1: Open the Google Play Store and search the TTSlexx app.

Step 2: Once the app is installed go back to the OnePlus 10 and other models’ settings menu.

Step 3: Scroll to the Text-To-Speech option.

Step 4: You’ll see the service engine option. Tap on it and select TTSlexx instead of Google.

Step 5: Now, open the phone’s settings app again and go to the App’s page.

Step 6: Select Google Phone dialler.

Step 7: Clear the cache and storage. If you don’t clean the Google dialler app’s cache files, the TSSlexx wouldn’t function properly.

Step 8: Now, make calls and record audio without notifying the end users on your OnePlus 10 and other recent models.

Also Read | Here’s How To Stop Call Recording Warning On Android Phones

Using OnePlus Stock Dialler App

As mentioned above, OnePlus uses Google’s dialler app on all its smartphone lineups. The same is the case with the OnePlus 10 series phone and the previous-gen models. But the stock dialler app isn’t available on the Google Play Store for direct download. You’ll need to download the apk file separately online.

Also Read: Unable To Cast Screen On OnePlus TV? Quick Fix Guide To Resolve Chromecast/Miracast Issue With OnePlus Smart TVs

To do so, you can open any web browser on your respective smartphones and download the stock OnePlus dialler app. We are adding a new link here with which you can easily download the secondary dialler app for OnePlus. Make sure you have allowed outside sources from the settings to complete the installation process. The remaining steps are below:

Step 1: To make a call, open the stock OnePlus dialler app on your respective OnePlus 10 or other models.

Step 2: Make sure you set this app as default to record calls. You can do so from your phone’s setting menu.

Step 3: Now, toggle on the automatic recording option within this app. To do so, click on the app’s setting menu and scroll to the call recording option.
Step 4: Set automatic recording on. With this, the calls will be recorded without any sound as soon as it’s received/made.

Also Read | Stop Call Recording Announcement On Realme Smartphones: Here’s How

Categories
Featured How To Mobile

How To Turn Off Call Recording Announcement In Vivo Smartphone

Key Highlights

  • Many phones come with Google Phone or dialer as the default calling/dialing app
  • Google dialer app comes with a lot of unpleasant features
  • The call recording announcement is arguably the most irritating feature

Many Android phones today come with Google Phone or dialer as the default calling/dialing app. The Google dialer app has a lot of unpleasant features. The call recording announcement, however, is arguably the most irritating. As soon as you begin recording a call, the app plays a pre-announcement to both parties saying “This call is now being recorded.” When you end the call recording, it similarly plays “Call recording ended.”

Many individuals assert that if the other party finds out that the call is being recorded while it is happening, what use will it serve to record the call? We have therefore developed a fix for this issue that enables you to turn off call recording announcements. Let’s find out:

Also Read | Here’s How To Stop Call Recording Warning On Android Phones

How To Mute ‘This Call Is Now Being Recorded’ Announcement On Vivo Phones?

Method 1: Steps To Turn Off Call Recording Announcement On Google Dialer

Step 1: Open the Google Dialer app, then go to Setting.

Step 2: Next choose to uninstall updates.

Step 3: Download TTSlexx App from the Google Play Store.

Step 4: Open the phone’s settings, and search for text to speech option.

Also Read | OnePlus Call Being Recorded Notification: How To Stop ‘Call Is Now Recording’ Message On OnePlus 10T, 10 Pro, OnePlus 9, 8 Series

Step 5: Tap on the preferred engine.

Step 6: Select TTSlexx, it’ll show a caution warning, just let it be.

Step 7: Restart your Vivo phone.

Step 8: You have successfully finished all the necessary actions.

Step 9: Call someone now and try recording the call; it won’t make the previous announcement.

Method 2: Steps To Turn Off Call Recording Announcement Via Third-Party App

Downloading a third-party dialer and setting it as your default dialer on your Vivo smartphone is another approach to stop the announcement. You can covertly record calls with this. The app also allows you to activate the automatic call recording option.

Method 3

Flash the operating system of your smartphone with an appropriate ROM created for your country to permanently disable the call recording announcement. You must do this because, in an effort to avoid being sued, some manufacturers do not include this type of ROM with their dialers.

Also Read | Stop Call Recording Announcement On Realme Smartphones: Here’s How

Categories
Featured How To Tablet

What Is Auto Click (dwell timing) Feature On Android Tablet: How To Use It?

Google is offering a wide range of services for smartphones and tablets falling in the Android ecosystem. The search giant is making consistent upgrades with Android OS driving new-generation smartphones and tablets. Google is currently developing Android 13 which as the name suggests is the 13th generation of the company’s in-house mobile operating system. With the Android OS, Google has opened up new opportunities for smartphone and tablet users.

And we have seen some major upgrades with tablet hardware and the user interface. The user possibilities are endless with big-screen tablets. That’s one of the reasons why laptops are somewhat getting replaced with new-age Android tablets. A stylus pen support for creative work is one of the most prominent highlights of modern tablets. Connecting a wireless keyboard or mouse for professional tasks is another.

You can easily convert your tablet into a portable laptop-style gadget by adding a wireless keyboard or mouse to the device. After connecting a mouse, you can use the Auto click (dwell timing) feature available with Android 11.0 and above versions. This option lets you set automatic cursor actions when it stops moving for a certain period.

Google has designed this feature for users with motor impairment. You need a tablet with Android 11 OS or above to use this feature. Android mobile users can also try this feature. Once a successful connection is established between the tablet and the wireless mouse, you can set up the Auto click (dwell timing) feature.

Step 1: On your tablets, open the Settings app.

Step 2: Scroll down to the Accessibility tab.

Step 3: Locate the Auto Click (dwell timing) option. This option could be present with the ‘Click after pointer setting’ name in some select tablet models.

Step 4: Now, you can set the preferred automatic clicks timer. The automatic click will happen as per the timer you will select. You can choose from Short (0.2 seconds), Medium (0.6 seconds), Long (1 second), or custom.

How Can You Use The Auto Click (dwell timing) Feature Post Setup

Step 1: Scroll the cursor to the position you want to click.

Step 2: Stop using or moving the mouse once you are on the required position.

Step 3: The auto click will happen as per the time frame you have selected during the setup.

Categories
Featured How To Laptop

Here’s How To Activate Low Power Mode In macOS

MacOS Monterey brought a fair amount of developments to the platform. Low Power Mode is one of the more crucial changes for people who need to get the most battery life out of their devices. The feature is already well-known to anyone who owns an iPhone. By doing this, the device is set up to preserve as much battery life as possible.

By automatically reducing screen brightness and slowing the CPU clock speed, this lowers energy usage. This not only aids in lowering energy use but also keeps your MacBook quieter because the fans won’t be running (thanks to the lower CPU clock speed). Here’s how you can toggle on the Low Power Mode on macOS Monterey. Let’s check out:

Steps To Turn On Low Power Mode On macOS Monterey

On macOS Monterey, activating the Low Power Mode is a rather simple process. Although we will manually demonstrate how to toggle it on, you can also ask Siri to turn it on immediately.

Make sure you are using the most recent stable macOS Monterey version before we begin because it will probably work better.

Step 1: In the top left corner, click on the Apple icon.

Step 2: Tap on ‘System Preferences’.

Step 3: Now, click on ‘Battery’. It is located at the bottom next to the ‘Printers & Scanners’ and ‘Date & Time’ options. If you still don’t find it, simply search for it in the top right corner.

Step 4: Once you open the Battery settings, at the left bottom of the sidebar, tap on ‘Battery’.

Step 5: After you follow the above step, you should be able to see the ‘Low Power Mode’ option. To turn it on, tap on it.

The Low Power Mode will then be turned on and will start working. Turning on the Low Power Mode may provide you with a little additional juice, but you should be aware that the performance might not be exactly the same as previously. Don’t worry, though; your Mac will continue to operate in much the same way while using less energy.

Categories
Featured How To TV

Remove Pre-Installed Apps On Android TV: Here’s How To Do It

Key Highlights

  • Android TV offers similar benefits to Android smartphones but can also have preinstalled apps
  • Users have the option to mass-delete or disable pre-installed apps on their Android smart TVs
  • This allows them to remove unwanted bloatware and customize their TV experience according to their preferences

Android TV is essentially Android on a television. This has many benefits that we enjoy with Android smartphones, but it also has drawbacks, such as preinstalled apps that we don’t want, commonly known as “bloatware.”

On your Android smart TV, there is a simple option to mass-delete all of these pre-installed apps or, if you’d like, just disable them. Follow this post to learn how to remove bloatware from your Android TV if you’re looking for exactly that. Let’s find out:

Also Read | Buying A New Smart TV: Top Premium 43-inch. 50-inch, 55-inch Smart TVs Under Rs. 50,000 In 2023

How To Uninstall Apps On Android TV?

Let’s first go over how to remove an app using the Settings menu. Every app you install on your devices, including several that come preinstalled by the manufacturer, will function after you follow this procedure. To start:

Step 1: Go to the Settings menu. You can get there by tapping the gear-shaped icon in the home screen’s upper right-hand corner.

Step 2: To go to that sub-menu, click on Apps.

Step 3: You’ll need to tap ‘See All Apps’ and scroll down until you find the one you’re looking for.

Step 4: Click on the app you want to uninstall to get to its detail page.

Step 5: Tap on ‘Uninstall’ to continue.

Step 6: A new screen will pop up and the system will ask if you really want to uninstall this app from your Android TV. Click ‘OK’ to continue.

The screen will temporarily flash white while it’s removing the application. Once finished, the app will no longer be listed when you return to the Settings screen.

Read Also | How To Set Up Google Duo On Your Android TV: Follow These Steps

Disable Apps On Android TV

It’s likely that you’ll run into applications that don’t have the ‘Uninstall’ option available. You will discover Deactivate in its place. Disabling an app means that it will no longer appear anywhere and will still stream on TV even though its data has been removed.

The majority of the TV bloatware should now be gone, but there will always be preinstalled system apps that you cannot remove or disable from the menus. Although there are a few extra stages, you can also skip them.

Also Read | Best 55-inch High-Res Smart TVs Under Rs. 40,000 In 2023