Categories
Featured Leaks Tablet

Nokia T10 Budget Android Tablet India Debut Confirmed; Price Tipped Below Rs. 12,000

Key Highlights

Nokia T10 India launch soon

To be launched at Rs. 11,999

Will be available for sale via Amazon

HMD Global released the new-generation Android tablets for the budget-conscious masses. The brand had released the Nokia T10 and the Nokia T20 tablets in the international markets out of which the latter has been announced in the country. Now, the Finnish giant is also bringing the Nokia T10 tablet to the country soon. While the spec-sheet of the Nokia T10 tablet is known, the pricing and availability details for the Indian market have been revealed by a new leak. Below are the details:

Nokia T10 Price In India Revealed Before Official Launch

The Nokia T10 tablet is likely getting launched during the festive season sale on one of the largest e-commerce players in the Indian market. The tablet has been spotted on the Amazon Great Indian Festival sale’s offer page listing. Nokia Power User first spotted the listing. The report doesn’t reveal the exact launch date, however, the product page listing is a confirmation of its imminent launch in the country.

Going by the report, the Nokia T10 tablet would be a budget offering that will be priced at Rs. 11,999 in the country. This pricing leak seems authentic since it has been spotted on the Amazon Great Indian Festival sale offers page.

With this price tag, the Nokia T10 would arrive as one of the cheapest Android tablets in India that will be competing against the likes of the Realme Pad Mini and the Moto Tab G20 tablets. HMD Global could soon reveal the exact launch date for the Nokia T10 sometime soon. The expected availability is on the official Nokia India website along with Amazon.

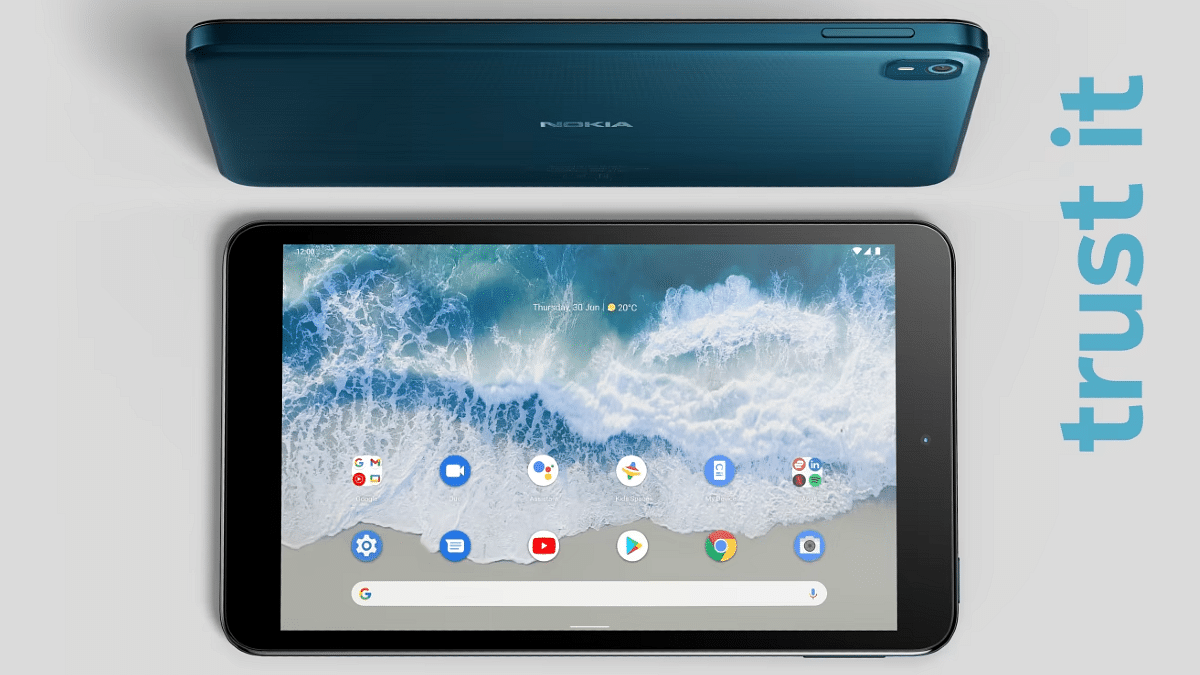
Nokia T10 India Specifications And Features

The Nokia T10 is an entry-segment Android tablet that runs on the Unisoc T606 processor. It is worth mentioning that the Nokia T20, the older sibling of the T10 also uses an octa-core Unisoc processor for power delivery and retails below the Rs. 15,000 price mark.

The Nokia T10 will be available in both Wi-Fi and Wi-Fi+ LTE variants. The device will ship with Android 12 OS and will offer a stock UI experience along with a promised three years of update cycle. Additionally, the Nokia T10 will flaunt an 8-inch display panel that will support a standard HD+ resolution.

The front panel will house a small 2MP camera for selfies and video calling, while at the rear there will be a single 8MP snapper for primary photography. The Nokia T10 will be featuring a USB Type-C port for charging and data transfers and will also integrate a 3.5mm headphone jack. The budget tablet will employ a 5,100 mAh battery to keep the lights on that will be supported by a standard 10W charging.

Categories
Featured How To Mobile

Want Lag Free Calling Experience? Here’s How To Make Calls Using Wi-Fi Networks From Any Mobile

Key Highlights

  • Mobile phones have made communication easier, even in remote areas
  • New smartphones support Wi-Fi calling for better voice call quality
  • Telecom operators are eliminating network dead zones for uninterrupted calls

Mobile phones have made it possible for the general masses to communicate with their distant relatives and peers on the go. Even with the onset of smartphones, the primary usage has been voice calls using mobile networks. Calling is now a premium experience with the new-generation smartphones as you get to make or receive calls even in remote areas where missing networks have been a common scenario until now.

The tech brands and telecom operators are now eventually scrapping out the dead zones on earth where network availability has been zero until now. Smartphone OEMs have also been equipping the new-generation phones with Wi-Fi calling. This new calling feature lets users make or receive calls using Wi-Fi instead of mobile networks from any telecom operator. Most telecom operators now allow smartphone users with the provision to call over a Wi-Fi network for a clear and uninterrupted user experience with voice calls.

Also Read | How to Fix Disconnecting Wifi Networks for Android?

All you need is the latest Android smartphone running on Android 6 or above and a reliable Wi-Fi internet connection. You can easily setup up Wi-Fi calling on your respective Android smartphones that run on the aforementioned OS versions for a rich and premium calling experience. You just need to set up the Wi-Fi calling feature to start making calls using it. Wi-Fi calling can be experienced on smartphones from popular brands such as OnePlus, Samsung, OPPO, Xiaomi, Vivo, Realme, and others. The steps are mentioned below.

Steps To Activate Wi-Fi Calling Feature On Android Smartphones Using Mobile Carriers

Step 1: Launch the Phone application on your respective Android smartphones (running on Android OS 6 or above).

Step 2: Click on the More option. It’s the three dots icon.

Step 3: Tap on the Settings menu.

Step 4: Now, select the Calls option.

Step 5: Scroll down to the Wi-Fi calling feature. If in case, this option is missing from the Settings tab, chances are the mobile operator whose services you are using still doesn’t support this option.

Step 6: For the users who don’t have the Wi-Fi calling feature present, the VoIP (Voice over IP service) is the second option.

Step 7: Just toggle on the Wi-Fi calling or the VoIP feature.

Also Read | Know WiFi Password on Android – Detailed in Simple Steps

How To Place Calls Using Wi-Fi Or VoIP Once Activated

Once the Wi-Fi calling or VoIP feature has been activated, you don’t need to perform any specific steps to place or receive calls over Wi-Fi. Simply, open the dialler app and make a call to any of your contacts and will be connected over Wi-Fi or VoIP.

For the tech geeks, stay updated with the latest cutting-edge gadgets in the market, exclusive tech updates, gadget reviews, and more right on your phone’s screen. Join Giznext’s WhatsApp channel and receive the industry-first tech updates.

Categories
Apps Featured How To

WhatsApp Business Quick Replies: How To Use Quick Replies For Businesses On WhatsApp Android, iOS

WhatsApp messaging service is used by numerous users globally. The app has evolved in the last few years and is offering services to general as well as professional users.  WhatsApp has also released a business app for small and large-scale industries to help customers with their queries instantly. With the WhatsApp Business app, you can also provide different services and resolve issues over chat.

Similar to WhatsApp’s primary messaging app, the business version also has the same set of advanced messaging features that enhances the experience with texting, voice, and video calls. WhatsApp is also proactively dishing out new features via OTA updates. The end-to-end encryption platform is also one of the crucial aspects that improve the messaging experience with business profiles.

One of the useful options that is available with the WhatsApp Business app is quick replies. This messaging feature can help you create shortcuts for a bunch of messages you frequently send the customers. With the WhatsApp Quick Reply feature, you can store up to 50 different text messages or images and videos and use shortcuts for the replies instead of typing the entire message. Below are the steps to add and use the Quick Reply feature for the WhatsApp Business app.

Steps To Add New Quick Replies To WhatsApp Business App

Step 1: Launch the WhatsApp Business app on your iPhone or Android smartphone.

Step 2: Click on the More option (three dots icon).

Step 3: Scroll to the Business tools tab.

Step 4: Tap on the Quick replies option.

Step 5: Click on Add and enter the desired message that you want to store as a Quick reply.

Step 6: Now, select the keyboard shortcut that you want to set as a Quick reply.

Step 7: Hit the Save tab.

How To Send Default Quick Replies Or Automatic Replies On WhatsApp

Step 1: Go to any chat window and type “/” in the message box. You can also click on the Attach (clipper icon).

Step 2: Select the Quick Replies option and then tap on the Use Quick reply as an attachment.

Step 3: Now, select the appropriate quick reply option that will automatically show up in the text box.

Step 4: You can either edit the message or send it directly

Categories
Apps Featured How To

How To Migrate YouTube Channel And Videos To A Different Account

Key Highlights

  • YouTube is the most popular platform for online video streaming and entertainment
  • Users can earn money by creating and sharing videos on YouTube
  • You can create a YouTube channel or move an existing one to a new email account

YouTube can be deemed the best streaming service for online video streaming. Users from all over the world have been using Google’s this video streaming platform for entertainment. Google has also made it possible for the general audience to earn a good sum of money by uploading videos and sharing them with the public.

Also Read | Top YouTube Channels For Exploring Hindu Mythology

If you want to earn money by creating videos on YouTube, you would need to create a channel. The wider popularity and audience reach are one of the best ways to make the most of monetization on YouTube. You can create your YouTube account and a brand channel using a Gmail or supported email address. If in case you already have an existing channel that you wish to move to any other email account, you have the provision to do so. You can move the videos as well to a different account. But what are the steps to migrate your old channel to a new account? Read the steps here.

Steps To Migrate Old YouTube Channel To A New Account

In order to move your old YouTube channel to a new account, you would need to be aware whether the channel is created using a Google or Brand account. If you don’t have the latter, you can create one by following the steps below:

Step 1: Sign in to your YouTube account and head to the channel list.

Step 2: Tap on the Create a channel.

Step 3: You would need to fill in all the necessary details related to your Brand Account.

Step 4: Complete the account verification process.

Step 5: Tap on Create option and your Brand Account will be created.

Also Read | Not Sure What To Watch? YouTube’s Play Something Button Picks For You

How To Move Any Brand Account To A Different Google Account

Step 1: Open the YouTube app and sign in to your Brand Account.

Step 2: Tap on the profile picture option from the app’s home page.

Step 3: Click on the Settings (gear icon).

Step 4: Scroll down to the Account option.

Step 5: Tap on the Add or remove manager tab.

Step 6: You will see the Manage Permissions settings. Click on it. You might be asked to verify your credentials such as password and email address. Complete the process.

Step 7: A new option will show up on the screen called Invite new users. Tap on it.

Step 8: Type the new email address or the Google Account to which you wish to migrate your old channel and its content.  

Step 9: Now, enter the name of the user and the profile’s role in the channel. If you are the primary owner, add your details.

Step 10: Click on Invite.

Step 11. Select Done and then open the new email address. Accept the invitation.

Step 12: After a time period of seven days, you will be able to sign in to the YouTube channel using the new account.

Step 13: Open the Settings menu and head back to the Manage Permissions option.

Step 14: From the drop down arrow, select the primary owner and tap on Transfer option.

For the tech geeks, stay updated with the latest cutting-edge gadgets in the market, exclusive tech updates, gadget reviews, and more right on your phone’s screen. Join Giznext’s WhatsApp channel and receive the industry-first tech updates.

Categories
Chipset Comparison Featured

Qualcomm Snapdragon 888 Vs MediaTek Dimensity 1300 Chipset Quick Comparison

The smartphone industry is evolving with the latest hardware innovations. The modern age mobile phones are all laced with the best-in-class camera, display, and battery features delivering a premium user experience. The chipsets packed inside each smartphone play an equally vital role in delivering a high-end user experience by providing reliable and faster processing speeds.

And when we speak of mobile chipsets, MediaTek and Qualcomm are amongst the two major players offering a wide catalog of options ranging from affordable to the premium segment. We have been consistently comparing the most popular mobile chipsets driving the latest smartphones. This article is a quick comparison between the Qualcomm Snapdragon 888 and the MediaTek Dimensity 1300 processors which are used by some of the best premium Android phones.

Qualcomm Snapdragon 888 Vs MediaTek Dimensity 1300 Processor: CPU Architecture, GPU Comparison

The CPU architecture is one of the most crucial aspects of any processor. Starting with Qualcomm’s premium Snapdragon 888, it has an octa-core CPU cluster with a single Cortex X1 processor with 2.8GHz clock speed, three Cortex A78 cores with 2.42GHz clock speed, and four Cortex A-55 cores with 1.8GHz clock speed. This flagship Qualcomm Snapdragon 800 series processor is fabricated with a 5nm process and ARMv8.4-A instruction set. It offers a frequency range of 2840MHz.

MediaTek has also used an octa-core CPU cluster to design the Dimensity 1300 processor along with the ARMv8.2-A instruction set. The fabrication process used for the Dimensity 1300 processor is 6nm and the frequency range offered is 3000MHz.

Qualcomm has used the Adreno 600 series GPU architecture and integrated the Adreno 660 GPU inside the Snapdragon 888 processor. This flagship grade Qualcomm processor has a high 840MHz frequency range, 1.1 Vulkan, 2.2 OpenCL, and 12 DirectX version.

On the contrary, the MediaTek Dimensity 1300 processor also has the same Vulkan, OpenCL, and DirectX version, but a different Maki-G79 GPU which has a higher 850Mhz GPU frequency. The MediaTek Dimensity 1300 gives tough competition to the Snapdragon 888 SoC in the CPU and GPU performance but falls short by just a few pointers.

Snapdragon 888 Chipset Vs Dimensity 1300 Processor: Memory, Multimedia (ISP)

The memory type supported by the Qualcomm Snapdragon 888 chipset is LPDDR5 with a total memory frequency of 3200 MHz. It can accommodate up to 24GB of maximum memory. The MediaTek Dimensity 1300 processor has the older LPDDR4X RAM support with 4266MHz memory frequency. It offers a maximum memory support of up to 16GB. The storage support offered by the Snapdragon 888 chipset is UFS 3.0 and UFS 3.1, while the Dimensity 1300 just comes with UFS 3.1 storage support.

Speaking of the maximum camera resolution, it’s 2160 x 3840 pixels with the Snapdragon 888 and 1080 x 2520 pixels with the Dimensity 1300. The former enables support for 1 x 200MP and 2 x 25MP max camera resolution which is just 1 x 200MP with the latter. Also, the Snapdragon 888 processor has up to 8K video playback and recording support, while the Dimensity 1300 has 4K@60fps videos recording support.

Categories
Apps Featured How To

Instagram Reel: How To Create And Share Instagram Reel Videos Using Templates On Android, iOS

Instagram is currently a fan-favorite app for social media content creators. The photo-sharing app has evolved on a large scale in the last few years; specifically, after coming under Meta (Facebook) umbrella. The company has garnered all the fame ever since it released Reel, a short video feature introduced as a TikTok rival globally.

Instagram has been making improvements with Reels, similar to other in-app features in a bid to make Reels more interactive. Looking at the rising popularity of Reel, Instagram even extended the time limit to up to 90 seconds for recording. Furthermore, the company has also allowed using multiple audio video effects, location tagging, and much more to enhance the quality and for better reach.

Amongst several such provisions is template usage. Instagram has added the option for users to create their version of any Reel video by using a pre-loaded template. For the unaware, the templates feature on Instagram allows creators to remix a reel by adding their own photos and videos while using the same musing and timing from an original Reel.

The templates are not available for all Reel videos specifically the short-length ones. You will be able to use templates only with the Reel videos that comprise at least three clips with music in the background. So if you want to create a new Reel video using a template, this article will guide you with the steps:

How To Create A New Instagram Reel Video Using Available Set Of Templates

Step 1: Open the Instagram app. Note, you can perform these steps on both Android and Apple iPhones.

Step 2: From your profile’s home page, go to the Reel video that you want to remix with the template. Note, you can add templates to the new Reel video that you are creating.

Step 3: Click on the more option (three horizontal/ vertical dots) on the Reel video.

Step 4: Select the Use as template option.

Step 5: In the next step, you will get the option to add the photos or video clips to the Reel video. You will also be able to sort the order in which you wish the images or photos to appear in the video.

Step 6: Click on Done. Now, preview and share your Reel video on your Instagram account.

Categories
Apps Featured Info

WhatsApp Latest Update Will Let You Share Voice Notes As Status: Here’s How

Key Highlights

New WhatsApp feature coming soon

Option to add voice notes as status

To be available for both Android and iOS

WhatsApp is regularly releasing new updates for its Android and Apple iOS mobile applications adding new aesthetics and user-friendly features. Just recently, the company was reportedly testing a new feature that will allow users to edit sent messages. But this isn’t the only new option that WhatsApp is working on. Previously, the company was rumored to be working on the option to add voice notes as a status update. However, the feature was being tested for the iOS app back then. Now, the company is also testing this new status update option for the Android app.

WhatsApp Voice Note Status Update Feature Coming Soon

WhatsApp’s next update will be adding the support to upload voice notes as a status. This update’s development has been shared with WaBetaInfo which has been consistent with sharing the latest WhatsApp updates in work. WhatsApp has already been testing this new status feature for iOS users and is apparently expanding its reach to the Android ecosystem as well.

WhatsApp currently only allows users to share images, texts, and short videos as statuses on their profile. With this new feature upcoming, users will also be able to share any important message as a voice note. The report shared by WaBetaInfo suggests the company has been testing this new feature with the Android 2.22.21.5 beta build.

WhatsApp has not confirmed any new development on this feature. But since it has been working already and testing it with the beta build, chances are we get some official nod soon. We can expect WhatsApp to release a stable update to set voice notes as status in the coming weeks.

According to the report, WhatsApp has also kept a short timeframe for the voice notes that will be shared as status updates. Users will be able to record and share up to 30 seconds of voice notes as a status on WhatsApp. Also, voice note statuses will have the same privacy options as the standard status updates.

Users will get the option to select from whom they wish to hide the voice note status and who can listen to the status. The process to share the voice notes as messages would also be the same as with the general status update on WhatsApp.

Categories
Chipset Comparison Featured

Qualcomm Snapdragon 780G Vs MediaTek Helio G99 Chipset Comparison: Best Mid-Range Gaming Processor

Planning to buy a new smartphone? Specifically an Android handset? Well, you have got numerous of options from multiple popular Chinese and non-Chinese smartphone OEMs when you step out to buy one. And most of the smartphone OEMs are currently relying on chipsets from either Qualcomm or MediaTek to power mid-range and flagship-grade handsets.

Qualcomm’s Snapdragon series and MediaTek Helio, Dimensity mobile processors are the commonly found chipsets in most Android phones. We already have compared several of the latest chipsets from both these brands to see which one offers good performance in terms of CPU, GPU, and memory.  This time we are pitting down two of the most popular premium mid-range chipsets from both these brands. From Qualcomm, we have selected the Snapdragon 780G which is game-centric processor. Whereas, from MediaTek, we have chosen the Helio G99 which is also a mid-range gaming processor.

Qualcomm Snapdragon 780G Vs MediaTek Helio G99 Chipset: CPU Architecture

Starting this comparison with the Snapdragon 780G chipset, Qualcomm has fabricated it on 5nm process and used an octa-core CPU architecture featuring a single Cortex-A78 core clocked at 2.4GHz, three Cortex A-78 cores clocked at 2.2GHz, and four Cortex A55 cores clocked at 1.9GHz.

On the contrary, MediaTek has designed the Helio G99 chipset using a 6nm fabrication process and has used an octa-core COU architecture comprising two 2.2GHz Cortex-A76 cores and six Cortex A55 cores clocked at 2GHz. The frequency range is 2400MHz with the Snapdragon 780G chipset and 2200MHz with the Helio G99 chipset. Qualcomm has used a better CPU cluster compared to MediaTek for its premium mid-range processor.

Snapdragon 780G Vs Helio G99 Processor: GPU Comparison

The Qualcomm Snapdragon 780G ships with the Adreno 642 GPU which is from the Adreno 600 GPU series. Whereas, the Helio G99 chipset has the Mali-G57 MC2 GPU integration which is from Valhall GPU architecture. The Qualcomm chipset comes with 490MHz GPU frequency with two execution units and 384 shading units. It has a 1.1 Vulkan version, 2.0 OpenCL, and 12 DirectX version which is the same as the Helio G99 and its younger sibling, i.e., the Snapdragon 778G processor. In terms of GPU performance, the Qualcomm Snapdragon 780G is slightly battery compared to the Helio G99.

Snapdragon 780G Vs Helio G99 Processor: Memory, Multimedia (ISP)

As far as memory compatibility is concerned, both Qualcomm Snapdragon 780G and the Helio G96 ships with LPDDR4X memory support. However, the memory frequency range is different. The Qualcomm Snapdragon chipset delivers a 2133MHz frequency, while the Helio G99 processor offers 4266MHz frequency range. Also, the maximum RAM allocation with the Snapdragon 780G is higher at 12GB, whereas, the Helio G99 has a lower up to 10GB max memory size support. In terms of storage, the Snapdragon 780G chipset offers the latest UFS 3.1 storage support, while the Helio G99 comes with older UFS 2.2 storage compatibility. 

Speaking of the multimedia support, the Qualcomm Snapdragon 780G chipset offers a max display and camera resolution of 3360 x 1600 pixels and 1x 192MP, 2x20MP respectively. This chipset has the ability to record up to 4K@30fps videos. The video playback support is also the same.

The MediaTek Helio G99 supports 1080 x 2520 pixels max display resolution and 1 x 10⁸MP, 2X 16MP max camera resolution support. This gaming processor has a lower video recording support of 2K@30fps. The Snapdragon 780G outperforms Helio G99 in these segments as well.

Categories
Featured mobile

Google Pixel 7, Pixel 7 Pro India Launch Finally Happening; To Be Sold Via Flipkart

Key Highlights

Google Pixel 7 series India launch confirmed

Flipkart landing page live

Google is gearing up for its annual developer conference I/O 2022 which is slated for October 6, 2022. The company will take the wraps off the new-age Pixel 7 series comprising the vanilla Pixel 7 and the Pixel 7 Pro. Until the Pixel 7 series availability was expected in the international markets. But seems like google is finally bringing both these handsets to the Indian markets as well. Google had only released the affordable Pixel ‘a’ series models in the country since the Pixel 3 series. This new development comes as a delight for Pixel fans in India.

Google Pixel 7 Series India Launch Confirmed Officially

Google will be announcing the latest Pixel 7 series models at the I/O 2022 event which is slated for October 6, 2022. Alongside the Pixel 7 and the Pixel 7 Pro, the company is also bringing the Pixel 7a. The rumor mill has already been giving us a sneak peek of the upcoming premium Pixel series phones. Now, a fresh listing at the e-commerce giant Flipkart confirms both the high-end Pixel series phones will be launched in the Indian sub-continent as well.

Just to recap, Google hasn’t released any flagship Pixel model since the Pixel 3 series. We only have seen the Pixel 4a, Pixel 5a, and the Pixel 6a in the country but not their high-end versions. But the latest dedicated Pixel 7 series microsite on Flipkart is a clear indication that Google is finally breaking its past trend and revamping its flagship smartphone lineup in the country.

As of now, the Flipkart microsite only mentions coming soon along with the products. It doesn’t reveal the exact availability timeline for the Pixel 7 and the Pixel 7 Pro in the country. Given the possibilities, we can expect both Pixel 7 and the Pixel 7 Pro to debut around the same time as the international markets in India. Google could make some official announcements related to the same in the coming days.

It is not clear yet if Google will also introduce the affordable Pixel 7a in the country alongside the Pixel 7 and the Pixel 7 Pro. We might have to wait for the brand to release the affordable Pixel 7 variant in the country. We are still waiting for some announcements from Google regarding the same and will keep you updated with the details.

Categories
Apps Featured How To

WhatsApp Privacy: How To Activate Or Deactivate End-To-End Cloud Backup For Google Drive, iCloud On WhatsApp

Whatsapp has become the go-to application for instant messaging for smartphone users globally. Meta (Facebook) acquired WhatsApp a few years ago and since then has been focusing majorly on improving the overall user and messaging experience. But what has been working in favour of WhatsApp right from the initial days is the end-to-end encryption platform that is best suited for personal and private conversations.  

But recently, one of the cybersecurity researchers pointed out a major loophole with WhatsApp’s end-to-end private ecosystem. It was revealed the brand is only proving the end-to-end encryption for the chats and media on the devices. The cloud server where the chat backups are stored doesn’t have this security layer. Soon after, WhatsApp added the end-to-end encryption service to the cloud backup as well. Now, users have the provision to add an extra layer of security to the Google Drive or iCloud backups on WhatsApp.

If you want your messages to stay protected from hacks and other security attacks, it would be wise for you to turn on the end-to-end encryption for the chat backups on Google Drive or iCloud. Since this feature isn’t activated by default, you’d need to toggle on this option manually. If you wish to enhance your WhatsApp security by adding the end-to-end security layer to chat backups, this step-by-step article will be your guide.

How To Turn On End-To-End Encryption Security For Chat Backups On WhatsApp

Just for reference, you can turn on the end-to-end chat encryption for both Google Drive and iCloud on WhatsApp. All you need is a working internet connection and the WhatsApp application installed on your respective Android smartphones or iPhones.

Step 1: Launch the WhatsApp application.

Step 2: Head to the Settings menu.

Step 3: Scroll down to the Chats option.

Step 4: Select the Chat Backup option.

Step 5: Tap End-to-end Encrypted backup.

Step 6: Hit the “Turn On” option.

Step 7: You’ll get prompted on the screen to create a new password or key. Do that.

Step 8: Click on the Create option. Wait for a while for WhatsApp to complete enabling your end-to-end encrypted backup for Google Drive or iCloud. Do note that you won’t be able to restore any backups if you lose WhatsApp chat or even forget the password or key. This is because WhatsApp doesn’t currently have the ability to reset or restore the backup.

How Can You Turn Off End-To-End Encrypted Chat Backup On WhatsApp

Step 1: Open WhatsApp mobile application and go to the Settings menu.

Step 2: Click on Chats and then select the Chat Backup option.

Step 3: Select the End-to-end Encrypted Backup menu.

Step 4: Click on Turn off. You would need to enter the password that you had setup initially.

Step 5: Confirm the changes and tap on Turn off.