Categories
Featured Gaming How To

Akshay Kumar’s Ram Setu Gets Its Official Video Game: Here’s How To Download It

Key Highlights

  • Ram Setu: The Run released on the Google Play Store and Apple App Store
  • nCore Games has teamed up with the makers of Ram Setu, the upcoming Diwali release
  • As mentioned in the Hindu epic text Ramayana, Ram Setu connects two nations

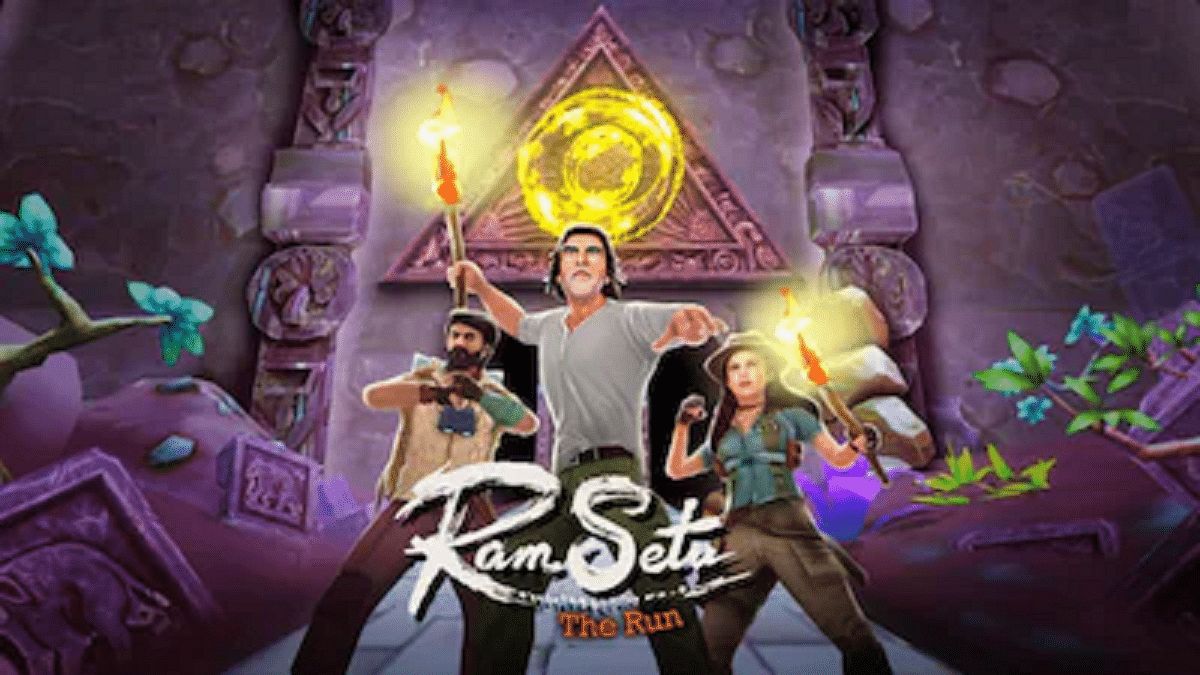
The official game based on Bollywood superstar Akshay Kumar’s upcoming adventure movie Ram Setu is finally out. The creators of “Ram Setu” collaborated with renowned gaming studio nCore Games to produce the endless runner game “Ram Setu: The Run.”

The game is now available on both Android and iOS and can be downloaded from the Google Play Store and the Apple App Store, respectively. Fans can download “Ram Setu: The Run” to their smartphones and tablets if they’re eager to learn more about the actor’s trip in the movie. Besides, the movie releases the day after Diwali, i.e., October 25, in theatres. Also Read | Indus Battle Royale Game Is India’s Take On PUBG, Fortnite: How To Pre-Register, System Requirements

‘Ram Setu: The Run’ is developed by Dot9 Games, a game studio based in Mumbai housed within nCore Games. Earlier, the game studio was Apna Games, a collection of location-based multiplayer games. Well, Ram Setu, The Run is an endless runner game, much like Temple Run. Here’s all that you need to know about the game:

How To Download Ram Setu: The Run?

Step 1: Open your device and go to Play Store or App Store. 

Step 2: Scroll down and you will see the game ‘Ram Setu: The Run.’ Click on it.

Step 3: Now, tap on Install and you are ready to go.

Also Read | Best Games On Xbox Game Pass That Are Worth Playing

Ram Setu: The Run: Gameplay

Players can select between the movie’s characters, i.e., Dr. Aryan Kulshrestha (Akshay Kumar), Sandra (Jacqueline Fernandez), or AP (Satyadev Kancharana) in “Ram Setu: The Run” and play as them.

The company stated in an official statement that players must dodge obstacles while also gathering tokens, gems, and power-ups, alongside avoiding obstacles and challenges that come to their ways such as enemy attacks, robotic drones, and wreckage.

In a variety of in-game challenges, players can drive jeeps, shoot down attackers, and avoid drones in addition to avoiding obstacles. Ram Setu: The Run includes whirling blades, explosive barrels, and trucks crashing in from the sides, all of which are inspired by the movie and encourage players to alter their approach. This makes random thugs even more likely to appear; you can take them out by timing a down swipe which will launch your character into a flying kick strike.

Also Read | Best Game Settings For BGMI, PUBG For A Premium Gaming Experience On Android, iOS

Categories
Accessories Featured How To

How To Enable Multipoint And Audio Switch Feature In Pixel Buds TWS Earbuds

Google is amongst those tech giants that is catering to the audience globally with technological services and also products. Google is currently dominating the premium smartphone space with its Pixel series of smartphones that uses the in-house custom Tensor chipsets and Android firmware. Google has also marked its presence in other consumer electronics categories including audio. The Pixel buds TWS earbuds are Google’s answer to AirPods and Galaxy Buds which are also premium range wireless audio earbuds.

Google has employed the latest of tech innovations to design the Pixel Buds earbuds. Just recently, at its I/O 2022 event, the company took the wraps off the new-generation Pixel Buds and showcased all the possibilities with the Pixel Buds that will ensure a premium listening experience on the go.

Multipoint connectivity is one of the features that Google has added to Pixel Buds TWS earbuds. It lets users connect the earbuds to more than one compatible device simultaneously. In simple terms, users can pair their Pixel Buds with two audio sources at once and seamlessly use the Audio Switch feature as well. However, this feature isn’t toggled on by default and you would need to make the required modifications with the settings manually. This article is a step-by-step guide to help you set up Multipoint connectivity with Pixel Buds. Read on:

How To Activate Multipoint Feature On Pixel Buds

Step 1: Unlock your Pixel or any other smartphone with which you wish to pair the Pixel Buds and use the Multipoint connectivity option.

Step 2: You would need a device running on the Android 6 OS or above.

Step 3: Open the Settings tab.

Step 4: Go to the Connected device option. Notably, you can also perform these steps to activate the Multipoint feature using the Pixel Buds app.

Step 5: Select the Multipoint option.

Step 6: Toggle on the Use Multipoint option.

How To Turn On Audio Switch On Pixel Buds

Step 1: Launch the Pixel Buds app on your respective Android phones running on Android 6 OS or above.

Step 2: You can also activate this option from the Connected Device option in the Settings menu. This is applicable for new-generation phones running on the Android 10 OS and above.

Step 3: Select the Audio Switch option.

Step 4: Activate the Audio Switch feature.

Categories
Apps Featured How To

Get Notified When Deals Go Live On Amazon: Here’s How

Key Highlights

  • Amazon allows you to create a personalized deal alert
  • This feature on Amazon is predicated on your searches
  • It allows you to get the product at a good price

One of the most popular shopping websites in the world, Amazon is the go-to destination for all things electronics in India. Even if the website occasionally has numerous bargains, you might find greater deals via the Amazon mobile app, especially if you set up an alert.

You can set a deal alert on Amazon that is personalized to you and is based on your app searches. Your platform searches are the basis for Amazon’s deal alert feature. If you repeatedly searched for an iPhone in the app when you were looking to buy one, Amazon will build a deal alert for you that you can turn on within the app.

This will enable you to purchase the item at a good price. Despite the feature’s usefulness, only a few people are aware of it. This article will show you how you can set up an Amazon deal alert. Let’s check it out:

How To Set A Deal Alert On Amazon?

Step 1: On your smartphone, open the Amazon app.

Step 2: In the bottom right corner, click on the Hamburger icon.

Step 3: From the list of options, tap on Accounts, it’s next to Buy Again and beside Lists.

Step 4: You will now see several options for your account.

Step 5: Look for the Message center section by scrolling below. Tap on Deal alerts in the Message center section.

Step 6: You will see four sections: Your deal alerts, Available deals, Available Offers, and Get deal alerts.

Step 7: After that, click on ‘Get deal alerts’ and you will see some modified deal options for which you can select and create a deal.

Step 8: You will receive alerts when the item is on sale or receives a discount once you create a deal alert by tapping on the “Create alert” button. The offers for today can also be found in the “Available deals” section; they are based on your interests and the items you search for or add to your cart on the Amazon app or website.

That is how you can quickly set up an Amazon deal alert for your preferred item and receive notifications when it is on sale.

Categories
Featured How To Printers

How To Add A Default Wireless Printer In Mac Devices

Printers are an essential tool for students and working professionals. While the digital transition is at its peak, printers still platy a vital role in our daily lives. The modern day printers are all advanced and lets users scan and fax from the same machines. HP, Epson, Canon, and Samsung are the noted players in the printer market in India offering a wide range of models.

Printers have also evolved with the technolgy the same way other mainstream consumer gadgets such as smartphones, tablets, laptops, and PCs. The services have also improved with the new-gen printers. For most of the general issues, you can try quick fixes at home to avoid visits to service centres.

The latest generation printers have wide range of connectivity options and also compatibility with multiple operating system including Microsoft Windows and Mac OS. We have previously shared some of the tips and tricks to resolve issues with Windows OS. Here we are sharing the steps to add a wireless printer to your Mac OS-powered device.

How To Add A Bluetooth Or Wireless Printer In MacOS

As mentioned above, this articles is centred around the method to add a Bluetooth printer to a Mac OS laptop or PC. If your MAC laptop or PC is Bluetooth-enabled then you can easily pair a wireless printer. Additionally, you can alo give prints using USB Bluetooth adapter that you have used to pair the Mac device and the PC.

Step 1: Open your Mac laptop or PC and check if the system firmware is up to date. You wouldn’t need to check this if the printer to be connected is one from the AirPrinter series.

Step 2: Complete the printer setup by filling up ink cartridges and papers.

Step 3: Turn on the printer.

Step 4: On your Mac device, tap on the Apple menu option.

Step 4: Click on System preferences.

Step 5: Tap in the Printers and Scanners option.

Step 6: Click on the Add option.

Step 7: Select the Default option.

Step 8: In the pop up screen, you’ll see the printer name in the list of printers. Select the appropriate printer.

Step 9: The wireless printer will now be set as default in your Mac laptop or PC. You can directly give print commands from the Mac device.

Categories
Apps Featured How To

Google Maps Tips & Tricks: Here’s How To Check Air Quality Index In Your Area

Key Highlights

  • Google Maps can help you check the AQI around you
  • This can help you make informed decisions about going out
  • This feature is currently available across many countries including India and US

It is the time of the year again when the air quality around us gets worse than it has ever been. Weather changes, festive firecrackers, the harvest, and car pollution will all affect air quality. Everyone’s health is put at risk by the poor air quality with heart and respiratory conditions, especially those who have asthma.

It is advised that people limit their outside travel at this time. Additionally, before traveling, check the air quality index to prevent health issues. To help you with that, Google provides a feature that will tell you the current air quality index of locations you are planning to visit.

Users can check an area’s air quality index using a dedicated tool in Google Maps. You can monitor the air quality wherever you go or wherever you live with the help of this feature. You can then schedule your outside activities in accordance with your newfound understanding of your surroundings. You can just forgo going outside if the air quality is high or extreme, and stay inside instead.

How To Check Air Quality Index On Android And iOS Using Google Maps?

You can use Android and iOS devices to track the air quality using Google’s air quality tool. Consequently, assisting you in deciding whether it is safe for you to go outside. Let’s check out how Google’s air quality feature functions.

Step 1: On your Android or iOS devices, launch Google Maps.

Step 2: After that, search for the location or tap on the target button in order to pinpoint your current location.

Step 3: Once the location is set, click on the layers button available at the top right corner of your screen.

Step 4: You will see options for Map types and Map details. Under Map details, select “Air Quality” by tapping it.

Step 5: Now, you can view the National AQI’s air quality data on Google. That’s all.

Categories
Featured How To TV

How To Resolve Payment Issues With In-App And Game Purchases, Subscriptions In Smart TVs

Android TV ecosystem is evolving with modern days technologies. Brands are incorporating the latest hardware innovations so that users get the best audio-video experience with large screens. And there is a horde amongst the manufacturers to offer all its consumer base a premium viewing experience at an affordable price tag.

We have multiple dedicated smart TV brands and smartphone OEMs that are catering to the audience in the smart TV market. And a majority of the brands are using Android services for their TVs. With Android smart TVs, you can also use third-party apps and games. You can download and install not just free apps but also paid apps. Making third-party app purchases is also a simple process when you do it on smart TVs.

You can try multiple payment methods to make new in-app purchases. The procedure remains the same as on smartphones and tablets or laptops/ PCs. But what if you are unable to make payments or go ahead with in-app purchases? Adding different payment methods to Google Play is one of the easiest ways in such cases. The solution is listed below:

How To Fix Payment Issues With App Purchases In Smart TVs

Buy services on other Android devices and then access on smart TVs.

Step 1: On any of your Android devices including a smartphone, laptop, or tablet, launch any web browser and go to play.google.com.

Step 2: Now, sign in to the Android TV with the same account.

Step 3: Find the content or the app that you wish to buy.

Step 4: If you are making an app purchase, complete the payment using your other Android device.

Step 5: If the content is related to a movie or show, you can do that on your other device and then watch it on your smart TV.

How Can You Start A New Subscription On Another Device?

Step 1: Open the website or the app whose subscription you wish to purchase.

Step 2: Now, make the payment on the website or the app.

Step 3: Go to your Android TV and hit back from the remote to dismiss any payment error message.

Step 4: Sign in to your account on the smart TV and start using the subscription services.

Categories
Featured How To Mobile

Want To Get Weather Alerts On Your iPhone? Here’s How To Do It

Key Highlights

  • Apple iPhone can send you severe weather alerts
  • Obtaining alerts on rain, snow, and other weather conditions is now easy
  • Users need to individually enable the feature in every city they visit

iPhones have had the weather app for a while. Apple has, however, only recently made available a feature that notifies users of weather conditions, particularly bad weather. The feature was previously only accessible in select regions including the US and the UK. The functionality was found in India and seems to be available in some regions.

If you frequently travel outside and are unsure of whether it will rain or not, this feature is great. Additionally, if the weather is bad, you can use this feature to be alert and stay indoors.

Steps To Get Weather Alerts On iPhone

Do note that this feature is only available in a few areas before we continue. Now, let’s see how to get weather alerts on your iPhone by following these simple steps:

Step 1: Launch the Weather app on your iPhone. Make sure you are using the most recent version of iOS since if there is a flaw in an older version, it might not function.

Step 2: Tap the hamburger/three vertical dots icon located in the bottom right corner of the app once it has been opened.

Step 3: You must now enable notifications if you want to get weather and rain alerts. Hit the Enable Notifications button.

Step 4: Tap on Next-Hour Precipitation.

Step 5: You must authorize the Weather app to ‘Always’ use location services after turning on Next-hour precipitation. The Weather app will notify you once you’ve done this for your region.

Step 6: To receive severe weather warnings for rain, snow, and other severe weather situations, you can also turn on Severe alerts.

Also, do note that the app only sends the weather forecast for your current location. So, if you travel to another city, you will need to configure that city in the app.

Categories
Apps How To

iOS 16 Tips And Tricks: Here’s How To Make Stickers From Photos

Key Highlights

  • With iOS 16, you can now add widgets to your home screen. This allows you to customize your home screen to display the information that you want to see.
  • Do you want to make your own stickers from photos? With iOS 16, it’s easy to do. Here are some tips and tricks on how to make stickers from photos.

With iOS 16, Apple unveiled a unique new tool that you can use to extract the subject from any photograph or image. This tool functions nearly like a quick version of Photoshop. The image can then be used as a sticker in the messaging app or pasted onto another image.

This feature is known as ‘Lift subject from background’. It is a part of a group of tools called Visual Look Up. Simply long-press any image to use it; you can then drag the image into another app or copy it. It’s now easier than ever to make a cutout sticker from one of your images using iOS 16.

Also Read: Here’s How to Set Long Videos as WhatsApp Status

This feature eliminates the need for the laborious procedure of manually isolating your topic from the backdrop. The iPhone, iPad, Mac, Photos, Screenshot, Quick Look, Safari, and even movies are all compatible with it. Although it isn’t really useful, it is nonetheless beautiful and enjoyable to use. Here is a step-by-step guide for creating stickers from images in iOS 16:

Also Read: iOS 16 Tips And Tricks: How To Make Siri Announce Notifications On iPhone

Steps To Make Stickers From Photos In iOS 16

Step 1: Open any photo on your iPhone that supports iOS 16.

Step 2: Long press the picture’s topic to pull it out.

Step 3: Now, extract the cutout of the subject.

Step 4: Watch for the pop-up menu of choices.

Step 5: Select the copy option from the settings menu after that.

Step 6: Now paste it where ever you want to.

Also Read: No SIM Card Error: How To Fix No SIM Card Detected/ SIM Toolkit Issue With Smartphones

Steps To Make Sticker From Photos On Your iPhones

The creation of stickers from iPhone images is also possible using this technique.

Step 1: Open the image that you want to make your sticker.

Step 2: The Share button is located at the bottom left corner, tap on it.

Step 3: Choose ‘Save to Files’ from the drop-down option after that.

Also Read: iOS 16 Tips And Tricks: How To Customize iPhone Lock Screen With iOS 16

Step 4: Go to the Files app now and find the photo.

Step 5: Now tap and hold on to the photo.

Step 6: Next, choose Quick Actions from the menu.

Step 7: Choose Remove Background now.

Separately, a transparent image will be created. It can be shared as a sticker on iMessage and other messaging apps.

Also Read: OnePlus Call Being Recorded Notification: How To Stop ‘Call Is Now Recording’ Message On OnePlus 10T, 10 Pro, OnePlus 9, 8 Series

Categories
Accessories Featured How To

OnePlus Buds Failed To Discover Or Identify? How To Resolve Pairing Issues With OnePlus Buds TWS Earbuds

Key Highlights

  • OnePlus Buds pairing issue is quite common
  • Often a quick fix resolves pairing issue with OnePlus Buds TWS

Majority of the smartphone OEMs are now expanding their businesses to digital accessories and other consumer electronics gadgets. OnePlus is amongst those popular Chinese smartphone OEMs that gradually became famous with audio accessories and smart TVs in addition to Android smartphones. OnePlus is known for launching a premium range of devices for Indian as well as global audiences.

For audiophiles, OnePlus is currently catering with its Buds and Buds Z series of TWS earbuds. You get the latest of hardware technologies with the OnePlus Buds TWS earbuds along with a refined audio output. Of course, the affordable price tag has favored OnePlus audio products specifically, the Buds and Buds Z series of truly wireless earbuds. You can buy the latest generation of OnePlus Buds TWS earbuds for under Rs. 5,000 and get a premium listening experience on the go.

Also Read: How Can You Pair OnePlus Buds, Nord Buds TWS With Apple Macbook Laptops (All Models)

OnePlus Buds and Buds Z series TWS earbuds have a wide range of compatibility with new-generation smartphones, laptops, tablets, and other supported devices. You aren’t restricted to simply using OnePlus TWS earbuds with OnePlus handsets only. Any Android phone or tablet with Bluetooth support is compatible with OnePlus Buds TWS earbuds. You can even pair your OnePlus truly wireless earbuds with new-age smart TVs.

The pairing process is quite simple with OnePlus Buds TWS earbuds thanks to the latest hardware and firmware integration. But in some scenarios, users have reported pairing issues. One of the most common pairing issues is the failed to discover or identify OnePlus earbuds. What can you do when you get an error message stating “failed to identify or discover” OnePlus Buds? We have listed the quick fix below:

Also Read: OnePlus Call Being Recorded Notification: How To Stop ‘Call Is Now Recording’ Message On OnePlus 10T, 10 Pro, OnePlus 9, 8 Series

How To Resolve OnePlus Buds Failed To Discover Or Identify Issue?

Step 1: Make sure your OnePlus Buds earbuds have sufficient power. You can check that by opening the charging case of the TWS earbuds and see if the indicator is steady. If you see fluctuating LEDs, it could be ab indication the earbuds are not completely charged or are running out of fuel. Plug in the charger and keep the lid of the charging case open. This will reset the earbuds and resolve any pairing issues.

Also Read: OnePlus Buds Pro 2 Review: Hitting The Right Notes?

Step 2: To reset, open the charging case’s lid and simultaneously press and hold the setup button on the charging case for at least two seconds. Once the LED starts blinking, the earbuds go into pairing mode. Follow the standard pairing process to get the connection done.

Step 3: If the issue persists and you aren’t able to pair your OnePlus Buds earbuds with a compatible device, try a factory reset. Keep the OnePlus Buds inside the charging case and keep the lid open. At the same time, press and hold the pairing button on the charging case for at least 10 seconds. Once the LED starts flickering the earbuds settings are restored to default. This method should instantly resolve any pairing issue.

For the tech geeks, stay updated with the latest cutting-edge gadgets in the market, exclusive tech updates, gadget reviews, and more right on your phone’s screen. Join Giznext’s WhatsApp channel and receive the industry-first tech updates.

Categories
Featured How To TV

OnePlus Smart TV Third Party App Crash: How To Resolve App Crash Issues With OnePlus TVs

OnePlus is quite a popular brand for Android smartphones. However, the Chinese firm has gradually established itself as one of the prime players in the digital accessories and consumer goods market such as smart TVs. OnePlus has introduced multiple new smart TVs in recent years. The trend is the same with OnePlus smartphones and its other range of consumer durables. We are speaking of reasonable price tags and feature-loaded products.

The OnePlus TV Y and U series are the best examples of modern days big screens with user advanced features including wireless network controls and third-party app support. Also, OnePlus TVs are embedded with smart control options such as voice-based digital assistant support (Google Assistant, Alexa, or Siri) and screencast.

OnePlus also rolls out timely firmware updates to its smart TV lineups similar to its smartphone series for a consistently improved user experience while watching shows or even hooking up an external gaming console. As mentioned above, third-party app usage is a key feature of OnePlus TVs.

You can download and use multiple apps from Google Play Store on your OnePlus TV. And OnePlus TVs are embedded with best-in-class hardware to make sure performance with both pre-installed and third-party apps is good. Despite this, users often experience app crashes or lagging. This at times hampers the user experience with premium OnePlus smart TVs.

 Since this is a common issue that OnePlus TV users have to deal with at some given point in time, it isn’t something permanent and can be resolved easily by performing some general fixes. If you are experiencing app crash or hanging issues with your OnePlus smart TV, here is what you can do.

How To Resolve Third Party App Crash Issue With OnePlus Smart TVs

You need to first check if the app crash issue on your OnePlus smart TV is with a single third-party app or multiple apps.

Step 1: If the app crash issue persists with a single app, it could likely be a compatibility issue. The app you are trying to install might not be supported by your OnePlus TV. But still, you can try clearing the caches and also re-installing the latest version of the app. If that also doesn’t work, you might have to consider using a different app.

Step 2: If all third-party apps are crashing, you need to check if there is any update for the TV is available. Download and install the latest firmware update for the OnePlus TV and reboot. Once you have updated the TV firmware, retry downloading the third-party apps.

Step 3: If none of the above steps work, the last resort would be resetting the TV. To do so, tap on the Settings menu and select More Settings.

Step 4: Tap on Reset.