Categories
Apps Featured How To

How To Remix With Collab In YouTube Shorts

Key Highlights

  • Side-by-side video remixing
  • Choose from multiple layout options
  • Rollout to iOS and Android to follow.

YouTube has introduced a new creation tool called Collab that allows creators to remix their videos in a side-by-side format with other YouTube or Shorts videos. With this feature, you can let your creativity shine by combining multiple videos in a split-screen format.

Here’s how you can start remixing with Collab!

Also Read: YouTube Music: How To Enable Auto-Add Songs To Your Last Playlist

Also Read: How To Migrate YouTube Channel And Videos To A Different Account

Step 1: Select Your Videos

To get started, choose the videos you want to remix. You can pick from eligible YouTube or Shorts videos that match your creative vision.

Step 2: Pick Your Layout

Collab offers various layout options, giving you the freedom to experiment and find the perfect layout that suits your style and content. This way, you can create engaging and unique Shorts that captivate your audience.

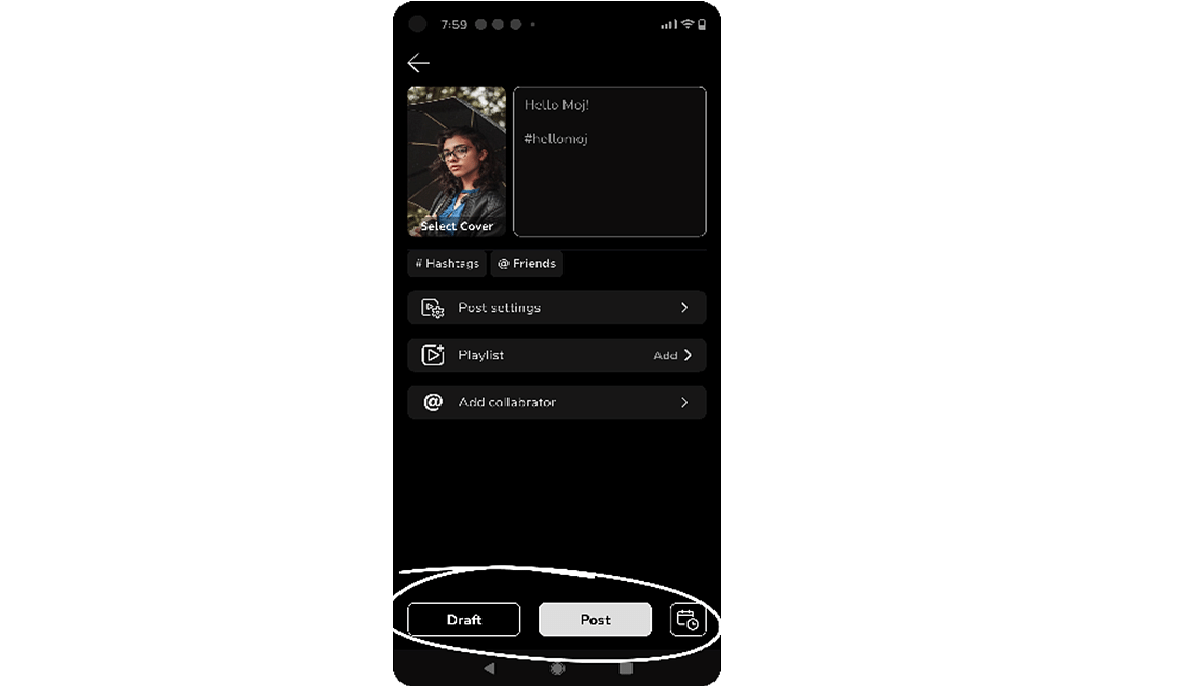
Step 3: Hit “Remix” and “Collab”

Once you’ve selected your videos and decided on the layout, it’s time to hit the “Remix” button, followed by the “Collab” button. These simple steps will merge the videos seamlessly, and you’ll be on your way to creating your masterpiece.

Also Read: YouTube Channel Naming Ideas: 100+ Best Names For YouTube Educational Channels

Joining Green Screen and Cut

Collab is not alone in the creative toolkit; it is accompanied by Green Screen and Cut features. With Green Screen, you can use another YouTube video or Short as the background for your original Short, while Cut allows you to incorporate short segments (1-5 seconds) from other videos into your creation. These additional tools provide even more opportunities for remixing Shorts content.

Also Read: 100+ Funny YouTube Channel Name Ideas To Make You Smile

Availability

Collab is being rolled out to all creators on iOS, with Android users getting access in the coming weeks.

Also Read: YouTube To Allow Creators To Upload Podcasts Directly Via App: Here’s How

Categories
Apps Featured How To

Flipkart SuperCoins (2023): Learn How To Earn, Use And Enjoy Exciting Rewards

Key Highlights

  • You can earn points known as SuperCoins while shopping on Flipkart
  • Redeem SuperCoins for products, mobile recharge, coupons, flight tickets, and exclusive deals on the Supercoin Zone
  • SuperCoins are valid for one month from the date of credit

Flipkart rewards its customers with valuable points known as Flipkart SuperCoins. These SuperCoins can be earned through purchases and various activities on Flipkart and partner platforms. Let’s explore how to earn, redeem, and make the most of these enticing rewards. Also Read | WhatsApp Self Message Feature Goes Official: How To Self-Chat On WhatsApp Using Android, iOS Devices

How To Earn Flipkart SuperCoins

Customers can earn SuperCoins by:

  • Placing orders on Flipkart.
  • Making purchases through the Flipkart app on partner platforms like PhonePe, Ola, Urban Company, 1MG, OYO, and Zoomcar.
  • Playing games on the Flipkart app.

For every Rs. 100 spent, regular customers receive two SuperCoins, while Flipkart Plus members receive four SuperCoins per Rs. 100 spent. Flipkart Plus members can earn up to 100 SuperCoins per order, while regular customers can get a maximum of 50 SuperCoins for each order.

How To Redeem Flipkart SuperCoins

SuperCoins can be redeemed for exciting rewards, including:

  • Purchasing products for just Rs. 1.
  • Mobile recharge and other free services.
  • Coupons and EGVs from the Supercoin Zone.
  • Exclusive deals on Supercoins Zone.
  • Booking flight tickets using SuperCoins on the Flipkart app.

Also Read | Four Best Coupon Apps For Online Shopping

How To Use Flipkart SuperCoins

To use SuperCoins effectively, follow these steps:

Step 1: Use the ‘Supercoins price’ filter to find eligible products.

Step 2: Browse and buy coupons and EGVs from the Supercoin Zone.

Step 3: Enjoy exclusive deals on the Supercoins Zone using SuperCoins.

Step 4: Book flight tickets conveniently using SuperCoins within the Flipkart application.

Flipkart SuperCoin Validity

It’s essential to note that SuperCoins have a validity of one month from the date of credit. Flipkart’s SuperCoins program provides an exciting opportunity for customers to earn rewards and enjoy a wide range of benefits. By earning and redeeming SuperCoins wisely, users can enhance their shopping experiences and make the most of these valuable incentives.

Also Read | Curious About Google Meet’s Camera Lock? Learn How To Use This Useful Feature

Categories
Apps Featured How To

AI-Powered Creativity: How To Generate Images Using Bing’s AI Technology

Key Highlights

  • Bing Image Creator enables users to create unlimited images
  • Users can expedite image generation by using “Boosts”
  • Bing Image Creator strictly prohibits sexually explicit, violent, terroristic, or self-harm-promoting images

AI has become an integral part of people’s daily lives, assisting with tasks, planning, and saving time. Bing Image Creator, an AI-based tool powered by OpenAI’s DALL-E, aids users in generating images based on text prompts for various projects and presentations. Also Read | Best Graphics Drawing Tablets To Buy For The Artist In You

How To Use Microsoft Bing Image Creator

To access Bing Image Creator, users can click on the sidebar icon within Microsoft Edge or access it through Bing Chat within Edge. Follow these steps to use the tool:

Step 1: Open a browser and visit bing.com/images/create.

Step 2: Click the “Join & Create” button and sign in with a Microsoft account or create a new one.

Step 3: Enter a custom prompt or use the “Surprise Me” feature for suggested prompts.

Step 4: Click “Create” to initiate image generation, which typically takes 10-20 seconds, resulting in up to four distinct images.

Also Read | AI Chatbots Unmasked: Check Out The Four Best Chatbots Competing With ChatGPT

Understanding Bing Image Creator Boost

Boosts serve as the currency to expedite image generation in Bing Image Creator. Users initially receive 25 boosts per week and can purchase more using Microsoft Rewards points. Each prompt consumes one Boost. If boosts are exhausted, users may have to wait for image generation, with wait times varying based on server and prompt.

Additional Boosts

Users can purchase five extra boosts for 500 Microsoft points, earned through various tasks on Microsoft Bing and Edge. Staying signed in with a Microsoft account allows users to accumulate points naturally.

Bing Image Creation: Limitations

Microsoft imposes strict content restrictions on Bing AI Image Creator. Users cannot generate sexually explicit, violent, terroristic, or self-harm-promoting images. Violation of the content policy may lead to access suspension. The tool is only for legal, personal, and non-commercial purposes, and generated images cannot be used for profit.

Also Read | From Chaos To Clarity: Five Proven Methods To Keep Your Gmail Inbox Organized

Categories
Apps Featured How To

Curious About Google Meet’s Camera Lock? Learn How To Use This Useful Feature

Key Highlights

  • Google Meet offers hosts a number of features to manage their meeting
  • With the help of Google Meet’s Camera Lock, hosts can lock video for everyone
  • The hosts and co-hosts of Google Meet may still use their videos as needed

Over the years, virtual meeting applications have made significant progress, offering a diverse range of features to enhance the meeting experience, making them seamless, enjoyable, and interruption-free. Google Meet stands out with its host control features, giving meeting organizers the power to manage participants’ engagement levels. One notable feature is “Camera Lock,” allowing hosts to restrict video usage for all attendees while retaining the privilege for themselves. Also Read | Want To Create A New Group For Google Meet Calls? Here’s How To Do It

How To Enable Camera Lock In Google Meet: A Step-by-Step Guide

As the host or co-host in Google Meet, you have the ability to activate Camera Lock, which disables all participants’ video cameras. However, hosts and co-hosts retain the privilege to use their videos whenever necessary. Remember that if Video Lock is set, mobile attendees may be removed from the meeting if their device doesn’t have the most recent version of the Meet or Gmail apps, Android OS version M or newer, or iOS version 12. Fortunately, by turning off Video Lock, previously removed participants can rejoin the meeting.

Also Read | How To Download Google Meet On Laptop: Here’s The Step-By-Step Guide

If you wish to use these functionalities, you can follow this step-by-step guide on how to use Camera Lock in Google Meet.

Step 1: Visit meet.google.com and log in with your Google account before the scheduled meeting.

Step 2: Click on the lock icon located at the bottom right corner of the screen.

Step 3: Select “Host management” to turn on from the menu.

Step 4: Choose to “Turn on their video” under the “Let everyone” section to lock or unlock participants’ video cameras.

In addition to its other offerings, Google Meet boasts a captivating feature that enables participants to watch YouTube videos together. This feature proves particularly useful for educators who wish to elucidate topics using YouTube videos.

Also Read | Google Meet Hacks: How To Change/ Update Google Meet Name Using A Laptop Or PC?

Categories
Apps Featured How To

Master Moj’s 90-Second Guide: How To Edit Captivating Videos In No Time

Key Highlights

  • Learn to create captivating videos on Moj in just 90 seconds
  • Effortlessly edit and enhance videos with filters, speed adjustments, and more
  • Customize posts with hashtags, tag friends, and collaborate with others for incredible content

Are you ready to shine and make waves in the digital universe? Discover Moj’s ultimate 90-second guide to effortlessly editing and posting videos on its platform. Follow this step-by-step guide to effortlessly create engaging content that will keep your followers hooked. Also Read | Want To Edit Videos For Instagram Reels? Best Five Apps You Can Download For Free

How To Edit Moj Videos In 90 Seconds

Step 1: Get Started

  • Open the Moj app on your device and head to the home screen.

Step 2: Add The Magic

  • Tap on the “+” button located at the center of the bottom screen.

Step 3: Choose Your Music

  • Click on the audio icon (the first icon on the center-right) to access the music library.
  • Select a song either from the recommended ones or use the search bar to find a specific song.
  • Pick the section of the song you want to use by using the yellow bar and trim it accordingly.

Step 4: Enhance Your Videos

  • Click on the Beautify icon (3rd icon in the center-right – icon with an emoji face).
  • Explore various filter options to make your videos more appealing.
  • Record using front or back cameras, and switch between them using the camera icon at the top right.
  • Use additional recording tools like flash, timer, and speed settings from this screen.

Also Read | Editing Videos On iPhone: Here Are The Best Free Third-Party Video Editor Apps For iPhone And iPad

Step 5: Record And Edit Like A Pro

  • After recording your video or uploading an existing one, tap on the next button.
  • Enter the trim flow by clicking on “Edit Clips” from the preview screen.
  • Select the specific sections of the video you want by using the white trim bar and the yellow marker.
  • Make further edits like changing speed, rotation, or sorting clips for multiple videos from the edit screen.
  • Add voiceovers, text, stickers, and more from the preview screen.
  • Click “Done” when your editing is complete.

Step 6: Customize Your Post

  • Enter relevant #hashtags and tag friends from the post-confirmation screen.
  • Adjust post settings, such as allowing comments, shares, duets, etc.
  • Collaborate with friends to create amazing content together.

Step 7: Share Your Masterpiece

  • Click “Post” to share your video with the world instantly.
  • Alternatively, use the schedule icon to post at a later time or save it as a draft for revisiting later.

Now, let your creative vision come to life and leave your audience craving for more with your engaging and captivating Moj videos!

Also Read | Need To Save Moj Videos For Later? Learn How To Download For Free

Categories
Apps Featured How To

Gboard On iOS: How To Download And Install Gboard Keyboard App On iPhone, iPad

Key Highlights

  • Gboard Keyboard app is available for iOS devices
  • Can be installed on iPhone and iPads
  • Offers several useful features such as Glide typing, auto correction, and more

Google is offering a wide range of services to mobile users. Not just Android but iOS users also have access to different Google services. For an easy and swift typing experience, Google has the Gboard application to take care of all the typing requirements for Android and iPhone users. Google has added the same set of features for Gboard on Android and iOS.

With Gboard one can get to use some of the nifty features such as glide typing, dark mode support, different customizations, single-hand typing mode, and more. The Gboard application further provides a realistic typing experience by allowing a height adjustment feature using a slider. The plethora of user-centric features and a realistic typing experience is what makes Gmail popular amongst iPhone and iPad users. But how can you download and install the Gboard on iPhone and iPad? The steps are mentioned below:

Also Read: From Chaos To Clarity: Five Proven Methods To Keep Your Gmail Inbox Organized

How To Download And Install Gboard On iPhone, iPad

Step 1: Download the Gboard app from the App Store

Step 2: Once the app is installed launch it

Step 3: Click on the Keyboard Settings option

Step 4: You can select from multiple options including Auto correction, Glide Typing, and Character Preview

Also Read: Gmail Vacation Replies: How To Create And Set Replies For Vacations On Gmail?

How To Set Gboard As Default Keyboard App On iPhone, iPad

Step 1: Open the settings app on your respective iPhones and iPad

Step 2: Tap on the “General” option

Step 3: Click on the Keyboard option and then select Keyboards

Step 4: Locate the Edit option on the top right corner and tap on it

Step 5: Tap and hold the Reorder option

Step 6: Drag the Gboard icon on the top of the list

Step 7: Click on Done

Also Read: Running Low On Google Storage? Five Best Techniques To Clear Your Gmail Space

How To Remove Gboard As Default Keyboard App From iPhone

If you don’t wish to keep Gboard as the default keyboard app on iPhone or iPad then you can follow these easy steps.

Step 1: Open the Settings app on your iPhone or iPad

Step 2: Go to the General tab

Step 3: Tap on “Keyboard” and then select the “Keyboards” option

Step 4: Hit the Edit option placed on the top right corner

Step 5: Tap on the Delete option beside the Gboard icon in the list

Also Read: Gmail Gets Google Calendar Schedule Feature: What Is It? How To Use?

Categories
Featured How To Mobile

iOS 17 Live Voicemail: How To Use It On Your iPhone

Key Highlights

  • Apple introduces iOS 17 which includes a Live Voicemail feature at WWDC 2023
  • Provides real-time visual feedback during playback, making voicemail management more convenient
  • Allows users to call back known contacts directly from the Live Voicemail playback screen

When iOS 17 launches this fall, iPhone users can look forward to a host of exciting new features and improvements. One standout addition is the Live Voicemail feature, revolutionizing the voicemail experience by transcribing voicemails into text and offering real-time visual feedback during playback. This article will guide you through using Live Voicemail on your iPhone running iOS 17, making voicemail management more efficient and convenient. Also Read | iOS 17 Arrives: Seven Exciting Features For iPhone Users

Enabling Live Voicemail On iOS 17

Before you can use Live Voicemail, ensure that your iPhone is updated to iOS 17 or later. To enable this feature, follow these easy steps:

Step 1: Get your iPhone’s Settings app open.

Step 2: Scroll down and choose the “Phone” option.

Step 3: Look for “Voicemail” and tap on it.

Step 4: Toggle on the “Transcribe Voicemails” option to enable Live Voicemail.

Once Live Voicemail is enabled, all your future voicemails will be automatically transcribed, and you can access the live voicemail playback along with the transcription from the Phone app.

Managing Live Voicemail

With Live Voicemail activated, managing your voicemails becomes a breeze. Here’s how:

Step 1: On your iPhone, open the Phone app.

Step 2: Tap on the “Voicemail” tab at the screen’s bottom.

Step 3: Here, you’ll find a list of your voicemail messages, and any new, unplayed voicemails will be marked with a blue dot. Click on a voicemail to open it and reveal the Live Voicemail playback screen.

Also Read | Various Methods To Power Off iPhone 13 And iPhone 14 Models: Here’s How

Using Live Voicemail Playback

The Live Voicemail playback screen offers several options to simplify voicemail management:

Transcription: The voicemail’s transcription can be found at the top of the playback screen. This text version allows you to read and understand the content without listening to the entire recording.

Play/Pause: By hitting the play button at the bottom of the screen, you can play and pause the audio message just like you would with a traditional voicemail.

Seek: Do you need to fast-forward or rewind the voicemail? To navigate the audio, left- or right-drag the progress slider.

Speaker: During playback, you can choose between speaker mode and standard earphone mode according to your preferences.

Call Back: In the top-right corner of the screen, there is a call button that you can hit if the voicemail is from a known contact and you want to call them back straight away.

Delete: The trash icon is located in the bottom-right area of the screen. Click it to remove the voicemail from your list.

Also Read | iOS 17 Hands-On: Set Up Standby Mode On Your iPhone? Here’s How

Categories
Featured How To Mobile

iOS 17 Hands-On: Set Up Standby Mode On Your iPhone? Here’s How

Key Highlights

  • iOS 17 brings a range of interesting features
  • Enabling Standby Mode is simple
  • Users can update to iOS 17 and access the Standby Mode

At the WWDC 2023 event earlier this year, Apple made an exciting announcement about the release of iOS 17. Packed with a plethora of new features, iOS 17 promises to enhance the user experience. Furthermore, Apple introduces “Standby Mode,” a unique feature that transforms your iPhone screen into a digital nightstand display when placed on a charging stand in landscape mode. This article will provide a step-by-step guide on how to set up and use this feature if your device is eligible for the iOS 17 update.

Also Read | iPhone Tips And Tricks: How To Answer Call Without Touching Your Phone

What Is Standby Mode?

Standby Mode is a groundbreaking addition to iOS 17 designed to optimize battery efficiency by reducing background activities when your device is inactive. By smartly analyzing your usage patterns, it identifies periods of inactivity and implements power-saving measures without compromising essential functions.

How To Enable Standby Mode?

To enjoy the benefits of Standby Mode on your iOS 17 device, follow these simple steps:

Step 1: Update to iOS 17

Ensure that your device is running the latest version of iOS 17. To do this, navigate to “Settings,” then select “General” followed by “Software Update.” Check for any available updates and proceed with the download if necessary.

Also Read | iOS Tips And Tricks: How To Setup And Use AutoFill For Contact Cards And Credit Cards In Safari On iPhones And iPads

Step 2: Access Standby Mode

Once your device is updated to iOS 17, go to “Settings,” then select “Battery,” and finally, choose “Standby Mode.”

Step 3: Toggle Standby Mode On

On the Standby Mode page, you will find a switch. Toggle it to enable the feature and activate Standby Mode on your device.

By following the steps provided in this article and making informed decisions regarding app refresh, location services, and notifications, you can maximize the benefits of Standby Mode and enjoy extended battery life on your iOS 17 device. Additionally, remember to keep your device up-to-date with the latest iOS updates and stay alert for future releases that may introduce additional battery-saving features by Apple.

For the tech geeks, stay updated with the latest cutting-edge gadgets in the market, exclusive tech updates, gadget reviews, and more right on your phone’s screen. Join Giznext’s WhatsApp channel and receive the industry-first tech updates.

Categories
Apps Featured How To

Google’s Album Archive To Shut Down In Two Days: Here’s How To Save Your Images Without Delay

Key Highlights:

  • Google Album Archive is being shut down by Google
  • Users will no longer have access to their old photos stored exclusively in Album Archive
  • Certain content, such as thumbnail photos and album comments, will disappear once the shutdown takes effect

Google Album Archive allows users to manage and view photo and video content from various Google products. However, Google recently announced the shutdown of this service, prompting users to take necessary steps to safeguard their stored images. In this article, we will explore what Google Album Archive is, the changes taking place, and how users can save their data. Also Read | Google Lens New Skin Feature Allows Searching Skin Conditions: How To Know It’s a Pimple, Lump, Or Mole Using Google Lens?

What Is Google Album Archive?

Google Album Archive is a cloud-based platform that enables users to store, manage, and access their photos and videos. It serves as a repository for content shared on Google products such as Google Hangouts (now Google Chats) and Picasa Web Albums. Unlike Google Photos, Google Album Archive focuses specifically on media that is not stored within Google Photos.

The Shutdown Announcement

Google has officially announced the closure of the Google Album Archive, which is scheduled to take effect on July 19, 2023. Users were informed about the shutdown through a notification and an update on the company’s support page. According to the announcement, content exclusively available in Album Archive will be deleted, and users are advised to download their data using Google Takeout.

Implications Of Shutdown

Once Google Album Archive ceases operation, all images stored on the platform will become inaccessible. Users who have not saved their photos in other apps, such as Google Photos, or lack a personal copy will lose access to their old images. Certain content, including thumbnail photos, album comments or likes, some Google Hangouts data from Album Archive, and background images uploaded before 2018 in the Gmail theme picker, will also disappear.

Also Read | How to Remove Profile Picture from Google Account (Gmail, YouTube, Google Meet)

Unaffected Content

While most data on Google Album Archive will be deleted, specific types of content will remain unaffected by the shutdown. Images from Google Account profile photos, Google Blogger, Google Photos content, and Google Photos Archive will not be affected. Users who wish to retain their images from Google Album Archive can use Google Takeout to download a copy of their data.

How To Save Your Google Album Archive Images

To save your images before the shutdown, follow these steps:

Step 1: Open Google Takeout in your web browser on a PC.

Step 2: Select “Google Album Archive” and deselect any other options.

Step 3: Click on the “Next Step” button.

Step 4: Choose a destination where you want the images to be saved, such as sending the download link via email or adding to Drive, Dropbox, OneDrive, or Box.

Step 5: Select the desired frequency for exporting your data (options include “Export once” or “Export every two months for one year”).

Step 6: Specify the file type and size preferences.

Step 7: Click on “Create Export” to initiate the process.

With the imminent closure of the Google Album Archive, users must take action to preserve their stored images. By following the outlined steps using Google Takeout, users can ensure that their Google Album Archive data is securely saved before the shutdown occurs.

Also Read | Gmail Gets Google Calendar Schedule Feature: What Is It? How To Use?

Categories
Apps Featured How To

No More Threads: Here’s How To Delete Your Instagram Threads Account

Key Highlights

  • Deleting Threads account is not possible without deleting your Instagram account
  • Threads allow users to deactivate their profiles without affecting their Instagram accounts
  • Instagram CEO Adam Mosseri acknowledged the issue

Once you’ve registered for a Threads account, there’s no turning back. Meta, the parent company of Threads, does not provide an option to delete your Threads account independently; instead, it requires you to delete your Instagram account along with it. This means that if you’ve already joined the Threads community, reconsidering your decision may prove futile.

Also Read | Instagram Threads: What Is It And How To Use Meta’s Twitter Alternative

According to Threads’ privacy policy, you can deactivate your Threads profile at any time, but deleting it requires the deletion of your entire Instagram account. However, the policy does allow for the deactivation of your Threads account without affecting your Instagram account. To assist you in this process, here is a step-by-step guide on deleting your Threads account.

Delete Your Instagram Threads Account: Step-by-Step Guide

Step 1: Launch the Threads app and click on the profile icon located in the bottom right corner.

Step 2: Tap the menu icon in the top right corner, represented by two horizontal lines, with the lower line being shorter.

Also Read | How Can You Delete Paytm Transaction History From Your Android And iOS Device

Step 3: Select “Account” and then choose “Deactivate profile.”

Step 4: Tap “Deactivate Threads profile” and confirm your decision.

Meta’s latest social networking platform, Threads, debuted on July 5 and has already surpassed 30 million users, achieving unprecedented growth in the online platform space. However, many users may have signed up without thoroughly reviewing the terms and conditions—a common practice for most people. Threads require users to have an accompanying Instagram account since it is built upon the existing app. However, the integration between the two platforms goes beyond a mere connection.

Addressing the issue, Instagram CEO Adam Mosseri stated on Threads that they are actively exploring options to allow for the separate deletion of Threads accounts.

For the tech geeks, stay updated with the latest cutting-edge gadgets in the market, exclusive tech updates, gadget reviews, and more right on your phone’s screen. Join Giznext’s WhatsApp channel and receive the industry-first tech updates.