Categories
Apps Featured How To

Fed Up Of Cluttered Gmail Folders? Here’s How To Create New Category Tabs For Emails On Gmail

Key Highlights

  • Gmail offers an option to categorize emails into specific tags
  • Users can select from multiple available categories
  • Moving older emails on Gmails to the newly selected category tabs is also an option

Gmail is widely used by personal and professional users for mailing services. Google’s in-house email app is available for smartphone as well as PC/laptop users.  Sending an email is a hassle-free task and the availability of numerous features allows an enhanced emailing experience. Google has also ensured a private and secure ecosystem with Gmail emails.

Gmail also makes it easy for its user base to neatly organize their inbox and other folders for space management. Adding categories to emails is also handy to access important emails quickly. Users can easily create multiple categories or tabs for easy segregation of emails on Gmail. Google has also added the option with which older emails on Gmail can be moved to the newly created category tab. The steps to add or remove categories in Gmail are listed below:

Also Read: Annoyed With Unwanted Emails On Gmail? Here’s How To Block Individual Email Address Or Bulk Mails On Gmail

Steps To Add Or Remove New Category Tabs On Gmail

Step 1: Open the Gmail app or website on your smartphones or laptops/ PCs respectively.

Step 2: Tap on the Settings menu (gear icon) that is placed on the top-right corner of the app’s homepage.

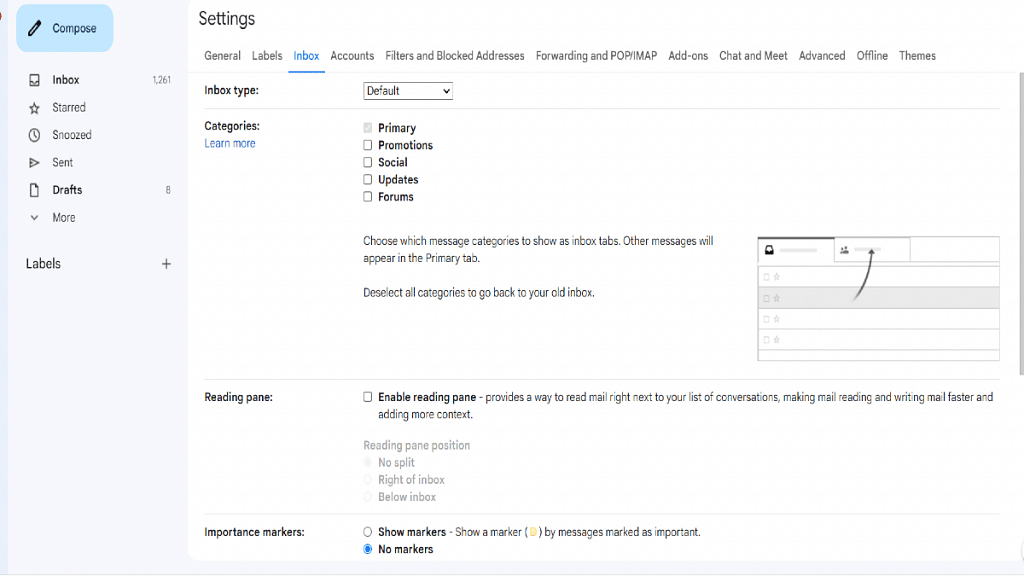
Step 3: Scroll to the Inbox option and click on it.

Step 4: Select the Inbox type option.

Step 5: Hit the Default tab.

Step 6: You need to select another inbox type if you wish to hide all tabs.

Step 7: You will now see the Categories menu.

Step 8: Select from the list of available categories. It’s worth mentioning that you can only select from the pre-set categories. This is because there isn’t any provision to create new category tabs on Gmail just yet.

Step 9: Tap on Save Changes. Note, enabling notifications for emails will be shown in the Primary category only.

Also Read: How Can You Make Or Join Video Calls Using Gmail On Laptop And PC

Steps To Move Or Send Emails To A New Category Tab On Gmail

Step 1: Once you have selected the category, you can easily move existing emails to the designated tab.

Step 2: Go to the mail that you wish to add to the newly created category tab.

Step 3: Drag the email to the selected category tab. This will move the email to the newly created category tab.

Step 4: If you wish to move all future emails from a specific sender to a category, you can enable the pop-up notification from the bottom left corner of the mail.

Also Read: How To Use Gmail Confidential Mode? How To Unsend/ Retrieve Emails On Gmail?

Categories
Apps Featured Info

Google Yearly Wrap-Up: Here Are The Top Games And Apps Trending In 2022

Key Highlights

  • Google announced the best apps and games in the Play Store
  • The tech giant revealed Filo is the best app for personal growth
  • Google also announced new awards for best apps and games for Chromebooks

The winners of Google Play’s Best of 2022 in India have been revealed by Google. The yearly awards recognize the best apps and games on Google Play Store. Except for the winners of the User’s Choice awards for Favorite Game and Favorite App, the winners were picked by the editorial team of Google Play.

Additionally, Google Play unveiled new awards for the best Play Pass game, best story game, best ongoing game, and best apps and games for Chromebooks. Here are the Best of Play 2022 apps and games winners:

Also Read | Best Apps To Detect Hidden Camera For Android And iOS

Google’s Best Apps And Games 2022

Dream by WOMBO, an AI-based app that creates art, has been named the best app by Google. An AI-based learning app called Questt is the best app in India. Apex Legends Mobile is the best game of 2022.

The BeReal app and Apex Legends Mobile both win the User’s Choice award. For those who don’t know, BeReal has surpassed all other apps this year in the App Store rankings. India’s Users’ Choice app is Shopsy and the game is Angry Birds Journey. There are various categories for the best games and apps. For a better idea, look at the list below.

Best Apps 2022

Best app for funPetStar
Best for wearTodoist
Best app for everyday essentialsPlant Parent
Best for tabletsPocket
Best app for personal growthBreathwrk
Best for ChromebooksBandLab
Best app for goodThe STIGMA App
Best hidden gemsRecover Athletics

Best Games 2022

Best for ChromebooksRoblox
Best OngoingGenshin Impact
Best MultiplayerDislyte
Best on Play PassVery Little Nightmares
Best IndiesDicey Dungeons
Best for tabletsTower of Fantasy
Best storyPapers, Please
Best pick up and playAngry Birds Journey

Google also offers a list of the best books and audiobooks. The best-selling books are It Ends with Us by Colleen Hoover, Fairy Tale by Stephen King, Fire & Blood by George R. R. Martin, I’m Glad My Mom Died by Jennette McCurdy, and A Court of Thorns and Roses by Sarah J. Maas.

Also Read | Google Play Store Alternatives: Best Android App Store Substitutes For Google Play

Categories
Apps Featured

Google Play Store Alternatives: Best Android App Store Substitutes For Google Play

Key Highlights

  • Android users need more control over their app experience
  • There are some great options out there the Play Store just can’t compete with
  • These apps let you download free apps and games just like the Play Store

If you’re trying to download an app for your Android phone, the first thing you’ll do is visit the Google Play Store unless you’re a power user. However, there will be times when an app is not available on the same, either because of regional restrictions or because the app doesn’t adhere to Google’s terms and conditions. At that point, Android’s open-source nature saves the day. You can install third-party app stores and download apps from them just like you use Google Play Store.

APKMirror

APKMirror is one of the most reliable places to sideload apps onto your Android device. It lets you download tons of free Android APKs; no premium apps are available here. However, there isn’t an Android app specifically for APKMirror. Therefore, users have to visit the website and download the APK. It is safe to download the apps from this Google Play alternative because they are free of malware. The apps are listed chronologically on the homepage, and you can also access weekly, daily, and monthly popularity charts.

Also Read | Pokemon Unite: Here’s How To Download And Play On Your Phone

Aptoide

With a well-designed user interface and a design that adheres to Google standards, Aptoide offers an almost identical experience as the Play Store. Aptoide’s open-source app store has over 700,000 Android apps. Its collection has been downloaded by 3 billion times. Since its launch in 2009, it has been used by over 150 million people worldwide. It is a secure and easy-to-use Android app store.

Samsung Galaxy Store

The Samsung Galaxy Store now offers a classic app store experience if you’re looking for that. Unfortunately, not all devices have access to the Galaxy Store. This app is only available on Samsung Galaxy devices that are part of the app library by default. The store offers fewer apps than Google. But all you have to do is connect it to your Samsung account and it includes exclusives like the mobile version of Fortnite, which isn’t offered on the Play Store.

TapTap

TapTap is a dedicated app store for games and a legitimate substitute for the various games available on the Google Play Store. You can have noticed that certain titles not yet listed on the Play Store are already open for pre-registrations as exclusives on TapTap. The fact that some of the more intense games like Valorant mobile are only accessible through pre-registration on TapTap suggests that the store is expanding to compete with Google. Many of the titles available here are also available on the Play Store, and you can find additional titles classified by preferences and personal preferences.

Also Read | How To Lock Play Store On Your Android Phones? Ways To Enhance Privacy With Google Play Store

Categories
Apps Featured Info

Lensa AI App: A Self-Portrait Generator Bringing In Some Heat For Real Artists

Key Highlights

  • Lensa AI is the latest app that can create customized avatars using AI
  • It is available on both Android and iOS devices
  • Users can download the app from the Apple App Store and Google Play Store

If your Instagram is overrun with algorithmically created images of your buddies, you are not alone. The photo editing app Lensa AI recently went viral after releasing a new avatar creation tool based on Stable Diffusion. The photo editing app Lensa AI went viral over the last few days with users sharing their eerie AI-created avatars in stories and posts.

Lensa’s fun, shareable avatars are the first of many humans interacting with generative AI tools. As for Lensa, it is also the first time they have paid for computer-generated art. Here’s everything you need to know about the Lensa AI app:

Also Read | Instagram Tricks: Here’s How You Can Change Instagram Language Settings On Android, iPhones

How Lensa AI Works?

You must be at least 18 years old to use Lensa which employs AI techniques to generate custom avatars. In order to generate bespoke avatars, users must upload a minimum of 10 to 20 selfies to Lensa’s server. As soon as the avatars are complete, all of the images that have been uploaded to its servers will be removed, claims Lensa AI. To use the Lensa AI app at its optimum, one must upload at least 10 to 20 selfies.

One can purchase 50 unique avatars for Rs. 349, 100 unique avatars for Rs. 549, or 200 unique avatars for Rs. 699, or one can get an annual membership. According to Lensa AI, creating avatars involves a lot of computational power which explains why it is rather pricey.

Lensa AI can produce videos with the Lensa watermark and provide up to three images each day as part of the free plan. You can use features like background object removal and magic retouch as part of the free plan.

Lensa AI is a great tool that can add a new perspective to your selfies and pictures. Even if the majority of its features are only available to paid users, the Lensa AI app’s free users can still test out a variety of its features to get a better understanding of what it has to offer.

Lensa AI App: How To Get It?

Lensa AI is available on both Android and iOS platforms. Users can download the app for free from the Apple App Store and Google Play Store. If you’re looking for a modern photo and video editor with AI features, Lensa AI is definitely an app to try.

Also Read | Instagram Reel: How To Create And Share Instagram Reel Videos Using Templates On Android, iOS

Categories
Apps Featured Info

Now Use WhatsApp In Picture-In-Picture Mode: Feature Available For iOS Beta Users

Key Highlights

  • WhatsApp has started rolling out picture-in-picture mode for some iOS users
  • This feature is being rolled out for video calling
  • It is available only for iOS beta users

Numerous new features are being developed by WhatsApp for its platform. Recently, the company added Communities and in-chat polls to its platform. Now, there are rumors that the messaging platform owned by Meta has started to roll out picture-in-picture mode for video calls in its iOS-based app.

It is important to note that WhatsApp’s Android and iOS-based apps do support picture-in-picture mode. The only videos that can use this feature are those that have been shared from other apps like Facebook or YouTube. The company now intends to grant comparable rights to video calls made through its platform. The goal is to make it easier for users to use other apps while video chatting with friends or family.

Also Read | WhatsApp Polls: What Is It And How Can You Create WhatsApp Polls For Individual User Or Groups?

Users of the messaging service will be allowed to use other applications while making video calls on WhatsApp, according to a report by WABetaInfo, the blog that monitors advancements in WhatsApp.

Despite this, WhatsApp has not yet made this feature available to all iPhone users. Instead, it is only available to a small group of beta testers who are running WhatsApp beta for iOS version 22.24.0.77 and 22.24.0.78 on their iPhones.

By installing the most recent version of the app on their iPhones and attempting to use another app while video calling a friend, WhatsApp beta users can test out this feature. “If your account allows this feature, you’ll instantly see a picture-in-picture view when you’re multitasking in other apps. It uses the official iOS API, so you can also temporarily hide the video call view depending on the situation,” the blog site wrote in its blog.

WhatsApp Picture-In-Picture Mode: Availability

The blog site states that the feature is currently available for iOS 16.1 and above. So, it could be one of the features enabled by the update that adds official support for iOS 16. The Meta-owned company is also working to support devices running iOS 15.

Also Read | WhatsApp Self Message Feature Goes Official: How To Self-Chat On WhatsApp Using Android, iOS Devices

Categories
Apps Featured How To

Can’t Find Images In Phone’s Gallery Your Device? Here’s How To Find Lost Photos And Videos On Google Photos

Google is offering multiple tools and services to mobile users and is frequently updating the Android platform with new features proactively. Google Photos is amongst the top few mobile applications being used by numerous users globally. Google Photos is one stop destination to store photos and videos and also edit and share via Google Drive and other mediums.

Google Photos is an in-house gallery app from the search giant which is pre-installed on every Android mobile and tablet and can be easily accessed from the app drawers. Data backup is also an option with Google Photos. It comes in handy when you wish to create some room for additional apps by removing old photos and videos from the device’s storage.

Also Read: Google Pay 9x Booster: Confirmed Working Trick To Get 9x Booster In Gpay Food Market Offer

Google Photos definitely works as a photo vault app for smartphones. Google has also made it quite simple to access old photos and you don’t have to scroll down the entire album to look for a specific image. But do you know you can also search for lost photos and videos on the Google Photos app?

Well, there are a bunch of tricks with which you can easily find any image or video that you think has disappeared from the gallery. This can happen when you have switched to a different Google account for photos or due to a random bug. If yo want to know the methods with which you can find lost photos and videos on Instagram then read this article:

Also Read: Want To Set Your Google Calendar Private? Here’s How To Do It

How To Find Lost Videos And Images On Google Photos

Step 1: Check the account with which you are logged in to the Photos app. It should be the same account on which you have enabled the backup. If it’s a different account, login back with the correct account.

Step 2: Check photos from different social media and messaging apps such as Facebook, Instagram, or WhatsApp. You will need to follow the steps below for the same:

  • On the Google Photos app, click the Library option from the bottom.
  • Go to the Photos on device option and select the device folders.
  • Tap on the required app folder to see the images and videos.

Step 3: Check the Bin or trash folder too. You might have accidentally deleted the image or the video. Thankfully, Google permanently deletes the images in the bin or trash folder after 60 days. You still have ample time to recover accidentally deleted photos.

Step 4: Check the Archive gallery. Photos and videos that aren’t regularly viewed might have be moved to the archive folder. Follow the steps for the same:

  • On the Photos app, go to the Library section.
  • Tap on the Archive menu.

Also Read: Want A Male Google Assistant Voice On Android Phone? Here’s How To Enable

Categories
Apps Featured How To

Want To Set Your Google Calendar Private? Here’s How To Do It

Key Highlights

  • You can set your Google Calendar visibility to Public or Private
  • If you make your Google calendar public, anyone can see it
  • Users can also grant selected users access to their Google calendars

Whether you already regularly use Google Calendar or you’re just getting started, it’s useful to understand how to control the privacy settings for both your calendar as a whole and individual events. It’s crucial to understand how to modify your privacy settings if you use Google Calendar through an organization such as your place of employment or school.

Also Read | Google Maps Tips & Tricks: Here’s How To Check Air Quality Index In Your Area

In this article, we shared a step-by-step guide to setting your calendar to private so that others can’t see what you’ve done or are up to for the day. We also shared a guide for sharing specific calendar items with selected contacts.

Steps To Make Your Google Calendar Private

Step 1: On your computer, launch Google Calendar.

Step 2: On the left side of the screen, click on the “My calendars” section.

Step 3: Click the three dots in the top-right corner of the calendar you just chose after moving your cursor over it to adjust the sharing options.

Step 4: Select the “Settings and sharing” option from the menu now.

Step 5: Then, in the left column, go to “Access permissions for events”.

Step 6: If it is checked, uncheck the “Make available to public” option.

Steps To Share Your Google Calendar With Specific People

Step 1: On your device, open Google Calendar.

Step 2: Locate the “My calendars” box on the left side, and then click the Down arrow to expand it.

Step 3: Next, click the “More” icon while still positioned over the calendar you want to share.

Step 4: After that, tap on the option “Settings and sharing”.

Step 5: Now, under the “Share with specific people” option, select “Add people”.

Also Read | Want To Hide Unwanted Memories In Google Photos? Here’s The Trick

Step 6: Add a person’s email address now. You can also add the email address for the Google group as an alternative.

Step 7: Change their permission settings using the drop-down menu. And you are done.

For the tech geeks, stay updated with the latest cutting-edge gadgets in the market, exclusive tech updates, gadget reviews, and more right on your phone’s screen. Join Giznext’s WhatsApp channel and receive the industry-first tech updates.

Categories
Apps Featured How To

Instagram Tricks: Here’s How You Can Change Instagram Language Settings On Android, iPhones

Instagram is a widely popular social media app for photo sharing and short videos called Reels. The brand has added numerous upgrades to its Android and iOS apps to ensure a premium user experience. The desktop version of Instagram isn’t far behind and offers most of the features that are available with the mobile version of the app.

Instagram also is gaining popularity with budding content creators and entrepreneurs. The photo-sharing app has monetized its platform and is giving an opportunity to the audience to earn monetary benefits and also get a wider customer reach by endorsing their products.

And you don’t have to restrict yourself to using the default English language on the app. In addition to English, Instagram has support from multiple other international languages. If you are from India, you can also set the default language to Hindi. Setting up a default native language on Instagram allows easy usage and a better understanding of the features.

It also gets easier to navigate through the app and uses all features, tools, and services that are offered by Instagram when you change the native language settings.  But what all steps do you need to perform in order to change the default language settings on the Instagram app? We have listed down all the steps for your ease:  

Also Read: Instagram Stylish Name And Bio: How To Write Instagram Profile Name And Bio With Stylish And Cool Fonts

Steps To Change Instagram Default App Language Settings On Android

Step 1: Open the Instagram app on your Android phone and tap on the profile option. You can locate this profile icon at the bottom right of the app homepage.

Step 2: Click on the More option (three horizontal lines) located on the top right.

Step 3: Tap on Settings (gear icon).

Step 4: Click on Account.Step 5: Scroll down to the Language option.

Step 6: Select the appropriate language that you wish to set as default.

Also Read: Need A Cool Instagram Boy Name? Top 100 Instagram Boys Name With Alphabets A To L

Steps To Change Instagram Default Language On iPhones

Step 1: Launch the Instagram app on your iPhone and tap on your profile icon.

Step 2: Click on the More option and select the Settings menu.

Step 3: Tap on the Account option.

Step 4: Select the language option and set the required one as default.

Also Read: Instagram Business Profile: How To Setup Professional Instagram Business Account

Categories
Apps Featured How To

Digi Yatra In India: How To Register And Use The Service At Airports

Key Highlights

  • The Government of India has launched the Digi Yatra service in India
  • The service aims to make airport travel contactless and paperless
  • It is currently available at airports in New Delhi, Bengaluru, and Varanasi

The government has introduced a brand-new service called DigiYatra in India. This service aims to streamline airport entry and embarkation procedures for passengers. Travelers will be allowed to switch airport terminals without a ticket or boarding permit thanks to it. Both Android and iOS users can use the new digital service.

Face recognition technology is the foundation of DigiYatra which is available at the airport. The technology provides contactless and seamless passenger handling at airports. The national capital, Bangalore, and Varanasi are the present locations where DigiYatra services are offered.

How To Enroll For Digi Yatra Service in India

Here is how to sign up for the Digi Yatra service if you’re traveling from New Delhi, Bengaluru, or Varanasi:

Step 1: On your iPhone or Android smartphone, download the Digi Yatra app from the Apple App Store or Google Play Store.

Step 2: Tap the button ‘Get Started’ to begin the registration process.

Step 3: Enter your mobile number and click on the ‘Register’ button.

Step 4: After that, you will get the OTP on your mobile phone. Enter the OTP you received.

Also Read | Applied For A New Passport? Here’s How To Check Your Passport Application Status

Step 5: Now, at the bottom of the screen, tap on the ‘Wallet’ option.

Step 6: Click on the ‘Identity Credentials’ options. You need to upload your Aadhaar-verified Identity Credentials.

Step 7: Then, upload your selfie when prompted.

Step 8: Agree to the terms and conditions and hit the ‘Ok’ button.

Also, you can use your DigiLocker account to upload your identity documents. After uploading, a DigiYatra ID will be generated.

How To Use DiGi Yatra At Airports?

Travelers can provide their DigiYatra ID when booking tickets. The airline will send the passenger’s information, including the DigiYatra ID, to the airport. The procedure at the airport is as follows.

Step 1: If a ticket or boarding pass is required at the entry point, you will need to show the same.

Step 2: The boarding pass or e-ticket will be scanned. After scanning the barcode, the system will check your information and flight details.

Step 3: DigiYatra ID will then verify the identity using face recognition.

Step 4: After the ticket and DiGi Yatra ID have been successfully validated, the gate will open.

Step 5: Your Face ID and ticket PNR are combined into a single token that is used for the duration of your stay at the airport as soon as you enter the airport.

Step 6: Using an e-gate with facial recognition technology, you can access the security area and board the craft.

Also Read | Lost PAN Card? Here’s How To Apply For A Duplicate PAN Card Online

Categories
Apps Featured

SonyLIV Premium Free: Confirmed Tricks To Get SonyLIV Subscription Free Of Cost

Key Highlights

  • SonyLIV Premium Subscription is available at Rs. 999 for one year
  • There are many offers to help you get a free SonyLiv subscription
  • You can get up to 12 months of free subscription to the platform

SonyLIV is one of the most popular OTT platforms worldwide. Users can watch the latest movies, web series, and live-streamed shows on this platform. For Rs. 999 per year, it grants you access to almost all of the platform’s content.

That said, there are certain workarounds you can use to effectively get Sony LIV Premium for free if you’re not prepared to pay for a membership. We’re going to outline the procedures in this article, so you can learn how to obtain a Sony LIV subscription for free. This is how:

SonyLIV Subscription Benefits

Customers of SonyLIV can choose between three distinct subscription packages. These subscriptions are priced at Rs. 299 per month, Rs. 699 for six months, and Rs. 999 for 12 months.

In these Premium plans, users can fully access SonyLIV networks like SonyLIV Originals, web series, movies, and live streaming shows such as World Cup, The Kapil Sharma Show, Big Boss, serials, etc. This platform can also support offline downloads.

Also Read | SonyLiv Plans In India: Price, Benefits, Free Access, And More

SonyLIV Premium Subscription: How To Get It For Free?

There are many ways to subscribe to the free SonyLIV app. Users can get all these free subscription voucher codes from Paytm First, Times Prime, etc. Here’s what you need to know:

Paytm First

Paytm also offers special deals with Paytm First membership. Customers who buy Paytm First through its platform will receive a complimentary subscription to Sony LIV Premium. Paytm First membership price is Rs. 899 for six months. Under this, you can get a free six-month Sony LIV Premium subscription worth Rs. 699.

Also Read | Want To Make Paytm UPI Payments To Non-Paytm Users? Here’s The Trick

Reliance Jio Fiber

A free SonyLIV Premium subscription is also available with a variety of bandwidth plans from Reliance JioFiber. The telecom provider offers over 12 OTT app subscriptions including SonyLIV Premium, Amazon Prime, Disney+ Hotstar, Voot Select, ZEE5, Lionsgate Play, Netflix, and more with internet plans starting from Rs. 999 and going up to Rs. 8,499.

Times Prime

Times Prime is giving its customers a complimentary Sony LIV subscription. However, you must first purchase a Times Prime subscription for Rs. 999 in order to take advantage of this. You will receive a complimentary six-month subscription to Sony LIV Premium after you purchase a Times Prime subscription.

Also Read | How To Get Sony LIV Subscription Free: Here Are All Steps