Categories
Apps Featured How To

Meta Finally Allows Deleting Threads Account Without Instagram: Here’s How To

Key Highlights

  • Threads is Instagram’s take on X (Twitter)
  • Threads account deletion previously deleted Instagram account too
  • Option released to delete Threads account without Instagram

Instagram released a new dedicated app for microblogging called Threads recently for the global users. The social media app has been introduced as the primary rival to X which was earlier known as Threads. Threads became an instant hit in the market soon after its launch and got a huge user base within a short span. But Threads grabbed more headlines once users started complaining that deleting its account also deleted the linked Instagram account. With all the backlash from the consumers, Meta seems to have resolved the issue and is now allowing users to delete Threads account without affecting the Instagram account. Here’s the new update and the steps with which you can delete your Thread account without Instagram:

Also Read: 100+ Catchy Instagram Username Ideas For Poetry Enthusiasts

Threads And Instagram Accounts Become Independent: Know The Update!

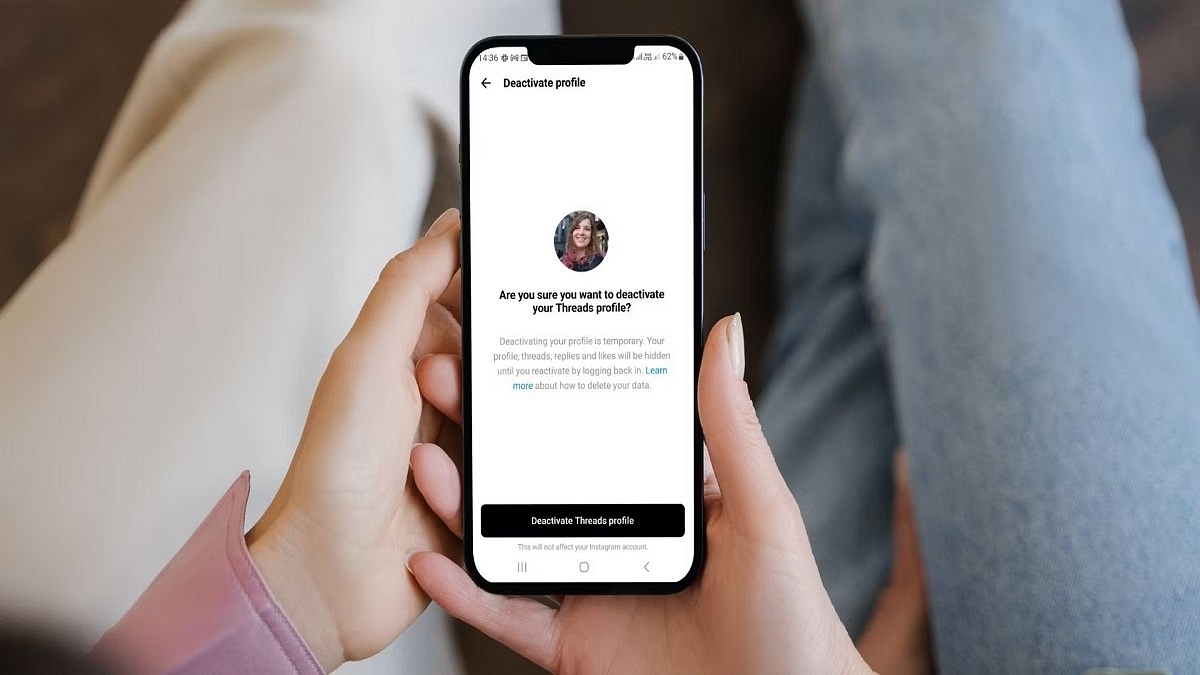
Both Threads and Instagram accounts are now independent. The same has been confirmed by Adam Mosseri, Instagram’s CEO. This means users will now be able delete their Threads account which will have no direct impact on the Instagram account.

This has been one of the biggest concerns with the consumers where deleting the Thread account also led to automatic deletion of the Instagram account. Now, account on both these apps will be functioning independently and users will get to delete accounts on either of the apps separately.

Also Read: How To Delete Your Instagram Threads Account

How To Delete Threads Account While Keeping Instagram Account Safe

Step 1: Launch the Threads application on your Android or iOS devices ‘

Step 2: Login with your account credentials

Step 3: Open the Settings menu

Step 4: Scroll down to the Deactivate or Delete option

Step 5: Tap on Delete

You can also deactivate for your Threads account if you don’t wish to remove it permanently. The profile will be temporarily deactivated in this mode. Do note that it will take 30 days for Instagram to completely delete your Threads profile. Therefore, if you wish to comeback within that period, your account will be re-activated.

Also Read: How To Use Instagram’s New Song Lyrics Feature In Reels: A Step-By-Step Guide

Categories
Apps Featured How To

Step Into Safety: Learn How To Change Your UPI PIN On Google Pay And PhonePe

Key Highlights

  • It’s crucial to reset your UPI PIN periodically as a security precaution
  • You must enter your current UPI PIN to reset it
  • Resetting your UPI PIN with Google Pay and PhonePe is easy

Cashless transactions via QR code scanning have become common in the UPI era. While UPI offers speed and reliability, the rise of online scams emphasizes the importance of periodically resetting or changing your UPI PIN for enhanced security. This guide will walk you through the steps to reset or change your UPI PIN on popular platforms like Google Pay and PhonePe. Also Read | How To Update And Change Mobile Number On Aadhaar Card Online

Google Pay: Step-by-Step Guide

Step 1: Ensure you have the latest Google Pay app version installed.

Step 2: Open the Google Pay app on your smartphone.

Step 3: Tap on your profile photo located in the top right corner.

Step 4: Select the “Bank account” option.

Step 5: Choose the specific bank account linked to your Google Pay.

Step 6: Tap on the three dots and locate the “Change UPI PIN” option.

Step 7: Enter your existing UPI number and proceed.

Step 8: Input the new UPI PIN.

Step 9: Re-enter the new PIN to confirm the change.

Also Read | Google Play Country Settings Modification: How To Change Country Settings In Google Play Using Android For Payments And Other Apps

PhonePe: Step-by-Step Instructions

Step 1: Launch the PhonePe app on your Android or iOS device.

Step 2: On the home screen, click on the picture of your profile.

Step 3: Locate the “Payment Methods” section by scrolling down.

Step 4: Select the relevant bank account.

Step 5: Choose “Reset UPI PIN.”

Step 6: Enter the information for your debit or ATM card linked to the bank account.

Step 7: Proceed by entering the OTP received.

Step 8: Provide your existing UPI PIN and continue.

Step 9: Enter the new UPI PIN.

Step 10: Confirm the new PIN by re-entering it.

You may proactively protect your UPI transactions and guarantee the security of your financial transactions on PhonePe and Google Pay by following these procedures.

Also Read | No Card? No Problem: Here’s How To Withdraw Cash From ATMs Via UPI

Categories
Featured How To Info

ICC Cricket World Cup 2023 Semi-Finals And Finals: Here’s How To Book Your Tickets

Key Highlights

  • Tickets for the Semi-Finals and Finals of the ICC Cricket World Cup are now available
  • November 15 and November 16 will mark the dates of Semi-Finals 1 and 2, respectively.
  • The date of the finals is November 19

Ticket bookings are now open for the highly anticipated semi-finals and finals of the ICC Cricket World Cup 2023. Brace yourself for two thrilling semi-final clashes on November 15 and November 16, leading to the grand finale scheduled for November 19. Also Read | 5 MacBook Keyboard Shortcuts You Probably Didn’t Know

How To Secure Your Spot: Booking Process

You can secure your tickets for the semi-final and final matches of the Cricket World Cup 2023. Here’s a step-by-step guide to ensure you don’t miss out on these monumental cricketing events.

Step 1: Visit the official ticket-booking page.

Step 2: Click on ‘Sign in’ at the top right corner and log in using your mobile number, email, Gmail, or Apple account.

Step 3: Once logged in, navigate to the ‘View All Matches’ tab on the home screen.

Step 4: Scroll down to find the matches on November 15, November 16, and November 19. Tap on the game you want to witness live in the stadium.

Step 5: Click on ‘Book’ to initiate the booking process.

Also Read | Facebook Multiple User Account: How To Create Multiple Facebook Profile For Single User

Step 6: Upon clicking ‘Book,’ find yourself in the queue or directly on the booking page. Select your seats and proceed.

Step 7: Complete the necessary personal details and continue to commence the payment process.

Step 8: Follow the payment process to finalize your booking and be part of the cricketing history.

The Contenders: Teams In The Race

As the semi-final lineup takes shape, India, South Africa, and Australia have already secured their spots. The fourth team to join the fray will be determined from the trio of New Zealand, Afghanistan, and Pakistan.

Beyond The Semis: More Cricketing Action Awaits

Apart from the semi-finals, four exciting matches remain. Catch the clash between South Africa and Afghanistan on November 10, followed by Australia vs Bangladesh and England vs Pakistan on November 11. Lastly, witness India vs Netherlands on November 12.

Also Read | No More Lines And Cards: Learn How To Book Delhi Metro Tickets On WhatsApp

Categories
Apps Featured How To Info

How To Hide Your IP Address On WhatsApp Calls

Key Highlights

  • WhatsApp enhances privacy with IP address concealment.
  • Calls relayed through WhatsApp servers for protection.
  • Simple steps to enable IP address protection.

WhatsApp is introducing a new privacy feature that allows Android and iOS users to protect their location and IP address during calls. This feature ensures your privacy by relaying the call connection through WhatsApp’s servers. Let’s see how to enable this feature and its implications for your privacy.

What Is WhatsApp’s IP Address Protection Feature?

WhatsApp’s engineering team has designed this feature to enhance user privacy. When enabled, your location and IP address are concealed from other call participants. It achieves this by switching from the standard peer-to-peer direct connection between callers to routing the call through WhatsApp servers. This obfuscates the IP address metadata that could reveal your internet service provider or general geographical location.

Also Read: WhatsApp Phasing Out Support For These Old Android Smartphones: Time To Upgrade Your Device?

Privacy And Encryption

It’s essential to note that while your calls are relayed through WhatsApp’s servers to obscure your location, the company cannot listen in on your calls. WhatsApp’s calls are end-to-end encrypted, ensuring the privacy and security of your conversations. The new feature mainly focuses on protecting the privacy-conscious users.

Also Read: How to Use Multiple WhatsApp Accounts On A Single Mobile Device: A Step-by-Step Guide

How To Enable “Protect IP Address in Calls”

Enabling this feature is straightforward. Follow these steps:

  1. Open WhatsApp and tap on “Settings.”
  2. Go to “Privacy.”
  3. Select “Advanced.”
  4. Tap on “Protect IP address in calls.”

This feature may result in a slight reduction in call quality, as your calls are routed through WhatsApp’s servers.

Also Read: WhatsApp Enhances Group Calls For iOS Users: Up To 31 Participants Now Supported With Latest Update

Additional Privacy Features

WhatsApp is also introducing a feature that allows users to silence unknown callers. This feature offers protection against more advanced cyber-attacks on your data, adding an extra layer of security for users.

Also Read: No More Lines And Cards: Learn How To Book Delhi Metro Tickets On WhatsApp

Categories
Featured How To

How To Change Your Aadhaar Card Photo: A Step-by-Step Guide

Key Highlights

  • Aadhaar card photos are a crucial part of identity confirmation
  • You can get access to a number of government and non-government benefits with Aadhaar
  • Holders of Aadhaar cards are able to change their photos

Your Aadhaar card photo plays a crucial role in verifying your identity, granting you access to various government and non-government services and benefits. However, there might be instances when you need to replace your Aadhaar card photo due to issues like poor quality, outdated appearance, or discrepancies with other official documents. In this article, we’ll walk you through the process of changing your Aadhaar card photo. Also Read | What Is A Masked Aadhaar Card? Here’s How You Can Download It Online

How To Change Aadhaar Card Photo

Step 1: Visit the Official UIDAI Website

To initiate the process of changing your Aadhaar card photo, start by visiting the official UIDAI website.

Step 2: Obtain the Aadhar Enrollment Form

You can download the Aadhar enrollment form from the UIDAI website, or you can collect it from the nearest Aadhar Sewa Kendra or Aadhaar Enrolment Centre.

Step 3: Complete the Enrollment Form

Fill out all the necessary details in the enrollment form accurately.

Step 4: Submission of Enrollment Form

Submit the completed enrollment form to the nearest Aadhar Sewa Kendra or Aadhar Enrollment Center. To locate the nearest center, visit the link: appointments.uidai.gov.in/.

Step 5: Biometric Verification

An Aadhar executive at the center will verify all the details through biometric verification.

Also Read | How To Update And Change Mobile Number On Aadhaar Card Online

Step 6: Capturing the New Photo

The executive will then capture a new photo to update on your Aadhar card.

Step 7: Service Fee

A service fee of Rs. 100 with GST will be charged for this process.

Step 8: Acknowledgment Slip and URN

Upon completing the photo update, you will receive an acknowledgment slip along with an Update Request Number (URN). This URN can be used to monitor the status of updates on the UIDAI website.

Also, note that the process may take up to 90 days for the updated information to reflect on your Aadhaar card. You can use the URN number to check the status of the Aadhaar update online. Once your Aadhaar card is updated, you can obtain a physical copy at your nearest Aadhaar Enrollment Centre or download an e-Aadhaar from the official UIDAI website.

Also Read | Need To Lock And Unlock Your Aadhaar Card Biometrics? Here’s How To Do It

Categories
Apps How To

Samsung Bixby Text Call Comes To India: What Is It? How To Use?

Key Highlights

  • Samsung brings Bixby Text Call feature for Galaxy handsets
  • Is an automated voice call feature
  • English language now available

Samsung has its self-developed virtual assistant tool called Bixby for Galaxy devices. In early 2023, Samsung launched Bixby Text Call automated voice call feature in its home country. Now, the company has released this feature for Galaxy smartphone/ tablet users in the Indian market too. What is this Bixby Text Call feature and how can you use it?

Samsung Bixby Text Call Feature: Functionality Explained

Samsung’s Bixby Text Call as mentioned is an automated voice call feature. With this tool, users will be able to answer any call without actually speaking. This AI automated voice tool will not only pick up any incoming call but will also respond to the caller and even ask the reason for the call. While setting up this feature, Bixby users can easily select from the pre-set responses and also manually type-in any message that they wish to send as a response to the caller.

Furthermore, after the Bixby text call feature is activated and it is in use, the call recipient will get to read the responses or the conversation done by Bixby and caller. They can proceed with text replies which will allow for a smoother conversation experience with the automated tool.

Samsung Bixby Text Call Feature: Steps To Activate And Use

Before you proceed with using the Bixby Text Call feature, you need to ensure you have a compatible Samsung Galaxy device. We will be mentioning the list below. If you have the supported Samsung phone, you can follow the steps below:

Step 1: On your Galaxy smartphone, go to the Settings menu

Step 2: Scroll to the Bixby Text Call feature

Step 3: Toggle on the Bixby Text Call option

Step 4: Now, you will be able to go ahead with the customizations that can be done with the voice/ audio feature

Step 5: You can edit the pre-set responses and add new replies

Also Read: Best Smartphones With Dolby Atmos To Buy In India

List Of Samsung Devices That Support Bixby Text Call Feature

  • Samsung Galaxy Fold 5
  • Samsung Galaxy Fold 4
  • Samsung Galaxy Fold 3
  • Samsung Galaxy Fold 2
  • Samsung Galaxy Fold
  • Samsung Galaxy Z Flip 5
  • Samsung Galaxy Z Flip 4
  • Samsung Galaxy Z Flip 3
  • Samsung Galaxy Z Flip
  • Samsung Galaxy S23 series (all models)
  • Samsung Galaxy S22 series (all models)
  • Samsung Galaxy S21 series (all models)
  • Samsung Galaxy S20 series (all variants)
  • Samsung Galaxy Note 20 series

Also Read: Car Troubles? Your iPhone Has The Solution: Here’s How To Use Visual Lookup

Categories
How To Mobile

Car Troubles? Your iPhone Has The Solution: Here’s How To Use Visual Lookup

Key Highlights

  • iOS 17 update unlocks new iPhone abilities
  • Visual Look Up feature for car dashboard symbols
  • iPhone users need to update to iOS 17

iPhones are powerful devices capable of performing various tasks. They can function as portable gaming consoles and even capture DSLR-like photos. However, an exciting feature introduced in the new iOS 17 update takes iPhone functionality to a new level by transforming it into a pocket-friendly car mechanic. Also Read | Use Your iPhones To Find Recipes: Here’s How To Use Visual Look Up Feature

Visual Look Up Feature

Thanks to the latest iOS 17 update, iPhones now boast an enhanced version of the Visual Look Up feature, enabling users to identify text within pictures or photographs they take. This feature, previously used for text recognition, has evolved to recognize the symbols on a car’s dashboard.

Clarifying Dashboard Symbols

Many car owners have encountered various icons next to their vehicle’s speedometer, with illuminated symbols often causing concern about potential issues. With the updated iPhone, you can now demystify these symbols. All you need to do is point your iPhone’s camera at the dashboard symbol and let Visual Look Up do the rest.

Identifying Car Features With Visual Look Up

Reports suggest that this feature can identify a range of dashboard warning lights, climate control symbols, defrosting indicators, and other car features. This newfound knowledge empowers users to address potential problems without rushing to the nearest service center.

Also Read | iOS Tips & Tricks: Learn How To Set Up Your Contact Poster On iPhone

How To Use Visual Look Up On Your iPhone To Recognize Car Icons

Now, let’s explore how to utilize this feature:

Step 1: Ensure your iPhone is running the latest iOS 17 version.

Step 2: Take a picture of the dashboard symbol you want to identify.

Step 3: Open the image using the Photos app on your iPhone.

Step 4: Look for the new steering wheel icon located at the bottom of the toolbar.

Step 5: Click on the icon to retrieve information about the car’s symbols.

It’s worth noting that this feature relies on the Safari browser on your iPhone. While its compatibility with all car models remains uncertain, it’s a valuable tool for diagnosing car issues. Knowing that something is amiss with your vehicle can be immensely useful, and we hope other phone manufacturers consider implementing similar features for their users.

Also Read | Use Your iPhone To Detect Depression And Anxiety: A Step-by-Step Guide

Categories
Apps Featured How To

No More Lines And Cards: Learn How To Book Delhi Metro Tickets On WhatsApp

Key Highlights

  • DMRC launched a WhatsApp-based metro ticketing system
  • The features cover all Metro lines across the Delhi-NCR
  • The service is also available for Gurugram Rapid Metro

If you’re looking for a convenient way to book Delhi Metro tickets without the hassle of long queues or a smart Metro recharge card, WhatsApp has you covered. Here’s a step-by-step guide to help you book your Metro train ticket right from your mobile phone. Also Read | How to Use Multiple WhatsApp Accounts On A Single Mobile Device: A Step-by-Step Guide

How To Book Metro Tickets Via WhatsApp

  • Step 1: Save the WhatsApp Number

Begin by saving the mobile number 9650855800 in your contacts, or send this number to yourself on WhatsApp to initiate a chat without adding it.

  • Step 2: Starting the Conversation

Open the chat and send a simple ‘Hi’ to get things started.

  • Step 3: Select Your Preferred Language

You can choose your preferred language between Hindi and English.

  • Step 4: Initiate the Ticket Purchase

Tap on “Buy Ticket” from the available options.

  • Step 5: Opening the Booking Page

The next screen will prompt you to click “Click Here,” opening a webpage within WhatsApp.

Also Read | Top Methods And Apps For Downloading WhatsApp Status In High Quality

  • Step 6: Select Stations and Ticket Quantity

On the webpage, select your starting and destination stations and indicate the number of tickets you wish to purchase.

  • Step 7: Review Your Journey

After providing this information, click ‘Continue’ to proceed.

  • Step 8: Review and Payment

A summary of your Metro journey and the total ticket amount will be displayed on the following screen.

  • Step 9: Choose Payment Method

Debit and credit card users can opt for “Pay With Other Modes,” while UPI users can select “Pay With UPI.”

  • Step 10: Completing the Payment

You will be redirected back to the WhatsApp chat, where you’ll need to select the “Pay now” button.

  • Step 11: Select Payment Method

Choose your preferred payment method, complete the payment, and your Metro ticket will be generated in QR code format. That’s all.

Also Read | WhatsApp Enhances Group Calls For iOS Users: Up To 31 Participants Now Supported With Latest Update

Categories
Apps Featured How To

Apple Lockdown Mode: What Is This Security Feature? How To Use?

Key Highlights

  • Apple Lockdown model available
  • Alerts sent on multiple journalists and opposition leaders phone
  • Steps listed below activate Lockdown mode on Apple devices

There have been several reports citing opposition party leaders and journalists have received a security message on their Apple iPhones. The alert stating “state-sponsored attackers” is being sent by Apple on these users’ devices which is an indication of a possible remote attack. Is this a new security feature that Apple is testing for iPhones and other devices? We have shared the relevant information and the steps to use this new Lockdown security mode below:

Apple Lockdown Mode: What Is It?

As previously mentioned, Apple Lockdown mode is a security tool that will safeguard a user’s phone of any remote phishing attack. Apple has reportedly sent the security alert on iPhones of multiple political party leaders from opposition and also several journalists.

According to the reports, the individuals that have received the alert notification for the “Lockdown Mode” have also received the precautionary guidelines on how to stay protected from any remote attack. The brand has also shared the steps with which one can activate and use Apple Lockdown mode on their respective iOS devices including iPhones and iPads.

Once an attack has been identified, all the services and access to the device will be locked. Devices running on iOS 16, iPadOS 16, and macOS ventura, and above will get this new Lockdown mode security feature.

Also Read: WhatsApp HD Photo Sharing On iPhone Finally Available: Steps To Share High Quality WhatsApp Photos

Apple Lockdown Mode Activation: How To Setup And Use

Step 1: On your respective Apple iPhones and iPads, open the settings menu

Step 2: Head to the Privacy and Security tab

Step 3: Tap on the Lockdown mode option

Step 4: Click on Enable

Step 5: Restart your device for proper functioning of this feature

Also Read: Lost Your Email Address? Don’t Panic! Follow These Steps To Recover It

Categories
Apps Featured How To

Google Pixel Car Crash Detection Comes To India: How To Use?

Key Highlights

  • Google releases Car crash detection system in India
  • Feature available for Pixel users
  • Tool was released back in 2014 for Google Pixel handsets

Google has one of the biggest ecosystem for user friendly apps and tools. The options are available across all Android smartphones. The Pixel lineup gets special access to various Google apps. One such applications was released for Google Pixel devices earlier in 2014 called Car Crash Detection. Designed as a safety features for smartphone users this feature made its way in the US and hasn’t been made available in other regions. However, Google has now increased the reach for the Car crash detection system to India and other markets. What is this feature and how can you use it? Read on the details below:

Google Car Crash Detection System Arrives In India: Here’s Its Functionality

Google Car crash detection system is designed as a crucial safety feature for Android smartphone users. Its functionality is to detect if the device user has met any accident in a car crash. In order to detect the car crash, the Pixel devices will utilize the integrated set of sensors.

Once the car crash is detected there will be a prompt which users can respond to within 60 seconds. If there is no response, an alert message of the car crash will be sent to the emergency services and contacts. This tool will prove essential in case of any mishaps and get help on time.

Notably, Google Car crash detection system has been available in the US only all this while. But now, it is made available in the Indian market. Other regions to receive the Car Crash detection system are Belgium, Austria, Switzerland, and Portugal.

Also Read: Google Introduces Emoji Reactions To Gmail For Android: Here’s How To Use It

How To Setup And Use Car Crash Detection System?

Before you setup the Car crash detection system, you need to make sure that you have the Personal Safety app installed on your device. It is compatible with all Pixel devices. Now follow the remaining steps below:

Step 1: Launch the Personal Safety app on your respective Pixel devices.

Step 2: Scroll to the Features option and tap on it.

Step 3: Now, locate the Car crash detection feature and select it.

Step 4: Tap on the “Set up” option.

Step 5: You will see a pop up confirming when to share location. Click on the “Allow while app is in use” option. You can also select “always in the background” option, but that will consume more battery.

Step 6: Allow permissions for physical activities and also microphone

Also Read: Paytm Unveils Guaranteed Seat Assistance Feature: Here’s How To Use