Categories
Featured How To Mobile

Is Your Smartphone Always Buzzing? How To Activate Do Not Disturb On Android, iOS

Key Highlights

  • Do Not Disturb mode feature is available on both Android and iOS devices
  • It enables you to turn off your phone’s notifications, calls, and messages
  • Activating Do Not Disturb mode on your smartphones is easy

In a world where smartphones demand our attention relentlessly, it’s crucial to regain control over your device. This guide will help you understand and activate the Do Not Disturb mode on both Android and iOS, allowing you to set boundaries and reduce interruptions. Also Read | Use Your iPhones To Find Recipes: Here’s How To Use Visual Look Up Feature

What Does Do Not Disturb Mode Mean?

For those unfamiliar, Do Not Disturb mode serves as a shield against all notifications, including phone calls, providing respite in various situations. Whether you’re aiming for an uninterrupted nap, engaging in a real-life conversation, striving to reduce screen time, or any other scenario, this feature can be your ally.

You have the flexibility to schedule automatic activation at designated times or engage it manually at your convenience. Additionally, Android allows you to set exceptions for notifications or calls from specific contacts, even when Do Not Disturb is active.

In simple terms, it lives up to its name by offering a quick means to disconnect from the constant buzz of your smartphone.

Also Read | iOS Tips & Tricks: Learn How To Set Up Your Contact Poster On iPhone

How To Enable Android’s Do Not Disturb Mode

Step 1: Launch the Settings App on your Android phone.

Step 2: Navigate to Sound and Vibration.

Step 3: Locate Do Not Disturb.

Step 4: Choose to Activate Immediately or Set Schedules.

In addition to this, you can customize various aspects of DND mode, such as what kind of notifications you want to allow or block, who can contact you, and what sounds and vibrations you want to mute.

How To Enable Do Not Disturb On iOS

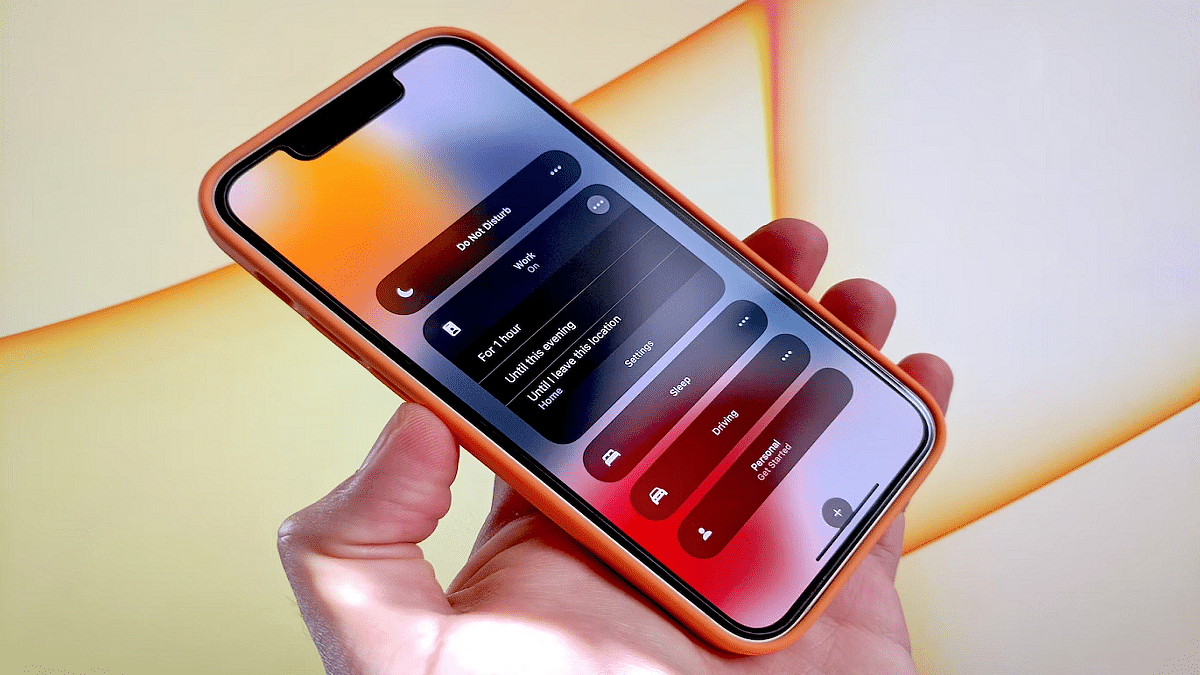
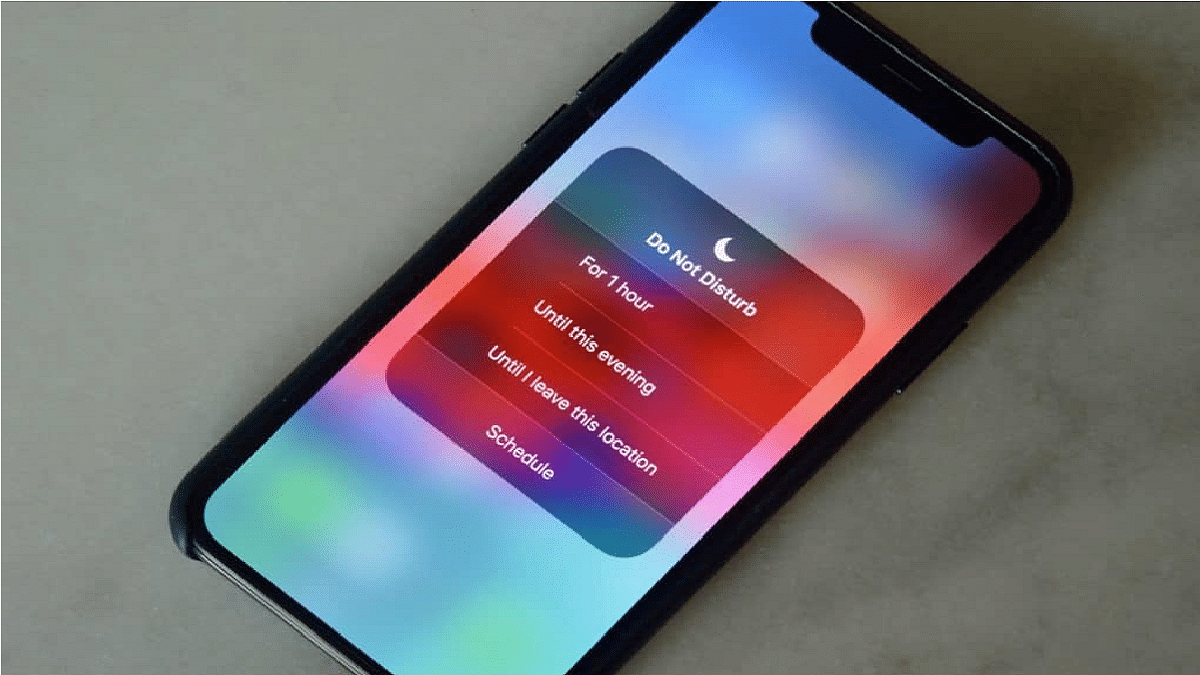
Step 1: Open the Control Center from the Top Right Corner of your iPhone.

Step 2: Long-press the Focus Button.

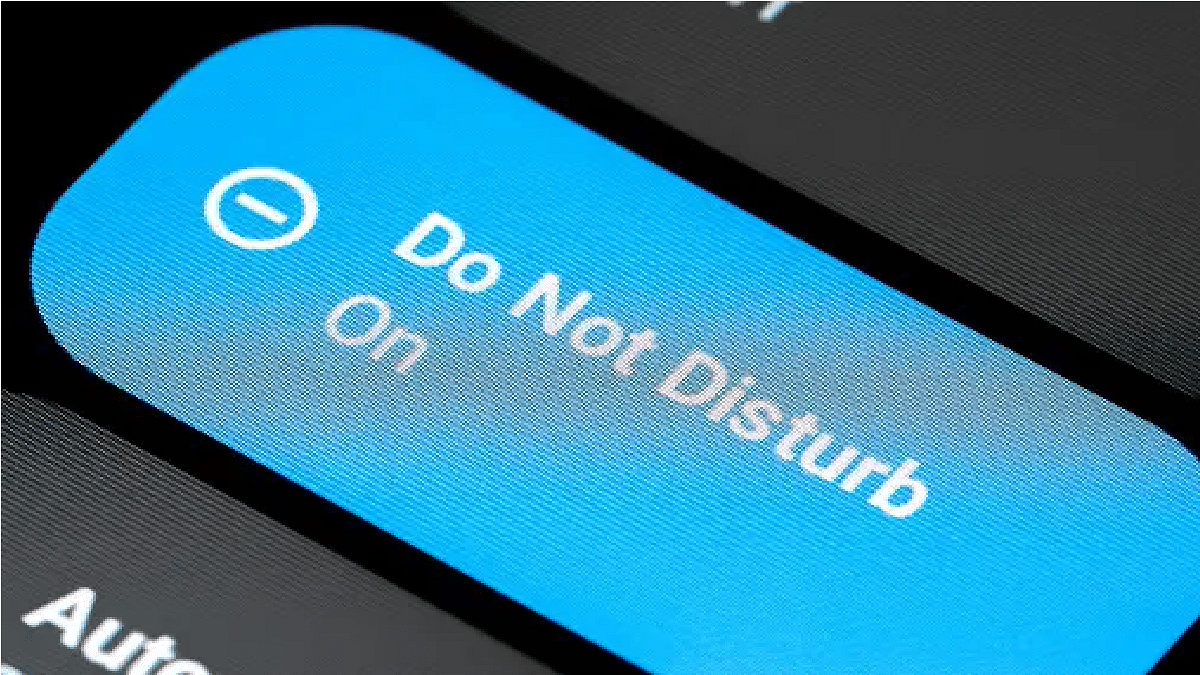
Step 3: Toggle Do Not Disturb On.

Step 4: Witness the crescent moon icon on your status bar and lock screen, indicating that Do Not Disturb is in effect.

Also Read | Google Passkey For Login: In-Depth Guide On What It Is And How to Use It

Categories
How To Info

Google Passkey For Login: In-Depth Guide On What It Is And How to Use It

Key Highlights

  • Passkeys Replace Traditional Passwords
  • Enhanced Security with Biometric Authentication
  • User-Friendly and Convenient Login Solution

Google recently declared that passkeys would be the main way to log into Google Accounts. They shared that a lot of people find it much easier than the old password way. They also pointed out that using passkeys is 40% quicker than using a password.

Let’s dive into what these passkeys are and how you can use them.

What Are Passkeys?

Passkeys are like digital keys that unlock your online accounts. Instead of passwords, you can use something like your fingerprint, your face, a PIN, or a pattern. Passkeys are designed to replace the old-fashioned ways of logging in, like using usernames and passwords.

How to Use Passkeys

To get started with Passkeys, you need to follow these simple steps:

  1. Sign in to the app or website using your old login method.
  2. Look for the “Create a Passkey” button and click on it.
  3. Check the information related to your new Passkey.
  4. Use your device’s screen lock, like your fingerprint sensor, to create your Passkey.

That’s it! You’ve now got a Passkey, and you can use it to sign in.

How Passkeys Work

Passkeys are designed to work with your device’s operating system. They’re securely stored in the Google Password Manager on Android, which syncs them between your Android devices. Passkeys are encrypted on your device before syncing and require decryption on new devices. Users with Android OS 14 or later can also use compatible third-party password managers.

Google’s passkeys make logging in easier, faster, and more secure. They’re the future of online authentication, replacing the troublesome password with a user-friendly alternative.

Also Read: Google Maps Tips & Tricks: How To Use Fuel-Efficient Routing In India

Categories
Apps Featured How To

Google Maps Tips & Tricks: How To Use Fuel-Efficient Routing In India

Key Highlights

  • Google has introduced new Google Maps features
  • Fuel-efficient routing feature is coming to Google Maps
  • It employs AI to recommend routes that save energy

Google Maps has unveiled an array of new features, including one specifically aimed at India, known as ‘fuel-efficient routing’. This feature employs AI to recommend routes that save energy, while maintaining similar estimated time of arrival (ETA) for users. Also Read | Find Nearest Grocery Store: Here’s How To Locate Closest Grocery Store Using Google Maps

Google Maps’ Fuel-Efficient Routing

Google Maps’ fuel-efficient routing uses artificial intelligence to suggest energy-efficient routes with fewer hills, reduced traffic, and consistent speeds. It strives to decrease fuel consumption, whether diesel, petrol, or gas, by proposing routes suitable for the specific type of vehicle users are driving, all while ensuring timely arrivals.

Google acknowledges that the ideal route depends on the engine type. For instance, diesel engines perform best at higher speeds, while hybrids and electric vehicles excel in stop-and-go traffic. Users can now specify their engine type – gas, diesel, hybrid, or electric – for more precise fuel or energy efficiency estimates.

Also Read | Google Maps Immersive View For Routes Shows Live Route Traffic, Weather, And More: How To Use?

How To Enable Fuel-Efficient Routing On Google Maps

Step 1: Open the Google Maps app on your smartphone.

Step 2: Tap your Profile Picture and then select Settings.

Step 3: Navigate to Navigation settings.

Step 4: Scroll to ‘Route Options’.

Step 5: Select ‘Prefer fuel-efficient routes’.

Step 6: Choose your engine type by tapping ‘Engine type’ and then make your selection.

Step 7: Tap Done.

In addition to suggesting energy-efficient routes, Google is developing a feature that will help users discover more sustainable transportation options, such as rail. They also plan to display public transit or walking recommendations when they are comparable to driving routes, available exclusively to Google Maps users in France.

Also Read | Want To Report Accidents And Road Closures On Google Maps? Learn How To Do It

Categories
Featured How To Mobile

Use Your iPhones To Find Recipes: Here’s How To Use Visual Look Up Feature

Key Highlights

  • iOS 17 brings the Visual Look Up feature
  • It helps take a photo of your food and get its recipe
  • The feature is available on iPhones running iOS 17

Have you ever seen a mouthwatering dish at a restaurant, longing to recreate it at home? Or have you ever perused your collection of past culinary adventures, longing for a recipe that could unlock the flavors of that unforgettable steak sauce you once savored? With the introduction of iOS 17, Apple has given iPhone users a great feature – Visual Look Up for food. This allows you to capture or save a photo of food and quickly access information and recipes. Curious to learn how to use the power of your iPhone’s camera to identify food and get recipes? Continue reading to discover the secrets.

Also Read | iOS 17 Hands-On: Set Up Standby Mode On Your iPhone? Here’s How

How To Identify Food And Get Recipes

Step 1: Take a snap of the food item that piques your interest using your iPhone. Alternatively, you can also apply this feature to existing photos or those taken from external sources.

Step 2: Now, navigate to the Photos app and select the image in question.

Step 3: Locate and tap the enchanting ‘i’ button nestled beneath your chosen photo. If your iPhone has successfully recognized an item within the image, it will adorn it with sparkling highlights.

Also Read | iOS Tips & Tricks: Learn How To Set Up Your Contact Poster On iPhone

Step 4: With anticipation, proceed to tap ‘Look Up Food.’ Your iPhone will present you with its suggestions for the depicted food, offering various options with the most probable choice positioned prominently at the top. Feel free to select any of the options to access a recipe from the vast expanse of the web.

Bridge The Gap, Share The Moment

In a world where connecting with someone face to face can sometimes be challenging due to various circumstances, iOS 17 introduces a delightful solution. Apple now empowers you to record and dispatch FaceTime video messages when your calls remain unanswered. This novel feature grants you the ability to convey your emotions and experiences in a more personal manner than mere text or voice messages.

Categories
Featured How To TV

Want To Connect Your Laptop To Your TV? Here’s How To Do It

If you’re seeking a larger display for your laptop, you don’t necessarily need to invest in a separate monitor. Your TV, which you likely already own, can serve as a great alternative. Connecting your laptop to a TV is a simple process that can transform your small screen into a comprehensive entertainment hub for movies and games. Here’s how to do it, whether through a wired or wireless connection. Also Read | JioTV App On Laptop: Here’s How To Install And Use

How To Connect Laptop To TV

Using HDMI Cable

The simplest way to link your laptop to a TV is by using a wired HDMI connection. To achieve this, you’ll require an HDMI cable, which you may already have if you own game consoles or computer monitors. Ensure that the HDMI cable you choose is certified for the necessary bandwidth, depending on your desired resolution and refresh rate. An 18Gbps HDMI cable is suitable for 4K at 60Hz, while 48Gbps is necessary for transmitting 4K at 120Hz.

Step 1: Plug one end of the HDMI cable into your laptop’s HDMI port and the other end into an available HDMI port on your TV. Note that these ports come with specific bandwidth support, so compatibility may vary.

Step 2: Once connected, both audio and video from your laptop should transfer automatically to the TV.

Step 3: For laptops without HDMI ports, such as some MacBooks, a USB-C-to-HDMI adapter can provide a solution.

Step 4: Depending on your intended use for the TV, whether as a second monitor or to mirror your laptop’s screen, you may need to adjust your laptop’s display output settings for resolution and refresh rate.

Also Read | Best 55 Inch TVs Under Rs. 40,000 In India

Using Wireless Chromecast Connection

If you prefer a cable-free approach, you can establish a wireless connection between your laptop and the TV. Some TVs offer built-in wireless support for external displays, while others may require an additional device, like a Chromecast. Chromecasts are small streaming dongles that plug into your TV’s HDMI port and enable media streaming from your laptop or mobile device.

Step 1: Connect the Chromecast’s power cable to one of your TV’s HDMI ports, ensuring you’ve set it up using the Google Home app and it’s on the same Wi-Fi network as your laptop.

Step 2: Open Google Chrome on your laptop, click the three dots in the top-right corner, and select “Cast.”

Step 3: Let the browser find your Chromecast in the list of devices and select it.

Your Chrome content will appear on your TV shortly. Remember that this operates over Wi-Fi, so a strong internet connection enhances the connection quality. While casting works well for web browsing, video playback, and certain applications, it may not be ideal for gaming due to potential lag.

Also Read | How To Connect OnePlus Buds True Wireless Earbuds With Smart TVs and Laptops?

Categories
Featured How To Info Tech Gadgets

Google Assistant With Bard Comes To Android, iOS: How To Use?

Key Highlights

  • Google Assistant is getting Bard integration
  • Feature available for both Android and iOS users
  • Will boos the AI user experience

Google introduced its own AI-regenerative tool called the Bard to take on Microsoft’s ChatGPT AI tool. Google has been working extensively on developing Bard ecosystem for Google products and is gradually expanding its services to different compatible devices. At the Made By Google event that concluded yesterday, the search engine giant confirmed Bard’s availability for both Android and iOS devices in the coming days via Google Assistant. Google is calling this new feature as ‘Assistant with bard’ and is expected to bring complete a mass rollout soon. What all functionality will this new Assistant With Bard Feature offer and how can one use it? Read on below:

Also Read: ChatGPT Mobile App Finally Launched For Masses: Check Compatible Devices, Features Offered

Google Assistant With Bard Feature: What Is It?

Google Assistant with Bard is debuting as a powerful personal assistant tool combined with generative AI. This new feature is designed to deliver a personalized generative interaction with the digital voice assistant that will further allow users to get done with several complex tasks.

The new Google Assistant with Bard feature is confirmed to be available to all compatible Android and iOS devices in the coming months. According to the search giant, Bard with Assistant is still in the development phase and the brand is working consistently to make it fully functional. But the rollout is expected to bring feedbacks that will help with further improvements.

Also Read: Google Bard CHatGPT Killer Goes Official? What Is It? How To Use?

What All Assistant With Bard Do?

The Google Assistant with Bard is primarily an enhanced version of the existing Google Assistant personal digital assistant. With the Bard integration, Assistant now gets more powerful and has all the latest generative AI features that the former offers. Google Assistant with Bard will be capable of performing various tasks similar to Google Assistant. The results will be improved with the integrated Bard generative AI.

Google is also expanding the Bard generative AI tool’s services to its wide range of existing services including Google Drive, Google Docs, Google Maps, YouTube app, and Gmail email app. All these services will be at command using voice, text, or even images.

Also Read: OpenAI Introduces Dall-E 3: A New AI That Converts Text To Images Using ChatGPT

Google Assistant With Bard: How To Use?

Google hasn’t revealed any specific steps to use the Assistant with Bard feature. However, it is known that an initial setup would be required to access and use Assistant with Bard feature on both Android and iOS devices. After the setup is complete, users would simply need to give voice or text commands to get generative responses from Bard.

Also Read: ChatGPT Is Now Available On Android Starting Next Week

Categories
How To Laptop

Lesser-Known MacBook Tips And Tricks You Can Give A Try Today

MacBooks are renowned for their sleek design and user-friendly interface, but beneath that lies a bunch of lesser-known tips and tricks that can help you enhance your productivity and overall experience.

In this article, we’ll delve into some of these hidden gems, so you can unlock the full potential of your MacBook.

Also Read: 4 Key Features Of 15-inch MacBook Air (2023)

1. Text Expansion for Efficiency

Typing the same phrases repeatedly can be tedious. Thankfully, macOS offers a text expansion feature that lets you create shortcuts for frequently used words or phrases.

To set it up, go to “System Preferences” > “Keyboard” > “Text,” and you can start creating your shortcuts.

2. Instant Dictionary Definitions

Enhance your vocabulary effortlessly by using macOS’s built-in dictionary. Simply hover your cursor over a word, press Command + Control + D, and a pop-up window will display the definition, synonyms, and more.

3. Quick File Preview

Need to quickly view the contents of a file without opening an application? In Finder, select a file and press the Spacebar for an instant preview. This is particularly handy for images and documents.

4. Screen Recording Made Easy

Creating screencasts or recording a portion of your screen is a breeze. Just press Shift + Command + 5 to access macOS’s screen recording tools. You can choose to record the entire screen or a specific area.

5. Batch File Renaming

Renaming multiple files can be time-consuming, but macOS can help. Select the files in Finder, right-click, and choose “Rename X Items” to batch rename them according to your preferred format.

Also Read: iPhone Tips & Tricks: Here’s How You Can Measure Height Using An iPhone Camera

6. Create PDFs from Anything

You can turn almost any document or file into a PDF. Just go to “File” > “Print,” and in the print dialogue, click the PDF button and select “Save as PDF.”

7. Custom Keyboard Shortcuts

Customize your MacBook’s keyboard shortcuts to streamline your workflow. In “System Preferences” > “Keyboard” > “Shortcuts,” you can create custom shortcuts for various system functions and applications.

8. Optimize Storage

Running low on storage space? MacOS offers an “Optimize Storage” feature. Go to “Apple Menu” > “About This Mac” > “Storage” and click “Manage” to offload old files and documents automatically.

9. Unlocking Hot Corners

Set up hot corners to trigger specific actions when you move your cursor to a corner of your screen. In “System Preferences” > “Mission Control,” you can configure hot corners to suit your needs.

10. Secure Your Files

For added security, use Disk Utility to create encrypted disk images. This allows you to store sensitive files with a password, adding an extra layer of protection.

Also Read: 5 MacBook Keyboard Shortcuts You Probably Didn’t Know

Categories
Apps Featured How To

Google Introduces Emoji Reactions To Gmail For Android: Here’s How To Use It

Key Highlights

  • Gmail users get an emoji reactions feature on its platform
  • This feature is currently available exclusively for Android users
  • It is set to expand to other platforms in the near future

Google has followed the long-standing requests of Gmail users by introducing emoji reactions to the platform. This feature, currently exclusive to Android devices, offers a novel way to respond to emails with a touch of personalization. While Android users are the first to embrace this feature, it is expected to expand its reach to iOS and web platforms in the near future. Also Read | From Chaos To Clarity: Five Proven Methods To Keep Your Gmail Inbox Organized

How To Add An Emoji Reaction On Gmail

To engage with this new feature, Android users can follow these steps:

Step 1: Ensure that you are using an Android device, such as a smartphone or tablet.

Step 2: Open the Gmail app on your Android device.

Step 3: Navigate to the email you wish to respond to using an emoji reaction.

Step 4: Locate the ‘Add emoji reaction’ option situated beneath the email message. You will find a smiling emoji icon next to it.

Step 5: Google provides a selection of emojis for you to choose from in the emoji picker. Pick the one that best conveys your response.

Also Read | Running Low On Google Storage? Five Best Techniques To Clear Your Gmail Space

Things To Keep in Mind

While this new feature adds a layer of expressiveness to Gmail, there are some conditions to consider:

School and Work Accounts: Users with school or work accounts may not have access to the emoji reaction feature.

Gmail App Version: It’s important to keep your Gmail app up to date. Older versions may display an unusual message when someone reacts via Gmail.

Third-Party Apps: If you access your Gmail messages through third-party apps like Microsoft Outlook, emoji reactions may not be visible.

Frequency Limit: Gmail imposes a limit of 20 replies to the same message for emoji reactions. Additionally, this feature does not apply to group email lists.

Exploring Emoji Reactions

Emoji reactions on Gmail offer a spectrum of expressiveness. Some reactions are vibrant and entertaining, like the confetti reaction, which fills your Gmail page with virtual confetti. Others are more subtle, taking up minimal screen space. This range of reactions allows users to choose the one that best suits their mood or message.

Also Read | Gmail Tips And Tricks: How To Secure Your Google Account With Two-Factor Authentication

Categories
Apps Featured How To

Spotify Tips & Tricks: How To Tune Into Podcasts In Your Native Language

Key Highlights

  • Spotify introduces new AI-powered feature
  • It helps to translate podcasts into listeners’ language
  • The feature is available for Premium and Free users

Spotify is making a significant leap by introducing an innovative AI-powered feature that promises to break language barriers for podcast enthusiasts. This feature, known as Voice Translation, leverages OpenAI’s cutting-edge voice-generative technology to translate podcasts into the listener’s preferred language while preserving the unique speaking style of the original host.

Also Read | Want To Download Songs On Spotify For Offline Playback? Here’s How

Expanding Podcast Availability

In the past, many podcast enthusiasts who weren’t fluent in English faced limitations in accessing a plethora of English-language podcasts. With Spotify’s Voice Translation, this barrier is shattered. Now, podcast episodes previously available exclusively in English will become available in various languages, each retaining the distinctive speech characteristics of the original speaker.

Initial Rollout

Spotify is gradually rolling out this groundbreaking feature, starting with the Spanish language. In the weeks to come, it plans to extend Voice Translation support to French and German languages. Initially, this feature will be available for select episodes in the catalog and future releases.

Diverse Podcast Content

Spotify’s platform already hosts an array of popular podcasts, including those from renowned podcasters like Dax Shepard, Monica Padman, Lex Fridman, Bill Simmons, and Steven Bartlett. The company has ambitious plans to include even more shows, such as “Dax Shepard’s eff won with DRS,” “The Rewatchables” from The Ringer, and a new original podcast by Trevor Noah slated for launch later this year.

Availability To All Users

One of the most appealing aspects of Voice Translation on Spotify is its accessibility. Both Premium and Free users can enjoy this feature. Spotify is taking a phased approach to its release, with Spanish translation available immediately, followed by French and German translations in the near future.

Also Read | Best Instagram Features That Are Worth Trying

How To Use Voice Translation On Spotify

If you’re eager to explore this feature, here’s a step-by-step guide on how to make the most of Voice Translation on Spotify:

Step 1: Open the Spotify app or download it from the Google Play Store or Apple App Store if you haven’t already.

Step 2: Use the search bar at the top to find your favorite podcast and tap to open it.

Step 3: Once you’ve chosen the podcast, select the specific chapter you want to listen to and navigate to the “Now Playing” view.

Step 4: Scroll down to find the “Listen to the audio translation – Spanish (or any other available language)” option and tap the Play button.

With Spotify’s Voice Translation, language will no longer be a barrier to enjoying your favorite podcasts, opening up a world of diverse content for listeners around the globe.

Also Read | Are You A Music Lover? Here’s The Best Music Apps In India

Categories
Featured How To Mobile

iOS Tips & Tricks: Learn How To Set Up Your Contact Poster On iPhone

Key Highlights

  • iPhones now have a new Contact Posters feature
  • Users of Contact Posters can choose to make their contact information public
  • Users can connect their Contact Poster and Medical ID

Apple recently launched iOS 17, introducing a range of new features for supported iPhones, including Standby mode, Offline mode, and Contact Posters. Among these, Contact Posters stand out as a unique offering, allowing users to create personalized calling cards displayed when they make calls to other iPhones. Importantly, Contact Posters are associated with your contact number or email address and can only be viewed by contacts you authorize.

Also Read | iOS Tips And Tricks: How To Change Or Set A Customized Background In Safari Web Browser On iPhones

How To Create Your Contact Poster

To use Contact Posters effectively, you’ll need to manage sharing settings and create your Contact Poster. Here’s a step-by-step guide:

Step 1: After updating to iOS 17, open the Contacts app.

Step 2: Look for the new “My Card” tab and select it.

Step 3: Within “My Card,” choose “Contact Photo & Poster.”

Step 4: Enable Contact Poster sharing by toggling the switch. Keep in mind that if you leave this off, others won’t be able to view your Contact Poster.

Step 5: When you attempt to enable sharing, you’ll encounter two options: “Automatically share your Contact Poster with existing contacts” or “Always Ask before sharing your Contact Poster.” Select your preferred option.

Also Read | iOS 17 Live Voicemail: How To Use It On Your iPhone

Now, let’s explore the customization options for your Contact Poster:

Step 1: To begin, choose a photo. Alternatively, you can opt for the Memoji feature, a virtual avatar of yourself (you may need to create one if you haven’t already).

Step 2: Once you’ve made your photo or Memoji selection, you can add various personal details to your Contact Poster. This includes your name, pronouns, nickname, social media handles, alternative contact numbers, address, personal notes, and email.

Step 3: Furthermore, you have the option to create a Medical ID and link it to your Contact Poster.

By following these simple steps, you can easily create and personalize your Contact Poster on iOS 17. This feature adds a unique touch to your calls and enhances your contact interactions.

Also Read | iOS Tips And Tricks: How To Setup And Use AutoFill For Contact Cards And Credit Cards In Safari On iPhones And iPads