Categories
Apps Featured How To

WhatsApp Pink Scam Red Alert For Android Users: What Is This New Scam? How To Stay Safe?

Key Highlights

  • WhatsApp Pink scam affecting Android devices
  • Steals personal and banking data
  • Can be uninstalled manually

WhatsApp is the most popular mobile application amongst both Android and iOS users. The success is credited to the numerous features and end-to-end encryption for privacy. However, despite multiple security layers, WhatsApp has become a favorite destination for scammers too. We have already come across multiple reports citing different WhatsApp vulnerabilities being used by scammers to trick the masses. A new WhatsApp scam is now in the town called WhatsApp Pink. What is this new WhatsApp scam and how can one stay protected? Details are below:

Also Read: How To Upload WhatsApp Status In High Quality (Images, Videos) On Android, iOS?

WhatsApp Pink Scam? What Is This WhatsApp Scam?

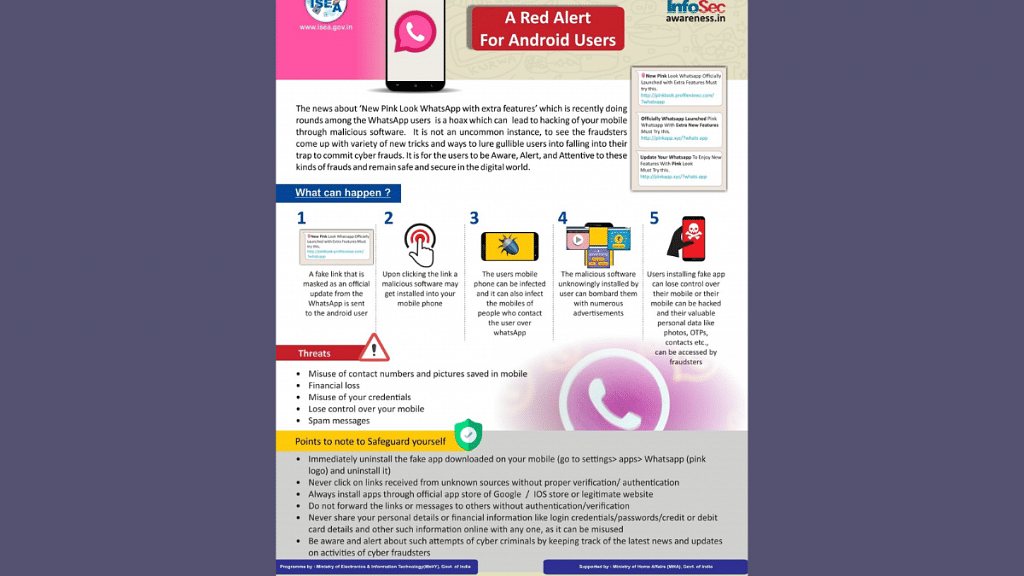
WhatsApp Pink is a new scam where attackers are gaining access to users’ devices under the pretext of offering a new WhatsApp version. Mumbai police have issued an advisory warning to the masses related latest WhatsApp scam with which they can lose not just crucial personal data but also money. The tweet shared reads, “WhatsApp Pink – A Red Alert For Android Users”. The tweet also has some pictures along with the measures that one can take to stay protected from the latest WhatsApp Pink scam.

In this new WhatsApp Pink scam, attackers are sending messages to victims convincing them of a promised update for the WhatsApp Pink app. Users are being lured in with multiple new feature upgrades that the original version doesn’t offer. This is similar to WhatsApp+ which came with multiple different features and customizations that weren’t being offered by the original version.

However, with WhatsApp Pink, it’s all a scam. Instead of offering the set of features as promised, scammers are taking control of a user’s device once they have clicked on the link to upgrade to the fake WhatsApp app. Once the scammers get control of the user’s device they will be easily able to steal private information such as banking information, contacts, and personal data including images and videos.

Also Read: WhatsApp Channels Message Broadcast Tool Launched: What Is It? How To Use?

How To Stay Safe From WhatsApp Pink Scam?

If in case, you have accidentally clicked on the link to download and install the fake WhatsApp Pink scam, then uninstalling it would only be the safest way to avoid any further attacks.

Step 1: Launch the Settings App on your Android device

Step 2: Click on the Apps option

Step 3: Select WhatsApp Pink (It will have a pink logo)

Step 4: Tap on Uninstall

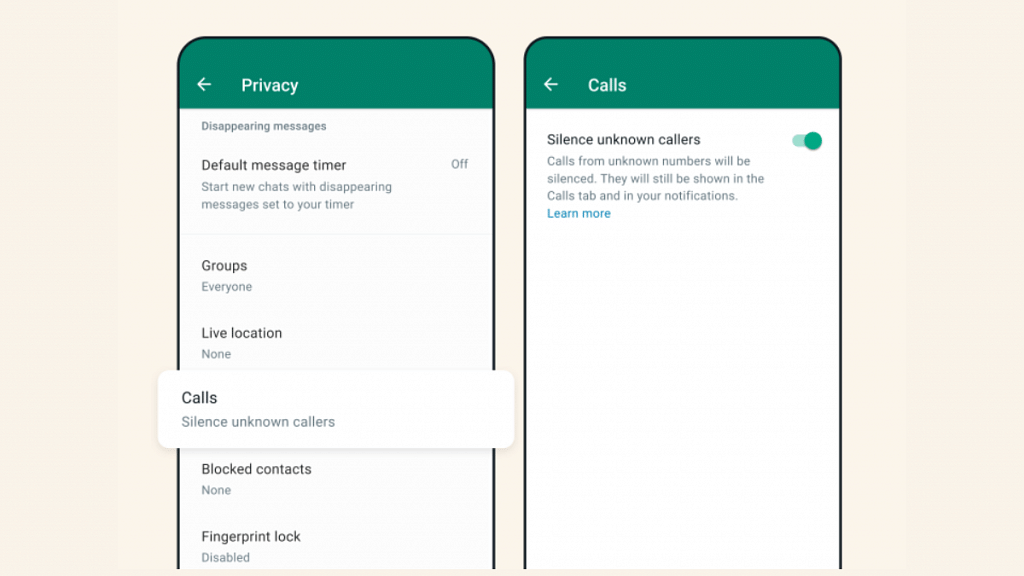
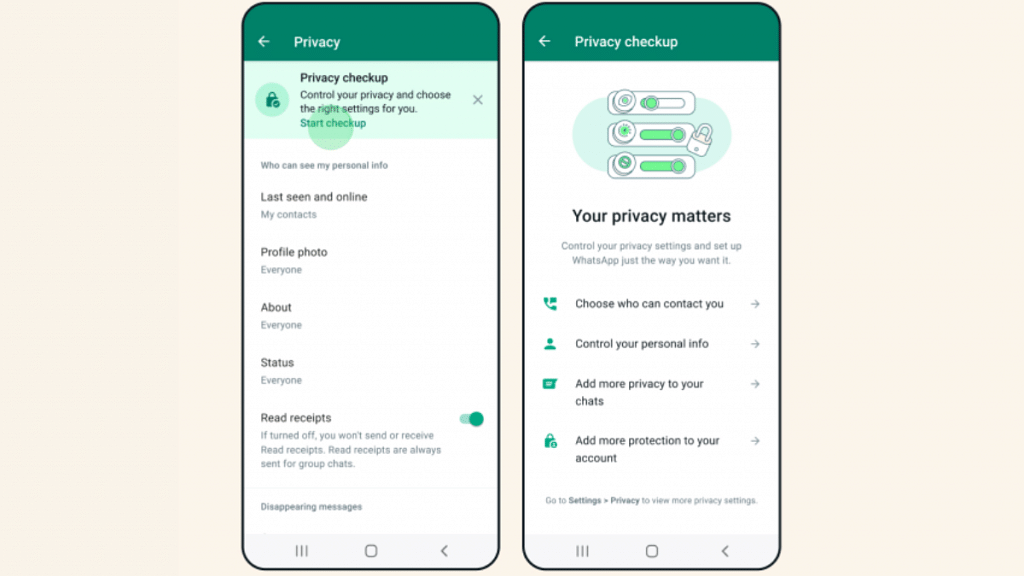
Also Read: WhatsApp Silence Unknown Caller, Privacy Checkup Security Features Released: How To Use?

Categories
Apps Featured How To

Lost Your Email Address? Don’t Panic! Follow These Steps To Recover It

Key Highlights

  • Remembering multiple email addresses can be challenging
  • If you forget your email address, there are methods to recover it, even without logging into a device
  • Microsoft and Gmail offer email recovery services where you can provide the necessary information to retrieve your email address

In today’s digital era, it is common for individuals to have multiple email addresses. While this offers convenience in managing personal and work emails, remembering all these addresses can be challenging. If you find yourself in a situation where you have forgotten your email ID or address, there are several methods you can employ to retrieve it. This article provides an easy-to-follow guide on how to find your email ID or address across popular email services such as Gmail and Outlook, whether you are using a PC, laptop, or mobile phone. Also Read | How To Archive Emails In Microsoft Outlook: Here’s The Step-By-Step Guide

How To Find Your Email Address Without Logging In

If you haven’t logged in to any device and need to retrieve your email address, there are a couple of approaches you can take. The first method requires access to the device you last used to log in. If you have such access, follow these steps:

Access The History Section

On the device you last logged in from, navigate to the History section. By doing so, you might be able to locate your email address within the browsing history.

If you do not have access to the device you last logged in from, you can still find your email address by using the email recovery services provided by Microsoft and Gmail. Here’s how to proceed with each service:

How To Recover Your Email Address Via Microsoft

To recover your email address associated with a Microsoft account, follow these steps:

Step 1: Visit the Microsoft email recovery page using any web browser.

Step 2: Provide the phone number associated with your Microsoft account or an alternate email address. Click Next to proceed.

Step 3: Enter the OTP you receive and initiate the account recovery process.

Also Read | Running Low On Google Storage? Five Best Techniques To Clear Your Gmail Space

How To Recover Your Email Address Via Google

If you are using a Gmail account and need to retrieve your email address, follow these steps:

Step 1: Open the “Find Your Email” Page using a web browser.

Step 2: Enter the phone number linked to your Gmail account or your recovery email address. Click Next to continue.

Step 3: On the subsequent page, fill in your First and Last name as requested, then click Next.

Step 4: Click Next on the “Get a verification code” page.

Step 5: Enter the 6-digit code you receive, initiating the account recovery process.

Forgetting your email address can happen to anyone, but fortunately, there are effective ways to retrieve it. By following the step-by-step guide provided above, you can easily find your email ID or address on various leading email services such as Gmail and Outlook, regardless of whether you are using a PC, laptop, or mobile phone.

Also Read | Gmail Vacation Replies: How To Create And Set Replies For Vacations On Gmail?

Categories
Featured How To Info

How To Apply For Free Electricity In Karnataka’s Gruha Jyothi Scheme: Step-by-Step Guide

Key Highlights

  • Affordable electricity scheme for citizens of Karnataka
  • Offers 200 units of free electricity to every household
  • Over 8 lakh households have already registered for the scheme as of June 20

The Karnataka government has initiated the Karnataka Gruha Jyothi Scheme, following the extension of the Delhi government’s 200-unit free electricity scheme. This scheme, which was one of the promises made by the Congress party during the state assembly election, was approved on June 2, 2023. On June 18, 2023, the Gruha Jyothi Scheme registration period officially opened.

Also Read | Want To Reschedule Your Passport Appointment Online? Follow These Steps

What Is Karnataka Gruha Jyothi Scheme?

The Gruha Jyothi Scheme aims to provide affordable electricity to the citizens of Karnataka. It also seeks to raise awareness about energy conservation and encourage the use of renewable energy sources.

Benefits And Registration

Under the scheme, every household in Karnataka is eligible to receive 200 units of free electricity. According to reports, beneficiaries must apply for the Gruha Jyothi Scheme before July 5 in order to begin receiving subsidies in August. The online application process for the scheme opened on June 18. The response has been overwhelming, with over 8 lakh households already registering for the scheme as of June 20. The Bangalore Electricity Supply Company Limited has recorded a total of 8.16 lakh registered consumers.

Required Documents

To apply for the scheme, applicants need to provide the following documents:

  1. Proof of identity: Aadhaar Card, Voter ID Card, PAN Card, or passport
  2. Proof of address: Aadhaar Card, Voter ID Card, Ration Card, or rent agreement
  3. Passport-sized photographs
  4. Details of the bank account
  5. Proof of property ownership: sale deed or property tax receipt
  6. Consent letter for tenants
  7. Self-declaration

Also Read | New GST Registration India: How To Register GST Online And GET GSTIN Number Quickly

Karnataka Gruha Jyothi Scheme 2023: How To Apply?

To apply for the scheme, follow these steps:

Step 1: Go to the official website of KPTCL at www.sevasindhugs.karnataka.gov.in.

Step 2: Look for the registration section dedicated to the Gruha Jyothi Scheme.

Step 3: Fill out the online registration form with all the required details.

Step 4: Attach the necessary documents, such as proof of identity and address.

Step 5: Review the application form carefully to ensure accuracy and completeness.

Step 6: Submit the registration form.

Step 7: Make a note of the reference number provided upon successful submission.

Step 8: The authorities will verify the information and grant approval.

Step 9: After approval, the applicant will receive further instructions regarding payment details and the installation process for the electricity connection.

Also Read | Lost PAN Card? Here’s How To Apply For A Duplicate PAN Card Online

Categories
Apps Featured How To

Never Miss A Payment Again: Learn How To Set Up Payment Reminders On Google Pay

Key Highlights

  • Google Pay offers a range of features for convenient digital payments
  • Users can set up recurring payment reminders to avoid missing important payments
  • Currently, Google Pay requires users to manually make payments even with reminders

Google Pay is a versatile digital payment platform that offers a wide range of features and functionalities. In addition to sending money and making online payments, Google Pay includes a useful payment reminder feature to prevent missed payments. Also Read | How Can You Delete Google Pay Transaction History: A Step-By-Step Guide

How To Set Up Payment Reminders

To ensure you never forget important payments, Google Pay provides a recurring payment reminder feature. Follow these steps to set up recurring payment reminders:

Step 1: Open the Google Pay app on your iOS or Android smartphone.

Step 2: Navigate to the bottom and select “Regular payments.”

Step 3: Choose the appropriate category under “Payment categories.”

Step 4: Tap “View all” to see available categories and select the one that suits your requirement.

Step 5: Enter the necessary details for recurring payments: choose the payee from your contact list, select a start date, determine the frequency of payment, set the amount, and give the payment a name for easy reference.

Step 6: To view the payment reminder in your checklist, tap “Set reminder.”

Also Read | How To Pay Utility Bills Using Google Pay? Here Are The Steps

Benefits And Limitations

Google Pay’s recurring payment reminder feature is currently limited to peer payments. It does not include autopay settings, meaning payments are not automatically debited from your account at a set frequency. Instead, you will receive a reminder to make the payment manually. The payer is notified to make the payment, but the amount does not get debited automatically.

Conclusion

Google Pay offers a convenient solution for managing digital payments. By utilizing the payment reminder feature, users can set up recurring payment reminders and avoid missing important payments. Although autopay settings are not available, the reminder system ensures that users are prompted to make payments on time.

Also Read | UPI Tips And Tricks: Here’s How You Can Set UPI PIN Without Using Debit Card Details

Categories
Apps Featured How To

WhatsApp Silence Unknown Caller, Privacy Checkup Security Features Released: How To Use?

Key Highlights

  • WhatsApp Silence Unknown caller feature released
  • Will mute spam calls
  • Privacy Checkup feature also released

WhatsApp has emphasized user privacy right from the beginning. The company has released various privacy-centered features for its mobile and desktop app and is rapidly evolving its platform to make it more secure for personal and professional messaging. The two new features released by WhatsApp aim to further enhance user security by silencing spam calls from unknown numbers and allowing users to check the security layers. What is the new security feature released by WhatsApp and how does it work? Below are the details:

WhatsApp Silence Unknown Calls Security Feature: How Does It Work?

The latest security features released by WhatsApp are called Silence Unknown Callers and Privacy Check. With the former WhatsApp has now allowed expanded possibilities for better control over incoming calls; specifically the ones coming from an unknown number. The Silence Unknown caller feature as the name suggests will be muting notification from an incoming call from an unknown number.

WhatsApp has designed this feature to filter out calls that are either from spam or scam callers. The app will automatically silence calls from such numbers so that users can verify if the call is important or spam and respond accordingly. Once this feature is active, the calls from unknown spam numbers won’t show up on the app’s home screen. However, users will be able to see missed/ silenced calls from the unknown number on the call list page. The steps to activate the Silence Unknown Caller feature are below:

Step 1: Open WhatsApp on your respective devices

Step 2: Go to the Settings Menu

Step 3: Select the Privacy option

Step 4: Tap on Calls option

Step 5: Toggle on the Silence Unknown caller option

Also Read: WhatsApp Screen Sharing Feature For Video Calls In Works: How To Share WhatSApp Screen on Android?

WhatsApp Privacy Check Feature Explained

In addition to the Unknown Silence call feature, WhatsApp has also introduced the Privacy Checkup feature. This security feature will allow users to check all the security layers under a single tab. This feature is also designed to enhance user privacy and will help them make apt modifications with the added security layers. Users will be able to navigate through multiple privacy layers using the Privacy Checkup feature.

Also Read: WhatsApp Channels Message Broadcast Tool Launched: What Is It? How To Use?

Categories
Apps Featured How To

Want To Hide Your Online Status From Friends On Facebook? Here’s How

Key Highlights

  • Facebook users have the option to hide their active status
  • It provides them privacy and control over their online presence
  • This feature ensures flexibility and discretion for individuals using Facebook

The online status indicators on Facebook, such as the green dot, grey crescent moon, and empty grey circle, can attract unnecessary messages from friends. If you’re tired of receiving such messages every time you go online, this article will provide you with simple steps to hide your ‘Active’ status on Facebook across Android, iOS, and the web. Also Read | How To Edit Facebook Photos Via Mobile, Desktop App Directly

How To Hide Your Facebook Active Status On Web

Step 1: Visit the Facebook website and navigate to the Messenger tab located on the left side of the main page.

Step 2: Click on the three dots in the upper-right corner of the Messenger window, and then select Preferences.

Step 3: A pop-up menu will appear. Click on “Active Status: On” and disable the toggle. You can also choose your preferred method of hiding the online status from the available options.

Step 4: Once you’ve made the desired changes, click Save.

How To Hide Your Facebook Active Status On Android

Step 1: Open the Facebook app on your Android phone or tablet. In the upper-right corner, click on the Messenger button. Make sure that you have the Messenger app installed on your device.

Step 2: Inside the Messenger app, go to Chats, and then access your Messenger settings. Locate the Active Status option.

Also Read | Facebook Tips And Tricks: How To Create And Upload Facebook Reel Videos

Step 3: Disable the “Show when you’re active” toggle. This will remove the green dot displayed next to your name on Facebook. When prompted, tap on Turn Off to confirm the action.

How To Hide Your Facebook Active Status On iPhone, iPad

Step 1: Open the Facebook app on your iOS device and tap on the three-line menu icon at the bottom-right of the screen.

Step 2: Navigate to the Settings and Privacy section and select Settings.

Step 3: Within the Privacy section, choose Active Status, and on the following page, toggle off the “Show when you’re active” option. Click Agree when prompted.

By following this guide, you can hide your Active status on Facebook and avoid the influx of unwanted messages from friends on the platform. If you wish to take further steps to enhance your online privacy and reduce tracking, you may even consider deleting your Facebook account.

Also Read | Want A Blue Tick On Facebook? Here’s How To Get Verified Today

Categories
Apps Featured How To

Google Lens New Skin Feature Allows Searching Skin Conditions: How To Know It’s a Pimple, Lump, Or Mole Using Google Lens?

Key Highlights

  • Google Lens gets Skin feature
  • Allows getting information on different skin conditions
  • Will also help with detecting lump and bumps on skin

Google’s wide range of mobile services has simplified our fast-paced lifestyle. The company is not only bringing in new features but also refining existing services. Google is diving deep into the AI world and has been grabbing headlines with its own ChatGPT alternative called Bard. But with apps and features like Google Lens, Google already has been showing its expertise in developing AI tech. Recently, Google has made it possible for users to get an insight into their skin condition. What is this new Google Lens Skin feature and how you can use it to check skin conditions? Read below:

Google Lens Skin Feature Use Explained

The latest Google lens feature will use AI technology to determine the skin conditions of any user. The app will now be able to describe any mole or skin condition that would be difficult for any general user to identify. With this new skin feature, the Google Lens will search for skin condition that the user will upload in the form of a picture. This new AI medical feature will be describing if the bump on the skin is a pimple or any odd mole.

How To Check Skin Condition Using Google Lens

Step 1: Unlock your Android smartphones

Step 2: Open the camera app on your phone and click the picture of the mole/ pimple or skin patch that you want to check.

Step 3: Launch the Google Lens mobile application. You can download the app if it isn’t pre-installed.

Step 4: Now, upload the image that you have captured to check the skin condition

Step 5: You will be shown the list of visual matches that will describe your skin condition

What Else The Google Lens Skin Feature Helps With? Who Can Use?

In addition to describing the skin condition, the Google Lens skin feature will also help users find additional information about nails and hair. This feature will help users to search or describe any unwanted lump or bump on the lip or lines on the nails. It will also help users detect hair loss on the head. Currently, only the users in the US will get an access to the Google Lens Skin feature. Remaining markets including India will possibly get this new Lens feature in the coming months.

Also Read: Google Maps Launches Three Features To Simplify Your Travel Planning! What Are They?

Categories
Apps Featured How To

Need To Save Moj Videos For Later? Learn How To Download For Free

Key Highlights

  • Moj is a highly popular short video app
  • It offers a built-in feature to download videos
  • Downloading videos from the app is easy

Moj, a highly popular short video app, is used by millions of users nationwide with its user-friendly interface and an abundance of great content. Unlike other short-video apps, Moj offers a convenient built-in feature that allows users to download videos directly from the app without relying on third-party websites or applications. In this guide, we will walk you through the step-by-step process of downloading Moj videos on your mobile phone. Also Read | Instagram Reels: How To Add Own Audio Recording, Other Creator’s Music To Insta Reels Videos

However, it’s important to note that downloading videos for commercial use without permission may lead to legal complications. It is recommended to seek permission from the original content creator before downloading Moj app videos onto your device. With that clarification, let’s proceed to the instructions for downloading Moj videos for free.

How To Download Videos From Moj

Step 1: To begin the video download process, locate and open the Moj app on your smartphone.

Step 2: Choose the video you wish to download from the Moj app’s extensive collection.

Step 3: Tap the share button, typically represented by an arrow icon, to trigger the download process.

Step 4: A ‘Share’ tab will appear, presenting various social media platforms like Instagram, WhatsApp, and Facebook. This tab also provides additional download options.

Step 5: Select the download option from the available choices in the ‘Share’ tab.

Also Read | YouTube Shorts: How To Create And Upload YouTube Short Videos On Android, iOS

Step 6: Upon selecting the download option, the app may require permission to access photos, media, and files on your device. Allow the necessary permissions to proceed.

Step 7: Once permissions are granted, the selected video will start downloading onto your smartphone.

Step 8: When the download is complete, you will receive a notification. Open your gallery app to access and enjoy the downloaded video at any time, even without an internet connection.

With Moj’s built-in functionality, downloading videos from the app is a simple process that enables you to enjoy your favorite content offline. By following these simple steps, you can easily download Moj videos and watch them repeatedly without consuming data. Remember to respect the rights of content creators and seek permission when using downloaded videos for commercial purposes. Now you can enhance your Moj experience by downloading and enjoying videos hassle-free.

Also Read | How Can You Download And Watch Instagram Reels On Android, iOS Without Installing Third-Party Apps?

Categories
Featured How To Mobile

iPhone Check-In Feature: Learn How To Use It To Notify Loved Ones Of Safe Arrival

Key Highlights

  • Check-In feature notifies chosen contacts upon your safe arrival at home
  • It shares a location if you arrive on time
  • It can also be used when you’re at home and planning to go out

During the WWDC 2023 event, Apple introduced a new feature for iMessage that aims to keep your loved ones informed when you arrive home safely. Known as the Check-In feature, it uses estimations of your arrival time and monitors your progress. In the event that you fail to reach home within the estimated timeframe, it will first notify you and subsequently send an alert to your designated contacts. Also Read | Apple New ‘NameDrop’ Feature for iPhones: What Is It? Steps To Use

The Check-In feature also allows users to modify the estimated arrival time by using the edit button. Additionally, it can be used to notify contacts when returning from a trip to the grocery store at night. Simply set the estimated length of the trip, and the feature will automatically notify your contacts upon your return.

Step-by-Step Guide On Using Check-In Feature On iPhone

For those interested in using the Check-In feature to inform their loved ones about their safe arrival, here is a step-by-step guide:

Step 1: Open iMessage and access the conversation thread with the individual(s) you wish to alert upon your arrival home. If necessary, start a new conversation with them.

Step 2: Locate and tap the plus sign situated to the left of the text field.

Step 3: From the list of available apps, select Check-In. This will initiate the Check-In feature, enabling you to share your estimated arrival time and location with your chosen contacts.

Also Read | Magnify Anything, Anywhere: Learn How To Use Your iPhone As A Magnifying Tool

Step 4: Your iPhone will automatically determine your current location and your home address. It will then provide an estimate of the time required to reach home by walking or driving. If needed, you can modify this estimate by tapping the Edit button, allowing for adjustments to incorrect estimations or changes in your mode of transportation.

Step 5: Tap Send to share your Check In with the selected contacts. You also have the option to include a personal message or an emoji, if desired.

Step 6: To edit your estimated time of arrival or cancel the Check-In, simply reopen the Check-In app. Moreover, you can monitor the remaining time until you reach home and view the number of individuals following your Check-In. Upon your safe arrival, your contacts will receive another notification indicating your return. The Check-In will then automatically conclude, ceasing the sharing of your location. Alternatively, you can manually end your Check In by tapping the End button within the app.

Privacy And Security Precautions

While using the Check-In feature, your real-time location is not shared unless you arrive home on time. However, if you fail to reach home within the estimated duration, it will share your current location, the route you took, as well as your phone’s battery and signal levels with the designated contacts. It is important to note that this data is end-to-end encrypted, ensuring privacy and security.

Also Read | Want To Share Your iPhone Screen On FaceTime? Here’s How You Can Do It

Categories
Featured How To Mobile

How To Set Up Weather Widgets On Your Android Device For Instant Weather Alerts

Key Highlights

  • People who receive weather alerts are made aware of the current or predicted weather conditions
  • Android phones come with a built-in weather app
  • In the event of severe weather, weather notifications might be helpful

Cyclone Biparjoy, an extremely severe cyclonic storm, poses a threat to coastal areas in certain parts of the country. To stay informed during such situations, adding weather widgets to your smartphone’s home screen is a convenient and quick method. Android devices offer built-in weather services with accurate and real-time data. Here’s a step-by-step guide on setting up weather widgets on your Android phone to receive instant weather updates. Also Read | Want To Get Weather Alerts On Your iPhone? Here’s How To Do It

Easy Steps To Set Up Weather Widgets On Android

To add a weather widget on most Android phones, follow these simple instructions:

Step 1: Long-press on the home screen of your Android device to initiate widget customization.

Step 2: Select the “widgets” option from the available customization menu.

Step 3: Search for the “weather” option among the list of widgets.

Step 4: Long-press the weather widget and place it on your home screen to add it successfully.

Weather Widget Features And Details

On Android phones, the weather widget provides valuable information such as the current temperature, UV index, and humidity percentage. With these details at your fingertips, you can easily stay informed about the weather conditions.

Cyclone Biparjoy: IMD Issues Red Alert

The Indian Meteorological Department (IMD) has declared Cyclone Biparjoy as an extremely severe cyclonic storm and issued a red alert for the Saurashtra and Kutch coasts in Gujarat.

Also Read | How Can You Download And Watch Instagram Reels On Android, iOS Without Installing Third-Party Apps?

Cyclone Path And Expected Impact

Cyclone Biparjoy is projected to move nearly northeastwards and is predicted to cross Saurashtra and Kutch, along with the adjoining Pakistan coasts. The landfall is expected to occur between Mandvi (Gujarat) and Karachi (Pakistan), near Jakhau Port (Gujarat) by the evening of June 15, according to the IMD’s latest forecast.

Conclusion

By setting up weather widgets on your Android device, you can receive real-time updates and stay informed about weather conditions, including the potentially dangerous Cyclone Biparjoy. Taking advantage of the built-in weather services offered by Android, you can ensure that you’re prepared and can respond promptly to any weather-related situations.

Also Read | How To Record/ Capture Screen On Windows 11 Laptops And PCs?