Categories
Apps How To

WhatsApp iOS Users Can Now Upload Voice Notes As Status: Here’s How

Key Highlight

  • WhatsApp has introduced a new ‘Voice Status’ feature for iOS users.
  • The feature is available with the latest version 23.5.77 of the app for iOS users.
  • The voice notes shared on status updates cannot be longer than 30 seconds.

WhatsApp has announced that its new ‘Voice Status’ feature will be rolled out with the latest version of the app, version 23.5.77, for iOS users. With this new feature, iOS users can record and share voice notes on their WhatsApp status. The feature allows users to share their thoughts, feelings, and ideas with their friends and family in a more personal way. It is an excellent tool for those who prefer to express themselves through voice rather than text.

The new feature allows iPhone users to share their voice recordings in the Status tab, alongside the existing options of photos, links, videos, and text updates. Users can record a voice note and share it with their contacts, who can view it for 24 hours before it disappears.

The roll-out of the ‘Voice Status’ feature for iOS users is part of WhatsApp’s ongoing efforts to improve the user experience on the platform. It’s important to note that the voice notes shared on status updates cannot be longer than 30 seconds. To use the feature, users need to update their WhatsApp app to the latest version.

Also Read: WhatsApp To Soon Allow Username Instead Of Phone Numbers: Details Inside

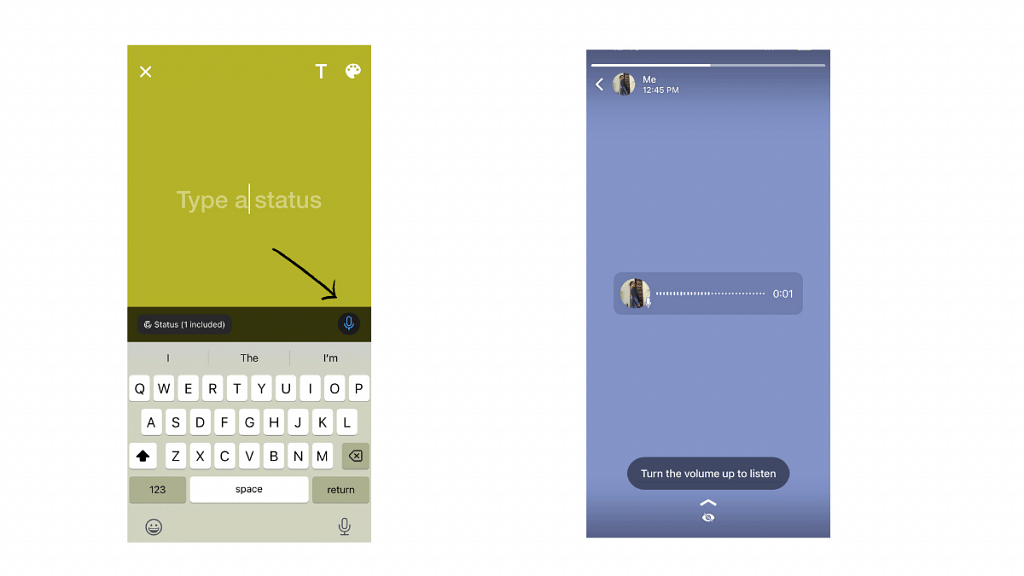
To share a voice message on WhatsApp for iPhone, follow these simple steps:

  1. Open WhatsApp and go to the ‘Status’ tab.
  2. Tap on the floating button with the pencil icon.
  3. Click on the microphone icon that appears on the bottom right of the screen.
  4. Tap and hold the button to start recording your voice status.
  5. Let go of the button to stop recording.
  6. Tap on the send icon to share your voice status.

To discard a recorded voice note, users can simply slide sideways from the mic icon.

With this feature, you can add a personal touch to your status updates and communicate with your contacts in a engaging way. Try it out and have fun sharing your voice messages with your friends and family on WhatsApp!

Recently, the platform has also introduced some exciting updates such as disappearing groups, allowing users to schedule group calls, Picture-in-Picture mode for iOS users, and many more fascinating features.

Also Read: WhatsApp New Update To Bring Temporary Group Feature With Expiry Date: Read Details Here
Categories
How To Info

How To Update And Change Mobile Number On Aadhaar Card Online

Indian government has authorized multiple identification documents for personal identification of residents in the country. When we speak of such documents, Aaadhaar Card, Pan card, and driving licence works as the primary identity documents in India. While all these cards are important, Aaadhaar card is the most crucial one. It primarily is a 12-digit unique identity number which is accepted by both government and private organizations as an identity document of any Indian or foreign national residing in the country for over 182 days in a twelve month period.  

The Indian government has made it mandatory to link a certain set of documents to be linked with Aadhaar for verification. A permanent house address and personal phone number are the most crucial information that has to be linked with Aadhaar. It is always advised to cross-verify the data including the house address and phone number to avoid errors.

Also Read: Here’s How To Block BSNL SIM? See All Steps Here

In some cases, you might need to update the data on the Aadhaar card. This might happen if you move to a new permanent residence or change your personal mobile number. Thankfully, all the documentation update can now be done online and you don’t have to go through the hassle of standing in queues at the designated centers. In one of our previous articles, we covered the method with which you can change your house address on the Aadhaar card. In this article, we will be guiding you with the steps to update or change your personal mobile number linked to your Aadhaar card.

Also Read: PhonePe UPI Pin Activation Via Aadhaar: Steps To Enable UPI ID Using Aadhaar Number

How To Update, Change, Or Add A New Phone Number On Aadhaar Card Online

Step 1: You would first need to visit the official UIDAI (Unique Identification Authority In India) website and then make the required changes. Open any web browser on your laptop, PC or mobile and type www.uidai.gov.in. Hit enter.

Step 2: Once the UIDAI website’s homepage opens up, tap on the “My Aadhaar” tab.

Step 3: From the dropdown, click the Update Aadhaar Details (Online) option. Once you perform this step, you will be redirected to the Aadhaar Self Service Update portal.

Step 4: Now, select the “Update your address online” option.

Also Read: Wrong Name, Address On Your Aadhaar Card? Here’s How To Update It

Step 5: On the next page, you will be asked to enter the 12-digit aadhaar card number along with the security code on the screen.

Step 6: Tap on the Send OTP option.

Step 7: Use the OTP sent on your mobile to login to the Aadhaar account online.

Step 8: Once you have logged in successfully, tap on the Mobile Number option.

Also Read: New GST Registration India: How To Register GST Online And GET GSTIN Number Quickly

Step 9: Enter the new mobile number that you wish to be linked with Aadhaar.

Step 10: Click Submit Update Request option.

Step 11: You will now need to upload supported identity proof.

Step 12: Once all these steps are completed and the required identity proofs are submitted, UIDAI will initiate the process to update the new mobile number on your Aadhaar card.

Also Read: Google Photos Magic Eraser: What Is This Feature? How To Use It?

Categories
Apps Featured How To

Download Music From Instagram To Your Phone: Here’s How

Instagram is a popular social media platform that allows users to share photos and videos with their followers. Sometimes, users come across music on Instagram that they would like to download for personal use. However, Instagram does not provide a direct download option for music. In this article, we will explain how to download music from Instagram using various methods. Also Read | Instagram Tricks: Here’s How You Can Save, Download Instagram Reels With Audio On Android, iOS

Method 1: Using a screen recorder app

One way to download music from Instagram is by using a screen recorder app. There are several screen recorder apps available for both iOS and Android devices. Simply follow these steps:

Step 1: Open the Instagram app and find the video containing the music you want to download.

Step 2: Then, open the screen recorder app and start recording your screen while the music is playing.

Step 3: Once the recording is complete, you can save the video and extract the audio using video editing software or a free online converter.

Method 2: Using an Instagram music downloader app

There are several third-party apps available for both iOS and Android devices that allow you to download music from Instagram. Some popular apps include InstaSave, FastSave, and Video Downloader for Instagram. These apps allow you to download videos and music directly from Instagram, without having to use a screen recorder app. Simply copy the URL of the Instagram post containing the music you want to download and paste it into the app. The app will then extract the audio and save it to your device.

Also Read | Want To Edit Videos For Instagram Reels? Best Five Apps You Can Download For Free

Method 3: Using a web-based Instagram downloader

There are several websites that allow you to download videos and music from Instagram. Some popular websites include DownloadGram, InstaDownloader, and Ingramer. Simply copy the URL of the Instagram post containing the music you want to download and paste it into the website. The website will then extract the audio and allow you to download it in various formats, such as MP3 or WAV.

Downloading music from Instagram is easy and can be done using various methods. However, it is important to note that downloading copyrighted music without permission is illegal and can result in legal consequences. Therefore, it is important to only download music that is either royalty-free or for personal use only.

Also Read | Instagram Reels: How To Add Own Audio Recording, Other Creator’s Music To Insta Reels Videos

Categories
Apps Featured How To

Want To Download Songs On Spotify For Offline Playback? Here’s How

Key Highlights

  • Spotify is a popular music streaming platform with a vast library of songs
  • The platform offers both free and premium subscription options
  • Premium subscribers can enjoy additional features like ad-free listening and offline downloads

Spotify is one of the most popular music streaming platforms worldwide, offering users access to millions of songs across different genres. While the platform is primarily designed for streaming music online, users can also download songs from Spotify and listen to them offline.

To download songs from Spotify, you will need a premium subscription. Spotify premium offers ad-free listening, unlimited skips, high-quality audio streaming, and the ability to download songs for offline listening. Also Read | Want To Download Instagram Stories With Music? Here’s How

How To Download Songs On Spotify?

To download songs from Spotify, follow these simple steps:

Step 1: Open Spotify on your iPhone or Android device and sign in to your premium account.

Step 2: Find the song you want to download by using the search bar or by browsing through playlists and curated albums.

Step 3: Once you have found the song you want to download, click on the three dots next to the track’s title.

Step 4: In the dropdown menu that appears, click on the ‘Download’ option.

Also Read | Best Headphones For Music Lovers To Buy In India Under Rs. 5,000

Step 5: The song will now begin to download, and you can monitor the download progress in the Downloads section of your Spotify app.

Step 6: Once the song has finished downloading, it will be available for offline listening, and you can access it by navigating to your Downloads section in the Spotify app.

It’s worth noting that you can only download songs from Spotify on up to five different devices. Additionally, downloaded songs will only remain available for offline listening as long as you remain a premium subscriber. If you cancel your subscription or let it lapse, the downloaded songs will become unavailable until you renew your subscription.

Overall, downloading songs from Spotify is a simple and convenient process that can be done in just a few clicks. With offline access to your favorite tracks, you can enjoy your music even when you’re not connected to the internet.

Also Read | Are You A Music Lover? Here’s The Best Music Apps In India

Categories
Apps How To

Google Photos Magic Eraser: What Is This Feature? How To Use It?

Key Highlights

  • No need for Photoshop to remove objects
  • Magic Eraser works on Android & iOS
  • Erase anything with a few taps

Photobombers or unwanted objects might ruin your shots. The good news is that you can take them out of any picture. A few years ago, you needed to become proficient in specialized photo-editing software like Photoshop to do it. but no longer. With the Magic Eraser feature in Google Photos for Android and iOS, anyone with a smartphone can quickly and effortlessly remove any undesired things from their photographs. We’ll demonstrate how.

Also Read: WhatsApp Account Hijacking: What Is It? How To Stay Safe?

What Is Magic Eraser?

The Magic Eraser feature was introduced in 2021 and has since shot to the top of the list of mobile photography’s most talked-about features. Objects, people, and other items that might be out of place in a shot will be picked up by this function. When objects are found, it suggests eliminating them, and with a single tap, the feature removes the object from the image.

With the release of its Pixel 6 series, Google included Magic Eraser in Google Photos. Magic Eraser, once a Pixel-only feature, is a fantastic tool for erasing undesirable items and photobombers from any shot, whether you’re using an Android or iOS device. Although Google Photos is accessible on all mobile devices, if you don’t own a Pixel, Magic Eraser can only be used with a subscription plan.

Also Read: Forgot Your Amazon Alexa Password? Here’s How To Change And Reset It

How To Use Magic Eraser?

Step 1: Open the Google Photos App.

Step 2: Choose a photo that has a distracting element or person in it, then tap to view it.

Step 3: In the menu bar bottom, select Edit. Choose Tools from the available options.

Step 4: Click on Magic Eraser. Unwanted objects will be immediately sought out by Google Photos.

Step 5: If the App recognizes what you want to delete on its own, hit erase all to get rid of the objects that are highlighted. To save the image, select Save copy after tapping Done to complete the process.

Step 6: If Google Photos is unable to recognize the things you want to delete, you can manually do so by tracing your finger over the undesirable object. The object will be immediately removed from Google Photos.

Step 7: After you’re done, select Done > Save copy.

Also Read: Instagram Privacy: How To Hide Online/ Active Status, Last Seen On Instagram

For the tech geeks, stay updated with the latest cutting-edge gadgets in the market, exclusive tech updates, gadget reviews, and more right on your phone’s screen. Join Giznext’s WhatsApp channel and receive the industry-first tech updates.


Categories
Apps Featured How To Smart Watch

Use ChatGPT On Apple Watch? Here’s The Step-By-Step Guide

Key Highlights

  • ChatGPT is now available for Apple Watch users
  • This powerful language model is now available with the WatchGPT app
  • WatchGPT is a paid app that will cost you Rs. 349

ChatGPT quickly rose to fame and is one of the most talked about technologies these days. This is one of the fastest tools to reach 100 million users. It is a powerful language model developed by OpenAI that can be accessed through various platforms, including Apple Watch.

Also Read | Here’s How To Use The Viral AI Chatbot ChatGPT: A Step-By-Step Guide

How To Use ChatGPT On Apple Watch?

The WatchGPT, which includes all the features from OpenAI’s ChatGPT, is all you need to support an AI chatbot. You don’t actually need to do anything very technical. However, it costs around US $3.99, which is equivalent to about Rs. 328. You can get the WatchGPT app directly from the App store if you are ready to pay this sum. Now, you must be aware of the steps necessary to enable ChatGPT support on your Apple Watch. Here’s a brief guide on how to use ChatGPT on your Apple Watch:

Step 1: Install WatchGPT App On Your Apple Watch

The first step is to download the WatchGPT app on your Apple Watch. You can do this by opening the App Store on your Apple Watch, searching for “WatchGPT,” and then installing the app.

Step 2: Launch The OpenAI App

Once the app is installed, launch it on your Apple Watch. You’ll see a screen with a text box. Click on the ‘Ask me Anything’ button.

Step 3: Type Your Query

Use the small keyboard on your Apple Watch to type your query into the text box. ChatGPT uses natural language processing, so you can type your query as you would speak it.

Step 4: Wait For The Response

After typing your query, press the “Send” button, and wait for ChatGPT to generate a response. The response will appear on the screen of your Apple Watch.

Step 5: Continue The Conversation

If you’re not satisfied with the response or have further questions, you can continue the conversation by typing your follow-up query into the text box.

Step 6: End The Conversation

To end the conversation, simply exit the OpenAI app on your Apple Watch.

Some Tips For Using ChatGPT On Your Apple Watch

  • Keep your queries short and concise. The small screen on the Apple Watch makes it challenging to read long responses.
  • Speak clearly and use proper grammar. ChatGPT can better understand your queries if they are well-formed.
  • Take breaks between queries. ChatGPT can generate responses quickly, but taking breaks is essential to avoid mental fatigue.

Also Read | List Of Best ChatGPT Extensions You Can Use For Google Chrome

Using ChatGPT on your Apple Watch is easy and convenient. With a few simple steps, you can have a conversation with this powerful language model right from your wrist.

For the tech geeks, stay updated with the latest cutting-edge gadgets in the market, exclusive tech updates, gadget reviews, and more right on your phone’s screen. Join Giznext’s WhatsApp channel and receive the industry-first tech updates.

Categories
Apps Featured How To

Want To Cancel Your Disney+ Hotstar Subscription? Here’s How

Key Highlights

  • Hotstar offers a wide range of TV shows, movies, live sports, and other content to its subscribers
  • Canceling your Disney+ Hotstar membership gives you more control over your day
  • Canceling the Disney+ Hotstar subscription is fairly simple

Hotstar is a popular online streaming platform that offers a wide range of TV shows, movies, live sports, and other content to its subscribers. However, there may be times when you want to cancel your Hotstar subscription. If you are facing this situation, then you can follow the steps below to cancel your Hotstar subscription.

Also Read | Netflix For Fitness Enthusiast: Collaborates With Nike To Stream Workout Videos On Its OTT App

How To Cancel Your Disney+ Hotstar Subscription?

Canceling a Hotstar subscription is a simple process that can be completed in just a few steps. By following the steps outlined below, you can quickly and easily cancel your Hotstar subscription if you no longer wish to use the service.

Step 1: Visit The Disney+ Hotstar Website

The first step to cancel your Disney+ Hotstar subscription is to visit the Hotstar website. You can do this by typing “hotstar.com” in your web browser’s address bar and hitting enter.

Step 2: Login To Your Account

Once you are on the Hotstar website, you will need to log in to your account. You can do this by clicking on the “Login” button at the top right corner of the page and entering your email address and password.

Also Read | Free Disney+ Hotstar Access: Here’s How To Get It With Airtel Prepaid Plans

Step 3:  Go To The Subscription Page

After logging in, you need to go to the subscription page. You can do this by clicking on your profile picture at the top right corner of the page and selecting “My Account” from the drop-down menu. On the My Account page, click on the “Subscription” tab.

Step 4: Cancel Your Subscription

On the subscription page, you will see the details of your subscription. To cancel your subscription, click on the “Cancel Subscription” button. Follow the prompts to complete the cancellation process.

Step 5: Confirm The Cancellation

Also Read | Here’s How To Download Videos From Netflix, Amazon Prime, And Disney+ Hotstar

After you cancel your subscription, Hotstar will ask you to confirm the cancellation. Make sure to read the terms and conditions carefully before confirming the cancellation. Once you confirm the cancellation, your Hotstar subscription will be terminated, and you will not be charged any further.

For the tech geeks, stay updated with the latest cutting-edge gadgets in the market, exclusive tech updates, gadget reviews, and more right on your phone’s screen. Join Giznext’s WhatsApp channel and receive the industry-first tech updates.

Categories
Apps How To

Find Nearest Grocery Store: Here’s How To Locate Closest Grocery Store Using Google Maps

Key Highlights

  • Google Maps allows locating nearby grocery and food stores.
  • Filters can be added based on rating and distance.
  • Feature available for smartphones, laptops, and PCs.

The COVID-19 pandemic has helped online businesses to grow rapidly in India and overseas. Despite the lockdown, several emergency and general services were provided to the masses at doorsteps. Food and grocery delivery saw an all-time high. Users also started locating nearby stores for groceries and other essentials to cut down on travel time and save fuel expenditure.

Multiple new apps and websites have been developed in the last few years that help users to locate nearby grocery and food stores. Google Maps is also offering a feature with which one can easily find nearby grocery or food stores. Not just grocery stores, but one can easily locate nearby petrol pumps or more with Google Maps.

Also Read: Avoid Overspeeding Traffic Challans: How To Enable Speed Limit Warning In Google Maps

This option to find any nearby grocery store is quite useful for the masses who are frequently traveling. It becomes an easy task to search for a shop even if you don’t know the native language of the location you are visiting. But what can you do to find the nearest grocery store using Google Maps? Take a look below:

Also Read: Google Maps Privacy: How To Blur Or Delete House Or Any Other Image In Google Maps Street View

How To Find Nearest Grocery Store Using Google Maps App on Smartphones

Step 1: Launch the Google Maps mobile app on your Android or iOS smartphone or tablet.

Step 2: In the search box, type the location or the address where you will be visiting or where you wish to find the local grocery store.

Step 3: Hit the search button

Step 4: Once the location shows up on the screen, you will see a bunch of options including Directions, Start, and more. Skip that and scroll down to the categories tab.

Step 5: You will now see Restaurants, Petrol, Hotels, Groceries, and other options.

Step 6: Select the Groceries tab.

Step 7: The list of grocery stores nearby will show up on the screen. They will be marked as red pins or dots.

Also Read: Free Fire Maps: Top Five Free Fire Drop Locations On Map For Maximum Loot

Step 8: You can tap on the closest pin location.

Step 9: If you wish to add more filters such as store rating, distance, and more, you can do so using the drop down menu under the Search box.

For the tech geeks, stay updated with the latest cutting-edge gadgets in the market, exclusive tech updates, gadget reviews, and more right on your phone’s screen. Join Giznext’s WhatsApp channel and receive the industry-first tech updates.

Categories
Apps How To

Delete A Page In MS Word: A Step-By-Step Guide

Key Highlights

  • Extra pages in Word could be caused by tables, hitting the Enter key too many times, and more
  • Deleting blank and extra pages in Word is an easy process

Microsoft Word is a widely-used word processing program that allows users to create, edit, and format documents. Sometimes, when working with a document, you may need to delete a page. This could be because the page contains incorrect information, is no longer necessary, or is causing formatting issues. Fortunately, deleting a page in Word is a simple process that can be completed in just a few steps. Here’s how to delete a page in Word:

Also Read | Forgot Your Amazon Alexa Password? Here’s How To Change And Reset It

Step-By-Step Guide To Delete A Page In Word

Step 1: Open the document in Word and navigate to the page you want to delete.

Step 2: Click anywhere on the page you want to delete to place your cursor on it.

Step 3: Press the “Delete” key on your keyboard. This will delete all of the content on the page, including any text, images, or other objects.

Step 4: If the page you want to delete is at the end of the document and you want to remove the empty page, simply place your cursor at the end of the text on the previous page and press “Delete” until the empty page is removed.

Alternatively, you can also use the “Backspace” key to delete content from the end of the document until the empty page is removed.

Also Read | Google Sheets Tips And Tricks: How To Add ChatGPT Extension To Google Sheets

If you’re having trouble deleting a page using these methods, it’s possible that there are hidden characters, such as a page break, causing the page to remain. In this case, you can try the following steps:

Step 1: Click the “Home” tab in the Word ribbon.

Step 2: Click the “Show/Hide” button in the Paragraph group to display all formatting marks in the document.

Step 3: Look for any page breaks or other formatting marks that may be causing the empty page to appear.

Step 4: Select the formatting mark and press “Delete” on your keyboard.

By following these simple steps, you can easily delete a page in Word and keep your documents organized and free of unnecessary content.

Also Read | WhatsApp Account Hijacking: What Is It? How To Stay Safe?

Categories
Apps Featured How To

YouTube Tips And Tricks: How To Download YouTube Shorts Videos Offline

Key Highlights

  • YouTube Shorts is short format videos to take on Instagram Reels and TikTok
  • YouTube Shorts can be downloaded using third party apps
  • Shortnoob and savetube.me are the popular platforms to download YouTube Shorts

YouTube is the biggest platform for online video playback. The Google-owned streaming platform has the biggest library for professional and amateur content. The popularity has been an all-time high in the last few years. The company has been consistently upgrading the services on YouTube and has been providing a rich user experience across mobile and the desktop app.

YouTube also stepped into the race of short videos with YouTube Shorts. This feature has been released to counter Instagram Reels and the likes of TikTok and others. YouTube Shorts has gained immense popularity in a short span; specifically, amongst budding content creators. It’s one of the easiest ways to increase the audience reach on the platform.

Also Read: YouTube Video Playback Error On TV: How To Fix Error Code 3, Error Code 5 Issue With YouTube TV App

We have already shared the method with which you can create and upload YouTube Shorts videos. But what if you are scrolling through the app and stumble upon a YouTube Short that you wish to play offline later? Well, downloading that YouTube Shorts video is the only option then. There is no direct option offered by Google to download YouTube Shorts videos on respective smartphones, tablets, laptops, or PCs. However, this doesn’t make the task impossible. There is an easy method with which you can download and play YouTube Shorts video offline. Below are the steps:

Also Read: 100+ Best Channel Name Ideas For YouTube Account Dedicated To BTS Army

How To Download YouTube Shorts Videos On Smartphones, Laptops, PCs

You will need a third-party app or website to download YouTube Shorts videos online. Shortnoob and savetube.me are a few of the portals from where you can download the YouTube Shorts videos on your respective devices.

Step 1: Open YouTube app on your respective devices.

Step 2: Go to the Shorts video that you wish to download.

Step 3: Tap on the Share option.

Step 4: In the next step, copy the video link

Step 5: Now, launch Shortnoob or savetube.me on any web browser. You can do this on smartphones, tablets, laptops, or PCs

Step 6: Paste the video link in the designated tab

Step 7: Select the resolution in which you want the video file to be downloaded

Step 8: Wait for the download link

Step 9: Once the download link is created, hit on Download. That’s it, the YouTube Shorts video will be downloaded on your device.

Also Read: 100+ Best Channel Name Ideas For YouTube Account Dedicated To BTS Army