Categories
Apps Featured How To

Magnify Anything, Anywhere: Learn How To Use Your iPhone As A Magnifying Tool

Key Highlights

  • The Magnifier app helps you zoom in to the details of an object near you
  • Users can also adjust the image brightness and contrast, as well as apply color filters
  • There’s also the option to freeze one or more frames to review them

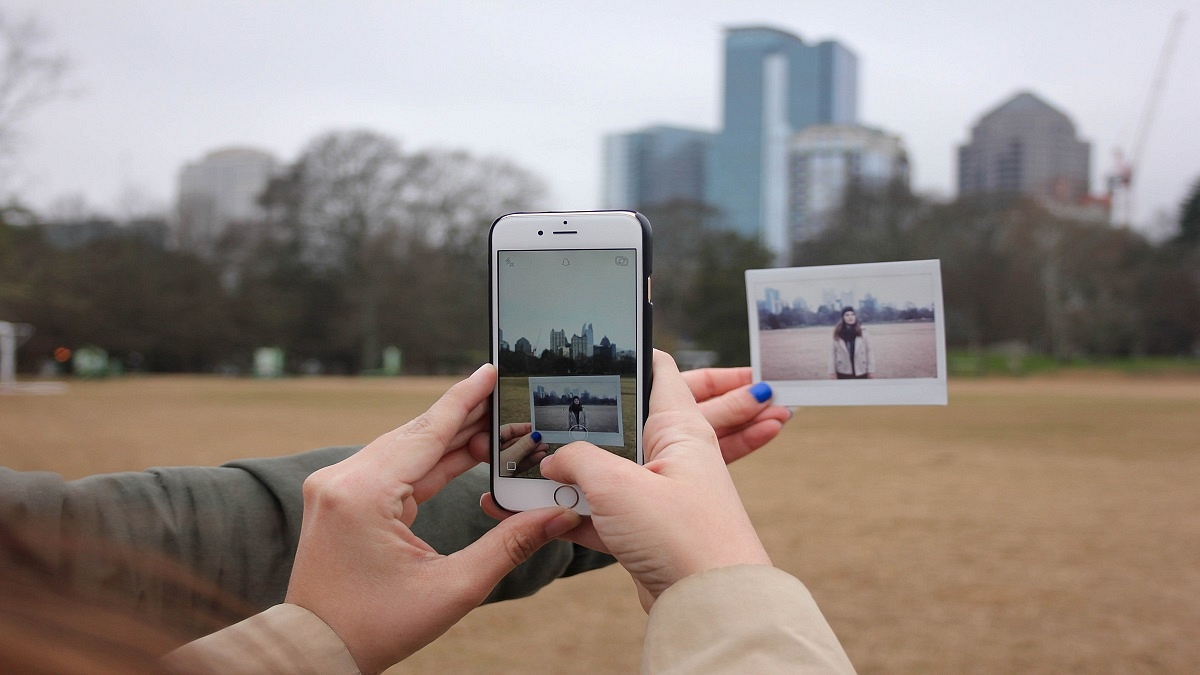
Our iPhones have replaced many tools and gadgets, including cameras, calculators, flashlights, notepads, GPS units, and compasses. Now, there’s another item your iPhone can replace—a magnifying glass. Today, we’ll explore the iPhone’s Magnifier app, a handy tool that magnifies objects or text using your iPhone’s camera.

Also Read | Invisible Messages On iPhone: How To Send Invisible Messages Using iMessage On iPhones?

The Magnifier App On iPhone

The iPhone’s Magnifier app turns your iPhone or iPad into a magnifying glass. This lets you zoom in on nearby objects or text. By utilizing your iPhone’s built-in camera, Magnifier enlarges the objects or text, enhancing visibility for your convenience.

How To Turn On Magnifier App

Enabling Magnifier is a simple process. Follow these steps:

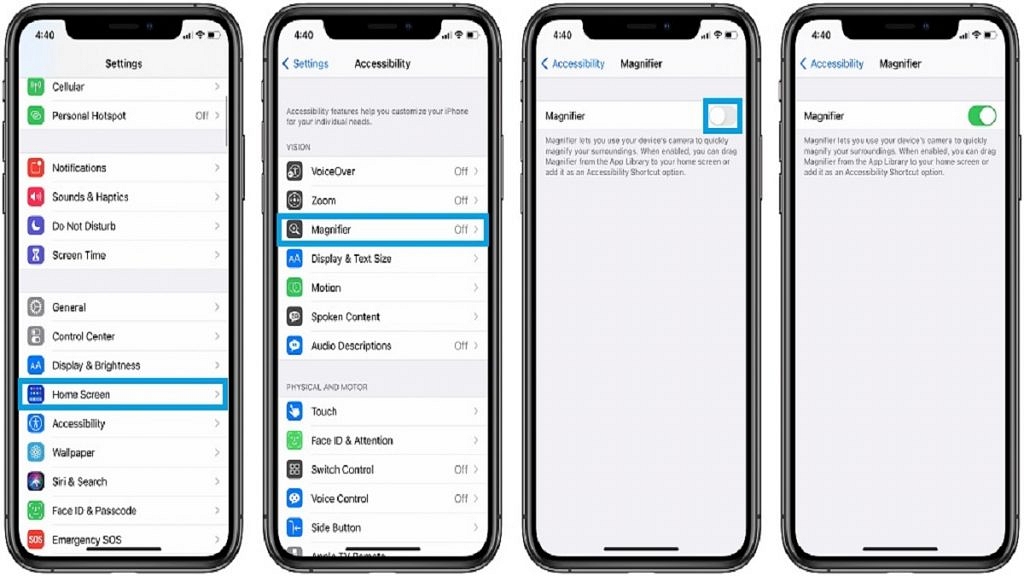
Step 1: Go to Settings > General > Accessibility.

Step 2: Tap on “Accessibility.”

Step 3: Choose “Magnifier.”

Step 4: Activate the switch next to Magnifier.

Step 5: To enable automatic adjustment of brightness and contrast based on ambient light, toggle the switch next to Auto-Brightness.

Also Read | iOS Tips And Tricks: How To Setup And Use AutoFill For Contact Cards And Credit Cards In Safari On iPhones And iPads

How To Use Magnifier App

After enabling Magnifier, tap the button on the right side of your iPhone three times to activate it. For older iPhone models, press the home button to turn on the magnifier.

The Magnifier feature functions similarly to the iPhone’s camera app. Point it at the text or object you wish to magnify and take a picture. Adjust the magnification level by dragging the slider or lock the focus by tapping the lock button. In Magnifier, you can apply filters, activate the flashlight, freeze-frame the image, and zoom in or out using the available options.

For the tech geeks, stay updated with the latest cutting-edge gadgets in the market, exclusive tech updates, gadget reviews, and more right on your phone’s screen. Join Giznext’s WhatsApp channel and receive the industry-first tech updates.

Categories
Apps Featured How To

WhatsApp Chat Lock Privacy Feature Released For Android, iOS: How To Lock WhatsApp Chats Using This New Feature?

Key Highlights

  • WhatsApp Chat Lock feature introduced
  • Creates a separate chat folder for privacy
  • Locked chats remain hidden from plain sight
  • Locked WhatsApp chats cab be accessed using a device password

WhatsApp is the best private instant messaging application that Android and iOS users can download on their respective devices. Besides the end-to-end encryption, WhatsApp has several other security layers that make this platform secure for personal conversations and the brand is consistently adding new features to further boost user privacy. In a bid to do so, WhatsApp has recently added yet another privacy-centered feature for chats. The latest security feature released by WhatsApp is the Chat Lock feature. What is this new chat lock security feature released for WhatsApp users and how can you use it? Read the details below:

Also Read: How To Upload WhatsApp Status In High Quality (Images, Videos) On Android, iOS?

WhatsApp Chat Lock Feature: What Is It?

The WhatsApp Chat Lock security feature is designed to keep all personal chats private without directly using any biometric authentication feature such as PIN, Password, Face, and fingerprint unlock. With this feature, all the personal chats will be moved to a private safe (separate folder) which can only be accessed using the device password.

Once the chats are moved to the chat lock folder all the content in the chat including text messages and media files including images and videos. Once the chats are moved all the content will be hidden automatically. This new privacy feature is quite handy for users who need to keep all their personal chats secure from getting into wrong hands.

WhatsApp is rolling out the Chat Lock feature as an OTA update in a phased manner and it should be available to all the respective units going forward. Users can also check if there is any update pending manually to get access to the Chat Lock feature on WhatsApp.

Also Read: Best Websites For Perfect WhatsApp DP For Girls

How To Use WhatsApp Chat Lock Feature?

Step 1: Launch the WhatsApp application on your respective devices. Do check if the app is updated to the latest version. If not, do check for updates manually.

Step 2: Scroll to the chat window that you wish to lock

Step 3: Now, click on the contact or group profile picture icon

Step 4: From the list of available options select the Chat Lock feature. This new option can be located next to the Disappearing Messages option.

Step 5: Toggle on the Chat Lock option

Step 6: Complete the authentication by entering the device lock password

Also Read: WhatsApp Tips & Tricks: How To Unblock Yourself And Regain Access

How To See Locked WhatsApp Chat Messages

Once the chats are locked become hidden and can only be accessed by using the steps listed below.

Step 1: Launch WhatsApp application again on your respective devices

Step 2: From the homepage, swipe down on the screen for the locked messages to become visible.

Step 3: Now, tap on the locked chat that you wish to read or see and unlock using the device password

Also Read: WhatsApp Chat Transfer Without Google Drive Backup: What Is This Feature And How To Use?

Categories
Apps Featured How To

Google Maps Immersive View For Routes Shows Live Route Traffic, Weather, And More: How To Use?

Key Highlights

  • Google Maps Immersive View for routes features released at I/O 2023
  • Offers real time street view, transport mode, and more
  • Features Time Slider to show routes during weather changes
  • Stable update yet to be released

At the I/0 2023 event, Google unveiled a slew of advanced AI features for its range of services alongside the new Pixel product lineup. Android 14, Google Bard, and intuitive features for Gmail and Google Maps were also introduced at Google’s annual developer conference. One such interesting and useful feature that Google announced at the I/O 2023 event is the Google Maps Immersive View feature which will allow users to see real-time traffic status and also weather updates.

Google Maps Immersive View For Routes Feature: What Is It?

The Google Maps Immersive Street View for routes feature introduced at the I/0 2023 event is an AI feature that uses complex algorithms to merge billions of aerial and Street View images using computer vision and AI. This helps Maps to develop a comprehensive digital representation of the globe and provide all the required information that the user needs in one spot.

Also Read: Find Nearest Grocery Store: Here’s How To Locate Closest Grocery Store Using Google Maps

Google Maps Immersive View For Routes: How To Use?

Google Maps Immersive View for routes features is yet to be added to the Maps app (both Android and iOS). The rollout is expected as an OTA in the coming months. However, the exact availability remains uncertain. But we believe Google will commence the phased roll-out of the Maps Immersive View for routes soon.

Once the feature is live, users will be able to use it with just a few taps. As for what all Google Maps Immersive View For Routes feature offers, take a look below:

Google Maps Immersive View for routes is designed to show real-time route information including an immersive preview of the route being traveled and the mode of transport such as driving, biking/cycling or walking before the journey begins.   

Besides the route preview and mode of transport, users will also get to see immersive real-time images of the parking spots, bike, and pedestrian lanes, and also intersections in a multidimensional view. This feature will further allow Maps to show the approx. number of cars and other vehicles on the road in real-time by using AI.

To further enhance the navigation feature, users will also get the option to check the air quality and how the track becomes during changes in weather. This can be done using the time slider option in the Immersive View Maps For Routes.

Also Read: Google Maps Privacy: How To Blur Or Delete House Or Any Other Image In Google Maps Street View

Categories
Apps Featured How To

Gmail Tips And Tricks: How To Secure Your Google Account With Two-Factor Authentication

Key Highlights

  • Gmail users can configure two-step authentication
  • It secures your Gmail accounts and keeps them safe
  • The web and the Android and iOS apps for Gmail both offer this feature

Google has become a universal part of our daily lives. From checking emails, sharing photos, to accessing online documents, we rely heavily on this tech giant to keep us connected and organized. However, with so much personal information stored in our Google accounts, it’s crucial to ensure that our accounts remain secure. One effective way to do so is by enabling two-factor authentication. Here are some tips and tricks for Gmail users on how to secure their Google accounts with 2-Step verification. Also Read | Annoyed With Unwanted Emails On Gmail? Here’s How To Block Individual Email Address Or Bulk Mails On Gmail

What Is Two-Factor Authentication?

Two-factor authentication is an additional layer of security that requires users to provide two forms of identification when logging into their accounts. The first factor is the user’s password, while the second factor is typically a unique code sent to their phone or email, or generated by an app. By requiring both factors, 2FA ensures that only authorized users can access their accounts.

How To Enable Two-Factor Authentication In Your Google Account

To enable 2-Step verification for your Google account, follow these steps:

Step 1: Sign in to your Google account and click on your profile picture.

Step 2: Click on “Manage Your Google Account.”

Step 3: Go to the “Security” tab.

Step 4: Under “Signing in to Google,” click on “2-Step Verification.”

Step 5: Follow the prompts to add your phone number and verify it.

Step 6: Choose whether to receive your verification code via text message or phone call, and click “Next.”

Step 7: Enter the verification code you received and click “Next.”

Step 8: Click on “Turn on” to enable 2FA for your Google account.

Also Read | Gmail Useful Tricks: How To Add, Customize Digital Signatures On Gmail

Tips And Tricks For Using Two-Factor Authentication

Here are some additional tips and tricks for using 2FA to secure your Google account:

Keep Your Devices Secure: Two-factor authentication won’t be effective if your device is already compromised. Make sure you use a strong password and keep your device up-to-date with the latest security patches.

Be Vigilant: If you receive a verification code that you didn’t request, it could be a sign that someone is trying to access your account. Don’t share your verification code with anyone and report any suspicious activity to Google immediately.

Overall, enabling two-factor authentication is an important step toward securing your Google account. By following these tips and tricks, you can ensure that your personal information remains safe and secure. Remember, it’s better to be safe than sorry, so take the time to enable 2FA today.

Also Read | Fed Up Of Cluttered Gmail Folders? Here’s How To Create New Category Tabs For Emails On Gmail

Categories
Apps Featured How To

Delhi Metro Smart Card Not Working? Follow These Steps To Get A New One Instantly

Key Highlights

  • Getting a new Delhi metro smart card is possible if your card is defective
  • Passengers will have to pay Rs. 50 to replace a physically damaged card
  • No security deposit will be taken from the passenger if the card is physically OK

Delhi Metro Rail Corporation (DMRC) smart cards have made traveling on the Delhi metro faster, easier, and more convenient. However, if your smart card is not working, it can be a frustrating experience. Fortunately, getting a new Delhi metro smart card immediately is possible. This article will guide you through the steps to get a new smart card.

Also Read | How To Check Metro Card Balance Offline And Online? Learn Here

How To Replace Your Delhi Metro Smart Card

Step 1: Check for damage

Before getting a new smart card, make sure that the card is not physically damaged. Sometimes, the card may stop working due to scratches or other forms of damage.

Step 2: Visit the Customer Care Center

The next step is visiting the Customer Care Center (CCC) at any Delhi metro station. You can also contact them through their website or helpline number. The CCC will check the card and inform you of the problem.

Step 3: Submit the old smart card

If the unreadable smart card that was deposited is found to be physically damaged, the passenger will be required to pay a security deposit of Rs. 50 in cash before a new card is issued. However, if the unreadable smart card is in good physical condition, the passenger will not be required to pay any security deposit.

Also Read | How To Recharge Metro Smart Card Online: A Step By Step Guide

Step 4: Get the new card

Once you have submitted the old card and paid the fee (for a physically damaged card), the CCC will immediately provide you with a new smart card.

Step 5: Transfer the balance

If you have a balance on your old smart card, you can transfer it to the new card. You can do this by visiting the Add Value Machine (AVM) located at any metro station. Tap the old card and enter the transfer amount. Then, tap the new card to complete the transfer.

Also Read | Recharge Your Delhi Metro Card Using Airtel Thanks App: Here’s How

Overall, getting a new Delhi metro smart card immediately is possible if your card is defective. By checking for damage, visiting the Customer Care Center, paying the fee for the damaged card, getting a new card, and transferring the balance, you can continue to enjoy the benefits of using the Delhi metro with a new smart card.

For the tech geeks, stay updated with the latest cutting-edge gadgets in the market, exclusive tech updates, gadget reviews, and more right on your phone’s screen. Join Giznext’s WhatsApp channel and receive the industry-first tech updates.

Categories
Apps Featured How To

Google Photos Hacks: How To Edit Videos And Adding Effects Such As Filters On Google Photos

Key Highlights

  • Google Photos is a popular gallery app
  • Allows viewing photos and videos saved in device storage
  • Photo and video editing is possible with Google Photos

Google Photos is one of the advanced gallery apps available for smartphone users. It is one of the default apps that you will find on most of the devices running on the Android ecosystem. As is the case with other major Google apps and services, there are endless possibilities that you get with Google Photos. Besides viewing the images in the gallery, Google Photos also allows viewing videos that one has captured using the phone camera or has received via instant messaging apps or downloaded online.

In addition to simply viewing, the Google Photos app also allows users to edit photos and videos in real-time. This is one advanced feature that makes Google Photos one of the most potent gallery apps available for smartphone users. Not just photo editing, Google Photos also lets users edit videos. One can easily trim, mute, and even stabilize videos using the editor in Google Photos. Cropping and rotating videos using the editor is also a possibility with Google Photos. But if you wish to use the Google Photos app as a full-fledged editor, you can also add filters and adjust effects with videos. How can you do that? Read the steps below:

Also Read: Can’t Find Images In Phone’s Gallery Your Device? Here’s How To Find Lost Photos And Videos On Google Photos

How To Adjust Video Effects In Google Photos

Before you proceed with video editing on Google Photos make sure the device has at least 3GB RAM. Google One membership is also required for adjusting effects in videos using Google Photos.

Step 1: Launch the Google Photos app and go to the video that you wish to edit

Step 2: Click on the Edit option

Step 3: Tap on Adjust option

Step 4: You now need to select the appropriate effect that you wish to add to the video

Step 5: Move the dial if you wish to modify the effects

Step 6: Once all the changes are made and the effects are added, hit the Done button

Step 7: You can also undo any effect by simply tapping Cancel

Also Read: How To Download Or Transfer All Facebook Videos And Images Directly To Google Photos

What All Effects Can Be Added To Video Using Google Photos

  1. Brightness adjustment
  2. Contrast adjustment
  3. White point adjustment
  4. Highlights adjustments
  5. Shadow adjustment
  6. Black point adjustment
  7. Saturation modification
  8. Skin tone and Blue Tone
  9. Tint adjustments
  10. Add HDR effect

Also Read: Google Photos Magic Eraser: What Is This Feature? How To Use It?

Categories
Featured How To

How To Upload And Use Animated Emojis As Telegram Profile Picture On Android, iOS

Key Highlights

  • Telegram is one of the best WhatsApp alternatives
  • Allows uploading animated emojis as profile photos
  • Background colors can also be changed

Telegram is one of the best WhatsApp alternatives that is available for Android and iOS users. Even desktop users can access Telegram’s instant messaging services for professional and personal conversations. The wide array of features along with the end-to-end encryption platform for messaging has credited to Telegram’s success in the last few years.

For a better user experience, Telegram has been releasing new features and tools for its mobile and desktop applications. Telegram is also a safe platform for voice and video calling. In addition to security features, Telegram has also added options such as emoji category and set animated emojis as profile pictures.

Also Read: WhatsApp Chat Transfer Without Google Drive Backup: What Is This Feature And How To Use?

The option to upload an animated emoji as a profile picture on Telegram is a new feature that was introduced earlier this year and is a fun way to add artistic appeal to any profile. For the users who are done with uploading basic photos or selfies as profile photos, uploading animated emojis is the best solution. But how can you upload an animated emoji on Telegram.

How To Upload Animated Emojis As Profile Photo On Telegram

Step 1: Open the Telegram application on your respective devices

Step 2: Tap on the three dots option placed on the top right corner of the app’s homepage

Step 3: Select the Settings menu

Step 4: You will now see the “Set Profile Photo” option. Click on it.

Step 5: From the list of options select the “Use an emoji” option

Also Read: WhatsApp Tips & Tricks: How To Unblock Yourself And Regain Access

Step 6: Upon performing the aforementioned step, a new page will open up displaying multiple emoji and stickers that you can use the profile picture

Step 7: Scroll through the list of emojis or stickers that you wish to use as an animated emoji and tap on it

Step 8: You will get an option to change the background color if you don’t find the default pre-set apt

Step 9: After completing the above steps, tap on the “Set Profile Photo” option. Once you do this, an animated emoji will be added as your profile picture on Telegram

Also Read: How Can You Change Font Style In Telegram: Steps For Android, iOS, Desktop

Categories
Apps Featured How To

How Can You Download And Watch Instagram Reels On Android, iOS Without Installing Third-Party Apps?

Key Highlights

  • Instagram Reel is offering easy audience reach for content creators
  • No direct way to download Instagram Reels on Android or iOS
  • A workaround solution available to download Reels without third party apps

Instagram photo-sharing app has gained its popularity amongst Indian as well as global consumers. Meta has been consistently upgrading its platform with new features and made it one of the most advanced social media apps of all time. Over the last few years, Instagram Reels gained popularity amongst the audiences and a spike has been seen with new content creators getting on board.

Instagram Reels have become the trending way to reach the maximum audiences with all the added glamour. Watching Instagram Reels have become the best entertainment source for most of us. There are times when you come across a Reel video that you wish to rewatch offline without opening the app.

With no direct way of downloading the Instagram Reels videos, one has to resort to third-party apps to get the deed done. But what if we tell you there is a way with which you can directly download Instagram Reels videos from the app itself? The steps aren’t super tricky either ad can be performed on both Android and iOS devices. If you wish to download Instagram Reels without using any third-party app then follow the steps mentioned below:

Also Read: Instagram Tricks: Here’s How You Can Save, Download Instagram Reels With Audio On Android, iOS

Steps To Download Instagram Reels Videos From The App Itself On Android Devices

Step 1: Launch the Instagram mobile application and open the Reel video that you wish to download

Step 2: Tap on the Share icon (paper plane icon)

Step 3: From the available options select the “Add Reel to your story”

Step 4: In the next step you would need to discard the Story

Step 5: The story (Reel video) once discarded will be saved in the device’s Instagram folder

Step 6: You can now easy access the downloaded Instagram Reel video on our phone using the File Manager or device Gallery

Also Read: Instagram Reels: How To Add Own Audio Recording, Other Creator’s Music To Insta Reels Videos

How To Download Instagram Reel On iOS

The steps to download Instagram Reels video on iOS is identical to Android OS. You would need to launch the app on your iPhone and share the Reel as a story to download it to the device storage.

Also Read: Instagram Tips And Tricks: How To Remix Instagram Reels With Videos And Photos

Categories
Apps Featured How To

PhonePe UPI Lite: What Is It? How To Send Up To Rs. 200 Without UPI Pin On PhonePe?

Key Highlights

  • PhonePe UPI Lite is now active for all users
  • Allows money transfer of up to Rs. 200 without entering UPI pin
  • Money will be deducted from UPI Lite account

UPI Lite is the new trend in the digital money transfer field. Introduced back in September 2022, the UPI Lite has been developed and launched by NPCI (National Payments Corporation of India) and RBI respectively to further simplify the online money transaction process for lower amounts.

Previously Paytm released the UPI Lite feature on its platform allowing money transfers of up to Rs. 200 without entering the UPI pin. Now, rival app PhonePe has also joined the bandwagon and released PhonePe UPI Lite in India. How does the PhonePe UPI Lite work and what steps do you need to send lower amounts of up to Rs. 200 without entering a UPI pin? Let’s know the details:

Also Read: Paytm Lite: What Is It? How To Setup And Use Paytm Lite On Smartphones?

PhonePe UPI Lite: What All It Offers?

The PhonePe UPI lite is essentially identical to the Paytm UPI lite where users will be able to conveniently transfer up to Rs. 200 with a single tap. There won’t be any need to enter the UPI PIN. Only if the amount that is being transferred is more than Rs. 200, users will need to enter the UPI Pin.

However, one would need to set up a UPI Lite account to use this service. For the money transfer, the money will be deducted from the UPI Lite balance that is available on the device. The UPI Lite system won’t directly include the customer’s core banking system for the money transaction process. The UPI Lite is primarily designed to make the low-value transaction process simple and quick for the users.

Also Read: UPI Money Transaction Limit In India: Here’s The Limit Of Transactions You Can Do Via GPay, PhonePe, Paytm Daily

How To Use PhonePe UPI Lite To Send Rs. 200 Without Entering Pin?

Step 1: Open the PhonePe app on your smartphone.

Step 2: On the home page scroll down to see the UPI Lite option. Tap on it.

Step 3: Enter the amount that will be saved as UPI Lite balance and will be used later for quick money transfers.

It is worth noting that one wouldn’t need to complete any KYC to use the PhonePe UPI Lite services. And the maximum amount that one can add as an advance balance in the UPI Lite app is up to Rs. 2,000.

Also Read: How Can You Delete Paytm Transaction History From Your Android And iOS Device

Categories
Featured Gaming How To

IPL Legends Face-Off: Play As Virat Kohli Or Gautam Gambhir In The Online Game

Key Highlights

  • The recent IPL match between RCB and LSG garnered attention for a non-game-related reason.
  • The spat between Virat Kohli and Gautam Gambhir became a trending topic on Twitter
  • Someone has now created a game based on this incident, fittingly called “Kohli VS Gambhir”

Regardless of your interest in cricket, you may have come across the recent dispute between Virat Kohli and Gautam Gambhir during an IPL match. The spat between the two players on the field swiftly transformed into a meme war on the internet. However, a novel development has now emerged wherein an online game has been created to allow users to simulate the fight between Kohli and Gambhir while even selecting their preferred characters. Also Read | Are You A Quiz Master? Here Are Four Best Quiz Games For Android

Kohli-Gambhir IPL Fight Takes Over The Internet

A user posted the game’s video on Twitter and since then it has taken over the Internet. The clip commences with a text overlay stating, “I made a game so that they can fight properly,” while displaying the digital representations of Virat Kohli and Gautam Gambhir adorned in their team jerseys. The footage also reveals that you have to pick between Kohli and Gambhir as your player and then engage in combat against the opposing team. The game is available to play on both mobile and desktop platforms.

The Game

The game is evidently an amateur attempt, as visible from its 2D graphics. It was produced using the Unity game engine and uploaded to Github. While it is possible to play the game on both desktop and mobile devices, the latter option takes an extended duration to load and, in some cases, crashes. If you are genuinely keen on exploring the game, you can visit the related website.

Also Read | Five Games To Play After God of War Ragnarok: Keep The Adventure Going

How To Play

Upon loading the game from the website, you will need to select either Kohli or Gambhir. Once you have made your choice, you will be placed on the cricket field, with Kohli battling against Gambhir, and RCB facing off against LSG while donning their respective uniforms.

As the game begins, you will notice both teams performing warm-up exercises, contributing to the overall theatrics. The game involves a physical quarrel between the two IPL teams, wielding cricket bats to beat each other.

The gameplay concludes with the final remaining player being declared the winner, and their team will be the victorious one. If you have picked Kohli and completed your brawl with Gambhir, you have the option to assist your teammates. Overall, the game is not meant to be taken seriously, but instead provides a lighthearted interpretation of the Kohli-Gambhir controversy.

Also Read | Poki games: The best four online games to play for free